Element References
An element reference is an occurrence of shared element content. Several occurrences can use the same drawing while retaining their own placement and visual properties. Use references when the reusable unit is a part of a glyph rather than a whole source glyph.
References as Shared Content
The occurrences are peers: no particular glyph has to be the permanent source. Editing the shared contours through any unlocked occurrence changes the same content. The other occurrences display that change under their own transformations.
For example, a shared serif can appear at several sizes and orientations. An Element-tool move changes one placement. A Contour-tool edit to the serif's curve changes every occurrence. Giving two elements the same name does not by itself establish this relationship; the content must actually be linked.
The element frame provides a visible boundary around an occurrence. Enable View > Anchors & Elements > Element Frame when you need it. Its caption can show the element name and usage count, helping you recognize content that is referenced elsewhere. The content-lock indication explains whether you can edit it in place.
An unlocked occurrence is not more authoritative because it happens to be easier to edit. A detected or locked reference can take you to another editable occurrence when opened for editing. The shared content is still one drawing.
A reference shares element-level content such as contours, its collective name, element guides, pins, and a note. It does not automatically import the containing glyph's advance width, glyph anchors, or glyph-level hinting. Those belong to a different level of the model.
Creating and Managing References
Copy and paste a linked occurrence
- With the Element tool, select the source element.
- Copy it with Edit > Copy.
- Open the target glyph in the same working font and choose the intended drawing context.
- Choose Edit > Paste Element Reference.
- Inspect the new occurrence, its lock state, and its transformation.
Use the command name as the check: ordinary Paste Elements can create independent content instead. A reference can be locked initially to prevent accidental shared-content edits. Unlock deliberately when the shared drawing, rather than this placement, needs to change.
Add by name or from the Gallery
Choose Element > Reference > Add Reference… to find a glyph or named element. Use the Glyphs/Elements filtering choices to distinguish whole-glyph candidates from named parts. Inspect the selected item and metrics choice before adding it.
The dialog can offer a contour-copy alternative. That produces editable copied geometry instead of the reference you requested through the ordinary linked route. Check the action button and the all-master scope; the single-master workflow does not require copying into every master. Cross-master use is taught in Variable Components; the dialog reference provides the full field tour.
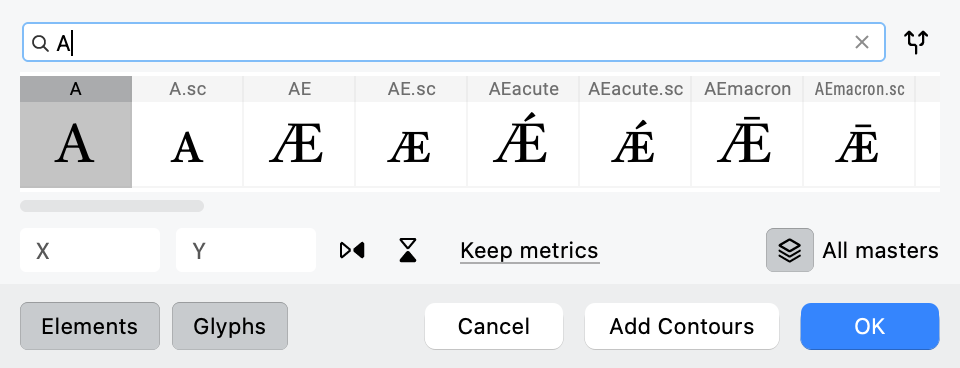
The reference dialog combines candidate selection with placement and metrics choices. Add Contours is the copy alternative; check which action and master scope you use.
A named element also appears in Window > Panels > Gallery. Drag it into the Glyph window to place a reference, or use Place for the current target. With glyph cells selected in the Font window, Gallery placement can add the shared part to those targets. Inspect the selection before using that batch route.

The Gallery presents reusable elements by name and appearance, with separate Place and Replace choices.
Use Paste Special
Copy the intended glyph or layer, then use Edit > Paste Special with the contour/image as references option. Select only the data categories you intend to transfer. The option for metrics as links is a different relationship; linked contours do not automatically imply linked sidebearings.
Whole-glyph Duplicate and Append workflows can retain existing reference relationships or build reference-based copies. Their settings and source/target font context matter. The Duplicate dialog also offers independent glyphs, so do not assume that every duplicate is linked—or that a new glyph name proves independence. Inspect its elements after transfer.
Detect existing shared geometry
Detection can turn independent drawings into shared content, so later edits affect every linked occurrence. Save a native copy first, especially if identical-looking parts may need to develop independently. Then choose Font > Detect Element References to analyze repeated content and link matching elements. Inspect representative results afterward.
Preferences > Open Fonts > Composites and components > Detect composites controls repeated-contour detection. The configured component-versus-reference import choice determines the reuse mechanism. The reference-oriented command can be labeled Detect Composites when component-oriented import/detection settings are active.
Detected references may be locked except for an editable occurrence used as the convenient editing location. Check that lock state before changing a repeated feature. Detection does not eliminate the need to decide whether all occurrences should share future edits.
Inspect or unlink
Use the reference-display controls under View > Anchors & Elements and the Elements panel to inspect the relationships. Select an occurrence and use Element > Reference > Unlink Reference when it needs independent content. This is different from unlocking it: unlocking permits a shared edit, while unlinking changes what it shares.
Deleting one occurrence removes it from that glyph; it does not mean that all other occurrences of the shared drawing should disappear. Before replacing shared content through a library or reference command, check whether the operation targets one occurrence or every use.
Pins: Attaching Elements
A pin is a named point belonging to an element's content. It transforms with that element and is shared by its references. It provides the element-level attachment mechanism corresponding to glyph anchors.
Select the intended element and choose Element > New > Pin, or use the Guides tool's Option/Alt-click pin gesture. The new pin receives a generated name in the p… family, commonly p1; inspect it rather than depending on a particular counter state.
Open Anchors & Pins and choose Pins to edit the name, position, and appearance. Pins usually appear as blue circles, with a filled/outline distinction for active and inactive states. This contrasts with the usual red glyph-anchor marker, but the appearance can be customized.
Selected pins can use Contour > Align Points. With only pins selected, the commands align them to one another; with nodes also selected, their bounds provide the reference for the selected pins. Check the selected objects and resulting pin coordinates, especially on transformed elements: a pin edit changes shared content.
Set an attachment relationship
Use a plain name such as join on the receiving element and _join on the element that should attach to it. Place each pin at the point where the parts should meet, and keep both active.
In Anchors & Pins > Pins, click the icon before a pin’s name if necessary to make it filled, indicating that the pin is active.
The receiving element must come earlier in the element order: place it below the attaching element in the Elements panel, using Element > Arrange or dragging its row. FontLab evaluates eligible named pins through the ordered elements, translating the attaching occurrence to meet an available matching pin. Inspect the result before relying on a chain, especially when several elements repeat the same name or several pins constrain one part.
This is a placement relationship. A pin belongs to shared content, so moving it can change the attachment of other references using that content. A private instance offset and a shared pin edit have different scopes.
Use numeric positions or the calculator-marked location expressions to define pin coordinates. A pin can follow a named guide or another available reference in its coordinate context, just as an anchor can. Check x/y expressions separately and inspect the evaluated point after an element transform.

The Pins tab lists the element’s attachment points. Select a pin to inspect its coordinates and expressions below the list.
Select pins and use Edit > Copy Anchors/Pins to transfer them to another element context. Check which element receives the copied pins and whether matching names already exist. Rename through the panel or label; remove with the panel's minus control or the applicable delete command. Deactivating a pin stops its ordinary attachment participation while retaining the point.
Pins also supply named attachment for the Glue filter. That use adds generated geometry and is taught in The Glue Filter; it is separate from simply positioning references together.
Element References vs. Components
Both mechanisms reuse drawing, but they express different ownership:
| Question | Element reference | Component |
|---|---|---|
| What is shared? | Element content, which can be a sub-glyph part | Content supplied through a designated source glyph |
| Is there a source glyph? | Not inherently; occurrences are peers | Yes |
| Does placement vary per occurrence? | Yes | Yes, subject to attachment or recipe control |
| Are glyph metrics and anchors available through the relationship? | Not automatically | Yes, through the component construction and metric/anchor workflows |
| Does it replace glyph-level hint transfer? | No | Components support source-glyph handling appropriate to the construction/output |
A component occupies the element level in the host but resolves a whole source-glyph relationship. It is not merely an ordinary reference whose lock box happens to be checked. This distinction explains why components remain the natural choice for accented-letter composites, while references are useful for recurring fragments.
Convert between the mechanisms
Element > Reference > References to Components looks for a suitable source glyph for shared content. A standalone, unlocked, minimally transformed occurrence is the useful candidate. If several candidates exist, the source-detection rules choose among them; if none is suitable, the reference can remain unchanged. Inspect the chosen source and resulting transform.
Component to Reference replaces the glyph-source relationship with element references to the source's drawing. It leaves the source glyph available and can create locked references. It does not give you independent contours; use Unlink Reference or Decompose according to the independence you need.
The Elements panel can manage the current glyph's parts while the Font window is active, including removal with − and reordering through Element > Arrange. Confirm the current glyph and selected panel rows: a Font-window glyph selection is not automatically the same target as the element selection.
Choose references for shared shape content and components when the reusable part benefits from being a glyph with its own metrics and attachment data. Both are optional tools for organizing a design; neither requires every similar-looking form to remain linked.
Element references share drawing content without transferring glyph-level hinting data. That limitation is one reason components remain useful for composite glyph construction. The Nonspacing property is a per-element metric choice, as taught in Controlling Composite Metrics; sharing geometry does not replace that choice.