Working with TransType 4
Below is a short overview of how TransType 4 works.
- With TransType, you can convert multiple fonts at a time.
- You can add fonts in various formats into TransType.
- Once you’ve added some fonts, you can perform manual and automatic editing of some font settings — most importantly, make decisions on menu naming and grouping within a font family.
- You can also use filters to apply some visual effects to the fonts which are being converted.
- TransType always presents the intended (target) configuration of the fonts: it shows you how the fonts will look and behave after the conversion.
- Once you are happy with your modifications, you can select a conversion profile (i.e. the target font format), and select the Destination location. Then, you click on “Convert”. TransType then performs the conversion of each font into the desired location, using the conversion profile. In TransType 4, one and the same profile applies to all fonts in a project per conversion.
- After the conversion is done, depending on TransType’s preferences, the app will either remove all the fonts from the project or keep them, allowing you to re-run the conversion.
User Interface
The TransType 4 user interface (UI) consists of the following elements:
- Application menu, which gives access to various settings and actions
- Top bar, a toolbar on top of the application window, which allows you to choose the view of the Main area; to show and hide the Font Info panel; the Preview panel and the Glyph Map window; to choose the conversion profile and destination; and to run the conversion
- Main area of the application window, which shows all the target fonts that TransType will generate when you start the conversion, and allows you to select some of the fonts and modify some of their properties
- Main area toolbar, which gives access to some operations related to the current Main area mode, and which gives some information about TransType’s status
- Font Info panel, an optional, non-detachable panel, which gives access to some of the selected fonts’ naming information and its internal parameters
- Preview panel, an optional, non-detachable panel, which allows you to type in some text and see what this text looks like in the selected fonts
- Glyph Map window, an optional and detachable window which shows the selected font’s entire glyph repertoire
A schematic structure of the user interface is shown on the following illustration:
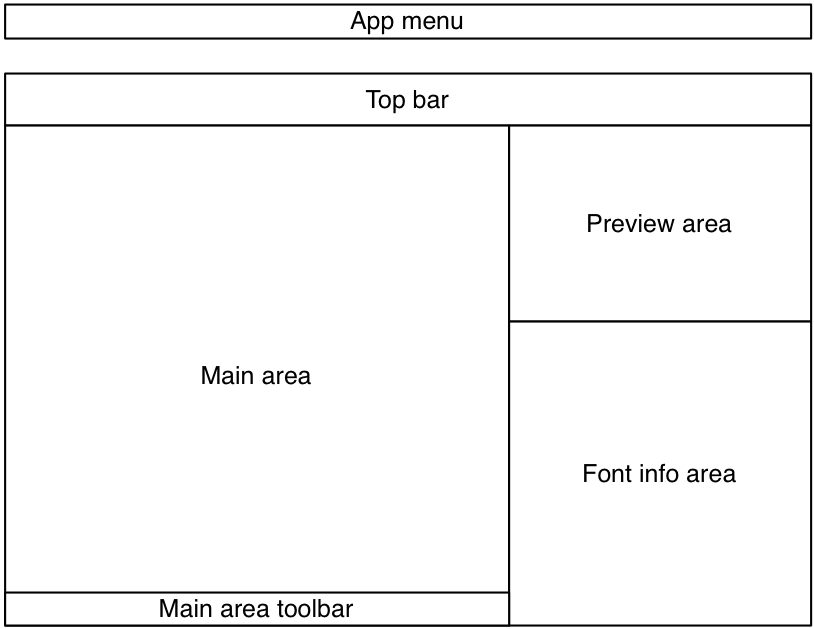
Illustration: TransType 4 schematic UI overview
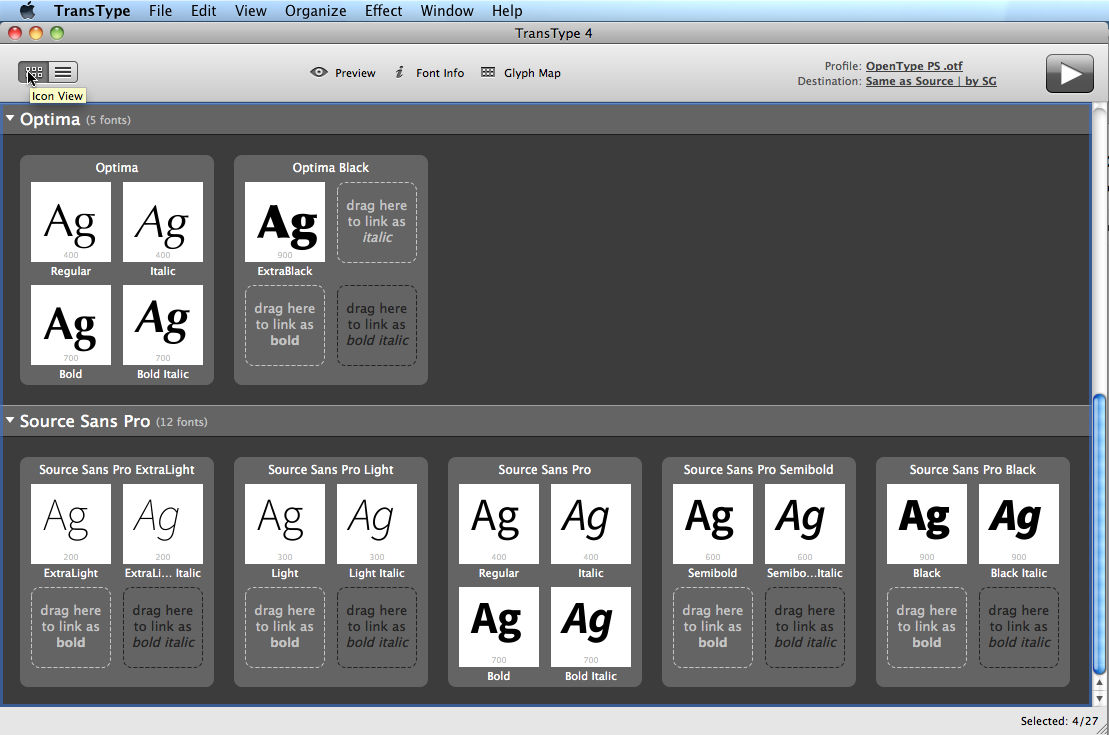
Illustration: TransType 4 user interface with Preview and Font Info panels hidden.
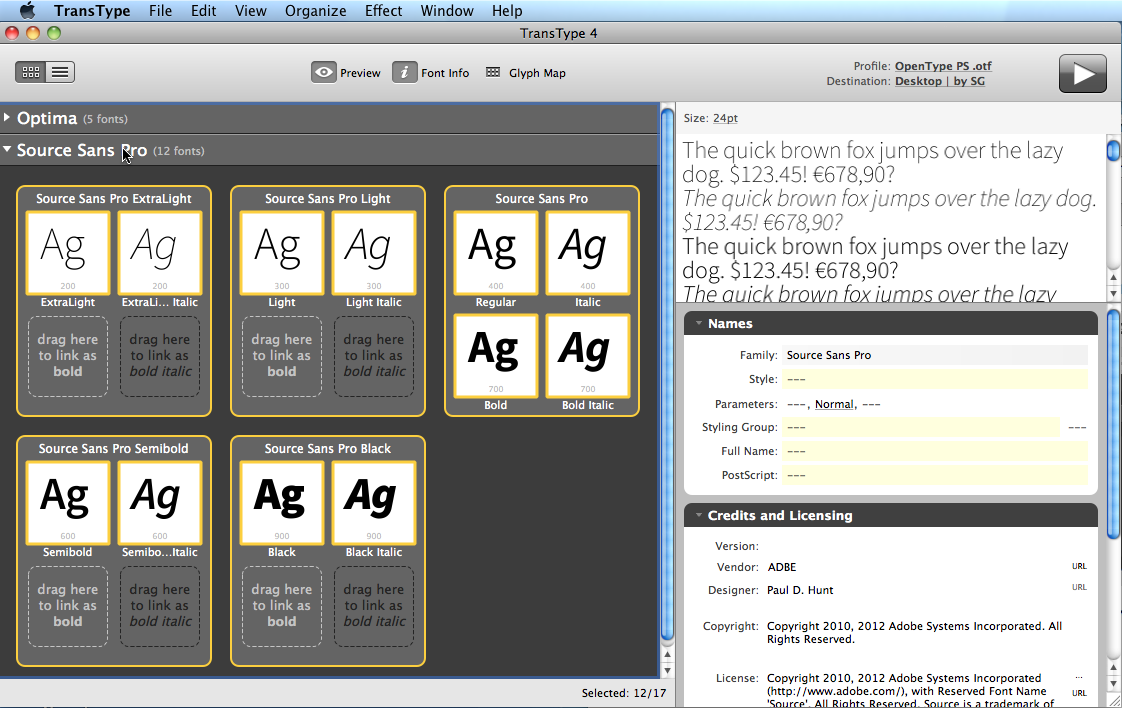
Illustration: TransType 4 user interface with Preview and Font Info panels shown.
Adding fonts to TransType
Any font which you add to TransType becomes the source of a conversion. TransType 4 supports the following font formats as sources:
Note
Multiple Master fonts are not currently supported in TransType 4.
The simplest way to add fonts to TransType is to drag-and-drop them into the TransType window from the Finder (Mac OS X) or Explorer (Windows).
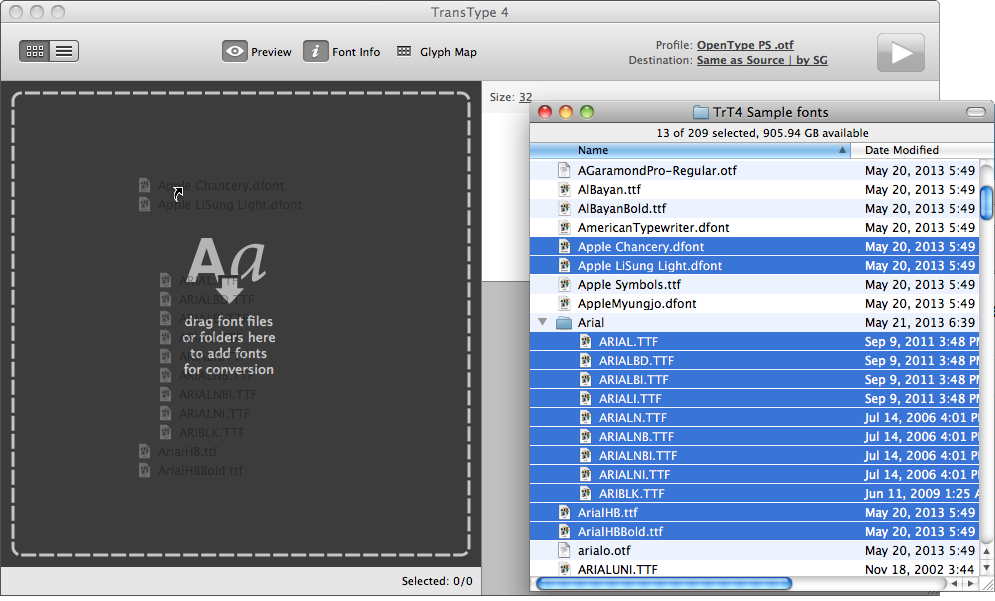 There are more ways to add fonts to TransType. You can invoke them using the File menu:
The “Add Font Files…” entry invokes an Open File system dialog which allows selection of multiple files. All files that you select will be added to TransType.
The “Add Folder…” entry invokes an Open Folder system dialog which allows selection of one folder. TransType will then scan all subfolders of the folder selected by you for possible font files and add them all.
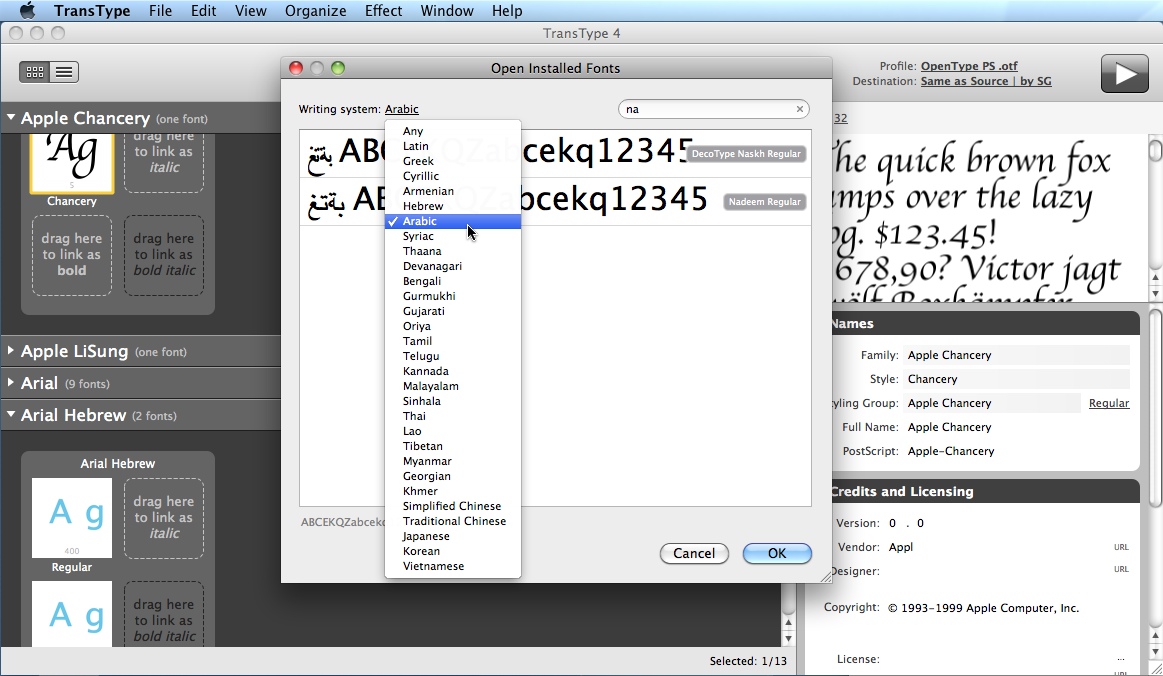
The “Add Installed…” entry invokes a special dialog which allows you to open fonts installed on the system. In this dialog, you can search for portions of a font name and you can show only the installed fonts which support a certain writing system (alphabet), for example Latin, Cyrillic or Arabic:
The “Add Recent Font Files” entry allows you to add again one of the fonts that were recently added to TransType.
Adding Mac fonts to TransType on Windows
TransType can add source fonts from regular folders or from within ZIP archives. If you’re running TransType 4 on Windows and would like to convert Mac fonts into Windows-compatible fonts, you need to compress the Mac fonts into a ZIP file.
To do that, on Mac OS X, open Finder; click on a folder containing all the fonts that you’d like to convert; and choose “File / Compress…” from the menu. Then move the resulted ZIP file to your Windows machine and add it to TransType (without decompressing).
Preparing the conversion
Once you’ve added some source fonts to TransType, you will see some font targets in the Main area.
A font target is the “intended output font.” A single target contains information necessary to convert the source font into the final font file — in an intended format, with the intended menu naming and grouping and other information. All editing operations that you perform within TransType are done on targets. Those targets do not physically exist as fonts on your hard drive until you run the conversion. Your original (source) font files are not changed or overwritten while you’re preparing your fonts for conversion in TransType.
See the further chapters for a detailed description of all the operations which you can perform in TransType while preparing the fonts for conversion.
The most important section of the TransType user interface which you will use to prepare your fonts for conversion is the top bar.

Illustration: TransType 4 close-up of the Top bar.
The principal elements of the top bar are:
-
on the left side:
-
View icons to choose the view of Main area: either the Icon view or the List view
-
in the center:
-
Toggle button to show or hide the Preview panel
- Toggle button to show or hide the Font Info panel
-
Toggle button to show or hide the Glyph Map window
-
on the right side
-
Profile selector to show and select the conversion profile for all fonts added to TransType
- Destination selector to show and select the destination location for all fonts added to TransType
- Convert button to start the conversion of all or selected fonts
Performing the conversion
Conversion profiles
The Profile selector in the Top bar is a dropdown list that shows and selects the conversion profile for all fonts added to TransType.
A profile is a target font format. When you run the conversion, the fonts selected in TransType (or all fonts, if you didn’t select any) will be converted into the target font format.
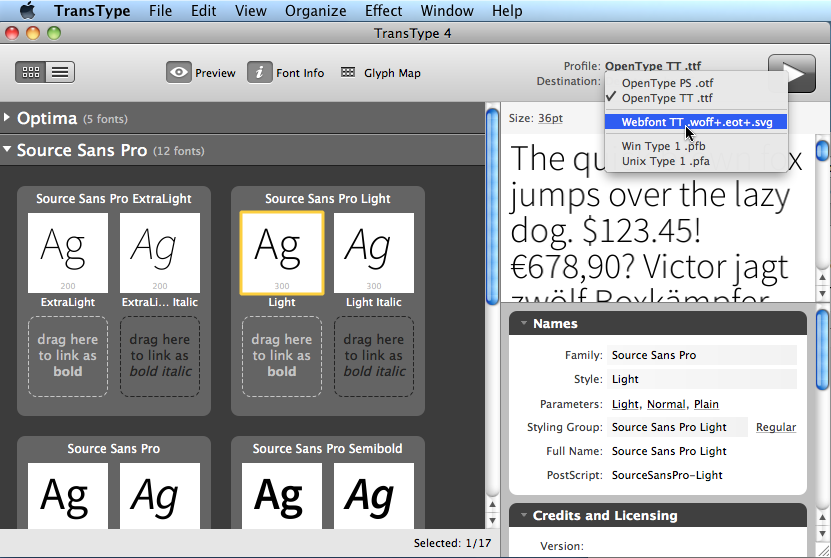
Illustration: Profile selector
TransType 4 supports the following target profiles:
OpenType PS .otf
The source fonts will be converted into OpenType fonts with PostScript (CFF) outlines. There will be one file per target font, with the file extension .otf.
You can install the converted fonts on Mac OS X, Windows and most other platforms. The file size of OpenType PS fonts is typically smaller than of OpenType TT fonts. The screen quality is mostly good, though on Windows XP the OpenType PS fonts may look a bit thin. The fonts print on all printers. They may not work in some very old apps.
OpenType TT .ttf
The source fonts will be converted into OpenType fonts with TrueType outlines. There will be one file per target font, with the file extension .ttf. This type of OpenType fonts is backwards compatible with TrueType fonts — so if you need a TrueType font, you should select OpenType TT .ttf.
You can install the converted fonts on Mac OS X, Windows and other platforms. The file size of OpenType TT fonts is typically larger than of OpenType PS fonts. The screen quality varies from excellent to poor. The fonts may not print on some rare printers, but they will work even in very old apps.
Webfont TT .woff+.eot+.svg
The source fonts will be converted into CSS @font-face font packages (or “webfonts”), which can be installed on a website and used directly in HTML. There will be several files per target font: .ttf, .woff, .eot, .svg. Most recent browsers all use the .woff files, but older browsers use the other formats, so they’re all included. A sample HTML and CSS file is also included, and shows how the webfonts can be used in an HTML document.
Please remember: many commercial font vendors do not allow users to convert their fonts to webfonts. Instead, those font vendors offer specially-prepared webfonts under a separate license. Please check the font’s licensing terms before converting!
Win Type 1 .pfb
The source fonts will be converted into old-style PostScript Type 1 fonts in “Windows binary” form. There will be four files per target font (.pfb, .afm, .inf, .pfm). This format is obsolete, use it only if you absolutely need to.
Unix Type 1 .pfa
The source fonts will be converted into old-style PostScript Type 1 font in “Unix ASCII” form. There will be two files per target font (.pfa, .afm). This format is obsolete, use it only if you absolutely need to.
Conversion destination
One of the important properties of a target is the destination i.e. the location (path and filename) of the target font files. The Destination selector in the Top bar is a dropdown list that shows and selects the Destination location into which the Target files will be put after conversion, as well as the subfolder / file naming scheme.
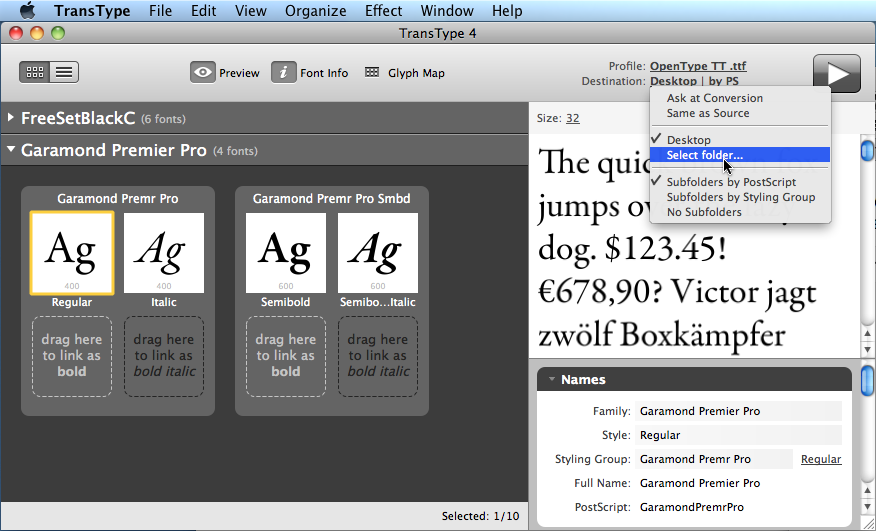
The first four entries of the Destination selector let you choose where the target fonts will be saved. TransType offers the following choices:
Ask at Conversion
TransType will open a “Select folder” dialog every time you click on the Convert button. So every time you convert some fonts, you’ll be able to pick the folder in which the target fonts will be saved.
Same as Source
Each of the target fonts will saved in the same folder as its source font.
Desktop
The converted fonts will be saved to your Desktop.
Select folder…
When you choose this entry, TransType will open a “Select folder” dialog, and you will be able to pick a folder. Then, every time you click on the Convert button, the converted fonts will be saved to that folder. If you’d like to change the folder at some point, choose this entry again.
The last three entries of the Destination selector control how TransType will group the converted fonts into subfolders in your destination folder.
Subfolders by PostScript
TransType will use the PostScript name of the font to create subfolders. The PostScript name of each font includes a “family section”, optionally followed by a dash and a “style section”. TransType will form subfolders using the “family section” of the PostScript name. So for example, if you are converting fonts with the PostScript names “Lato-Light”, “Lato-Regular”, “Lato-Bold”, “Lato-Black” and “LatoSerif-Regular”, TransType will create two subfolders: “Lato” (where the first four fonts will be saved) and “LatoSerif” (where the fifth font will be saved).
Subfolders by Styling Group
TransType will use the Styling Group name of the font to create subfolders. This is the name which you see in the Icon view above each square that represents a Styling Group. When you choose this option, each subfolder will contain up to four fonts.
No Subfolders
TransType will save all converted fonts into the destination folder, without creating any subfolders.
Convert button
The Convert button in the Top bar starts the conversion process.
If you have one or several fonts selected in the Main area only selected fonts will be converted. To convert all targets, click on the blank area outside the styling group to deselect fonts, or choose Edit / Select All to select all targets for conversion.
During conversion, a progress bar for the entire conversion process will be shown, and below it, a thinner progress bar may appear that indicates the conversion progress per each font. When the progress bar is visible, you can click on the “X” icon next to it to abort the conversion.
After conversion, the status bar will show a summary of the completed conversion. If you chose a destination other than “Same as Source”, the status bar will also include a “Reveal results” link. If you click on the link, a Finder or Explorer will open the destination folder containing the converted target fonts.
In Preferences, you can control what should happen if a font with the same file name already exists in the destination folder.
TransType preferences
To open the Preferences dialog box, select the Preferences command in the application menu (Mac OS X) or in the Edit menu (Windows).
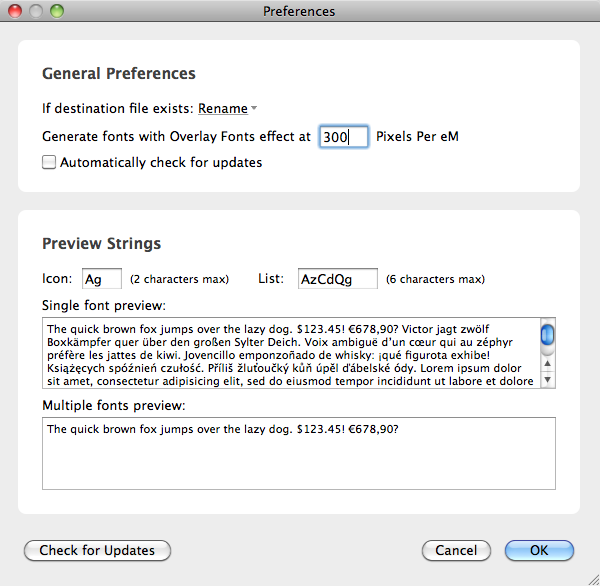
The first item includes the dropdown button with three entries:
- Rename — destination fonts with identical names within the same destination folder will get different names. TransType won’t replace fonts but will add numbers to the file names: FontName-Regular1.ttf, FontName-Regular2.ttf, etc.
- Overwrite — destination fonts with identical names within the same destination folder will be overwritten;
- Skip — fonts with identical names will be skipped so that the previous version of the font will retain.
The Generate fonts with Overlay Fonts effect edit box allows you to change the quality of bitmap fonts created with the Overlay Fonts filter. The default value is 300 pixels per eM.
To let TransType to search for new available version updates, turn on the Automatically check for updates option. TransType will contact the web site every time it is started. You can manually do the same by clicking on the Check for Updates button at the bottom of the Preferences dialog.
The rest of the dialog contains different font preview strings used on the icons in the Main area and in the Preview panel. Edit these strings as you prefer.