Release notes for FontLab 8.4.0.8887
27 June 2024
Say hello to FontLab 8.4!
Enjoy more than new 90 features, improvements and fixes since FontLab 8.3, including:
Edit, space, test
- Quickly access tool-relevant operations via context menus.
- Get more control over Glyph window panning and node rendering.
- Quickly change glyph metrics in the Widgets.
- Use UVS sequences with CJK and emoji.
- Preview kerning, underline, and strikethrough.
Prototype and assemble
- Visually adjust variable components made from any glyph.
- Build complex glyphs with better Skin filter.
- Quickly add named anchors and new glyph variation layers.
- Better adjust stroke caps.
Refer, re-use, harmonize
- Use components in Mask as visual reference.
- Detach serifs from stems & make them re-usable.
- Quickly turn contour selections into new components or elements.
- Scale paths, elements and components to the same width or height.
FontLab 8.4 is free if you have a FontLab 8 license, and is available as a discounted upgrade for all users of FontLab 7, FontLab VI, FontLab Studio 5, Fontographer 5, TypeTool 3, RoboFont and Glyphs. Need an extended trial, or a tool for a single project? The FontLab 8 3-months starter license is just US$97!
Explore & prepare
Tool-relevant context menus
In FontLab 8, we’ve added the Toolbox: whenever you activate a tool in the Toolbar, a small floating panel may appear, that gives you single-click access to additional sub-tools and operations within that tool. These sub-tools or operations were otherwise often accessible with a modifier key.
Note
The toolbar gives you access to 23 tools. Out of these, 10 tools have a toolbox. If the toolbox is not visible for a given tool that has a toolbox, double-click the toolbar icon to open the toolbox.
New FontLab 8.4 adds context menus to most tools. This makes accessing the sub-tools and tool-specific operations even easier. You can access the context menu right where your pointer is, and you have access even if the toolbox is not visible.
Previously, the Contour, Element, Metrics, Kerning and TrueType Hinting tools had dedicated context menus.
New Now many more tools have context menus! If you activate the tool and right-click the Glyph window, you can:
| Tool | Key | Context menu |
|---|---|---|
| Text | T | perform important text operations (also accessible from the Text menu) |
| Eraser | 2 | activate the Eraser, Simple Eraser, Lasso Eraser or Simplify Path sub-tool |
| Brush | B | activate the Brush, Simple Brush, Power Brush or Erasing Brush sub-tool, toggle the Soft Brush option, and open relevant panels |
| Pencil | N | activate the Simple Pencil or Smart Pencil sub-tool, and toggle the Existing Contour is Editable and Soft Pencil options |
| Knife | J | activate the Knife, Drag to Add Nodes, Drag to Break or Drag to Slice sub-tool |
| Scissors | Q | activate the Scissors, Disconnect, Loop Corner or Ink Trap sub-tool |
| Magnet | U | perform operations on hints and Power Guides |
| Thickness | 8 | perform operations on Stroke and Brush, open relevant panels |
| Guides | G | perform operations on anchors and guides, open relevant panels |
| Rotate | R | perform rotation and flipping |
| Scale | S | perform scaling and flipping, including the new Same Width, Same Height, and in contour mode, Same Width Only and Same Height Only |
| Slant | D | perform slanting, including the new Slant By Italic Angle |
| Oval | O | activate the geometric Ellipse or the Oval with Tension sub-tool |
| Rectangle | I | activate the Rectangle, Polygon, Star and Erasing Rectangle sub-tool |
Note
For most tools, the context menu appears when you “start a right click”: you press the right mouse button or, on macOS, you also hold Ctrl and press the left mouse button. The Eraser, Brush and Guide have special functionality associated with right-dragging, so for them, the context menu appears when you “finish the right click”: you press and release the right mouse button, or on macOS you also hold Ctrl and then press and release the left mouse button. In practice, you’ll barely notice this subtle difference.
TODO: One powerful workflow you can try is: select some nodes with Contour tool, press and hold the
Draft & draw
Rendering of nodes & handles in Glyph window
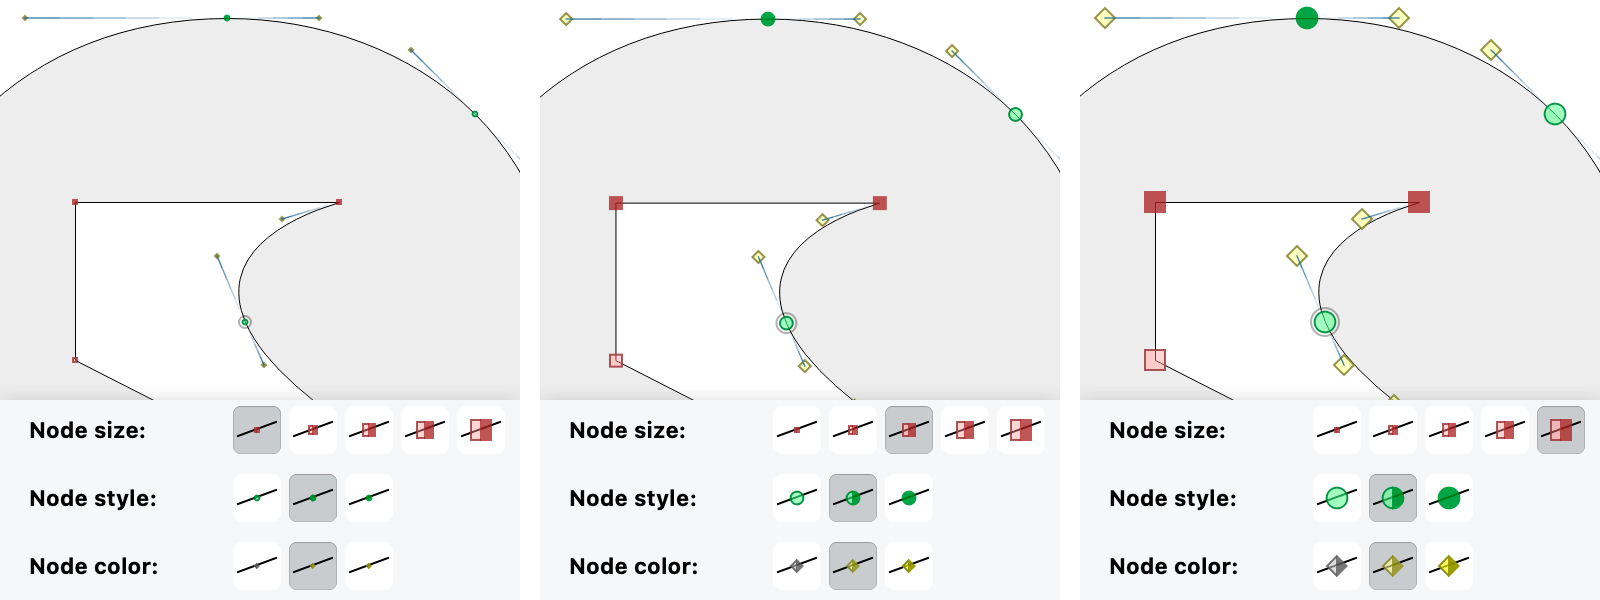
In FontLab, contours are made from points: nodes (on-curve points) and handles (off-curve points). With the Preferences > Glyph Window settings, you can easily customize the Glyph window rendering of nodes & handles that’s most suitable for your habits, and for your monitor size & pixel density.
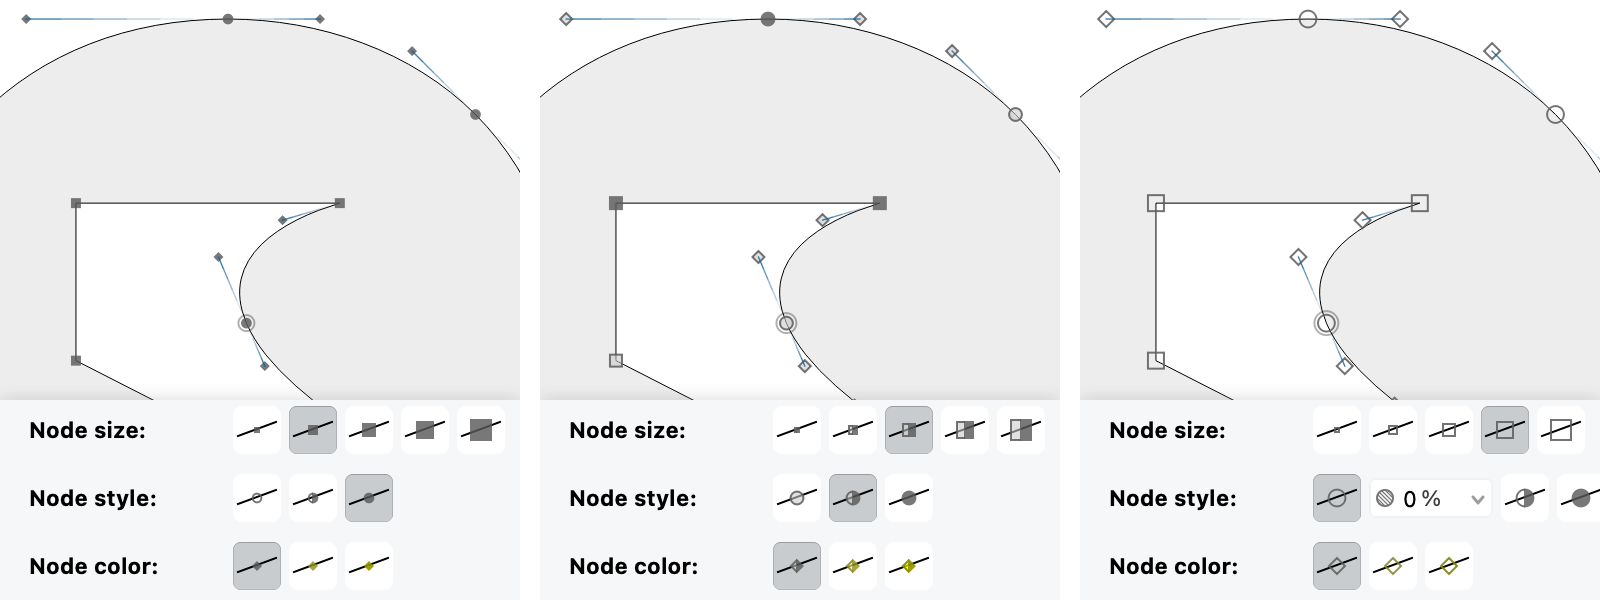
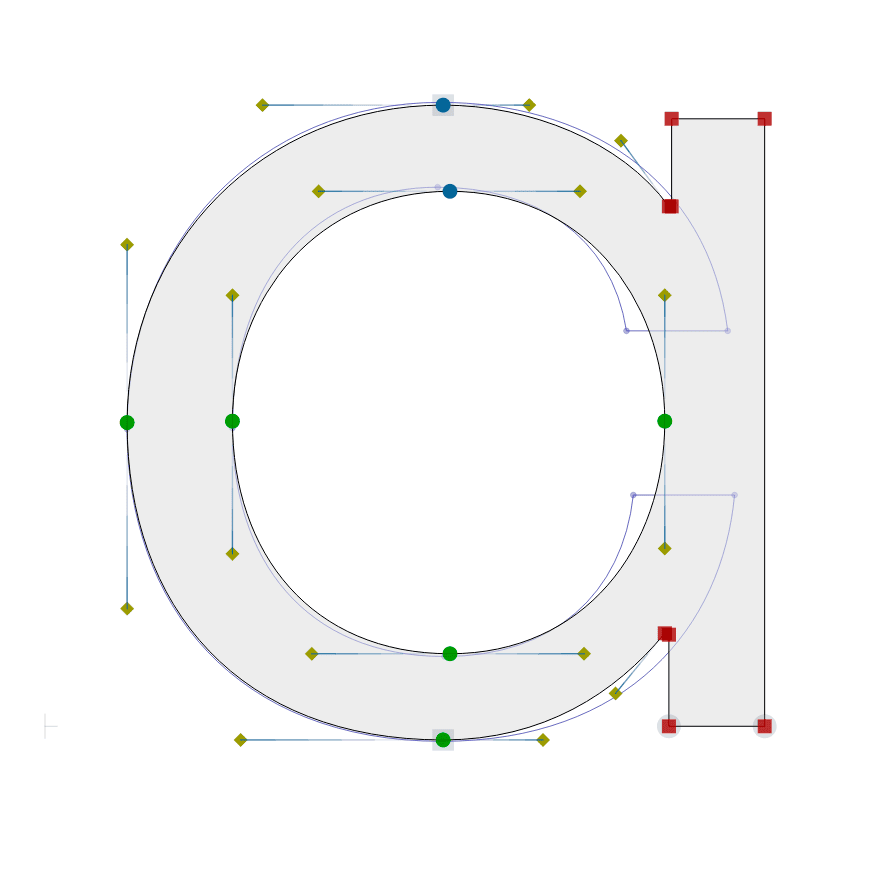
The shape of the point tells you what type of point it is:
- circle: smooth node (smooth connection between two curve segments)
- triangle: tangent node (smooth connection between a line and a curve segment)
- square: corner node (sharp connection between two segments)
- rhombus (diamond): handle
In the Node style section, you can customize the outline and fill of the rendered nodes & handles:
- Light color renders all nodes & handles with an intense outline and a lighter fill. New You can now choose the translucency of the lighter fill. 0% just renders the outline.
- Full color renders all nodes & handles with a uniform intense fill.
The middle setting Full color only on extrema and straight corners renders extrema and straight corners in full color and other nodes in light color. In the Node color section, the first setting shows all nodes & handles with grayscale.
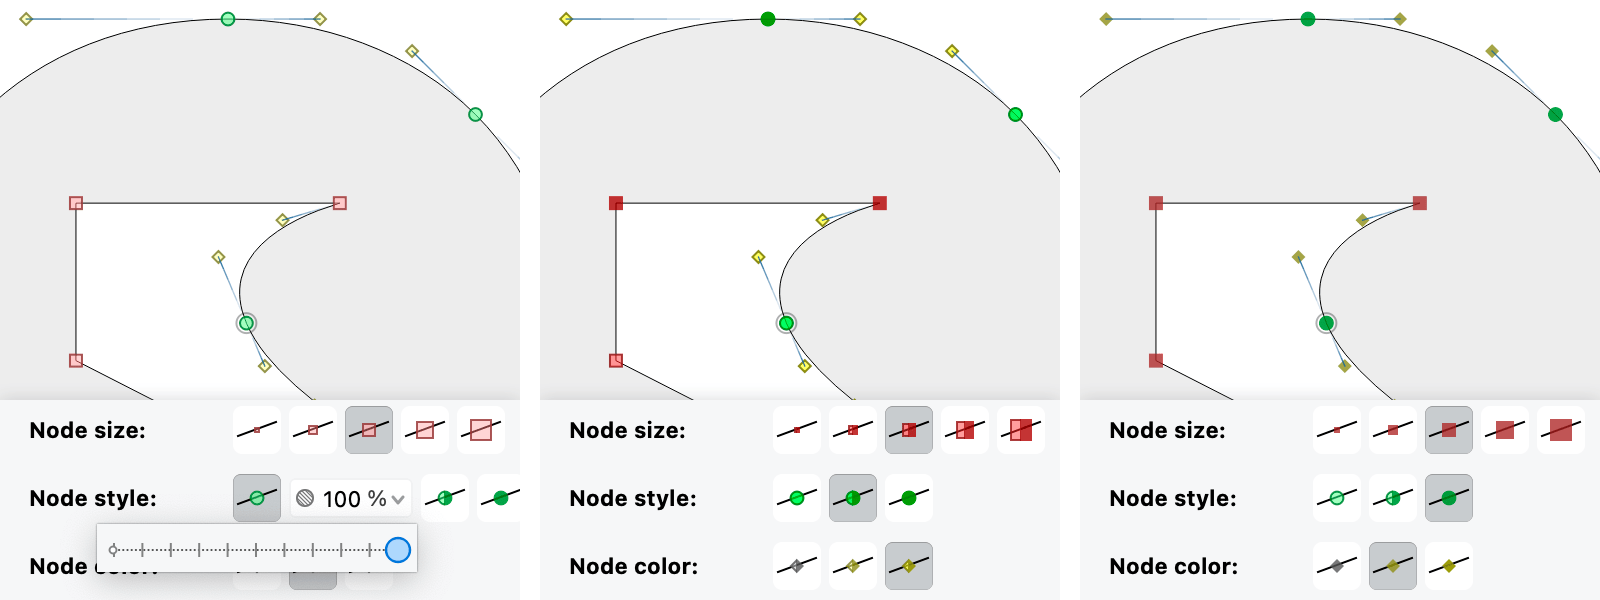
In the Node color section, the second and third setting use colorization (muted or intense), which provides additional visual feedback about the type of node & handle:
- green circle: smooth node
- violet triangle: tangent node
- red square: corner node
- blue circle, square or triangle: start point
- yellow rhombus: PostScript handle
- violet rhombus: TrueType handle (off-curve point) adjacent to a node
- green rhombus: TrueType handle between two TrueType handles
Combine color intensity with style and size settings. Intense colorized nodes work great even if you set the size to small or tiny!
Note
FontLab also indicates additional point properties.
An extra circle around a smooth node indicates a Genius node.
An extra square around a corner indicates a Spike node.
Short horizontal strokes at the vertical or horizontal edges indicate Servant nodes.
Improved stroke caps
If you apply a stroke to a contour using the Stroke panel or the Thickness tool, or if you apply the Power Stroke filter, you can control various stroke parameters in the Stroke panel.
Flat stroke caps
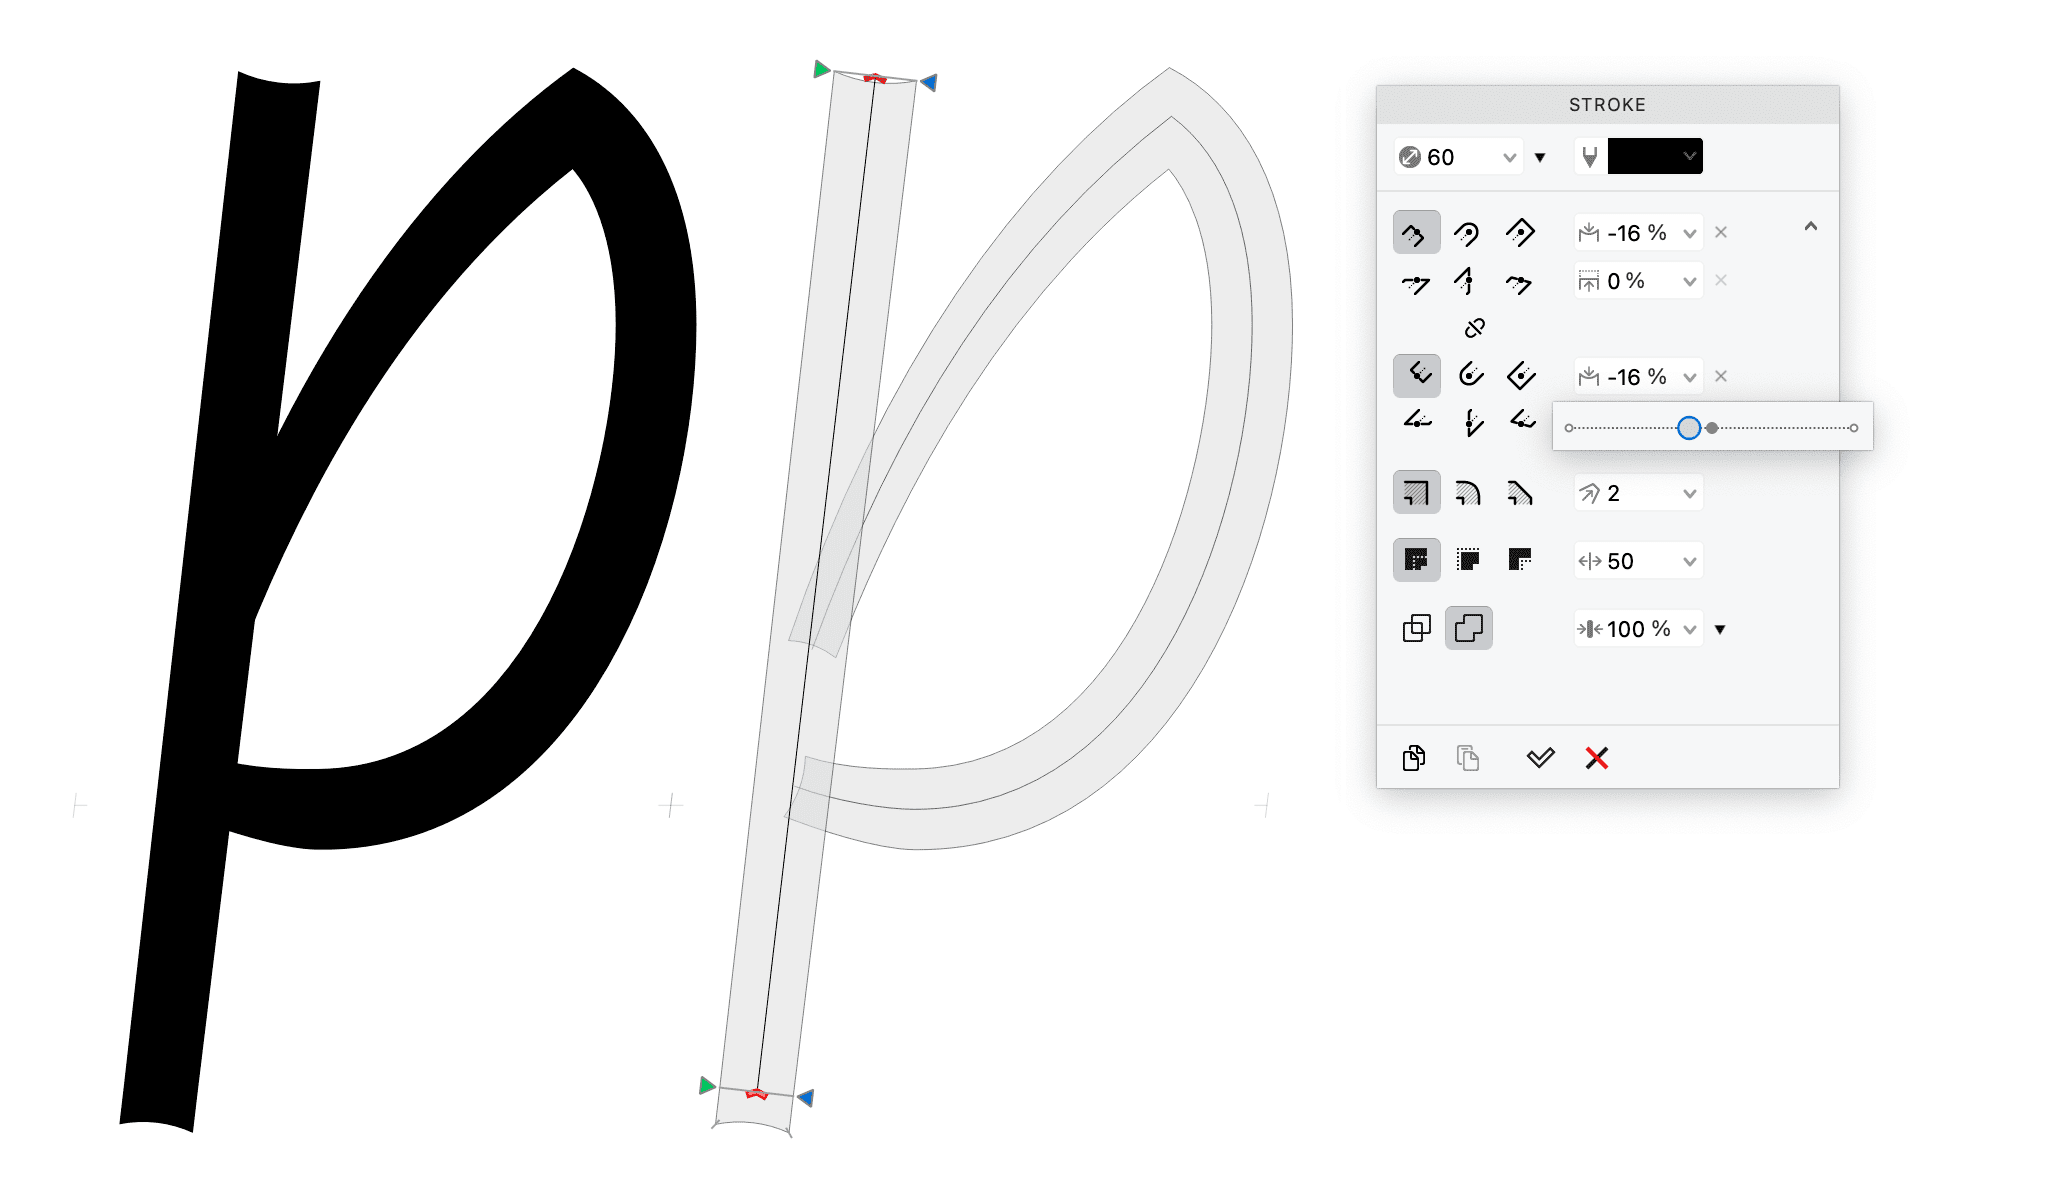
If you choose a Flat cap, in the Cap shape field you can change the cap: -100% is round concave, 0% is flat, 100% is round convex. With the Cap shift field:
- At 0%, the sides of the cap are at the node.
- Positive values extend the cap beyond the node, 100% extends it by the node’s stroke thickness.
- New Negative values retract a convex cap towards the skeleton, –100% retracts it so that the tip of the cap is at the node. For non-convex flat caps, negative values have no effect.
Round stroke caps
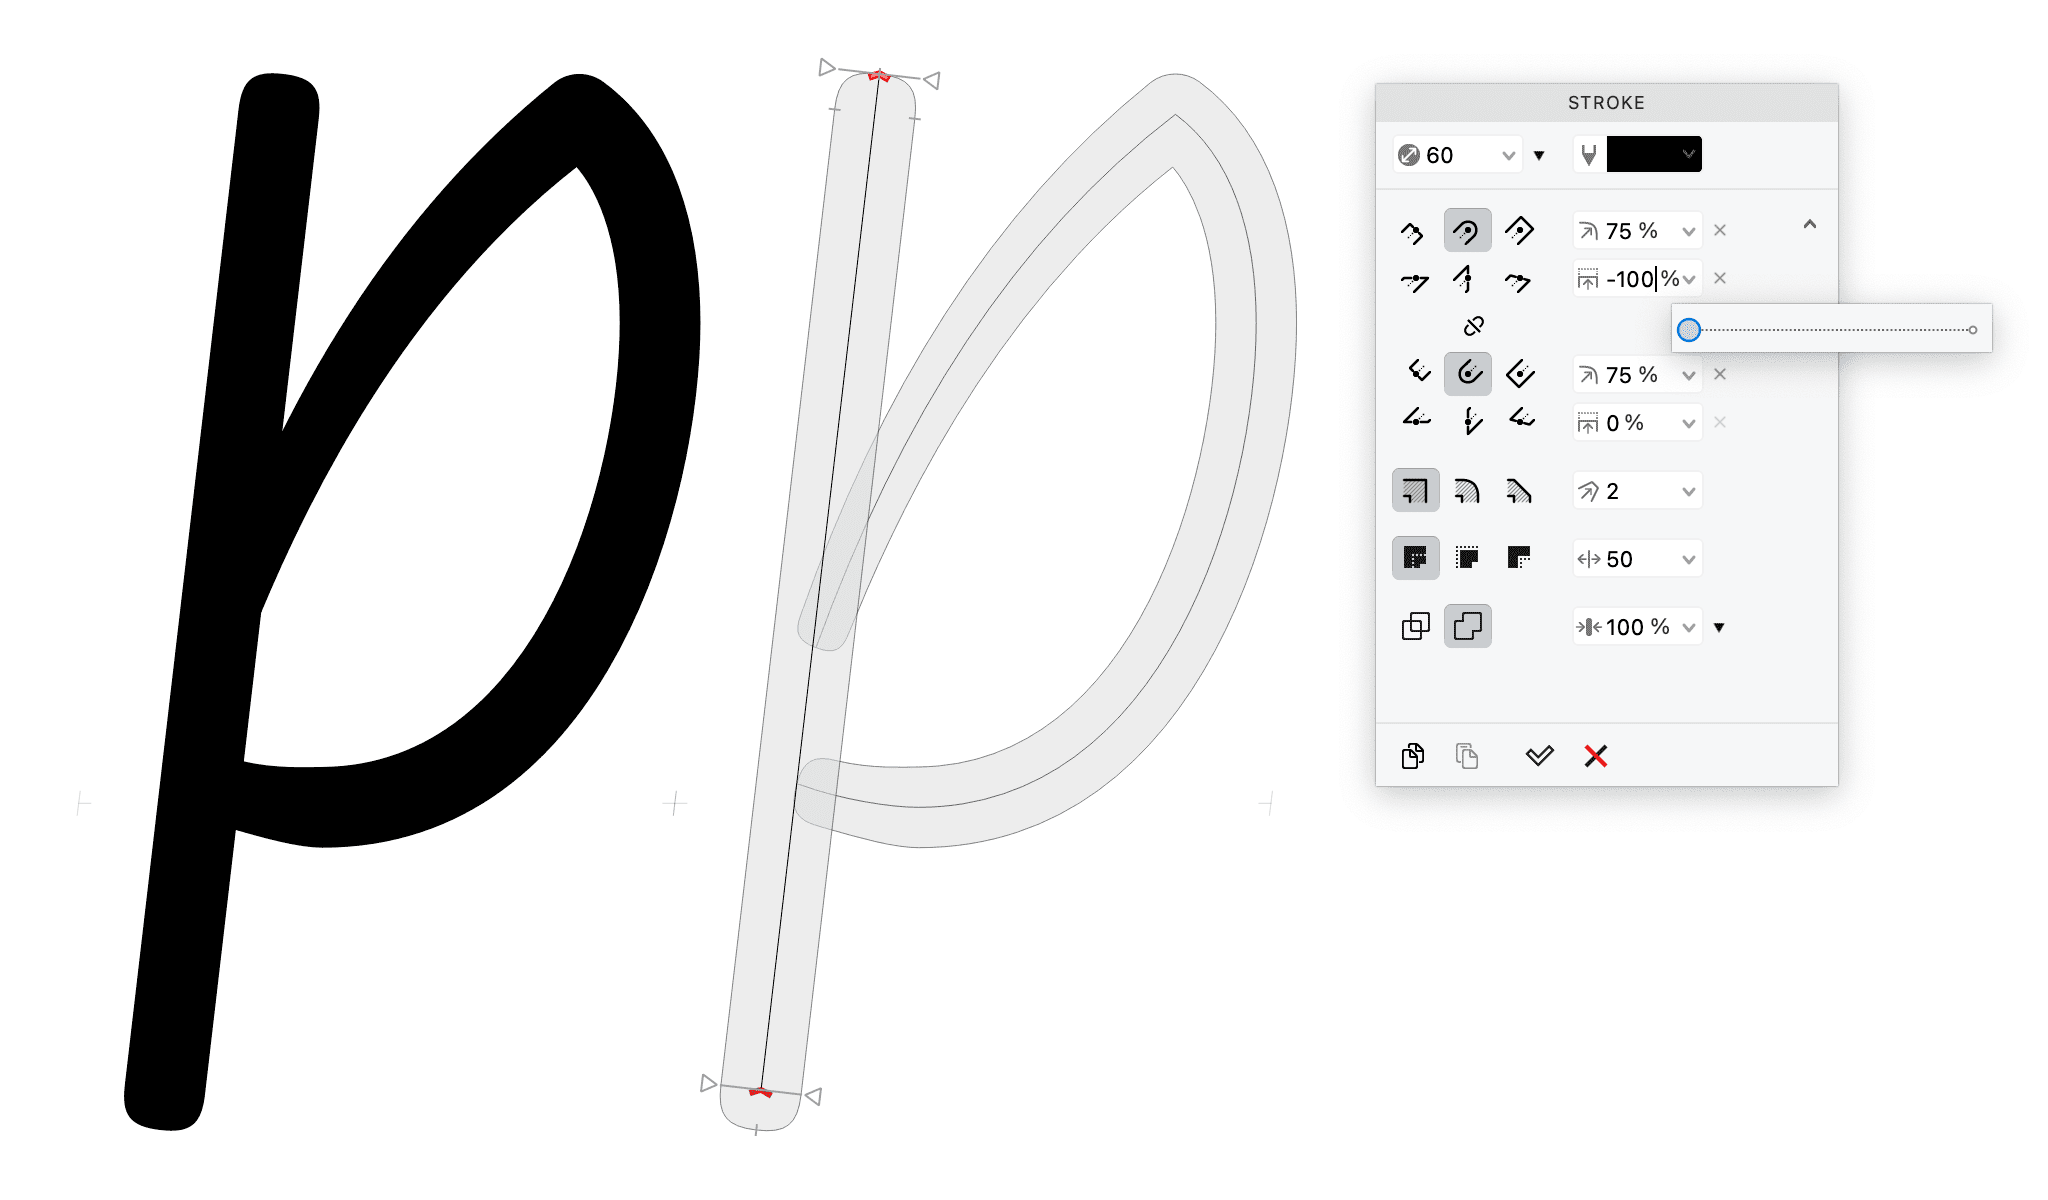
If you choose a Round cap, in the Cap tension field you can change the curve tension of the cap: 0% is triangular, 50% is round, 100% is nearly square. New With Cap shift field:
- At 0%, the sides of the cap are at the node.
- New Negative values retract the round cap towards the skeleton, –100% retracts it so that the tip of the cap is at the node.
Square stroke caps

If you choose a Square cap, the Cap shape field behaves the same as with a Flat cap. But the Cap shift works in a way that’s opposite to the Flat cap:
- At 100%, the sides of the cap are at the node.
- At 0%, the sides of the cap are extended by the node’s stroke thickness.
Add components to Mask
If you work on a glyph layer in the Glyph window and choose Tools > Mask > Edit Mask or press CtrlH, FontLab activates or creates a Mask layer associated with the current “parent layer”.
New If the Mask layer is active, you can use Glyph > Add Component and choose the component source. If you turn off the All masters toggle and click OK, FontLab will add the component so that it points to the mask’s parent layer. You can change the layer or instance that the component uses (see the section about variable components).
This way, you can visually reference letterforms from other glyphs in the mask of your current glyph.
Note
If you turn the All masters toggle on, FontLab will add the component to all parent master layers, not to the current mask layer.
Brush tool (B) context menu
New Click the Brush icon in the toolbar, or tap or hold B and right-click the canvas: the context menu opens where you can choose the Brush sub-tool or option. To toggle between the sub-tools, you can also click the icons in the toolbox or repeatedly tap the B key.
To resize and rotate the brush tip, Ctrl-drag on the canvas or New right-drag.
Brush sub-tools
Simple Brush: FontLab draws simple contours using the brush settings specified in the Brush panel or the tool’s property bar. You cannot change the brush thickness or angle of the contours after you’ve drawn them with the simple brush. The contours are immediately editable with the Contour tool.
Power Brush: FontLab draws a new element and in it draws a skeleton (as if you used the Pencil tool), and applies the Power Brush filter using the current brush settings. After you’ve drawn with Power Brush, you can edit the skeleton contour with the Contour tool, and you can use the Brush panel or the Brush tool property bar to change the global brush thickness or angle. You can also use the Thickness tool to change the local brush thickness at any skeleton node. To get the final contours, use Element > Expand Filters.
Erasing Brush: If you draw over any closed contours, FontLab cuts out (erases) the portions of the existing contours that you’ve drawn over. It also removes any existing overlaps. This is similar to using the Erasing rectangle sub-tool of the Rectangle tool, but for more freeform strokes.
Brush options
Soft Brush: If it’s turned on, any selected Brush sub-tool will have some inertia as you draw with it. Soft Brush ignores small jiggles of your hand so the resulting curves are smoother. It also helps you make corners more pronounced, and produces fewer unintended line segments.
Pencil tool (N) context menu
New Click the Pencil icon in the toolbar, or tap or hold N and right-click the canvas: the context menu opens where you can choose the Pencil sub-tool and options. To toggle between the sub-tools, you can also click the icons in the toolbox or repeatedly tap the N key.
Pencil sub-tools
Simple Pencil: If you make a drawing move away from existing contours (hold button, move, release), Simple Pencil creates a separate freehand contour that follows your drawing move. Hold Alt to make a straight line, Shift to makes it horizontal or vertical. Hold Ctrl to prevent joining with start/end nodes or modification of existing contours.
Smart Pencil: Works like Simple Pencil, but performs simplification on the paths you draw. If you make one drawing move away from existing contours, or if you hold Ctrl as you make your drawing move, Smart Pencil also tries to convert a drawing move that resembles a line, rectangle or ellipse into “perfect” versions of these basic geometric forms.
Pencil options
Existing Contour is Editable lets you use any Pencil sub-tool to modify existing contours in-place.
- When it’s off: If you start a drawing move near a start/end node of an existing contour (inside the blue circle), Pencil creates a new contour (does not join the new contour with the existing one). Alt and Shift work like above. If you finish the drawing move near a start/end node of an existing contour, Pencil joins the end node of your current drawing move with that start/end node. Alt and Shift work like above.
- When it’s on: If you start a drawing move near a start/end node of an existing contour, Pencil joins the new contour with the existing one. Alt and Shift work like above. If you finish the drawing move near a start/end node of an existing contour, Pencil behaves the same as with the toggle turned off: it joins the end node of your current drawing move with that start/end node. Alt and Shift work like above. If you start a drawing move on the outline of an existing contour (with a blue X-cross visible), Pencil will modify the existing contour: when you finish the drawing move, it will replace a part of the existing contour with the drawing you have just made. Alt and Shift work like above, so you can easily replace an existing part of the outline with a straight line. If you hold Ctrl, Pencil prevents any joining with start/end nodes or modification of existing contours.
Soft Pencil: If it’s turned on, any selected Pencil sub-tool will have some inertia as you draw with it.
Ellipse / Oval tool (O) context menu
New Click the Ellipse / Oval icon in the toolbar, or tap or hold O and right-click the canvas: the context menu opens where you can choose between the Geometric Ellipse and Oval with Tension sub-tools. To toggle between the sub-tools, you can also click the icons in the toolbox or repeatedly tap the O key.
Geometric Ellipse: Drag from the corner or Alt-drag from the center to draw an ellipse. Hold Shift to draw a circle. Hold Cmd Ctrl to draw a counter (the contour is in the opposite direction). Click to open a dialog box to create an ellipse with a numeric size.
Oval with curve tension: Works analogically to Geometric Ellipse, but in the toolbox you can specify the curve tension of the oval (by default, Font Info > Font Dimensions > Curve tension). An ellipse or circle has the tension of 55%.
Rectangle / Polygon / Star tool (I) context menu
New Click the Rectangle / Polygon / Star icon in the toolbar, or tap or hold I and right-click the canvas: the context menu opens where you can choose between the sub-tool. To toggle between the sub-tools, you can also click the icons in the toolbox or repeatedly tap the I key.
Rectangle: Drag from the corner or Alt-drag from the center to draw a rectangle. Hold Shift to draw a square. Hold Cmd Ctrl to draw a counter (the contour is in the opposite direction). Click to open a dialog box to create a rectangle with a numeric size.
Polygon and Star: Work analogically. Use the numeric text box in the toolbox or property bar to set the number of corners of the regular polygon or the star. Click and drag to start drawing from the center, hold Shift to constrain the rotation to 90 degrees.
Erasing Rectangle: Draw over any closed contours to cut out (erase) the portions of the existing contours that you’ve drawn over with the rectangle. Also removes existing overlaps. This is similar to using the Erasing brush sub-tool of the Brush tool.
Thickness tool (8) context menu
New Click the Thickness icon in the toolbar, or tap or hold 8 and right-click the canvas: the context menu opens where you can choose one of several operations relevant to strokes and brushes:
- Make Power Brush: Apply the Power Brush filter to the element contours, and instantly edit the thickness of the calligraphic brush per node, or (with Shift) per element.
- Make Power Stroke: Apply the Power Stroke filter to the element contours, and instantly edit the thickness of the stroke per node, or (with Shift) per element. Power Stroke behaves like the regular stroke, but FontLab considers the contours dynamically created by the stroke part of the glyph’s “body” — the same way as it considers normal contours. So you can perform further operations on them, autohint, they take part in metrics calculation etc.
- Merge Stroke: Add the outside stroke part to the original filled contour, and disregards the inside part of the stroke.
- Expand Stroke: Create new contours for the outside and inside stroke part.
- Remove Stroke: Set all stroke properties of the current element to none.
- Open Stroke Panel: Access additional properties for stroke and the Power Stroke filter. Change the element thickness, caps, miters, stroke offset, contrast and color.
- Open Brush Panel: Access additional properties for the Power Brush filter. Change the brush element thickness, shape, modulation.
- Open Color Panel: Access color properties for the element stroke and fill.
Edit & refine
Select entire contour
With FontLab, you have a few ways to select the entire contour with the Contour tool:
- Double-click the contour outline (but not a node or handle) to select that contour. Note: We recommend the other methods because if you don’t double-click precisely, you may inadvertently move the contour by a small distance.
- Alt-click or Cmd-click the canvas near the contour outline to select the nearest contour.
Rectangular marquee selection
- On macOS, hold Cmd as you drag the rectangular marquee around one or more nodes to select the entire contour that the node belongs to.
- New on Windows, start dragging the rectangular marquee, then hold Alt and select one or more nodes or handles to select the entire contour they belong to.
Note
If you also hold Ctrl as you select, the rectangular selection becomes horizontally slanted (rhomboid).
Lasso selection
New Hold AltCmd AltCtrl as you drag the lasso (freeform selection) around some nodes or handles to select the entire contour they belong to.
Scale paths to same width or height
New You can now scale paths to a desired width or height.
Note
A path is a continuous series of segments that belong to the same contour. So a path can be one segment, several adjacent segments, or an entire contour.
Scaling to largest path
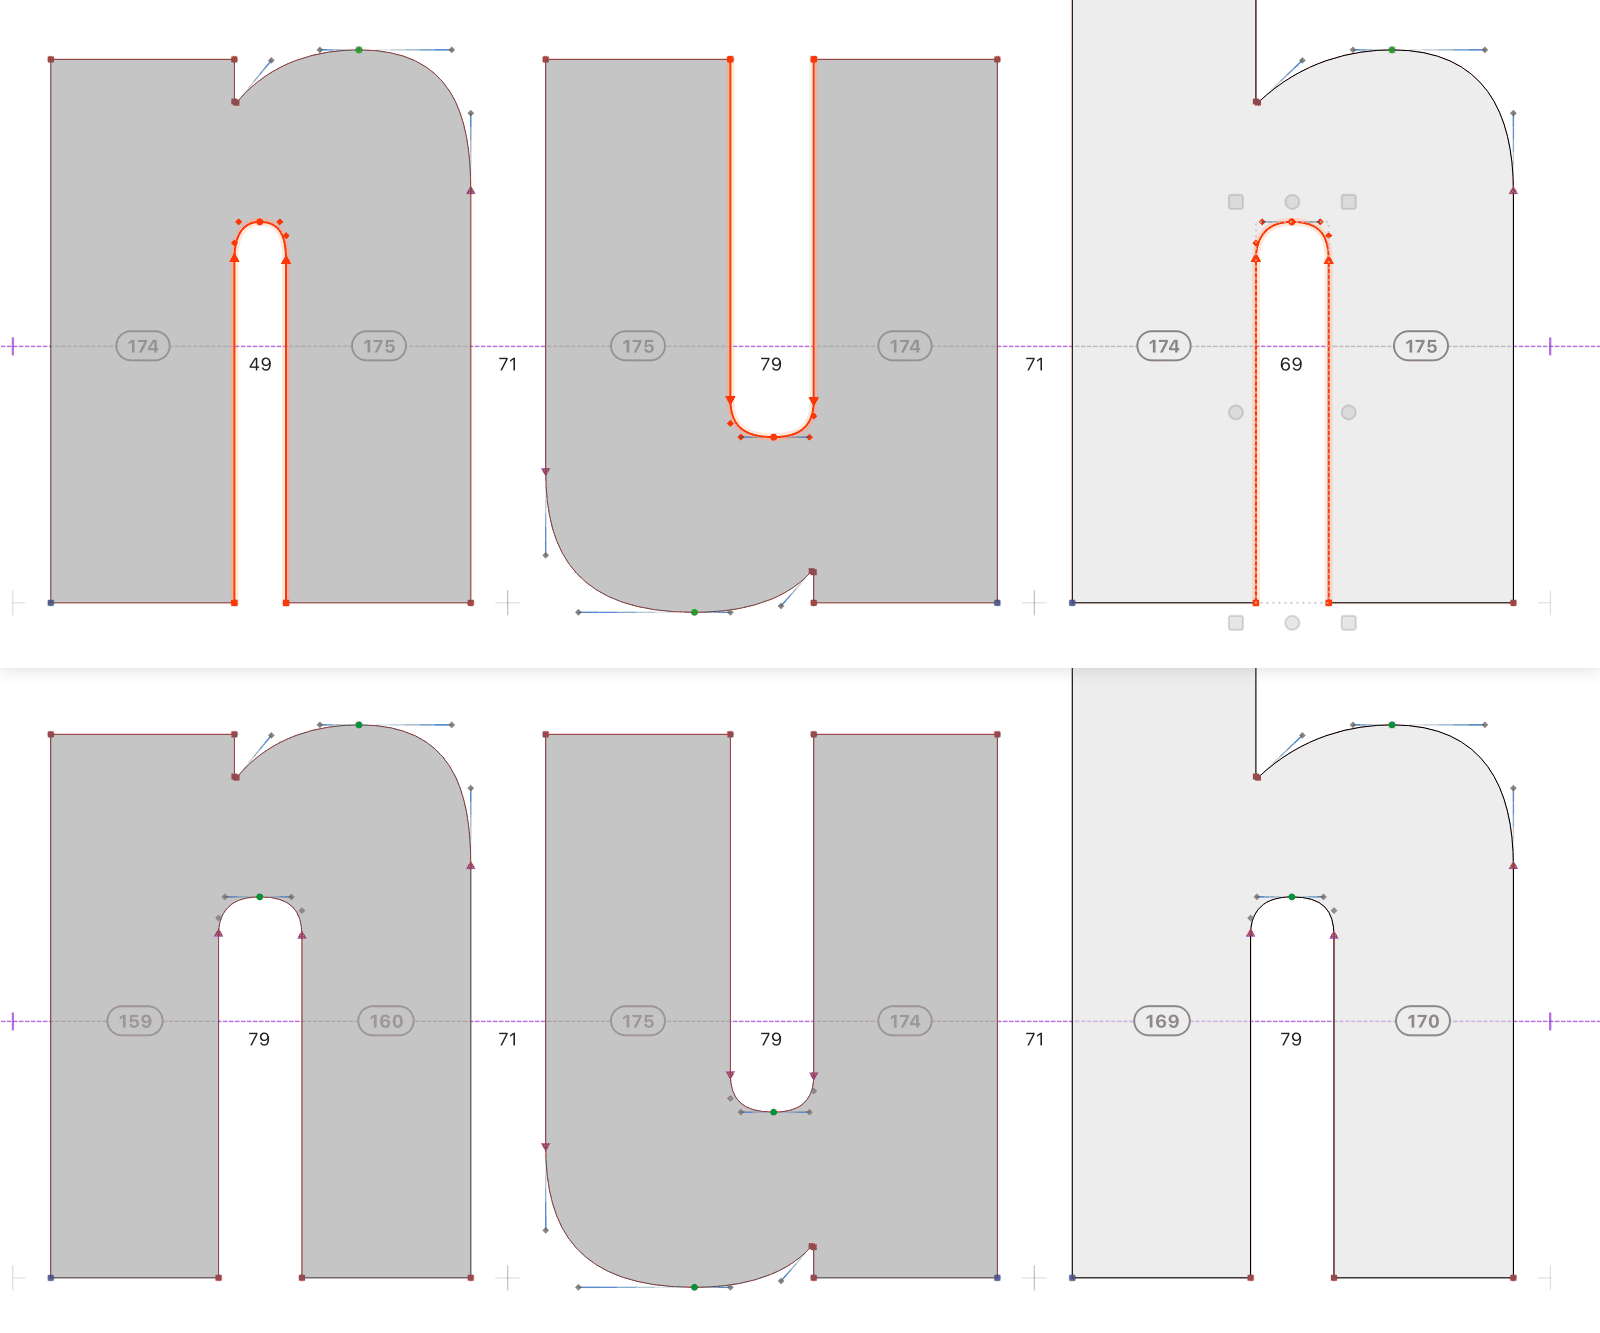
If you select several paths, you can use the menu commands in Contour > Align Points to scale all selected paths to the largest path:
- New Same Width proportionally scales each path to the largest path width
- New Same Width Only non-proportionally scales each path’s width to the largest path width, keeping the height
- New Same Height proportionally scales each path to the largest path height
- New Same Height Only non-proportionally scales each path’s height to the largest path height, keeping the width
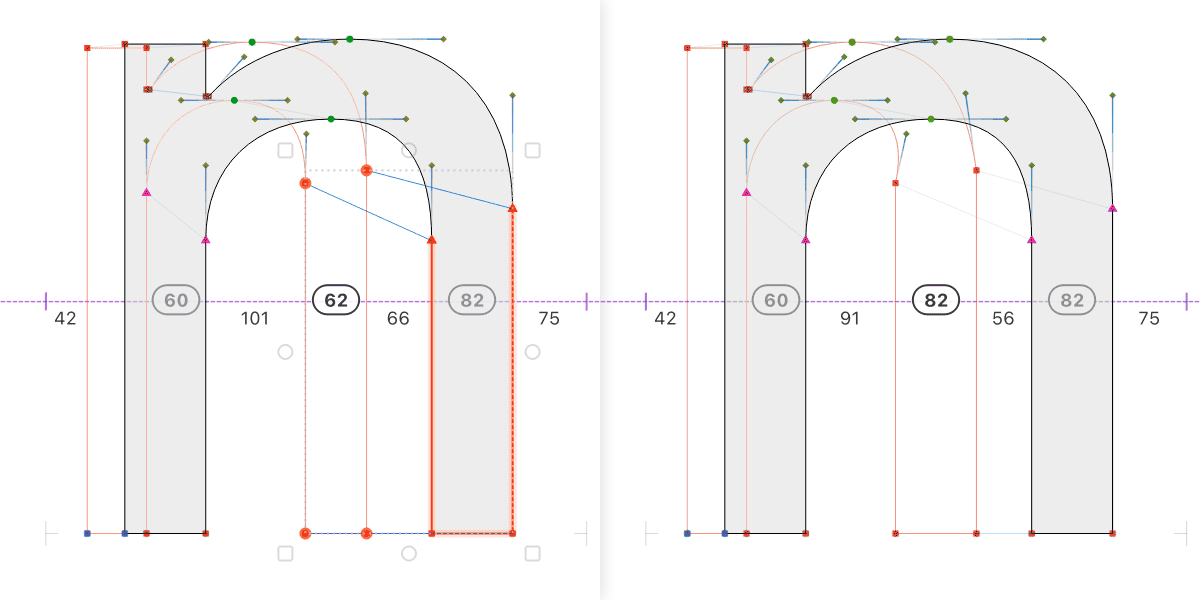
FontLab scales each path around its center. This works even for selections made across multiple glyphs if Edit > Edit Across Glyphs is turned on, and for selections made across masters if Edit > Edit Across Layers is turned on.
Scaling to advance width or font dimension
If you select one path (contour portion or entire contour):
- New Same Width proportionally scales the path to the advance width
- New Same Width Only non-proportionally scales the path’s width to the advance width
- New Same Height proportionally scales the path to x-height, or to caps height if the glyph represents an uppercase letter
- New Same Height Only non-proportionally scales the path’s height to x-height or caps height
Eraser tool (2) context menu
New Click the Eraser icon in the toolbar, or tap or hold 2 and right-click the canvas: the context menu opens where you can choose the Eraser sub-tool to remove nodes, handles and segments. To toggle between the sub-tools, you can also click the icons in the toolbox or repeatedly tap the 2 key.
To resize the eraser tip, Ctrl-drag on the canvas or New right-drag.
Eraser sub-tools
Eraser: Works like Simple Eraser, with Alt like Lasso Eraser, with Ctrl like Simplify Path.
Simple Eraser: Click or drag over nodes and handles to remove them, hold Shift to keep key nodes. Ctrl-drag to resize the Eraser radius. Alt-click a segment to break the contour and remove the segment. Alt-click a node to break the contour and remove the two adjacent segments.
Lasso Eraser: Drag on canvas to “draw” a freeform selector, release the mouse button to remove all nodes inside that selector. Hold Shift to keep key nodes.
Simplify Path: Click one node, then click another node on the same contour, and FontLab simplifies the shortest path between those two nodes.
Knife tool (J) context menu
New Click the Knife icon in the toolbar, or tap or hold J and right-click the canvas: the context menu opens where you can choose the Knife sub-tool to add or duplicate nodes, and to slice or break contours. To toggle between the sub-tools, you can also click the icons in the toolbox or repeatedly tap the J key.
Knife sub-tools
Knife: Works like Drag to Add Nodes, with Alt like Drag to Break, with Ctrl like Drag to Slice.
Drag to Add Nodes: Drag through contours: add nodes, Shift-drag: constrain adding horizontally / vertically. Click segment: add node. Shift-click segment: add the closest extremum or inflection. Click node: break contour. Shift-click node: duplicate.
Drag to Break: Drag through contours to add nodes and break contour at them, making open contours. Hold Shift to break horizontally / vertically. Once you’ve broken a contour with Knife, FontLab automatically selects one half of the broken contour. Press ShiftCmdI ShiftCtrlI to invert the selection.
Drag to Slice: Drag through contours to add nodes, or drag between two nodes: this will slice the contour, making separate closed contours. Hold Shift to slice horizontally / vertically.
Scissors tool (Q) context menu
New Click the Scissors icon in the toolbar, or tap or hold Q and right-click the canvas: the context menu opens where you can choose the Scissors sub-tool. To toggle between the sub-tools, you can also click the icons in the toolbox or repeatedly tap the Q key.
Scissors sub-tools
Scissors: Works like Disconnect, with Alt like Loop, with Shift like Ink Trap.
Disconnect: Click a node to unlink the node: FontLab breaks it, elongates the new end nodes slightly, and applies a Power Fill. Drag between or around two nodes, or drag around 4 nodes to make an overlap. To disconnect multiple corner nodes, you can use New Contour > Nodes > Disconnect Corner (previously called Unlink Corner).
Loop: Click a node to create a looped corner: FontLab unfills it if Font Info > Other Values > Unfill looped corners is turned on, and if the loop is outside the filled area. To create looped corners on several sharp nodes, select some segments or contours in Glyph window and choose Contour > Nodes > Loop Corner.
Ink Trap: Click a node to create a simple ink trap: FontLab duplicates the node and moves the new nodes apart by the width that is currently defined the simple ink trap width field in the toolbox. The value comes Font Info > Font Dimensions > Ink trap width but you can temporarily change it. Simple ink traps are created once, and you can edit each of them later by simply moving the two nodes. You can use Smart Corners to create smart ink traps that are updated dynamically. Use Font Info to change the width of existing smart ink traps and of future simple ink traps.
Transformation tool context menus
The toolbar contains three transformation tools: Rotate (R), Scale (S) and Slant (D). New Click the tool icon in the toolbar, or tap or hold its shortcut key, then right-click the canvas: the context menu opens where you can perform additional operations related to the transformation.
The fourth transformation tool is Tools > Free Transform (CmdT CtrlT, not available from the toolbar) that allows you to perform scaling, rotation, slanting and envelope transformations visually. With the Contour tool active, you can also double-click a contour selection to activate Free Transform.
The transformation tools work in two modes:
- Container transformation: If you activate a transformation tool from the Element tool, the transformation indicators will be green, and FontLab will apply a live (non-destructible, reversible) transformation to the element (or elements selected with the Element tool). Container transformation visually affects the content, but the underlying coordinates of all contours inside an element remain unchanged.
- Content transformation: If you activate a transformation tool from anywhere else, the indicators will be blue, and FontLab will immediately apply the transformation to element content (selected paths or all contours of the element). When FontLab performs content transformation, it rounds point coordinates to integers if rounding is specified in Font Info.
Note
Container and content transformations have the same effect on components.
Rotate tool (R) context menu
New As with the other transformation tools, the Rotate context menu operations work on the container (active element(s)) or the content (selected paths or all contours), depending on what tool was last active.
- Rotate 90°: perform counterclockwise rotation by 90°, same as tapping the R key multiple times.
- Rotate 180°: perform rotation by 180°.
- Flip Horizontal: swap left and right sides (mirror along the vertical axis), same as W tap.
- Flip Vertical: swap top and bottom sides (mirror along the horizontal axis), sale as E tap.
- Free Transform: access the container (green) or content (blue) Free Transform controls around the selection.
- Open Transform Panel: perform additional transformations numerically.
Scale tool (S) context menu
New The context menu for container Scale includes Same Width and Same Height, same as the menu commands in Element > Align.
New The context menu for content Scale includes Same Width, Same Width Only, Same Height and Same Height Only, same as the menu commands in Contour > Align Points.
Slant tool (D) context menu and Slant by Italic Angle
New The context menu for Slant includes the Slant by Italic Angle, which is also accessible as Tools > Transform > Slant by Italic Angle. If your master has a non-0 italic angle in Font Info > Font Dimensions, Slant by Italic Angle will slant the selected paths or all contours (when slanting the content) or the selected elements (when slanting the container) by that angle.
To slant some contour selections in the opposite direction, temporarily modify Font Info > Font Dimensions > Italic angle.
New The context menu also includes the menu items from View > Italic Angle, where you can control how the grid and sidebearings react to the non-0 italic angle of the master.
Consistency & precision
Multi-selection of guides
New If you select multiple guides, you can now change some properties of all selected guides in the Guides panel. Previously, the panel only showed properties of one of the selected guides.
Numeric scaling with Selection Frame
If View > Measurement > Stems or Auto-meter for stem widths in the lower section of the View panel is turned on, and the View > Selection Frame is turned on, the selection frame shows a width and a height, and you can edit these dimensions to perform scaling.
If these dimensions are visible, you can click one of the 8 selection frame handles to declare it the transformation origin, and selection will scale from that transformation origin. New The transformation origin is shown in blue.
Magnet tool (U) context menu
New Click the Magnet icon in the toolbar, or tap or hold U and right-click the canvas: the context menu opens where you can choose one of several operations relevant to hints and power guides:
- Add Power Guides: create element guides and link nearby glyphs to them, allowing you to make mesh-like modifications to the entire glyph structure
- Unlink Power Guides: unlink nodes from guides
- Autohint: automatically create PS hints for the current glyph layer
- Remove Hints: remove all hints from the current glyph layer
- Link Hints to Nodes: link the hints to the nodes, so that if you move a node, the hint adjusts
- Unlink Hints: make the hints independent of nodes, like in the actual OpenType PS fonts
Guides tool (G) context menu
New The Guides tool in FontLab 8.4 now has a regular context menu in addition to the previously-available drag context menu.
Regular Guides context menu
New Click the Guides icon in the toolbar, or tap or hold G and right-click the canvas: the context menu opens where you can choose one of several operations relevant guides and anchors:
- Add Anchor: create an automatically-named anchor in the place where you right-clicked
- Add Named Anchor: create an custom-named anchor in the place where you right-clicked or in one of the predefined position (see below for details)
- Remove Anchors: remove all anchors in the glyph layer
- Add Guide: if you have two nodes selected, add a glyph guide that goes through them, otherwise inactive
- Remove Element Guides, Remove Glyph Guides, Remove Font Guides: remove guides of a specific type
- Add Power Guides, Unlink Power Guides: same as in the Magnet tool context menu
Drag Guides context menu
With the Guides tool active, hold the right button (or hold Ctrl and hold the left mouse button) and between any two positions on the canvas. Release the button: an alternative context menu opens where you can choose operations relevant to the distance you’ve dragged:
- Add Vertical Guide at 50%: add a vertical glyph guide in the middle of the distance you’ve dragged
- Add Vertical Guide at 100%: add a vertical glyph guide at the end of the distance you’ve dragged = Add Vertical Guide at 200%: add a vertical glyph guide at double the distance you’ve dragged
- Add Horizontal Guide at 50%, …100%, …200%: add a horizontal glyph guide in the middle or end of the distance you’ve dragged, or at double the distance
- Add Slanted Guide: add a glyph guide that precisely follows the distance you’ve dragged
- Add Anchor: create an automatically-named anchor in the place where you finished dragging
Hints
If you have a composite glyph and decompose it or export the font to OpenType PS, FontLab now:
- New Recursively inherits hints from components, so hints in components made out of components get imported.
- New Removes duplicate hints of identical location and thickness, which may have originated from different components, for example duplicate ghost hints from components of a ligature glyph.
Build & assemble
Convert contour selection to component or elements
If you make a contour selection (partial or entire contours), you can easily make these selections re-usable in several ways.
Convert contour selection to new glyph and use it as component
Choose Contour > Convert > To New Component from the menu or New right-click and choose Selection to New Component from the context menu.
In the dialog, you can enter the name of the new glyph into which the selection will be pasted, and optionally choose if the new component source glyph should be marked as non-exportable.
FontLab cuts out the contour selection, pastes it into the new glyph, and in the current glyph inserts the new component at the same location.
FontLab always performs the conversion on all matching masters.
Note
By convention, if you plan the new glyph to be non-exportable, you can also start its name with a
_, but this is not mandatory.
Convert contour selection to new element
Choose Contour > Convert > To New Element from the menu or New right-click and choose Selection to New Element from the context menu.
In the dialog, you can optionally enter the name of the new element. If you enter a name, you can place a reference to that element into other glyphs using Element > Reference > Add Reference or using the Elements panel.
In the dialog, you can choose if FontLab should perform the conversion on the current master or on all matching masters.
FontLab cuts out the contour selection, and pastes it as a new element at the same location.
Note
Element names are unrelated to glyph names, but by convention you can choose element names that are distinct from glyph names, using suffixes or prefixes like
UC.seriftopor so.
Scale elements/components to same width or height
New You can now scale elements/components to a desired width or height.
Scaling to largest element/component
If you select several elements (with Element tool) or components (with Element or Contour tool), you can use the menu commands in Element > Align to scale all selected elements/components to the largest dimension:
- New Same Width proportionally scales each element/component to the largest width
- New Same Height proportionally scales each element/component to the largest height
FontLab scales each element/component around its center.
Scaling to advance width or font dimension
If you select one element or component:
- New Same Width proportionally scales the element/component to the advance width
- New Same Height proportionally scales the element/component to closest font dimension (descender, x-height, caps height or ascender)
Add named anchor
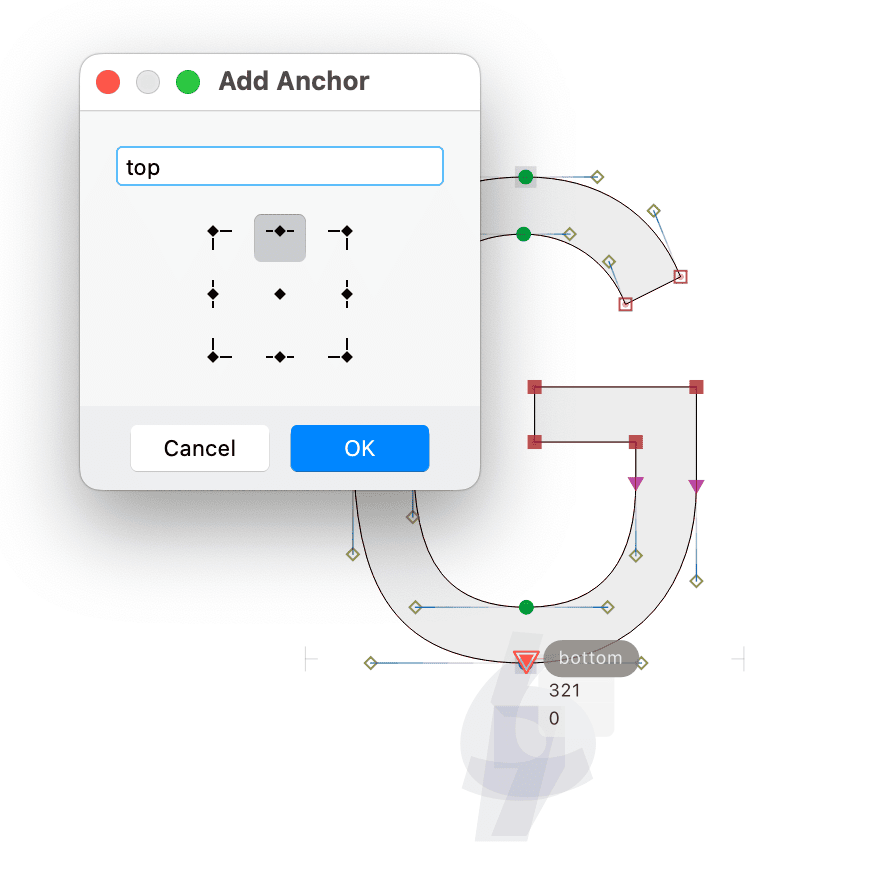
New To add an anchor in the current glyph (in the Glyph window) or in the selected glyphs (in the Font window), choose Glyph > Add Named Anchor, then type in the anchor name, and choose one of the predefined positions of the anchor.
Or activate the Guides tool, right-click and choose Add Named Anchor from the context menu. In this case, none of the predefined positions is selected, and if you don’t choose one, FontLab will add the anchor where you’ve right-clicked to open the context menu.
FontLab adds the anchor on all masters if Edit > Match Edits is turned on, otherwise on current master.
With a predefined position, if View > Italic Angle is active (set to Apply to Metrics or Apply to Metrics and Grid), FontLab uses the master’s italic angle to determine the anchor position (left or right bounds, or center.
Detach serifs
If you have a serifed typeface that uses simple contours, you can open a glyph such as H or n, select the top or bottom portions of vertical stems that contain bilateral serifs (serifs on both sides of the stem). You can select one or more such paths, like all 4 “serif areas” of a serifed H.
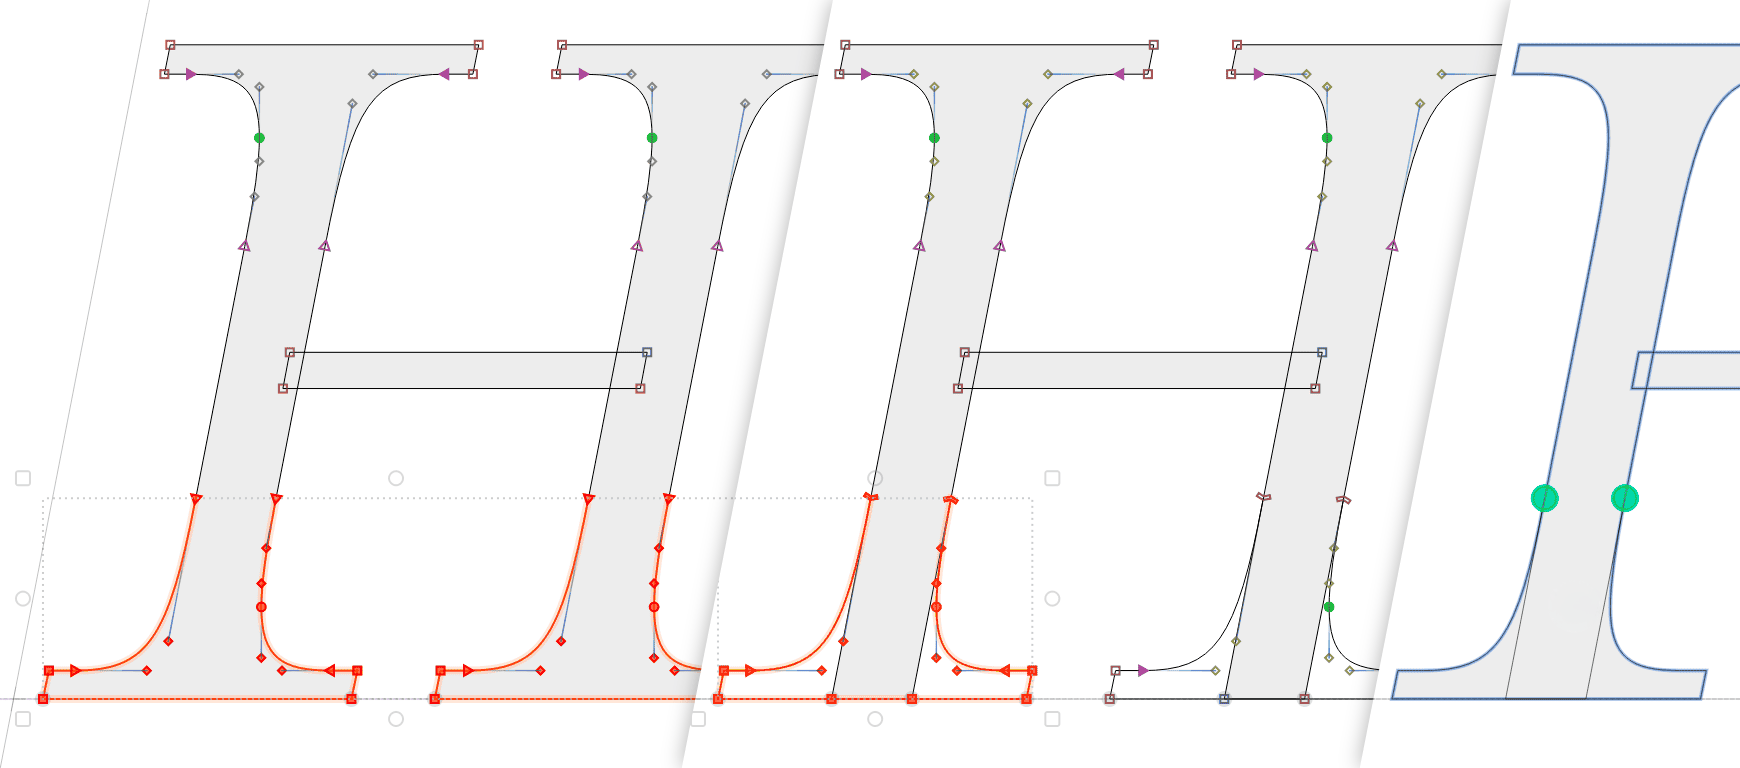
New Choose Contour > Detach Serifs, and FontLab will cut out the selection and paste it as a new contour, and will smartly extend and close each stem as if it was a sanserif stem. This also works with italic serifed fonts.
Select each new serif contour and use Element > Glue Selection to dynamically merge it back into the stem. You can also use Selection to New Component to create a skin source glyph and then use it with the Skin filter.
Note
The automatic serif detachment works best on fairly regular bilateral serifs on vertical stems. The top or bottom horizontal “base” must be a single segment. It does not work with serifs on horizontal stems (like the middle of
E), or with unilateral (one-sided) serifs (like at the top ofn,lorr). It works with italics, and works on all matching masters if Edit > Match Edits is turned on.
Skin filter
- New With the Skin widget, you can control the shift of the skin.
- New Fitting of the Cap skin is improved.
Metrics & kerning
Metrics operations in the widget
New In the widget fields related to glyph metrics, you can trigger certain operations. Turn on View > Widgets to see the widgets.
Sidebearing widget operations
New Open the local menu of a sidebearing widget field (hover over the field and click the ⋮ button). There, you can:
- Bind: convert a plain numeric value like
23into a bound sidebearing like=23. A bound sidebearing retains its value whenever you change the contour. - Unbind: convert a bound sidebearing into a plain numeric value
- Unlink: convert a metric expression like
nor|or=rsb("n")*1.2into a plain numeric value - Copy to Masters: copy the field content (numerical value or expression) into all masters
Advance width widget operations
New In the local menu (⋮) of the advance width widget, you can:
- Auto Space: automatically calculate the width
- Copy to Masters: copy the field content into all masters
Metrics in Glyph panel
New In the Glyph panel, you can click the Copy to Masters button next to the Advance width field to copy the field content (numerical value or expression) into all masters.
Families & variation
Axes, masters and layers: a recap
Font axes and font masters
In Font Info > Axes you can add a font axis that has a name, a 4-letter OpenType tag, and an axis code, which must be at least 2 letters (but can be any length). Use the + button to add a predefined or custom axis.
Then in the lower-left section of Font Info, you can add font masters, and in Font Info > Masters you specify the location of each font master on all font axes. There, you also need to click the blue dot to declare one font master as your main font master.
For example, if you add the wt font axis and have a Regular font master, by default that font master will have the axis location wt=400.
Note
FontLab has extended smart support for axes with certain codes:
wt(Weight),wd(Width) andop(Optical size). If you don’t want the built-in smartness, you can use different axis codes for these axes, for examplewghtfor Weight.
Glyph layers and their variable space location
Every glyph in your font can have multiple layers (at least one). A variable glyph layer is a layer that has a location in the font’s variable space, which is a list of coordinates, one per axis.
Every glyph layer has a name. If the layer’s name doesn’t match a font master name, by default it’s not variable, that is, doesn’t have a location in the variable space, and doesn’t participate in interpolation.
If the glyph layer’s name is the same as the name of a font master, the glyph receives (inherits) its variable space location from the font master. Not all glyphs must have layers that correspond to all font masters, but every glyph needs to have a layer that corresponds to the main font master.
If you turn on the Show layer properties toggle at the top of the Layers & Master panel, you can see and edit the variable location of the layer. If your font has the wt (Weight) axis, then the Location text field for the Regular layer shows a gray entry wt=400. It’s gray because the layer inherits the variable location from the Regular font master.
Glyph axes and font-less masters
You can easily assign, extend and override the variable location of the current glyph layer in Glyph window, and of the current layer of all glyphs selected in the Font window: use the axis=loc,axis=loc notation in the Location text field, or click the Select variable location button on the left.
In the Select variable location dialog, you can add the font axes, and then specify the location of the glyph layer on these font axes. If the glyph layer’s name matches the name of a font master, the location specified here will override the font master location.
In the dialog, you can also add additional (custom) glyph axes to glyphs. These axes are identified by a name, which is a least 2 characters long but can be longer (no spaces). Then you must specify the location of the layer on the glyph axes.
If you assign the variable location to a glyph layer in the Layers & Masters panel, that glyph layer becomes a “font-less master”. For all font axes that are not explicitly specified in the Layers & Master panel location, a font-less master inherits the location from the font master of the same name, or from the main font master if the layer’s name does not match any font master.
Define variable component sources
In FontLab, you can use any variable glyph as a “smart” variable component.
Font masters as variable component sources
For example, if your font has an op (Optical size) font axis, you can build size-reduced glyphs (like superscripts, subscripts or small caps) from components that point to an appropriate instance of your Optical size axis, and are, of course, scaled down appropriately.
Font-less masters as variable component sources
Or perhaps your font doesn’t have any font axes, but your f glyph has a custom fwidth glyph axis, where the Regular layer has a “normal” terminal the typical width, and the additional layer Regular.wide has a long and curvy f terminal.
In this case, you’d specify fwidth=0 as the variable location for the Regular glyph layer, and you’d specify fwidth=500 as the location for Regular.wide. You can pick any reasonable values you want, though FontLab’s user interface works best with values between 0 and 1000.
Control anchors in variable component sources
Let’s say your component source is variable along another axis (such as the wd or op for axes, or the fwidth glyph axis).
New Place an anchor with the same name as the axis code on every master of the component source glyph. Make sure these control anchors have a different position in each master. You can also use Glyph > Add Named Anchor to add the control anchors.
Add glyph variation
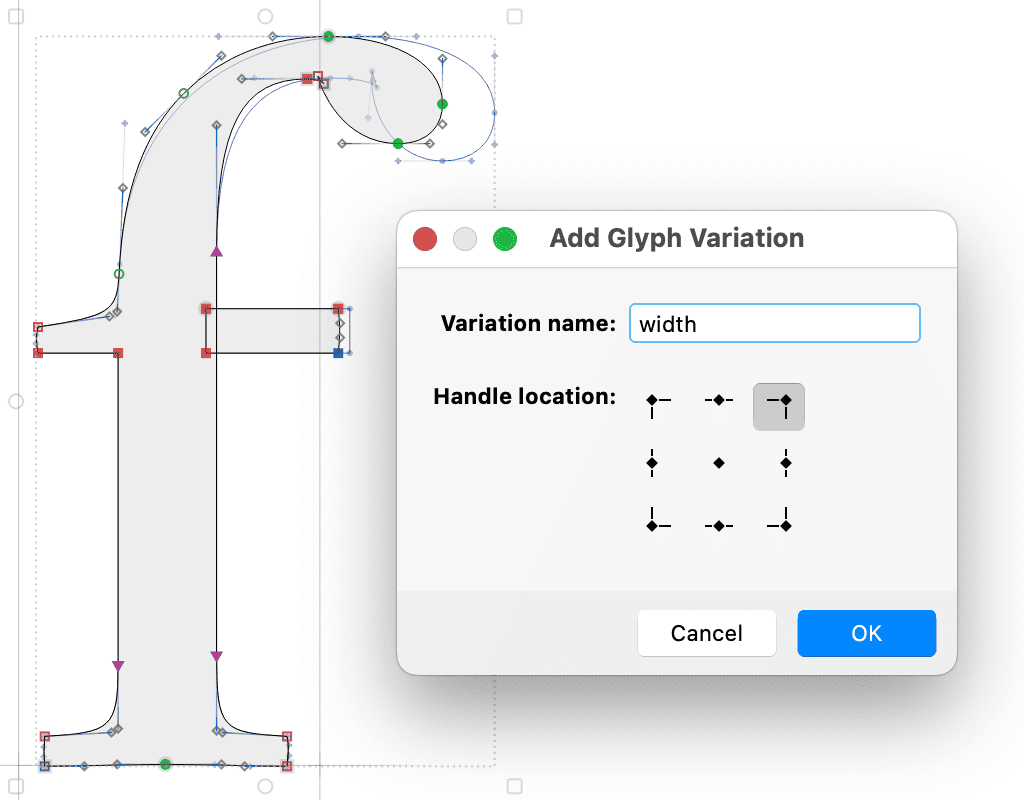
New In a component source glyph, you can now Glyph > Add Glyph Variation to quickly add a new font-less variation, intended for use as variable components:
- In the Variation name, enter the glyph axis name. FontLab will duplicate each existing master and append the axis name as the suffix to the new layers.
- In the Handle location section, choose the location of the control anchor that will be used as the instancing handle (see below for details). The name of the control anchor will be the same as the glyph axis name. FontLab will add that anchor to all existing and new masters. We recommend that you then move this anchor to a different place in each master.
Use variable components
You can use various techniques to build composite glyphs from components, like Glyph > Add Component or Font > Build Glyphs. Once you have a component in your composite glyph, and the component source is variable, click the component in the Glyph window and choose your desired instance — in one of several ways.
Select component instance dropdown
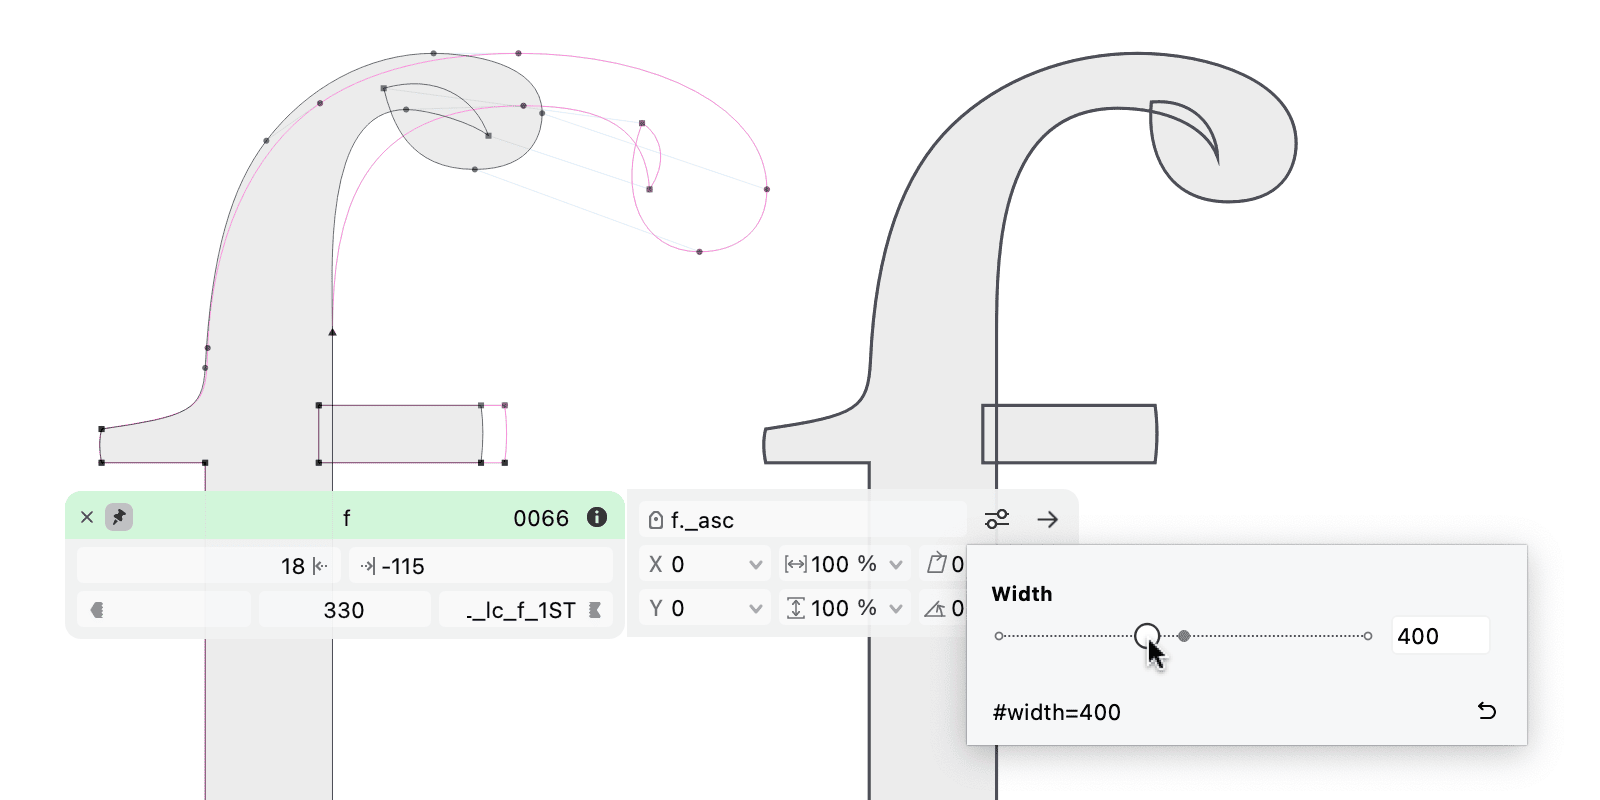
Click the “sliders” button ( ̥̄ ̱̊) to open the Select component instance dropdown. You can find the button:
- In the Component side widget. Turn on View > Widgets to see the widgets.
- In the Glyph window property bar. Turn on View > Control Bars > Property Bar to see the property bar.
- In the expanded properties section of the Elements panel. Turn on Show element properties at the top of the panel and then turn on the ^ icon (Expand properties) to see the expanded properties section.
In the Select component instance dropdown, you can instance the component, that is, choose your desired location of the component on all font and glyph axes. With the Reset to current layer button (↺), you can choose the instance that’s the same as the current master (in other words, make the component a “normal” component).
The dropdown also shows a read-only text representation of the location in #axis=loc,axis=loc format.
Component name or location text field
The expanded properties section of the Elements panel has a Component name or location text field. There, you can enter the text representation of the location in #axis=loc,axis=loc format. You can also enter a master name (like Bold) to get the component instance that corresponds to that master.
Weight instancing handle
New Let’s say your component source is variable along the wt (Weight) axis — so you have a wt font axis or the glyph has a wt glyph axis. Add such a component to the composite glyph, select it, and hover over its filled area.
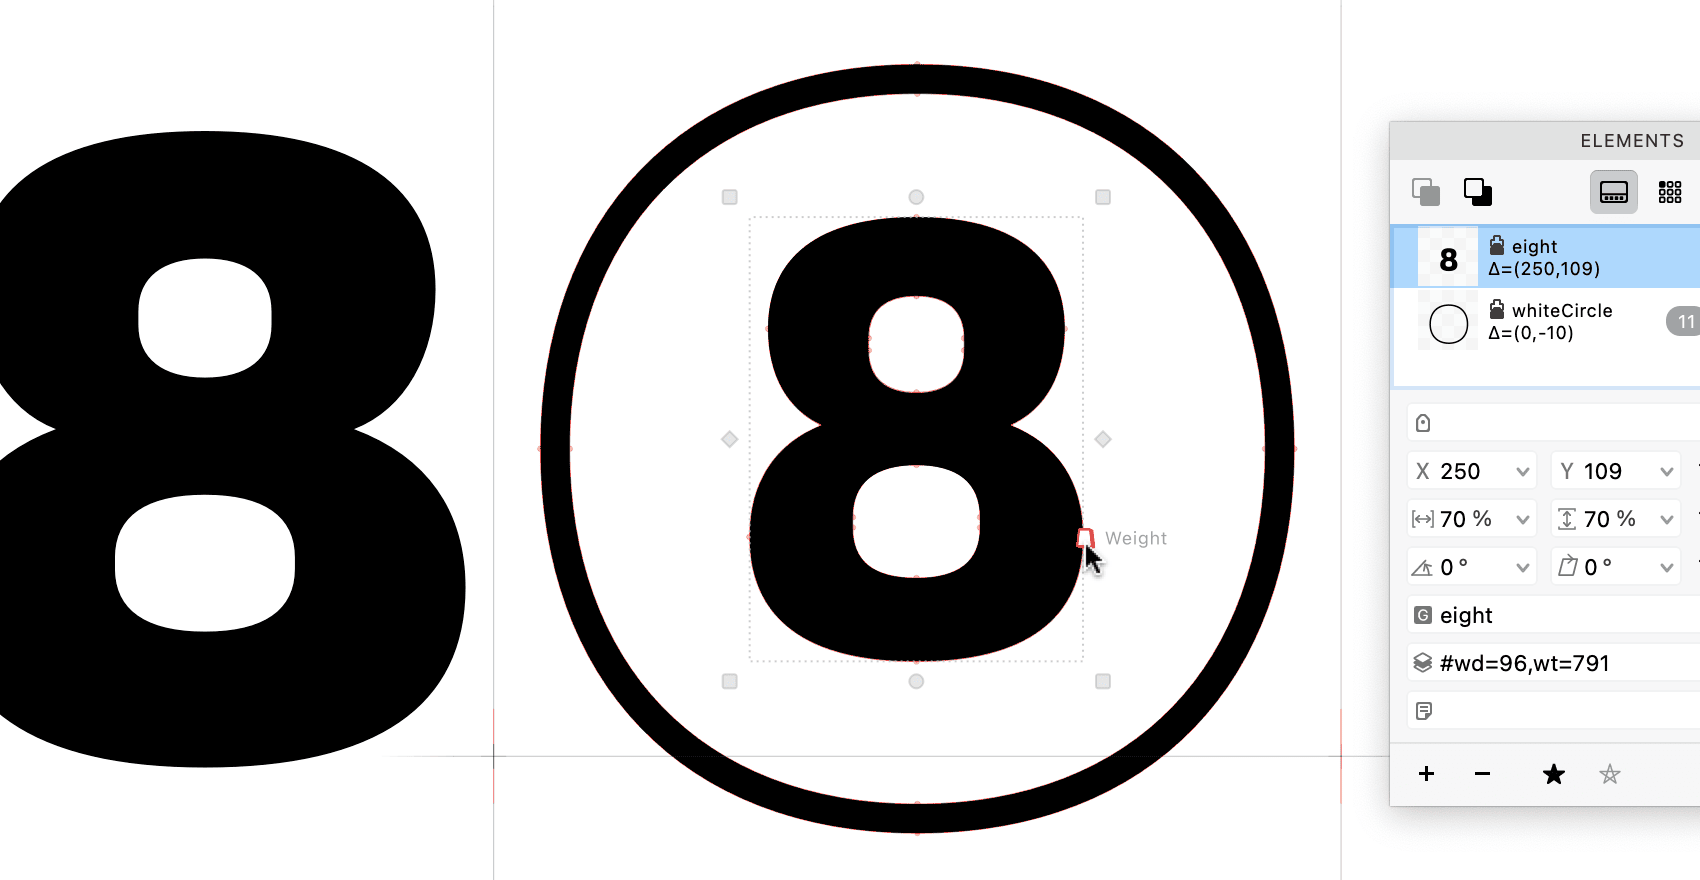
FontLab then shows an automatic Weight instancing handle (red trapezium labeled Weight) near the rightmost extremum node.
Drag the handle to choose your desired instance of the component along the Weight axis. Hold Cmd Ctrl or turn on the Contour lever toggle in the Contour toolbox to drag with increased precision.
To reset the instance, use the Select component instance or the reset button in the expanded properties section of the Elements panel.
Handles based on instancing anchors
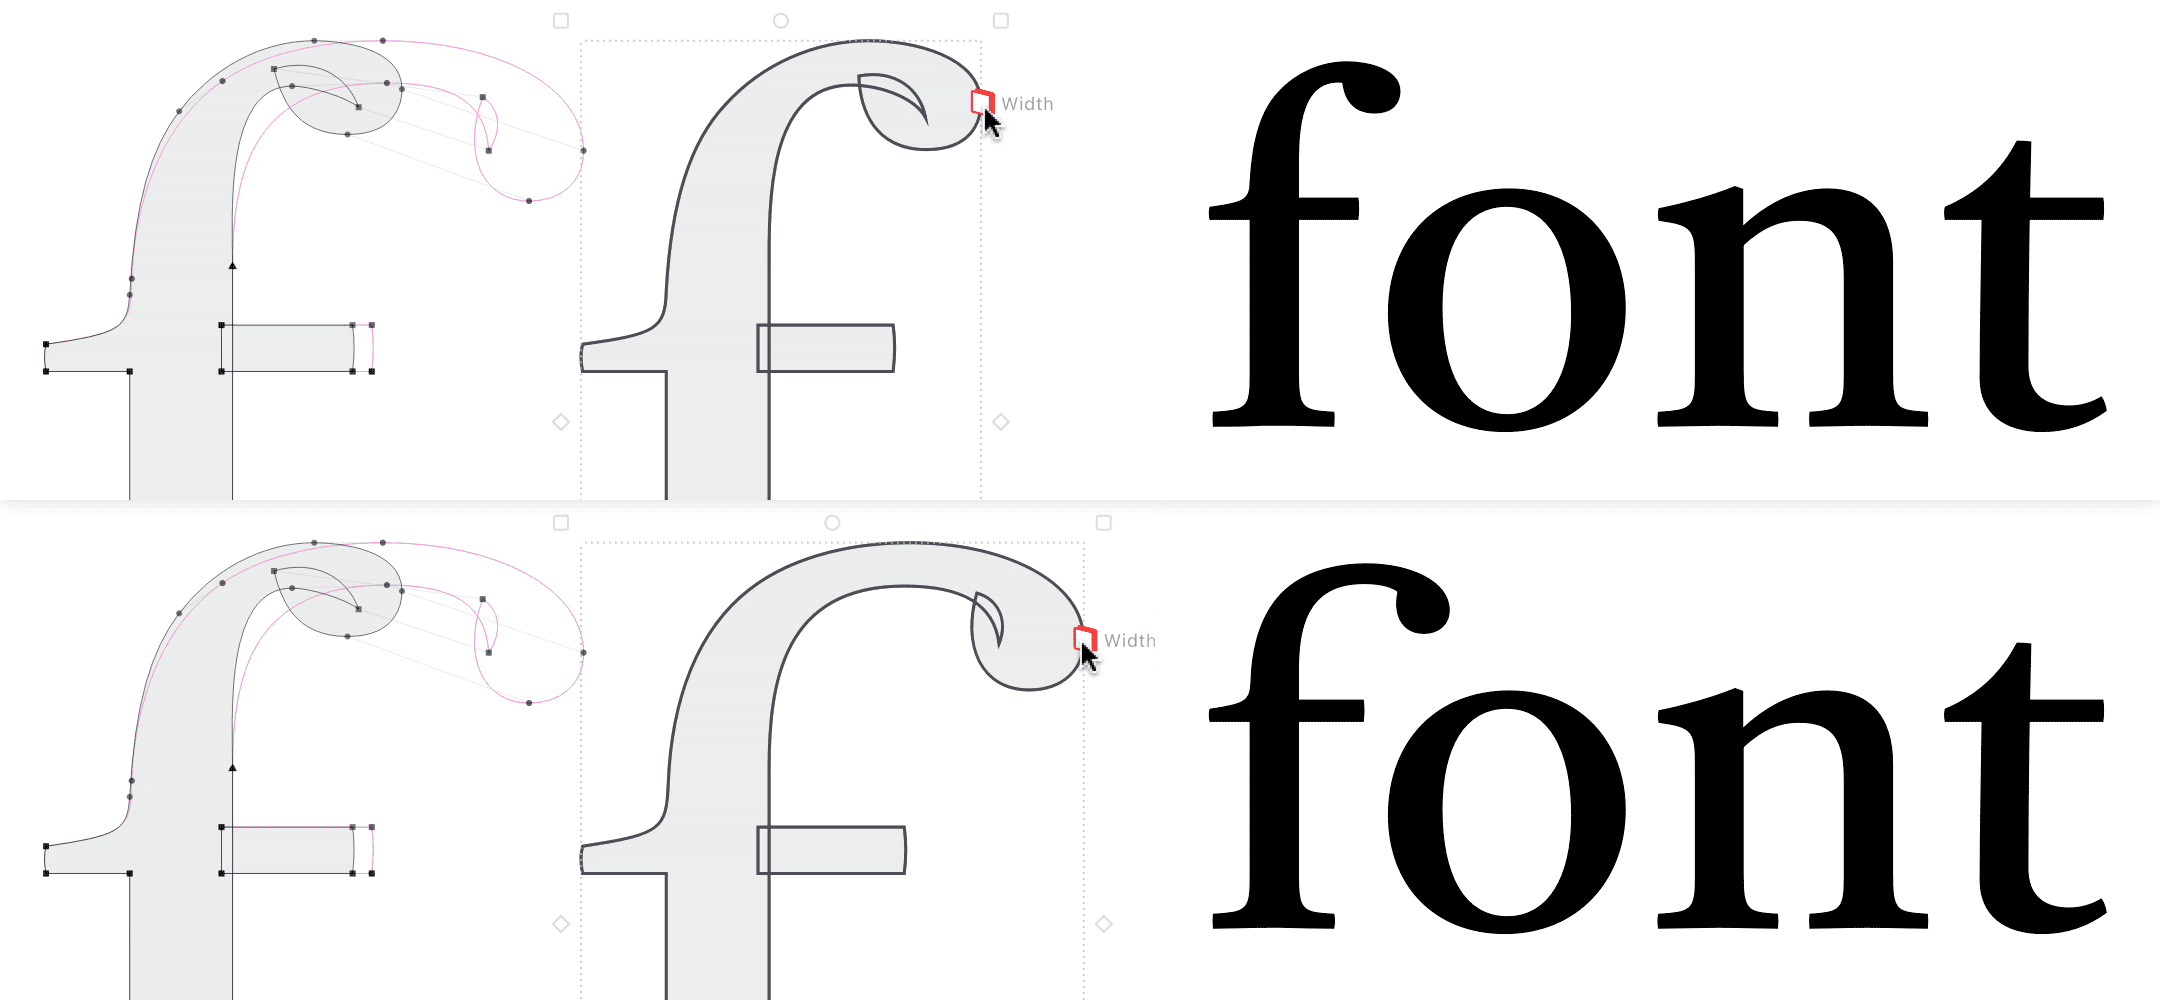
New Add a component that has instancing anchors to the composite glyph, select it, and hover over its filled area. FontLab then shows an instancing handle (red rhombus labeled with the instancing anchor’s name).
Drag the handle to choose your desired component instance. Hold Cmd Ctrl or turn on the Contour lever toggle in the Contour toolbox to drag with increased precision.
Note
The Weight and anchor-based instancing handles are red by default, like the wireframe of the special
#instancelayer. Click the Layer preview color icon for the#instancelayer in the Layers & Masters panel, and change its color — and the color of the instancing handles will change as well. If you don’t see the#instancelayer, make sure that your masters match, and that Preferences > Variations > Show #instance layer is turned on.
Selection Frame instancing handles
If you turn on View > Selection Frame, a subtle frame with 8 scaling handles appears around any selection, such as:
- selection of nodes, paths and contours done with Contour tool
- selected element with Element tool
- selected component with Contour or Element tool
- selection of multiple elements or components with Contour or Element tool
The corner handles of the selection frame are shown as squares, the horizontal and vertical handles are shown circular. The handles are filled if any of the selected elements has a live transformation applied, otherwise they’re transparent.
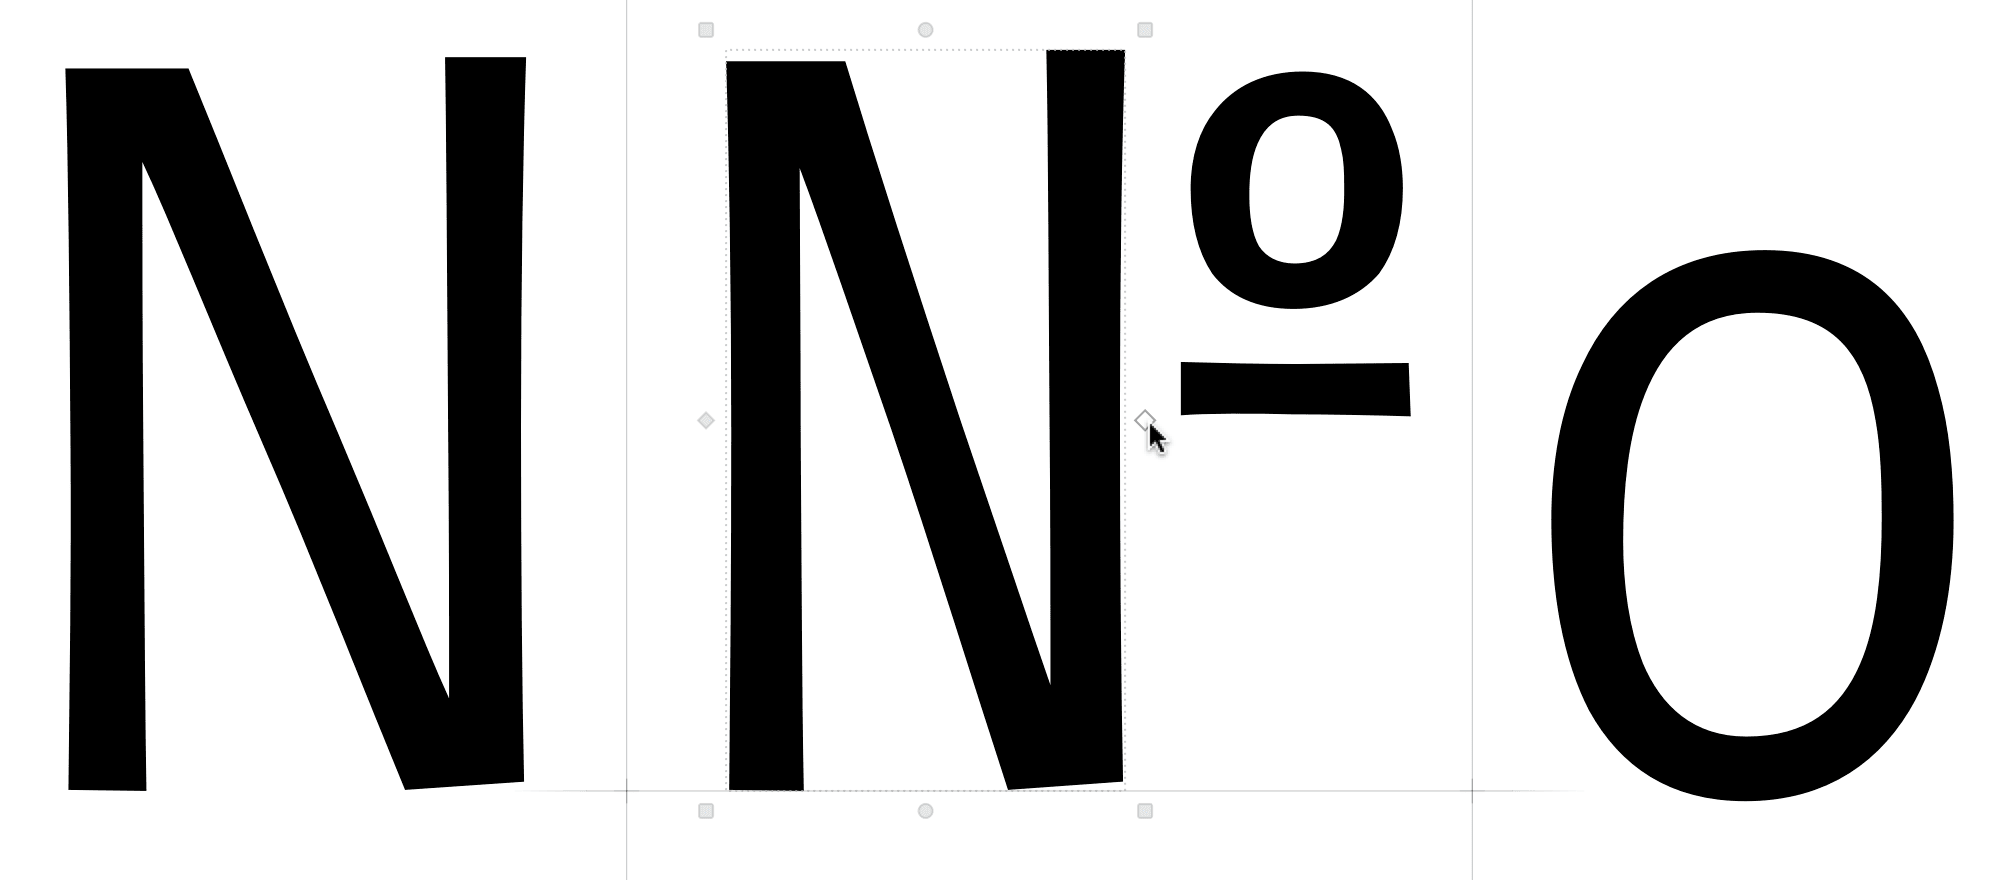
New If your component source is variable along the wd font axis or along the width glyph axis, and you select the component, the horizontal (left and right) handles of the selection frame become instancing handles that are shown rhomboid (⬦). Drag these handles to choose your desired component instance along the Width axis.
If your component source is variable along the height font or glyph axis, you can drag the top and bottom rhomboid instancing handles to choose your desired component instance along that axis.
The Selection Frame instancing handles work best if the component source is variable along both the width and the height axis. Then you can use both the side handles and the corner handles to choose your desired instance.
If the component source is variable in only one dimension (width or height), and you drag a Selection Frame instancing handle for that dimension, FontLab uses geometric scaling to keep the opposite dimension constant.
Note
To vary the width or height without the geometric compensation, use the Select component instance dropdown, or define instancing anchors and use the anchor-based instancing handles. To geometrically scale a component that’s variable along width or height, activate Tools > Free Transform.
Adjust
Remove layer content action
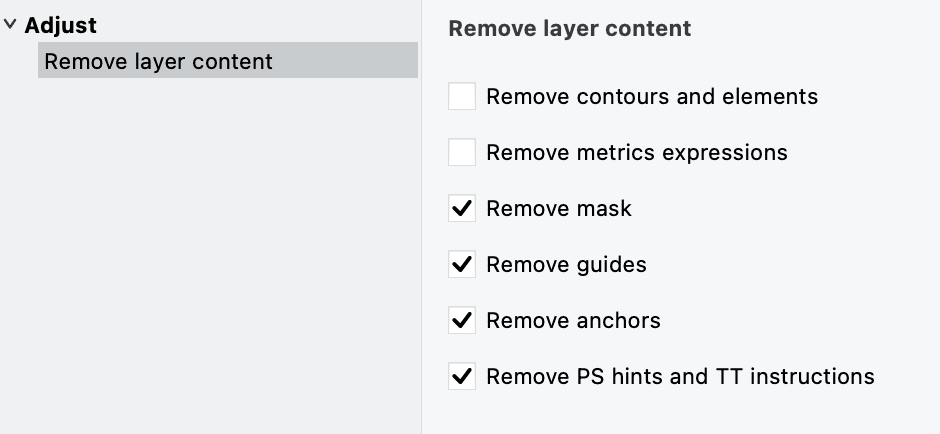
New The Tools > Actions > Adjust > Remove layer content action is much more granular. You can choose to selectively remove contours & elements, metrics expressions, mask, guides, anchors or hints.
Glyphs & fonts
Font Info
New In the Font Info pages Family Dimensions and Font Dimensions, the sliders associated with the numerical dimension boxes now go from 0 to 2×UPM or from –2×UPM to 2×UPM. Previously their range was unnecessarily huge (40,000). You can enter values outside these ranges numerically.
Font vendor database
New FontLab 8.4 ships with an updated vendor.dat file that is responsible for mapping between the 4-letter codes and the human-readable vendor names in Font Info > Creator > Vendor.
Font window
If a glyph contains elements that have live transformations applied (like live slant or live rotation), the Properties section of the Font window sidebar will list such glyph in the Transformed category, and the glyph will have the transformed virtual tag applied and visible in the Virtual tags section of the Classes panel.
Unicode Selectors (UVS)

New FontLab 8.4 supports Unicode Variation Selectors (UVS), special Unicode characters that are inserted into the text after the base character. They modify the appearance or behavior of the preceding character in a standardized way. The Unicode Standard defines a strict set of valid variation sequences.
To avoid confusion with “variation” that refers to variable glyphs, FontLab uses the term “Unicode Selectors” when referring to UVS.
Unicode Selectors are used with CJK ideographic sequences, other standardized UVS sequences for mathematical characters, Egyptian hieroglyphs, and certain Myanmar and Mongolian forms.
They are also used with specific emoji: a character followed by the VS15 selector (codepoint U+FE0E) indicates that the character should be displayed in the text style (monochrome). The same character followed by VS16 (U+FE0F) indicates that it should be displayed in the emoji style (colorful).
Glyph panel
New In the Glyph panel, you can specify one Unicode Selector sequence for any glyph.
Open the local menu (click the ⋮ button) in the Glyph Unicode codepoint(s) text field:
- If the glyph does not have a Unicode Selector sequence assigned, you can choose Add Unicode selector, which will open the Unicode Selector section of the panel, right below the field.
- If the font contains a glyph that represents a Unicode Selector sequence for the current glyph’s codepoint, the sequence will appear in the list. Click it to navigate to that glyph.
In the Unicode Selector section, you can:
- Specify one base codepoint of the Unicode Selector sequence, or use the local menu (⋮ button) to navigate to the default glyph of that codepoint.
- Choose the numerical value of the Unicode Selector (1 to 48).
- Specify if the Unicode Selector is default (see below).
- Remove the Unicode Selector sequence.
Unicode Selectors in Font window
New The Categories section of the Font window sidebar contains the Unicode Selectors category. You can use it to filter the Font window to only show glyphs that have a particular Unicode Selector assigned, or none.
varsel virtual tag for Unicode Selectors
New If any glyphs have Unicode Selector sequences specified, the virtual tags section of the Classes panel lists them under the varsel virtual tag.
Default Unicode selectors
In OpenType fonts, there are two kinds of Unicode Selector sequences:
- “Non-default sequence” maps from a Unicode codepoint and a selector codepoint to a glyph. This is a bit like OpenType features such as
ccmp. - “Default sequence” maps from a Unicode codepoint and a selector codepoint to a Unicode codepoint. This mapping happens purely on the codepoint level.
In the FontLab UI, you associate a Unicode Selector sequence with a “target” glyph — and that association will work if you don’t turn on the Default Unicode selector toggle.
If you turn on the Default Unicode selector toggle and export an OpenType font, FontLab will ignore the fact that the sequence has been defined in a particular “target” glyph. Instead, FontLab builds a mapping in the cmap table that maps the base codepoint of the Unicode Selector sequence plus the selector to the base codepoint itself. So if you’re specifying a default Unicode Selector sequence for a particular base codepoint, it’s best to do it in the glyph that actually has that codepoint assigned.
Classes
Classes panel
New If you drag-drop glyphs within the Classes panel, FontLab now shows a visual indicator.
Test & text
Quick preview and panning in Glyph window
When you’re working in the Glyph window, you can hold the ` key to temporarily enable Quick preview: all Glyph window details vanish and you only see the fully rendered text.
New With Preferences > Editing > Quick preview also when you hold Space key you can now choose how Glyph window behaves if you hold the Space key:
- If the setting is turned on, and you hold Space, you use the mouse pointer to pan around the Glyph window, which is rendered in quick preview mode. This is how previous FontLab versions worked.
- If the setting is turned off, and you hold Space, you use the mouse pointer to pan around the Glyph window, but the window content shows all details.
Kerning, underline and strikethrough in Preview panel
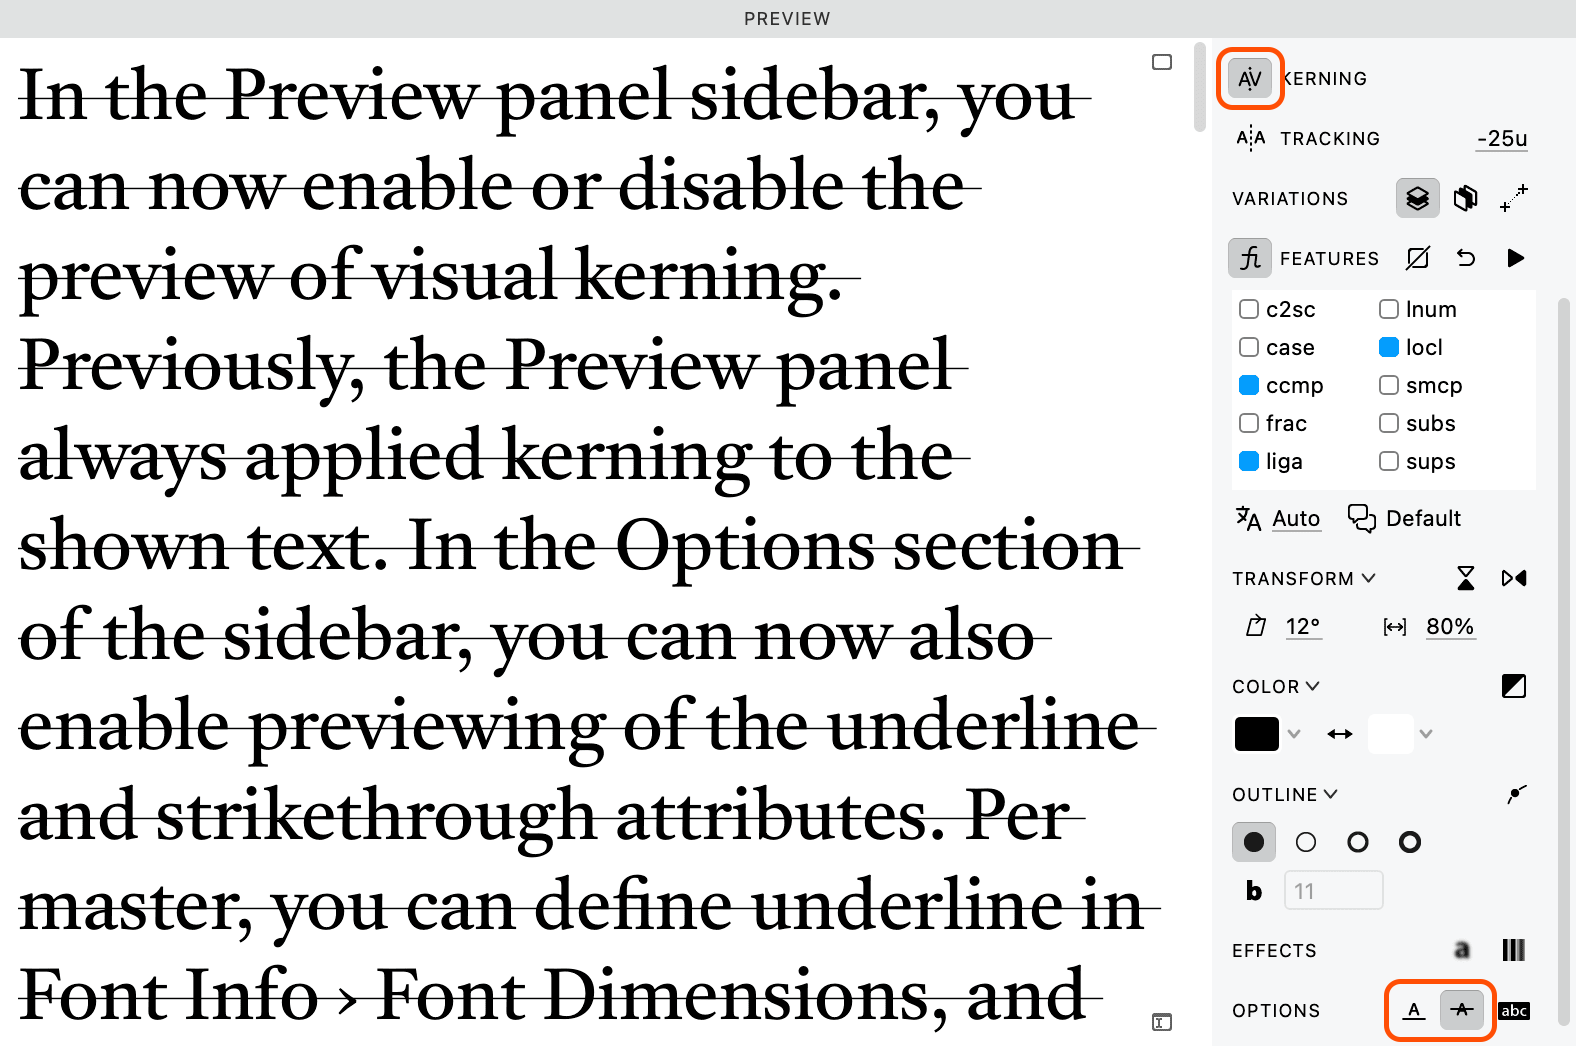
New In the Preview panel sidebar, you can now enable or disable the preview of visual kerning. Previously, the Preview panel always applied kerning to the shown text.
New In the Options section of the sidebar, you can now also enable previewing of the underline and strikethrough attributes.
Per master, you can define underline in Font Info > Font Dimensions, and strikethrough in Font Info > Other Values.
Unicode Selectors in glyphtext
In all places where you can enter glyphtext (such as the Glyph window content sidebar or text bar, or the Preview panel text bar), you can enter Unicode selectors using the codepoint notation (\uNNNN) or the New \:NN notation.
For example, in an emoji font that contains both the text and the emoji digits, typing 0 or \u0030 would produce the text digit “0”, and typing 0\:16 or \u0030\:16 or 0\uFE0F or \u0030\uFE0F would produce the emoji digit 0 (“0️”).
Note
You will see the result of the Unicode Selectors processing only if the Glyph window (sidebar or property bar) and the Preview panel (sidebar) have the Apply OpenType features and Unicode text processing toggle (fi ) turned on.
Formats
Unicode Selectors and cmap format 14
New FontLab 8.4 now reads and exports the OpenType cmap table format 14, which supports Unicode Selectors.
Scripts & extensions
Python API
- New When you create anchors with
flLayer.createAnchor(), you can now specify the anchor name and location. - New With
DlgPythonInput, your script can ask for user input of a value.
Bug fixes
-
Fix The Toolbox and the property bar now show the same active Brush sub-tool when you toggle the sub-tools. The Brush Toolbox no longer lets you deactivate all sub-tools (this used to be possible but means the same as the Simple Brush sub-tool being active).
-
Fix If you open a bitmap font in BDF format (for example, one that you created in BitFonter), FontLab converts the pixels into a fused contour made from squares. When doing this, FontLab no longer duplicates the start points.
https://github.com/Fontlab/fl/issues/7792 -
Fix If the Text Shape element is active, the button Reset in the Property bar removes the element. Previously, the button behaved the same way as the Expand button.
-
Fix FontLab no longer hangs when you restart it after a specific crash.
-
Fix FontLab correctly imports double-encoded characters from the
.glyphsformat.https://github.com/Fontlab/fl/issues/7736 -
Fix If you export font instances to the VFC format, FontLab now includes the appropriate kerning information.
https://github.com/Fontlab/fl/issues/7722 -
Fix Quick Measurement works for glyphs with auto layers again.
https://github.com/Fontlab/fl/issues/7612 -
Fix The algorithm of the Edit > Find Outline feature was improved.
-
Fix FontLab no longer messes layers when performing Edit > Paste Special “as component” in a multi-master font.
https://github.com/Fontlab/fl/issues/7693 -
Fix Slanted guides no longer lose their slant after you change their properties in Font Info.
https://github.com/Fontlab/fl/issues/7694 -
Fix FontLab no longer fails to correctly create a horizontal font guide with FontInfo > Guides.
-
Fix In auto layers, you no longer can edit edit anchors.
https://github.com/Fontlab/fl/issues/7696 -
Fix FontLab no longer fails to export fonts in the WOFF format.
https://github.com/Fontlab/fl/issues/7699 -
Fix If you have multiple glyphs selected in Font window, the Glyph panel displays a
multipleplaceholder in kerning class fields to indicate discrepancies, but if you assign a class there, FontLab no longer creates a kerning class namedmultiple.https://github.com/Fontlab/fl/issues/7701 -
Fix FontLab produces correct curve direction if you use Element > Brush & Stroke > Expand Stroke.
https://github.com/Fontlab/fl/issues/7725 -
Fix FontLab no longer deselects a text sticker if you’re editing it.
https://github.com/Fontlab/fl/issues/7708 -
Fix If Preferences > Operations > New glyphs > If possible: add componets is turned turned on, FontLab uses internal recipes to build composite glyphs. FontLab no longer adds the
spacecomponent to spacing marks (acute,ring,ogonek,dieresis) if you create them by double-clicking on their cells in the Font Window.https://github.com/Fontlab/fl/issues/7704 -
Fix FontLab no longer fails to render glyphs in Preview and in the Glyph window if the
ccmpfeature is applied to text.https://github.com/Fontlab/fl/issues/7705 -
Fix If you use Set Start Point in the node context menu, FontLab now sets the matching node as start point in all matching masters if Edit > Match Edits is turned on.
https://github.com/Fontlab/fl/issues/7706 -
Fix In the Add Component dialog, the Apply to all masters toggle by default matches the state of Edit > Match Edits.
-
Fix Sometimes cutting a contour with the Knife tool might make extra unnecessary elements. This is fixed now.
-
Fix If you import fonts from a TTC file and then export them as OpenType fonts, FontLab no longer generates file names with the time stamp. It uses PostScript font names instead.
https://github.com/Fontlab/fl/issues/7709 -
Additional bug fixes.