Introduction»
About this Guide»
This user guide is updated continuously. Everybody should read the FontLab User Interface article, particularly to learn about how to manipulate FontLab’s Panels, and how we differentiate between tapping versus holding keys for tools keyboard shortcuts.
What’s new»
The Release Notes page contains release notes of the public builds.
Preface»
The development of the digital font technology makes it easier for end-users to do text processing, typesetting and layout without sacrificing the typographic quality and logical correctness of the text. But nothing gets lost in Nature: using fonts is getting easier but developing them is more complex. Apart from just drawing letters, a type designer needs to know about encoding, hinting, layout features and various parameters that need to be set inside of a font.
FontLab 7 is an application that assists the font developer in all that: a digital font editor for Mac and Windows that allows the designer to create professional-level fonts from start to end. With FontLab 7, anyone can create, open, modify, draw, space, kern, hint and export desktop, web, color and variable OpenType fonts for any Unicode writing system, from Latin, Cyrillic and Greek, to Arabic, Hebrew and Indic, all the way to Chinese, Japanese, emoji, symbols and icons.
Field-proven by the makers of massive variable fonts and large font families like Grand Gothik, Circe Slab, Fact, Bolyar Sans, Graduate and Science Gothic, of revivals like CAL Bodoni, of decorative one-offs like Wanchy, of branding projects like Optician Sans, and of color OpenType fonts like the titling font for the Joker movie, FontLab 7 is a modern font editor for established type designers and font developers, and for graphic designers and illustrators who wish to customize existing fonts or create their own type designs.
-
Type design is about cleverness. FontLab 7 greatly reduces the technical complexity of smart OpenType font creation. It automatically generates OpenType Layout features for small caps, ligatures, stylistic sets, fractions, figure styles and other advanced typographic substitutions. No coding required!
-
Type design is about precision. Hold Cmd (Mac) or Ctrl (Windows) to activate precision dragging of nodes and handles and make fine contour adjustments without having to zoom in. FontLab 7 brings numerous enhancements to its unmatched vector editor, but if you prefer to draw in Affinity Designer or Sketch, you can now paste or import PDF vector artwork. Pasting and import of Adobe Illustrator and SVG drawings is also refined, and the redesigned Autotrace lets you turn bitmap images into smooth, beautiful vector contours.
-
Type design is about consistency. FontLab 7 lets you find and fix inconsistencies and problems that are hard to spot. With new thickness measurement, it’s easy to make perfectly even diagonal stems or glyph strokes that precisely follow the typographic contrast. FontLab’s unique built-in FontAudit quality checker finds and automatically equalizes stems that are uneven within one glyph or across glyphs. New Audit Kerning identifies and fixes kerning combinations that cause visual clashes.
-
Type design is about habits. FontLab 7 brings back FontLab Studio 5 fan favorites, like handles in Mask, or Font Info copy-paste.
-
Type design is about whitespace as much as about what’s drawn. Tapping the semicolon key lets you quickly autospace a glyph as you draw or edit it. FontLab 7 slashes the time-consuming kerning process: a built-in pair list sorted by priority; instant creation of kerning classes to kern some glyphs like other glyphs; and the ability to create “both-sided” kerning classes.
-
Type design is about scope. FontLab 7 fully embraces variable OpenType fonts, with new CFF2 support, intermediate glyph masters and conditional glyph substitution. Designing variable fonts and large font families is now simpler, as you can view and edit multiple masters at the same time.
-
Type design is about reducing repetition and increasing interchange. FontLab 7 can run multiple actions in a sequence, and lets you batch-rename glyphs and use different naming schemes. With the refined import and export of UFO3 and .glyphs formats and the new JSON-based copy-paste, you can effortlessly exchange font source projects with users of other apps. Designers of complex families can now install Vassil Kateliev’s TypeRig, a mighty batch-oriented plugin that supercharges FontLab’s already powerful handling of masters, metrics, guides and anchors.
FontLab 7 is an integrated type design and font-making solution. You can draw smooth, consistent glyphs; autotrace bitmaps; create overlaps; simplify paths; equalize stems; and scale outlines while keeping stroke thickness. You can draw in fractional or integer coordinates; see both numeric and visual measurements; and find & fix contour imperfections. You can space and kern in multi-line tabs or windows that feel like a text editor. You can create, open, extend, test and export font families, variable OpenType fonts, color fonts and web fonts for any Unicode writing system. And you can interchange with other font editing apps, and collaborate with their users.
In FontLab 7, we’ve made it easier to discover and learn about all this built-in functionality: move the pointer over a user interface element in FontLab 7 and hold F1, and the new Quick Help system shows a longer explanation.
FontLab Quick Start»
-
File > Open > Installed Fonts…
-
Pick a font from the list and click OK.
-
See Opening an Existing Font for more methods of opening fonts.
-
Change the Cols selector at the bottom of Font Window to fit your needs.
-
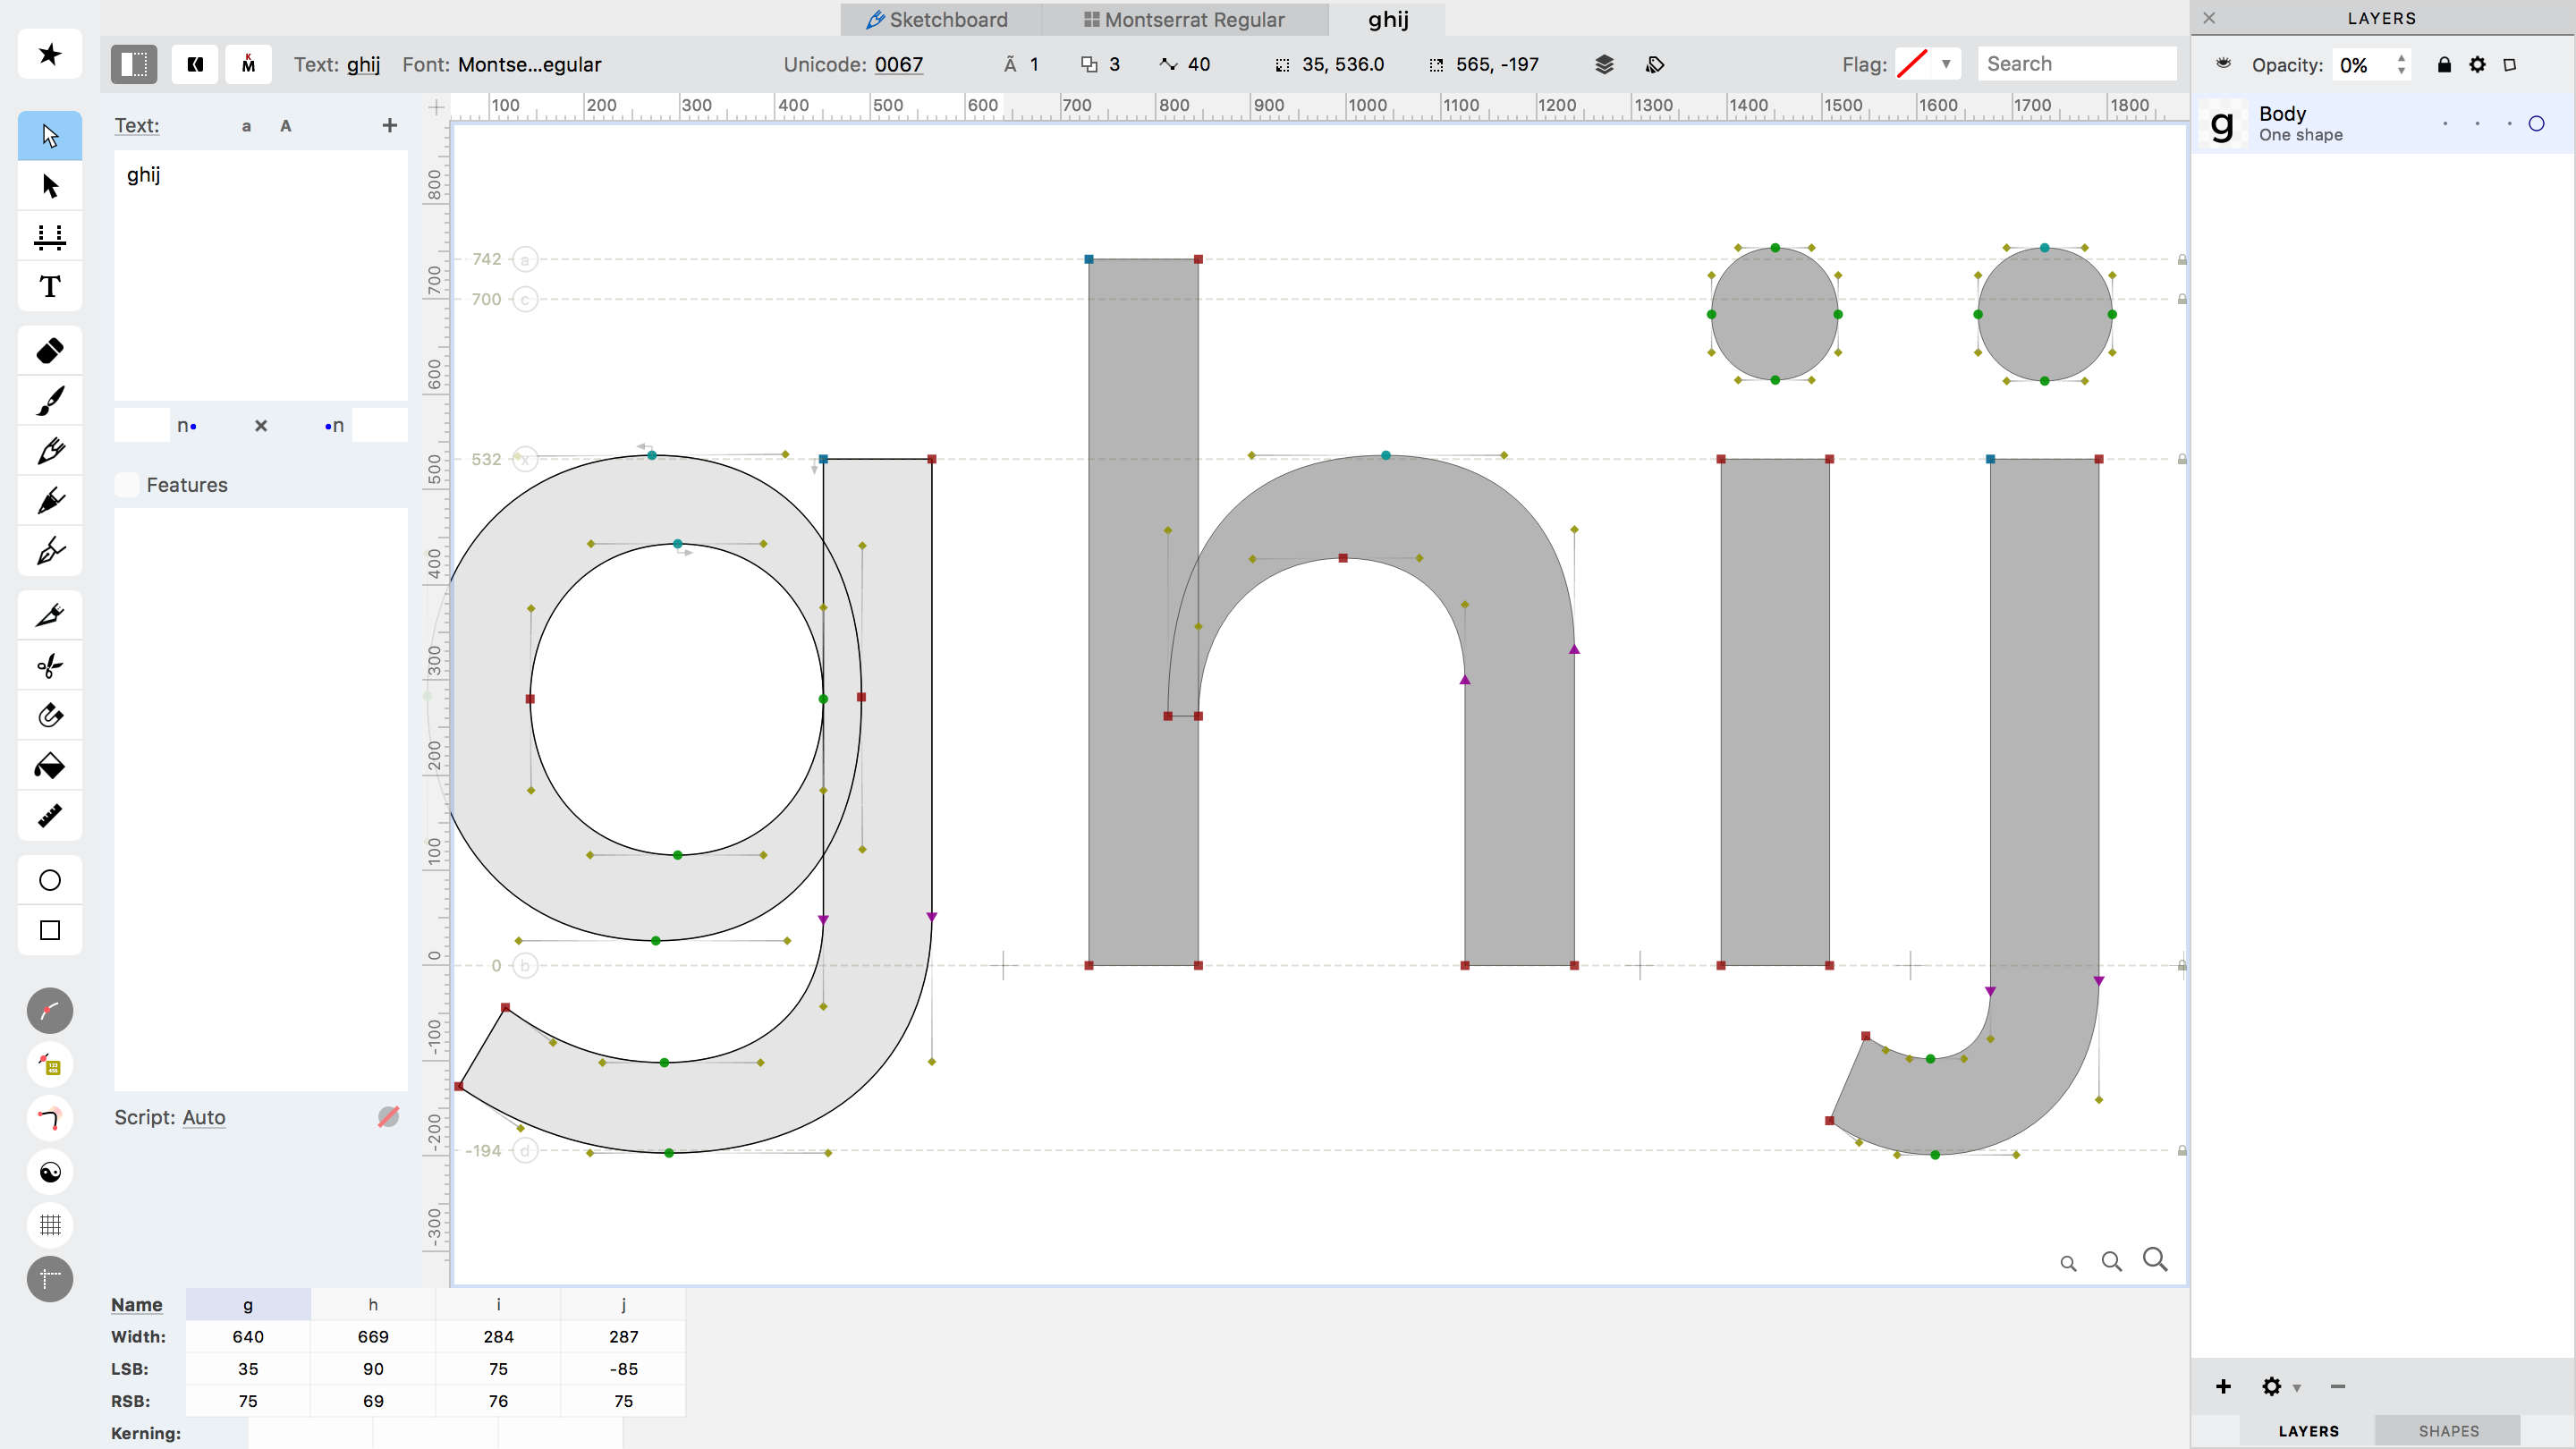
Double-click the “P” glyph to open the glyph for editing in a new Glyph Window.
-
See Font Window for more about the Font Window.
-
Tap T to activate the Text tool.
-
Type some text and press Esc
-
See Text tool for more about entering text.
-
Tap M to activate the Metrics tool.
-
Click any glyph in the text to activate it.
- Move the glyphs within the advance width with the pointer.
- Enable View > Show > Spacing Controls.
- Drag the sidebearing markers with the pointer.
-
See Editing Glyph Metrics for more on spacing.
-
Tap A or 1 to activate the Contour tool.
-
If it has TrueType outlines, perhaps choose Contour > Convert > To PS Curves.
- Move your pointer around the glyph’s contours to highlight nodes
- Drag nodes with the pointer.
- Open Window > Panels > View and click the Nodes and Handles buttons.
- Tap 2 to activate the Eraser tool.
- Click a node to remove it or on a handle to turn the curve segment into a line segment.
- Hold 3 or J to activate the Knife tool.
- While holding the key, click the outline to add a node. Release the key.
- Tap A and select some nodes using marquee.
-
Press CmdT and use the Free Transform tool to scale or rotate. Click away or press Enter to confirm.
-
Choose File > Export Font As.
-
Select “OpenType PS” in the list at the left and click Export.
- You’ve just modified a font and generated a new OpenType font which FontLab saved in a folder on your Desktop.
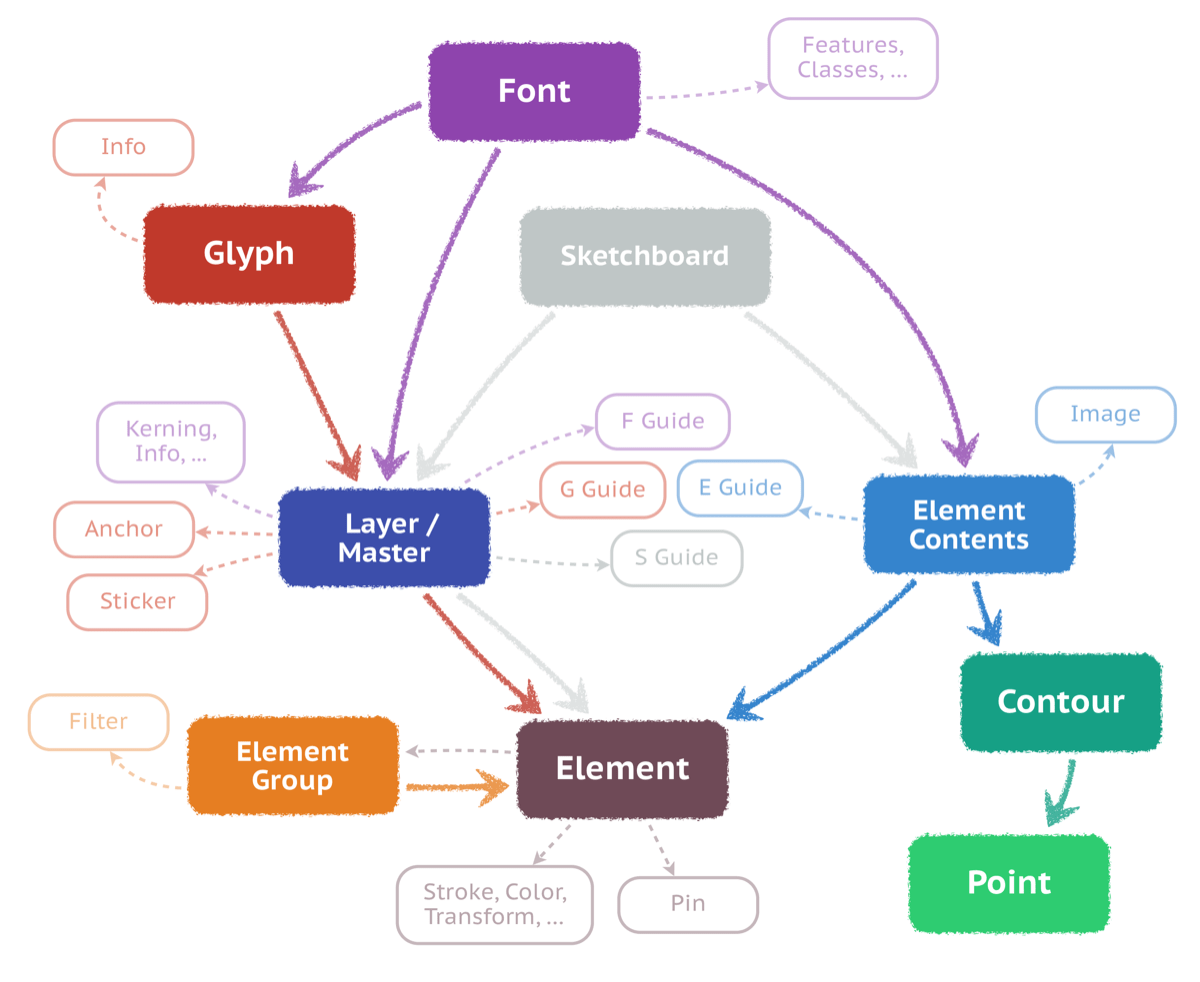
The following image visualized conceptually the (simplified) object structure that FontLab uses. The larger filled boxes are main objects, and they’re arranged from top to bottom to indicate parent/child relationships (a parent can have many children).