FontLab 7 Release Notes: Part 4»
Glyph names, OT features, text, layers, color, files, UI, Python, varia»
- FontLab 7 Release Notes: Part 4
- Glyph names, OT features, text, layers, color, files, UI, Python, varia
- Glyph names
- Auto OpenType features and the Features panel
- Naming glyphs for auto feature generation
- Adding auto features
- Updating auto features
- Adding custom code to autogenerated feature definitions
- Modifying auto feature definitions
- Adding autogenerated code to existing feature definitions
- Interpolable positioning features (cpsp etc.)
- Adding custom kerning lookups (kern)
- Using tags and classes in feature code
- GDEF glyph definition classes
- Other Features panel improvements
- Text
- Layers and Color
- Files and Formats
- User interface
- Python scripting
- Varia
Glyph names»
Built-in glyph naming schemes and synonyms»
A font is, above all else, a collection of glyphs. Those glyphs can represent default or alternative forms of Unicode characters and their ligatures, or can represent characters that follow some other encoding. Some glyphs are only used as “helper glyphs” to build some other glyphs. Each glyph in a font has a number (index, GID), and most glyphs represent some Unicode characters, which have numerical codes.
Numbers are great for computers but not so great for humans. Surely you can remember the names and even e-mail addresses of many people you’ve met — but can you remember their phone numbers? People are better with names than numbers, so when you work on a font, it’s easiest to refer to each glyph by a name.
If you work on many projects, and exchange fonts data with others, you’d think — surely someone came up with some standard to name all the different glyphs. Well, yes and no. The Unicode standard has standardized names for all characters of the world’s writing systems, but these names are long. Their purpose is descriptive. The character Á is named “LATIN CAPITAL LETTER A WITH ACUTE”. This is equivalent to “Professor William Henry Jones-Morris III, Ph.D.” — it’s not great for daily use. The Unicode names don’t fit into a glyph map, and they don’t include names of typographic variants, ligatures, icons etc.
Fortunately, Adobe’s PostScript printer language used short glyph names, and font makers have adopted and extended the principles used in PostScript, which is why glyph names are sometimes called PostScript glyph names. These names are more like “Billy” or “Will”.
Glyph names follow the AGL rules established by Adobe in the Adobe Glyph List Specification and in the Adobe Glyph List. In short: when you give a glyph a name, start with a plain English letter (A-Za-z). Only use those letters, digits (0-9). You can also use hyphens (-), but not in shipping OpenType fonts. Use underscore (_) in ligatures e.g. f_l. Use period (.) to add a suffix for OpenType variants e.g. Adieresis.ss01. Do not use spaces or other characters. Glyph names are case-sensitive, so Adieresis is different from adieresis.
uniXXXX and Production names»
When you export your font into OpenType, the glyph names should follow a stricter convention so that the font works well in all environments. This convention is called uniXXXX: if a glyph is the default representation of a Unicode BMP character U+XXXX, use the name uniXXXX, and if it represents a non-BMP character U+XXXXX, use uXXXXX, where X is an uppercase hex digit (0-9 and A-F). For non-default forms and ligatures, you can use the AGL rules (hyphens are disallowed).
Unicode 12 includes 137,929 characters. 70% of them are Chinese, Japanese and Korean idegraphs, which leaves more than 40,000 characters that belong to various other writing systems, as well as symbols or different sorts. For about 600 of those Unicode characters, the Adobe AGLFN list provides more human-readable names, for example, for Á, you can use Aacute or uni00C1. The AGLFN names and the uniXXXX names together are called Production names. Any shipping OpenType font should use either Production or uniXXXX names, though in TrueType- and CFF2-flavored OpenType fonts, you can also not use any glyph names at all.
In development sources (VFC, VFJ, UFO etc.), you can use any names that follow the AGL rules, but don’t need to follow the stricter uniXXXX or Production conventions. But this still keeps the question open: which names, precisely, should I use?
Friendly and Alternative names»
Font developers and font tool makers have been creating their own development glyph naming schemes. FontLab 7 brings four built-in glyph naming schemes, and lets you easily convert between these four and any custom naming schemes you may be using. In addition to the Production and uniXXXX naming schemes discussed above, FontLab 7 includes two glyph naming schemes suitable for development (although you can, of course, design and develop using the production or uniXXXX names if you wish):
- Friendly: this is a set of some 30,000 names, curated by Erik van Blokland and Frederik Berlaen, with some modifications; these names are commonly used by users of RoboFont
- Alternative: this is a set of also some 30,000 names, curated by Georg Seifert; these names are commonly used by users of Glyphs
The Friendly and Alternative glyph name schemes are mostly compatible with AGLFN, and they have a large overlap, though about 6,000 names differ.
The Alternative names use hyphens more often than the Friendly names. When you use glyph names with hyphens in FontLab metrics expressions, you need to surround the glyph name in quotes to distinguish the hyphen from the subtraction minus (e.g. 'A-cy'-5).
Synonyms»
FontLab 7 also includes a list of about 10,000 fallback synonyms, curated by the FontLab team. Fallback synonyms are glyph names for a given Unicode characters that are not in any of the built-in naming schemes, but have been used in some shipping fonts. FontLab uses fallback synonyms when you generate Unicode codepoints based on glyph names with Font > Generate Unicode.
FontLab 7 has a Find glyph name synonyms toggle next to many text boxes where you can search glyphs by name: Edit > Find Glyphs (CmdF/CtrlF), Quick Find Glyphs (/), Glyph > Add Component, Filter by glyph in the Classes panel. When this toggle is on and you type a glyph name, FontLab will find a glyph even if the glyph uses a different naming scheme — for that, FontLab uses all four built-in naming schemes and fallback synonyms.
Renaming glyphs»
When you open an existing font in OpenType or Type 1 format, FontLab can rename the glyphs to one of the built-in schemes. Go to Preferences > Open Fonts and turn on Make friendly glyph names, then choose the naming scheme in the dropdown. If you want to open the font with the glyph names as they are in the font, turn off this setting. When you open a font in a development format (.vfc, .vfj, .vfb, .fog, .ufo, .glyphs etc.), FontLab always reads and retains the existing glyph names regardless of this setting.
When you export a font, FontLab keeps current glyph names or converts them to Production names, depending on the setting in the export profile. Go to File > Profiles, duplicate a built-in profile with +, and in Glyph organization > Glyph names change between Use current glyph names, Use production glyph names and Do not use glyph names (TrueType only)
When you have a font open, you can rename all glyphs by choosing one of the built-in schemes in Font > Rename Glyphs. Choose Suffix… there to add or replace a glyph name suffix in selected glyphs.
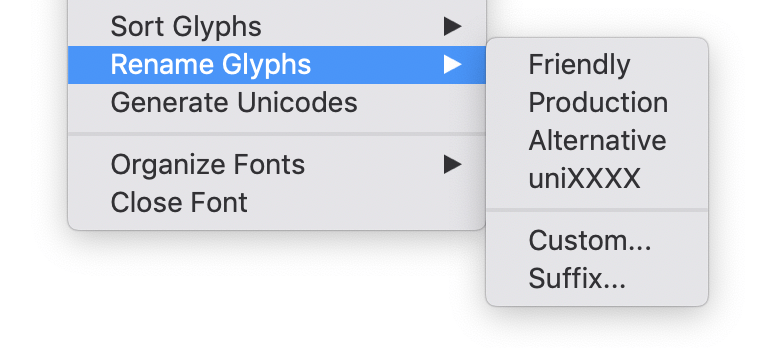
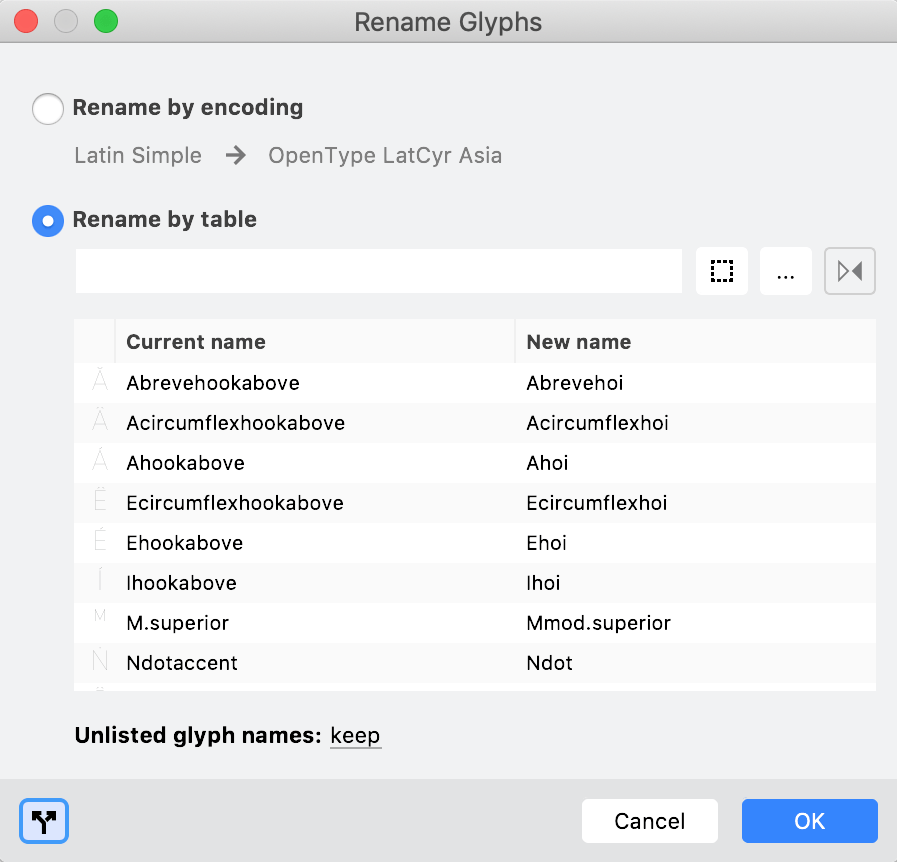
Choose Font > Rename Glyphs > Custom… to rename all or selected glyphs according to your own naming scheme. In the dialog, choose a glyph renaming method, and the table will list all glyphs that will be affected by the renaming. The New name column shows the names that will be assigned to glyphs. Double-click a name there to change it.
- Choose Rename by encoding and pick a source encoding (
.encfile) and a destination encoding — this will affect all glyphs present in your font that are found in the source encoding. - Choose Rename by table and click …, then choose a renaming file, which may be an Adobe GlyphOrderAnAliasDB file, a simple
.csv,.renor.txtfile where each line lists the old name followed by whitespace and by the new name, or a JSON rename file — this will affect all glyphs present in your font that are found in the renaming file; click the Swap button to reverse the direction of the renaming. - Choose Rename by table and click the dashed rectangle to pick the destination built-in naming scheme (Friendly, Production, Alternative and uniXXXX) — this affects the glyphs that were selected in the Font window.
At the bottom, choose what to do with glyphs that are present in the font but are not listed in the renaming table. When no renaming method is selected, the Unlisted setting affects all glyphs in the font.
Click OK to rename the glyphs.
When you rename glyphs like uni02E802E702E7, uni02E8_uni02E7_uni02E7, u02E8_u02E7_u02E7 to Friendly names, FontLab renames them to names like tonebarlowmod_tonebarmidmod_tonebarmidmod.
All the renaming methods listed above change the glyph name, and also change the old name to the new name in feature definitions, class definitions and auto layer recipes — so that after renaming, the font should behave the same as before.
To rename a single glyph, choose Glyph > Rename Glyph. There, you can decide if the glyph name should be changed only in the glyph, or also in feature definitions, class definitions and (new in 7) auto layer recipes.
Other glyph naming improvements»
-
Glyphs with .sups, .subs, .sinf suffixes are no longer synonyms of default glyphs for Unicode characters. They no longer trigger red lines in Font window glyph cells when no Unicode codepoint is assigned.
-
FontLab now correctly writes glyph names to into the
posttable.
Auto OpenType features and the Features panel»
FontLab 7 introduces an all-new system for automatic generation of OpenType feature definitions. To try it, open any font, open the Features panel, local menu (☰) choose Remove All Features, then choose Add Auto Features. You can use the Features panel to manage the automatic feature generation (short: “autofea”), but you can also use FontLab’s special syntax in FEA files that you author outside FontLab.
FontLab uses the industry-standard Adobe feature definition syntax (short “FEA”) to specify feature definitions that will be included in the exported OpenType font. FontLab 7 extends this syntax with special autofea blocks.
Each autofea block starts with a line that contains #> keyword and ends with a line that contains #< keyword. When FontLab updates the feature definitions, it updates any content between these delimiters, but leaves any content outside these blocks intact. The keyword can be one of the following: feature, languagesystem, classes, kernclasses, otclasses, tags and vtags.
The FontLab 7 autofea system can generate many OpenType features, primarily “discretionary” substitution features (those that end-users can turn on at their discretion using user interface elements in apps, or using font-feature-settings in CSS).
FontLab 7 can also generate the positioning features:
kernfor kerning: you can now include custom lookups; this works for export of static instances but not for variable fonts; see details belowmarkandmkmkfor mark attachment: this is a complex feature which does not work with the autofea system, so you cannot mix manual and auto code; also, we’ve turned off generation of mark attachment features in the built-in export profiles — but you can customize a profile and turn it on
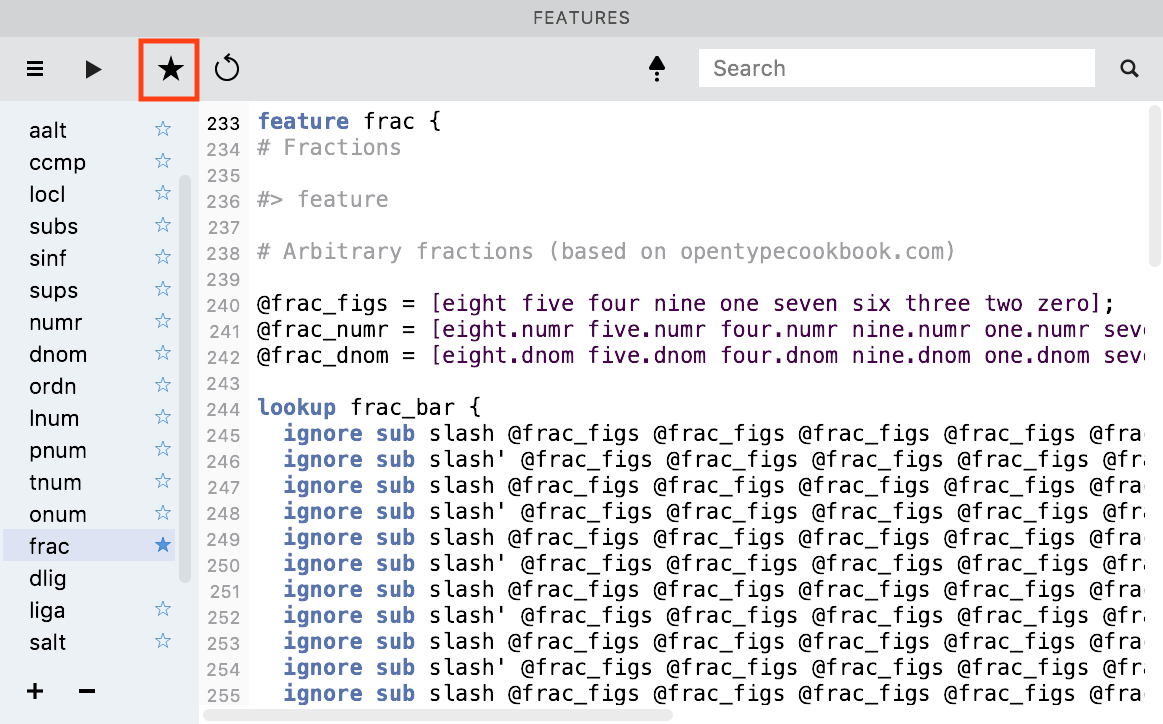
In the left-side list of the Features panel, you can see all feature definitions that are present in your font. The list includes the 4-letter feature tag. Hover your pointer over that tag to see a tooltip that shows the full name of the feature, a short description what the features does, and a short recommendation for font developers.
If the feature tag in the list is followed by an outlined star (☆), it means that this feature is currently defined manually but FontLab can autogenerate the definition. If the star is filled (★), it means that the feature is currently autogenerated by FontLab. If there is no star, the feature is defined manually, and FontLab either has no algorithm to autogenerate it, or the font has no suitable glyphs that can be used for generating the feature.
Naming glyphs for auto feature generation»
The core of the autofea system is the glyph naming. For simple substitution features, autofea has a simple algorithm:
- if the font contains a glyph named
a.swshand a glyph nameda, FontLab will generate thesub a by a.swshmapping in theswshfeature - if the font contains a glyph named
a.smcp..ss01and a glyph nameda.smcp, FontLab will generate thesub a.smcp by a.smcp..ss01mapping in thess01feature — the..separator is “stronger” than the.separator
For some features, FontLab also accepts some synonym suffixes, and it also generally accepts glyph name synonyms. Below are some features that have specialized algorithms:
c2sc,smcp: suffix.scor.smallto use the same glyph in both features,.smcpto only use the glyph insmcp,.c2scto only use the glyph inc2sccase: suffixes:.case,.capdlig: glyphnamest, any glyphname that contains_and has the.dligsuffix, or any glyphname that contains_except those used inligafrac: builds a contextual feature if the font containsfraction,slash,.numr.dnomglyphs, otherwise builds a simple feature for glyphsonequarter,onehalf,threequarters,onethird,twothirds,oneeighth,threeeighths,fiveeighths,seveneighthshlig: any glyphname that contains_and has the.hligsuffixliga: glyphnamesf_b,f_f,f_f_b,f_f_h,f_f_i,f_f_j,f_f_k,f_f_l,f_f_t,f_h,f_i,f_j,f_k,f_l,f_t,ff,fi,fl,ffi,ffl, or any glyphname that contains_and has the.ligasuffixlnum,onum,pnum,tnum: suffix.lfor.lnum_pnumfor proportional lining, suffix.osfor.onum_pnumfor proportional oldstyle, suffix.tfor.lnum_tnumfor tabular lining, suffix.tosfor.onum_tnumfor tabular oldstyle, but the algorithm also accepts.lnum,.onum,.pnum,.tnumand other suffixes like.oldstyle,.tabular,.tab,.fittedetc.locl: suffix.loclTRKor the more explicit suffix.latn.TRK.loclto buildloclforlatnscript andTRKlanguageordn: glyphnamesordfeminine,ordmasculine,numerorlig: any glyphname that contains_and has the.rligsuffixsalt: alternates used inss01-ss20features, also suffix.altand.1,.2etc.sinf: suffix.inferioror.sinf, if absent uses Unicode subscript charactersss01: suffixes:.ss01,.alt1; analogous forss02-ss20subs: suffix.subs, if absent uses Unicode subscript characterssups: suffix.superioror.sups, if absent uses Unicode superscript characters
Adding auto features»
To add a single new feature, click + at the bottom of the Features panel and choose the feature from the list. If your font contains glyphs with suitable names, FontLab will show a bullet (•) next to the features that it can autogenerate. If you choose a feature without the bullet, FontLab will only add a simple feature block that you need to fill manually. If the feature you’d like to add is not listed, choose Empty feature (xxxx), then type in the desired feature tag and press Enter.
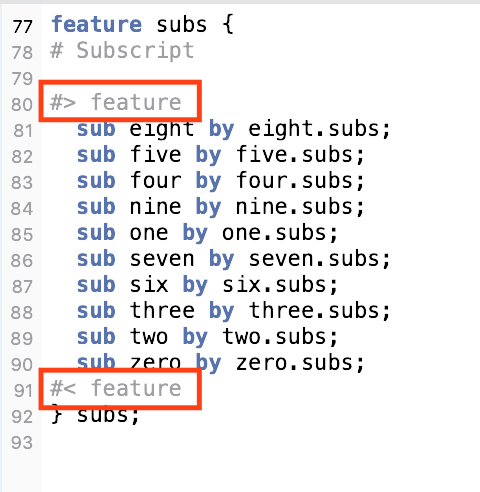
Each feature definition starts with feature xxxx { where xxxx is the 4-letter feature tag, and ends with } xxxx;. Inside the feature definition, FontLab adds an autofea block that starts with #> feature and ends with #< feature. These delimiter lines have a special meaning inside FontLab, but are treated as comments by the Adobe compiler that turns feature definitions into binary OpenType Layout data. If FontLab can autogenerate the definition for a feature, it will write the substitution rules, and sometimes lookup definitions, inside that autofea block.
To automatically generate all substitution features that FontLab can build, choose Add Auto Features from the Features panel local menu (☰). This will not overwrite existing feature definitions, will only add additional features.
Feature definitions need to declare languagesystems, i.e. scripts and languages in which features are registered. If your Prefix section does not have languagesystem declarations, Add Auto Features will generate them as an autofea block delimited by #> languagesystem and #< languagesystem.
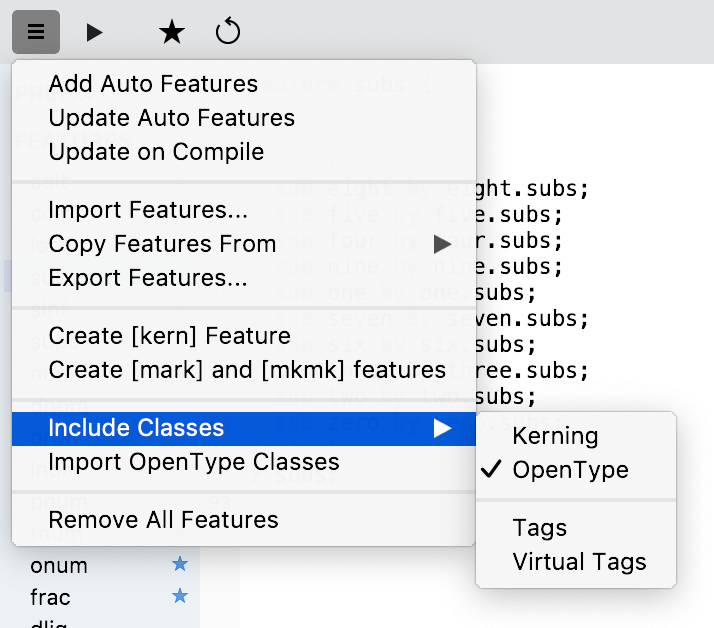
Depending on the settings of ☰ > Include Classes, Add Auto Features will also generate @-named FEA classes from Kerning classes, OpenType classes, Tags and/or Virtual Tags, and write them as an autofea block delimited by #> classes and #< classes in the Prefix section of the Features panel.
If you’ve added or renamed glyphs, you should Add Auto Features again.
Updating auto features»
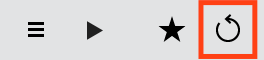
The update all autofea blocks (automatically generated feature definitions, languagesystems and @-named FEA classes) in the font, choose ☰ > Update Auto Features or Alt-click the ↺ button (Update selected auto features) at the top of the Features panel. To update only one or a few auto features, select the features in the list and click ↺.
When ☰ > Update on Compile is on, FontLab also updates all autofea blocks every time you compile the features or when you export the font. This is useful when you’re expanding your glyph set. If you have finalized your glyph set, turn Update on Compile off — exporting the font will be faster.
Adding custom code to autogenerated feature definitions»
Whenever FontLab updates auto features, it updates the content of the autofea blocks: everything between the lines #> feature and #< feature inside each feature definition, and everything between the lines #> languagesystem and #< languagesystem and #> classes and #< classes in the Prefix section.
You can easily mix automatic and manual feature content: just write your custom FEA code outside the autofea blocks. For example, if FontLab builds this ss01 auto feature definition:
feature ss01 {
# Stylistic Set 01–20

#> feature
  sub a by a.ss01;
  sub b by b.ss01;
#< feature
} ss01;
you can easily add an additional mapping like this:
feature ss01 {
# Stylistic Set 01–20

#> feature
  sub a by a.ss01;
  sub b by b.ss01;
#< feature
  sub c by c.swash;
} ss01;
Since the feature definition has an autofea block that starts with #> feature, the feature list shows a filled star. This means that whenever you use ☰ > Update Auto Features, or whenever you compile the features or export the font with ☰ > Update on Compile on, FontLab will re-generate the content between #> feature and #< feature — but it will not touch your hand-coded sub c by c.swash; substitution.
Modifying auto feature definitions»
You may want that FontLab builds a feature definition automatically once, but then you may want to customize the autogenerated code. For example, FontLab may generate some autofea code that is useful, but some that is “too much” or undesired.
Remove the autofea delimiter lines #> feature and #< feature completely, or change the first delimiter from #> feature to #/> feature, click outside the feature editor and the filled star next to the feature tag in the list will switch to an unfilled star.
The feature is then no longer an auto feature so FontLab will not touch its code when it updates auto features. You can now modify the feature as much as you want.
Currently, there is no difference between having a #/> feature delimiter and not having it at all — using #/> is just a convenience so you can keep track which code came from FontLab’s autofea algorithm.
Adding autogenerated code to existing feature definitions»
If you have existing features listed in the Features panel that have an outlined star (☆), FontLab can autogenerate the definition.
When you click that feature or Shift-select multiple features in the list and then click the large ★ button on top of the Features panel (Autogenerate code for selected features, not the small star in the list), FontLab will completely replace the existing feature definition with automatically generated content.
If want to add autogenerated code but you want to also keep existing feature code, click the feature in the list, then:
Insert a placeholder autofea block anywhere inside your existing manual feature definition, and click ↺. FontLab will fill the autofea block with autogenerated code, and will not touch the manual code. The placeholder autofea block must look exactly like this (no trailing spaces, just one blank line between the delimiters):
#> feature

#< feature
Alternatively, select the existing code in the feature editor, press CmdC or CtrlC, click the large ★, click before the final } in the feature editor, and press CmdV or CtrlV.
When you have an autofea block and manual code, you should check the manual code and e.g. eliminate manual substitution rules that are already done in the autofea block.
Interpolable positioning features (cpsp etc.)»
It is now possible to use Font Info parameters as numerical interpolable values in positioning feature definitions which will be exported into the OpenType GPOS table.
For example, to get an interpolable cpsp (capital spacing) feature, you can use it as follows:
- In Font Info > Parameters, choose your default master and use the + button to create two parameters:
cpsp1, where you set the value for the left sidebearing increase, andcpsp2, where you set the value for the width increase (should typically be 2× the value ofcpsp1). - Click Match Parameters, switch to the other masters and set the appropriate value for both parameters.
- Click OK to close Font Info, open the Features panel.
- In the panel’s local menu (☰), turn on Include Classes > Virtual Tags to use the autogenerated
@ucclass for all uppercase glyphs, or define aucclass in the Classes panel yourself. - Add a new feature
cpspand write its contents as follows:
feature cpsp {
    pos @uc <${cpsp1} 0 ${cpsp2} 0>;
} cpsp;
When you export the font as static OTF or TTF instances, or as a variable OpenType font, the positioning adjustments will be correctly interpolated for each instance.
Attention
You cannot preview the interpolation of parameter-based features within FontLab. When you Compile features, FontLab compiles the features with the parameter values of the current master, and renders all text using those values even if you switch the master. When you switch to another master and compile again, the values of this master will be used until you compile the next time._ .
Adding custom kerning lookups (kern)»
FontLab lets you perform kerning visually using the Kerning mode of the Glyph window (using the Kerning tool), and lets you use Kerning classes to kern some glyphs like other glyphs (you can create Kerning classes with the Classes panel and the Font > Kerning menu).
When you export your font as static or variable OpenType, FontLab converts the visual kerning into an kern feature. Normally, this happens on export, so your Features panel does not (and should not) have a kern feature entry.
However, if you want to add a custom lookup to the kern feature, choose ☰ > Create [kern] Feature in the Features panel. This adds a kern feature in the panel and converts the kerning of the current master into FEA code. If the export profile section Features and Kerning > OpenType kerning is set to Create [kern] code if not present or Do not create [kern] code, FontLab will then use the kern feature definition in the panel rather than the visual kerning.
If you work with multiple masters: choose the kern feature in the list and click ★ at the top of the Features panel: FontLab wraps the kern feature definition in an autofea block which will be updated for each instance separately when you export the font.
Now, at the end of the kern feature definition, you can write an additional lookup, for example for contextual kerning, where you can use Font Info parameters just like described earlier:
feature kern {
#> feature
  @_KERN_A = [A Aacute ...];... # This is the autogenerated kern code

  lookup KERN_LTR useExtension {
    lookupflag IgnoreMarks;
    pos A V -68;...
    lookupflag 0;
  } KERN_LTR;
  lookup KERN_LTR;
#< feature

lookup extraKern {
    pos L' ${Lquoteright1} quoteright' ${Lquoteright2} A;
} extraKern;

} kern;
Attention
Currently, custom code in the
kernfeature gets exported into static OpenType instances, but not into variable OpenType fonts._
Using tags and classes in feature code»
The ☰ > Include Classes submenu of the Feature panel local menu lets you decide whether FontLab should convert the Kerning classes, OpenType classes, Tags and Virtual tags into automatically generated @-named FEA classes. These classes are not visible in the Prefix section of your panel but FontLab includes them when you compile feature. To make them visible in the Prefix, click ☰ > Import Classes and Tags.
The kern feature generation will always convert the Kerning classes, but only inside the feature definition. Turning on Include Classes > Kerning classes lets you reference the Kerning classes in other features.
When you turn on Include Classes > Tags in the Features panel, and click, you can use tags as OpenType classes. FontLab will now sort the glyphs by name rather than glyph ID when it builds FEA classes from tags, so you can use substitutions such as sub @tag1 by @tag2; as long as number of glyphs with tag1 and tag2 is the same, and they have corresponding glyphnames (for example, without a suffix and with a suffix).
When you turn on Include Classes > Virtual Tags, you can use virtual tags in your FEA code. The @ALL class gives you all glyphs except .notdef, the @blank class gives you all glyphs that contain only whitespace, while the @noblank class gives you all glyphs that have some visible content.
@auto includes all glyphs built as auto layers, @composite includes all glyphs built from components, @noncomposite includes all glyphs that don’t use components, @references includes all glyphs that are used in composite glyphs. @match includes all glyphs that are variation-compatible while @nomatch includes glyphs that have non-matching masters. Auto classes built from virtual tags also include classes named with 4-letter script tags: @latn for Latin glyphs, @cyrl for Cyrillic etc.
The content of the automatic classes @uc (uppercase glyphs), @lc (lowercase glyphs), @sc (small caps) may not be fully correct in all situations.
If you assign normal tags that are the same as virtual tags, the corresponding FEA classes will be combinations of both.
Note
You may need to choose Font > Update Glyphs and then ☰ > Import Classes and Tags in the Features panel to refresh the FEA classes built from virtual tags.
FontLab wraps the auto classes in a autofea block between #> classes and #< classes, and will update these definitions when you update auto features. If you #> classes to #/> classes, FontLab will no longer update these classes (so you can manually edit or extend them in the FEA code).
Inside the #> classes autofea block, FontLab writes the auto classes in several “disabled” autofea blocks: #/> kernclasses for kerning classes, #/> otclasses for OpenType classes, #/> tags for normal tags and #/> vtags for virtual tags.
You may create a Prefix that contains some or all of the following placeholder autofea blocks. FontLab will fill the content of these blocks when it updates auto features, independent of the ☰ > Include Classes setting.
#> languagesystem
#< languagesystem

#> otclasses
#< otclasses

#> kernclasses
#< kernclasses

#> tags
#< tags

#> vtags
#< vtags
GDEF glyph definition classes»
When you select all glyphs in the Font window and click Auto Glyph Definition Class in the Glyph panel, FontLab will now classify all glyphs in your font into their functional roles.
This classification is used to build the GDEF table. You can view the OT Glyph Definition Class in the Glyph panel (when many glyphs are selected with different values, the field shows multiple). In Font window, you can see this classification as a glyph cell caption (OT Class) and as a List view column (OT Def). You can filter the Font window by these values with the Properties section of the Font window sidebar. If Include Classes > Virtual Tags is on, you can add the @ prefix to the corresponding virtual tag to use it as a normal FEA class.
| Glyph panel | OT Def | Properties | Virtual tag |
|---|---|---|---|
| Unspecified | – | OT None | otnone |
| Simple | S | OT Simple | otsimp |
| Ligature | L | OT Ligature | otliga |
| Mark | M | OT Mark | otmark |
| Component | C | OT Component | otnone |
The Properties section of the Font window sidebar can also contain the following property-based filters. If you’ve changed some of these properties in a glyph, click the Update button next to Properties to refresh these filters.
- Composite: at least one master contains at least one component
- Non-Composite: no master contains a component
- Compound: at least one master contains a glyph filter: Fill, Smart Corner, Power Brush, Glue
- References: at least one master contains element reference or source of a component
- Auto Layers: at least one master is built automatically as auto layer
- Colored: at least one master contains an element with non-default color or stroke
- Image: at least one master contains a bitmap image
- SVG: at least one master contains an SVG image
- Blank: no master contains an element, glyph is blank (non-printing)
Other Features panel improvements»
-
When you open an existing OpenType font and Preferences > Open Fonts > Decompile binary features is on, and when a feature has identical content across all languagesystems present in the font, FontLab now decompiles this feature into simpler FEA syntax, without repeatedly listing the languagesystems inside the feature definition. This does not influence how the feature works.
-
Import Features…: loads feature definitions in FEA syntax from an external text or font file; you can pick a text file with an extension
.txtor.fea, or a VFC, VFJ, VFB or UFO font file -
Copy Features From >: loads feature definitions from another font that is currently open; to copy feature definitions from an existing OTF or TTF, first open that font in FontLab, then use this operation
-
Export Features…: saves feature definitions in the FEA syntax as a
.feaplain-text file; the exported FEA file includes all auto classes built from classes and tags enabled in ☰ > Include Classes -
When you’re in the panel, the tooltip in the Compile features button reminds you that you can press CmdEnter (Mac) or CtrlEnter (Windows) to compile features.
-
When you’re in the panel, the tooltip in the Go to glyph or class at cursor button reminds you that you can press CmdL (Mac) or CtrlL (Windows) to show the glyph in the Font or Glyph window (if your text cursor is in a glyph name), or to show the class in the Classes panel (if your text cursor is in a class name).
-
When you decompile OpenType features, FontLab now preserves the order of lookups.
Text»
Typing glyphs in Glyph window»
When you press CmdL or choose Edit > List Related Glyphs… in the Glyph window, FontLab shows a popup that shows glyphs that are in some way related to the current glyph. You can choose a glyph with the arrow keys.
In this popup, as well as in the Edit > Find Glyphs popup (CmdF/CtrlF), the Quick Find Glyph popup (/) and the Find by Unicode popup (#) in the Glyph window:
- When you press Enter, FontLab will insert the glyph you chose into the text and replace the current glyph.
- In FontLab 7, when you press CmdEnter (Mac) or CtrlEnter (Windows), FontLab will insert the glyph you chose into the text after the current glyph, so you will see both glyphs.
Text > Copy Text As»
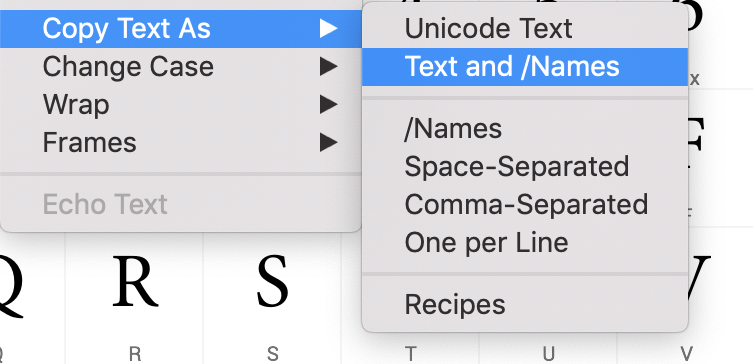
When you’ve selected some glyph cells in a Font window, when you have some text (glyphs) in a Glyph window, or when you have some selected text in the Text mode of a Glyph window, you can now use the menu items in the new Text > Copy Text As submenu to copy into the clipboard:
- Unicode Text: a Unicode plain-text string of all glyphs of the text that have a Unicode codepoint (the unencoded glyphs will be omitted)
- Text and /Names: a text string where the encoded glyphs are represented by their Unicode characters, and unencoded glyphs are represented by their glyph names prefixed with
/ - /Names: a text string of all the glyphs names of the text prefixed with
/ - Space-Separated: a string of glyph names separated by spaces (you can paste that into a class definition in the Classes panel, or as an inline class within a feature definition, surrounded by
[]) - Comma-Separated: a string of glyph names surrounded by
""and separated by,(you can use it inside a Python or JSON list) - One per Line: a list of glyph names, one per line (you can use it to create a custom
.encEncoding font filter) - Recipe: see the Auto Layers section for more info
Text features selector»
In FontLab, when you have feature definitions written in the Features panel, you can test them (apply them) to your text in the Glyph window (using the Features section of the sidebar or the fi icon in the property bar if the Glyph window is in Text mode), in the Preview panel (using the Features selector) or in a Sketchboard text frame (using the “fi” icon).
When you turn on the Features checkbox in the selector, FontLab activates the Unicode and OpenType processing using the built-in HarfBuzz library (the same that is used in Chrome, Firefox or LibreOffice). Even if you don’t apply any features, when the Features checkbox is on, FontLab will perform Unicode normalization and set the width of the combining marks to 0.
FontLab 7 has a redesigned the Features selector:
-
The feature tags with checkboxes for applying them are now listed in two columns, so you don’t have to scroll so much when your font has many features defined.
-
When you hover your pointer over a feature tag in the features list, now a tooltip appears with the full name and the tag of the feature, a short description what the features does, plus a short note for font developers.
-
You can now Turn on default features and Turn off all features using new buttons in the top-right. Previously, you could only turn off all features.
-
You can compile the features right in the Features selector, so you no longer need to open the Features panel. If ☰ > Update on Compile in the Features panel is on, this will also update the auto features.
Testing language-dependent OpenType features (“locl”)»
At the bottom of the Features selector, there is an improved Script dropdown and a new Language dropdown.
The Script dropdown works as follows:
- It lists scripts (writing systems) to which your font’s Unicode codepoints belog and those defined in your feature definitions using the
languagesystemstatements. - When you choose the first entry, Auto, FontLab performs automatic script itemization of the text using HarfBuzz: it splits your text into glyph runs by script, and then, for each glyph run, applies the features that you choose as they’re defined for that script.
- When you choose Default, Latin or any other script from the list, FontLab applies to the entire text the features that you choose as they’re defined for that script.
The new Language selector works as follows:
When the script is Auto, the language is always Default, but when you choose a script explicitly, the language selector will list all the languages (more precisely: OpenType languagesystems) that have features defined for that script, and will let you apply those features as they’re defined for that language.
Language-dependent feature behavior is typically defined in the locl (“Localized forms”) feature. Let’s say the Prefix section of the Features panel contains the line languagesystem latn TRK ; and you have a locl feature defined as follows:
feature locl {
script latn ;
language TRK ;
sub i by i.TRK;
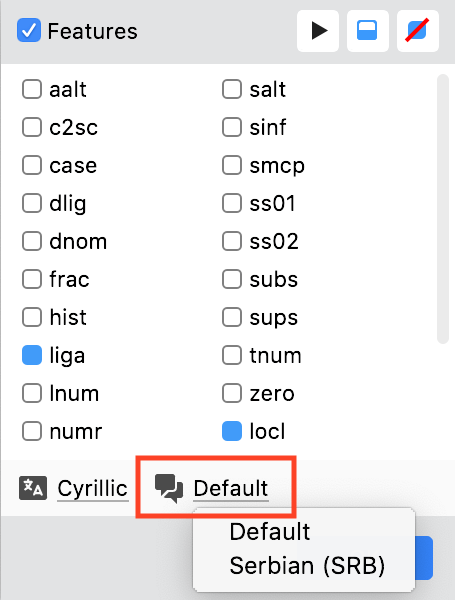
} locl;When you compile your features and then choose the Latin script, the language selector lets you choose between Default and Turkish (TRK).
When you turn on the locl feature in the Features selector (it is on by default), and you type fin in the Glyph window (or Preview panel or a Sketchboard text frame) — when you choose the Default language, you’ll see the glyph sequence /f/i/n (because the locl feature is actually not defined for the Latin script and default language), but if you choose the Turkish (TRK) language, you’ll see the glyph sequence /f/i.TRK/n.
Note
The features list shows all feature tags defined across any scripts and languages in your font. When you choose a different script or language, the features list will not change — even though some features may not be defined at all for the selected script and/or language. So a feature may be “on” but if it’s not defined for the given script and language, it will not have any effect.
Printing»
-
The Glyph window and the Preview panel now let you see the font in sizes from 4 points upwards. This also lets you print very small text.
-
On Windows, the text size in Preview panel (specified in points) now matches the text size in other Windows apps.
Layers and Color»
- The font that results from Font > Overlay Fonts now includes anchors from the main source font.
Files and Formats»
Save As»
When you do File > Save As, the app now suggests the original filename of the font, rather than a filename built from the Family name. This is consistent with other apps.
FontLab JSON (VFJ)»
Preferences > Save Fonts > Save to VFJ has a new Session checkbox. When you turn it off and then export as VFJ or save as VFJ, or if you turn on Preferences > Save Fonts > Save VFC and also > VFJ and save, then the VFJ file will not include timestamps of last modification of the glyphs. This makes the VFJ more suitable for version control systems.
Exporting mark attachment»
By default, FontLab no longer generates and exports mark attachment (the mark and mkmk OpenType features). All built-in export profiles now have the setting Features and Kerning > OpenType mark attachment > Do not create [mark/mkmk] code. To export mark attachment, customize the profile and in its Features and Kerning > OpenType mark attachment section, set Create [mark/mkmk] code if not present.
Export notification»
When FontLab has sucessfully exported a font, a notification dialog box appears, but the notification is also written to the Output panel. You can silence the dialog box (Do not show this warning anymore), and only observe the Output panel.
Open and export CFF2-based Variable PS (.otf) fonts»
You can now open variable OpenType fonts with PostScript outlines (CFF2-based variable .otf). You can also export PostScript-based variable fonts with the new Variable PS (Beta) (.otf) export profile. The support for CFF2-based variable fonts is still a bit experimental, so do not expect “shipping quality” for these fonts.
When you’re trying to export a Variable PS font, you may getan error such as fontTools.varLib.cff.MergeTypeError: In glyph 'B' 'hstemhm' at point index 0 in master index 1 differs from the default font point type 'hstem' in the Output panel. FontLab 7 uses the fontTools library to build the Variable PS fonts. Currently, that library does not always correctly “merge hinting” from different master fonts. But the developers of fontTools are improving the library actively, so it’s likely that some time soon, this problem will be fixed.
As a workaround, choose File > Export Font As…, choose the Variable PS (Beta) profile, click Customize…. In the Profile name field, change Variable PS (clone) to Variable PS (unhinted), press Enter, scroll down and in the Hinting section turn off Use hinting. Click OK.
Now you’ll have a new profile Variable PS (unhinted) that you can use to export the Variable PS font that uses no hinting (at least you will not get the warnings).
Variable TT (.ttf) export profile»
The export profile for TrueType-based variable OpenType fonts is now called Variable TT (.ttf) (previously it was OpenType Variations (.ttf)).
Color web fonts»
When you export a color font using a profile that has WOFF2 on, the OT+SVG and OT+CBDT color flavors are now exported as .woff2.
.glyphs»
FontLab now includes many detailed improvements when opening and exporting files in the .glyphs format.
FontLab opens .glyphs brace layers such as {300, 100} as sparse font-less masters with layer names :wt=300,wd=100.
DesignSpace, UFO3»
- The UFO Package and DesignSpace + UFO export profiles now export UFO version 3. To export UFO 2, customize the profile and turn on Use legacy format version.
- The DesignSpace + UFO export profile now exports
<designspace format="4.0">which supports themapandruleselements - When FontLab 7 reads
markcolor from UFO3 and converts it into color flag, and then exports UFO3 and converts the color flag into amarkcolor, it now does so more faithfully so the colors no longer change.
User interface»
-
When you hover your pointer over a font or glyph tab, a tooltip appears with the font file name and path.
-
The keyboard shortcut for opening/closing the Glyph panel is now CmdI (Mac) / CtrlI (Win). Edit > Invert Selection is now ShiftCmdI (Mac) / ShiftCtrlI (Win).
-
FontLab has panels that you can drag by their headers (title bars) to rearrange them on screen. You can also drag some panels by their entire area. To disallow the latter, right-click or Ctrl-click any panel’s title bar and turn on Drag by Header Only.
-
When you resize panels, the mouse pointer now changes to double arrows.
-
Several panels have a horizontal zigzag if some content of the panel is hidden. Enlarge the panel vertically to reveal all content.
-
The View panels and == the Panels list now have a gear icon. Click it to hide some buttons from the panel.
Python scripting»
-
The Scripts menu has a Update / Install Scripts command. Click it to install some useful Python packages as well as TypeRig, a monumental Python extension for FontLab 7 developed independently by Vassil Kateliev. TypeRig brings some example Python scripts as well as TypeRig GUI, a large panel that lets you perform various batch operations. When you run Update / Install Scripts for the first time, you will need to restart FontLab 7 two or three times. Run the command once every few weeks to update TypeRig. Note: This functionality is experimental.
-
The Scripts menu now shows all scripts that you place in the
Scriptssubfolder of your FontLab 7 user data folder. You can use the Scripting panel sidebar to add additional folders which will be shown as submenus in the Scripts menu.
Varia»
-
The History panel now has the Forget History button that lets you clean the undo stack if you wish to stop the ability to undo operations done before clicking the button.
-
When exporting OpenType fonts, FontLab uses the Adobe FDK for OpenType (AFDKO) to compile the feature definitions and to create the
CFFtable contains PostScript glyph descriptions. FontLab 7 now uses AFDKO version 2.8.9 that improves this process and fixes some problems.
FontLab 7 Release Notes»
-
Metrics, kerning, Font window, Font Info, hints, guides, classes
-
Variation, imported artwork, components, auto layers, elements
-
Glyph names, OT features, text, layers, color, files, UI, Python, varia