FontLab 7 Release Notes: Part 1»
General, editing, anchors, actions, FontAudit, copy-paste»
- FontLab 7 Release Notes: Part 1
- General, editing, anchors, actions, FontAudit, copy-paste
- App start and macOS 10.15 Catalina
- Quick Help
- Editing glyphs
- Anchors, pins and mark attachment
- Actions
- FontAudit
- Copy-paste
App start and macOS 10.15 Catalina»
Simply double-click to run FontLab 7 on macOS for the first time. (You no longer need to Ctrl-click the app icon and choose Open, then Allow.)
The app is now digitally signed and is compatible with the new Notarization process introduced by Apple in macOS 10.15 Catalina.
Quick Help»
Ever wondered: what does this button in FontLab do? FontLab 7 helps you discover its powerful user interface with the new Quick Help system.
Move your pointer over a UI element and wait a bit: FontLab shows the yellow tooltip, known from most apps.
Move your pointer over a UI element and hold F1: FontLab instantly shows a longer Quick Help tip. The Quick Help tips are more extensive and provide more detailed explanations. Much of the FontLab 7 user interface already has Quick Help tips, and we’ll be improving the system in upcoming builds. If you’re on macOS and System Preferences > Keyboard > Use F1, F2, etc. keys as standard function keys is off, hold FnF1, or turn that option on to use F1.
Tap F1 or FnF1 to turn on Quick Help mode. Now when you move the pointer around the user interface, Quick Help tips appear instantly so you can explore the descriptions. Tap F1 or FnF1 again to turn it off.
When you turn on Preferences > General > Show keystrokes, FontLab shows the keys you press, and also shows Quick Help tips in larger font — great for teaching, tutorials or presentations!
Tap ShiftF1 or ShiftFnF1 to show or hide Help > Help Panel. When you open a dialog or click a panel, the Help panel shows descriptions for the active dialog page or panel. The Help Panel and Quick Help are complementary.
Editing glyphs»
Precision Cmd/Ctrl-dragging of nodes and handles»
In FontLab 6.1.4, we introduced precision dragging for non-node editing. In FontLab 7, you can also use precision dragging of nodes and handles, and contour selections. With the Contour tool active in Glyph window:
- Hold Cmd (Mac) or Ctrl (Win). Start dragging a point (node or handle) a little, and the point will travel less than your pointer movement, so you can be very precise.
- Drag the point further and it will gradually match the movement speed of your pointer, so you can also easily drag far.
- As you are dragging, release Cmd/Ctrl and the point will jump to your pointer.
- Hold Cmd/Ctrl as you’re dragging, and the point will move in high-precision mode.
In Preferences > Distances > Ctrl/⌘-dragging a point moves it by 1/ you can change the precision of the precision dragging between 10 (highest precision at short drags) to 1 (constant dragging speed like in previous versions). Default is 6.

Cmd/Ctrl-dragging a point also turns off snapping. Precision dragging works for single nodes and handles, and for contour selections. It does not work for dragging other objects (guides, anchors etc.). On Mac, you can also holding Ctrl instead of Cmd to activate high precision, but only after you’ve started dragging.
With precision dragging, you can finally use your mouse or trackpad for short-distance dragging rather than using keyboard arrow keys!
Quick measurement»
FontLab 7 has vastly improved Quick measurement, the live on-screen measurement tool that follows your pointer in the Glyph window. You can now turn it on/off in View > Show > Quick Measurement or in the View panel. In addition to the numeric distance between the closest paths (basic Quick measurement), you can see the numeric distance at both ends of opposing segments (end lines), view a dynamic center line between two opposing segments, and visualize the thickness change with a colorful thickness rainbow.
Go to Preferences > Glyph Window and in the Quick measurement setting. From the dropdown, choose when the basic Quick measurement, the end lines, the center line, and the thickness rainbow are shown when View > Show > Quick Measurement is on:
- on fill: shown when you point inside a filled area
- on outline: shown when you point near the outline
- everywhere: basic Quick measurement is shown anywhere where you move the pointer inside the Glyph window, extra details are shown on fill.
End lines, center line, rainbow»
Then, turn on additional Quick measurement details to show along the basic Quick measurement:
Show end lines: if on, in addition to basic Quick measurement (the distance between two opposite segments near your pointer), FontLab also shows distances near both ends of opposite segments inside a filled area.
Show center line: if on, in addition to basic Quick measurement, FontLab temporarily shows a green center line between two opposing segments inside a filled area. Useful for positioning guides or anchors in the center of a stem.
Show rainbow: if on, in addition to basic Quick measurement, FontLab also shows a thickness rainbow between opposite segments inside a filled area.
- If the segments are lines, the thickness is even (the rainbow is uniform blue) if they are perfectly parallel.
- If the segments are curves, the thickness is even when the contrast between the measured vertical and horizontal thickness matches the contrast specified in Measurements panel.
- When the thickness is not even, the rainbow is colorful: blue where the distance is smallest, and red where it’s largest.
To equalize the thickness of a stem (esp. diagonal or curved), enter the desired contrast in Measurements panel, turn off Preferences > Editing > Clicking outline selects segment, click anywhere in a segment, or click a Tunni line or a node or handle, then place the pointer inside the stem so the rainbow appears, and use cursor keys to tweak the position until the rainbow becomes uniform blue.
Info
The thickness rainbow visualization was inspired by Super Tool by Simon Cozens.
Refined arrow key shortcuts for moving nodes and selections»
When you click a node or select some nodes and/or handles, you can now use the arrow keys (↑, ↓, ←, →) with modifiers as follows.
On macOS»
- Tap the arrow keys to move by
1unit or the distance defined in Preferences > Distances > Contour arrow moves. - Hold Shift to move by
10units or the distance defined in Preferences > Distances > Contour shift+arrow moves. - Hold Cmd to move by
100units. Previously, both Ctrl and Cmd moved by 100. - Hold Ctrl (new) or CtrlAlt to also nudge (interpolate proportionally) the handles of neighboring nodes.
- Hold Alt (new) to move a smooth node between its handles, move a sharp node but keep the handles in place (same as Alt-dragging).
- To increase/decrease the length of both handles of a node, use the arrow keys with FnAlt (or AltPgUp/AltPgDn). Previously, this worked with Alt←/Alt→.
On Windows»
- Tap the arrow keys to move by
1unit or the distance defined in Preferences > Distances > Contour arrow moves. - Hold Shift to move by
10units or the distance defined in Preferences > Distances > Contour shift+arrow moves. - Hold ShiftCtrlAlt to move by
100units. - Hold Ctrl (new) or CtrlAlt to also nudge (interpolate proportionally) the handles of neighboring nodes.
- Hold Alt (new) to move a smooth node between its handles, move a sharp node but keep the handles in place (same as Alt-dragging).
- To increase/decrease the length of both handles of a node, use AltPgUp/AltPgDn or AltEnd/AltHome. Previously, this worked with Alt←/Alt→.
Showing handles in Mask and inactive layers»
As previously, in Preferences > Glyph Window > Inactive, you can decide how the Glyph window shows nodes when View > Show > Nodes is off and nodes in inactive elements. You can hide them or show them in tiny or slightly larger size.
This affects how nodes in contours are shown when the Element tool is active. It also controls node display with Contour tool and other contour editing tools:
- when View > Show > Nodes is off (except those over which you hover your pointer)
- in inactive elements when you have several unlocked elements (but not components) in the current glyph layer
- in the other glyphs when Edit > Edit Across Glyphs is on, but Edit Across Elements is off
- in the Mask layer, if View > Show > Mask is on
- in other visible layers that are shown as wireframes
Finally, the second setting (tiny) shows smaller nodes with the Brush, Pencil, Rapid and Pen tools.
But what about handles (Bézier control points or BCPs)? In FontLab 7, you can see handles in the Mask layer and in other layers (masters):

- if you turn on the new Handles toggle in Preferences > Glyph Window > Inactive, and the nodes are not hidden in this setting
- and if View > Show > Handles is on
- for Mask, if View > Show > Mask is on
- for other layers (masters) if the layers are visible and shown as wireframes (see the Show inactive layers as wireframes section for details)
The new Handles toggle does not affect how the Glyph window shows handles in other inactive elements on the current layer. However:
- You can see (and edit) the handles of other glyphs with Edit Across Glyphs and …Elements both on.
- You can always see handles with Rapid and Pen if View > Show > Handles is on, but the second node in inactive elements setting (tiny) shows them smaller.
More flexible Shift-dragging of points»
When you have one or more nodes or handles selected, and you Shift-drag an non-selected node or handle, when Preferences > Editing > Shift-drag node adds to selection is:
- On: when you hold Shift, then hold the mouse button and start dragging the point, that point is added to the selection. To deselect the previous selection, first hold down the mouse button, then hold Shift and then start dragging.
- Off: the previous selection is deselected regardless of whether you hold Shift before or after your hold the mouse button and start dragging. To add to the previous selection, Shift-click the point first, then Shift-drag it.
Tangent start points»
When a tangent node is a start point, its color is cyan like any other type of start point. Also, the arrow that shows contour direction is now more visible.
Clicking near a node, handle or segment»
Preferences > Distances > Hit to node lets you specify the maximum pixel distance from where you must click to the screen location of the nearest node or handle, so that it will be selected. This setting now also applies to clicking near a contour segment.
Smart corners»
You can now add Smart Corners to one or more selected nodes in the Node panel, and change their radius.
Anchors, pins and mark attachment»
Exporting mark attachment features»
FontLab lets you define visual mark attachment using suitably named anchors (e.g. above in a base glyph and _above in the corresponding mark glyph). FontLab uses these anchors to position marks in auto layers and in composite glyphs that you generate using Font > Generate Glyphs.
If the export profile section Features and Kerning > OpenType mark attachment is set to:
- Always create [mark/mkmk] code, FontLab will generate the OpenType mark attachment features (
markandmkmk) on the fly when you export the font into static or variable OpenType formats - Create [mark/mkmk] code if not present, FontLab will generate these features only if they are not defined in the Features panel. Choose ☰ > Create [mark] and [mkmk] Feature in the Features panel to convert the anchor-based mark attachment for the current master into
markandmkmkin FEA syntax. This is not useful if you use multiple masters. FontLab does not support autofea blocks in themarkandmkmkfeature code, so if you work with multiple masters, you should not createmarkandmkmkin the Features panel. - Do not create [mark/mkmk] code, FontLab will not generate OpenType mark attachment features.
Many designers only use anchors for some glyphs, or only in some masters. When trying to build the OpenType mark attachment features in such fonts, FontLab VI would often produce warnings and errors on export. So by default, FontLab 7 no longer generates and exports the OpenType mark attachment features. All built-in export profiles now have the setting Features and Kerning > OpenType mark attachment > Do not create [mark/mkmk] code.
To export mark attachment, duplicate one of the built-in export profiles in File > Profiles.. and in its Features and Kerning > OpenType mark attachment section, set Create [mark/mkmk] code if not present. If your source font is variable, make sure that all masters in the base and mark glyphs have matching anchors.
Choose Create [mark] and [mkmk] features from the Features panel local menu (☰) to create the mark attachment code for the current master in human-readable FEA format. This is useful for inspecting and manually editing the code, but is not very useful with multipl masters: if you export this code, all masters will get the same mark positions. Remove the features from the Features panel, and use the export profile settings, and FontLab will interpolate the anchors build the suitable mark attachment features for each instance or master separately.
Selecting anchors and pins»
To select an anchor or pin in the Glyph window, you can now Alt-click its name, or click the anchor or pin itself. This makes it easier to select anchors that have the same location. To rename the anchor or pin, click its name.
Moving anchors and contour selections»
In the Glyph window’s Contour mode, you can select some nodes, segments or contours, then Shift-select some anchors, and then use the arrow keys to move both the contour selection and the anchors. This does not work with dragging.
To move all contours and all anchors, press CmdA (Mac) or CtrlA (Windows) to select all contours, then Shift-click an anchor, then press CmdA (Mac) or CtrlA (Windows) to select all anchors. With both contours and anchors selected, use the arrow keys to move the selection.
Copying anchors and pins»
When you have one or more anchors or pins selected in the Glyph window:
-
Use Edit > Copy Anchors/Pins to copy the selected anchors, pins and selected contours (if any).
-
Use the new Edit > Copy to Masters (CmdY on Mac, CtrlY on Windows) to copy the selected anchors and pins, and then paste them to all masters of the current glyph. If the other masters don’t contain anchors/pins with a given name, these anchors/pins are created. If the other masters contain anchors/pins with a given name, the position of these anchors/pins is updated.
Removing anchors»
You can now remove anchors with a certain name from all or selected glyphs in current master or in all masters.
Select some glyph cells in the Font Window and choose Tools > Actions > Contour > Remove anchors. Choose Active Layer and the dialog will list all anchor names in the current layer of the selected glyphs. Choose All Masters to see all anchor names in all masters of the selected glyphs. Select the names of the anchors that you wish to remove and click OK.
Slanting anchors»

When you slant glyphs using Tools > Actions > Slant, you can now turn on Slant anchors. This will move the anchors horizontally to accommodate the slant angle.
Show mark attachment no longer normalizes text»
When you you have Features off in the Glyph window, and you enter text that uses combining marks (e.g. /a/gravecomb/e/gravecomb), you can now turn on Show mark attachment (4th button in the property bar), and actually see the anchor-based mark attachment.
FontLab VI performed Unicode normalization if you showed mark attachment, so you’d actually see the text /agrave/egrave — since the sequences can be represented by precomposed characters (which is what Unicode normalization does).
Note
If you turn on Features in the Glyph window or the Preview panel, FontLab still performs Unicode normalization, so you will be seeing the precomposed Unicode characters. We are working on this.
Actions»
Operations in the Element and Contour menus typically work on the current selection in the Glyph window, or on the current layer of the glyphs selected in the Font window.
With the Actions dialog, you can transform and modify contours, transform metrics and hints, and add various effects to your contours in the current layer, visible layers or all font masters of:
- the current glyph of a Glyph window: choose Tools > Actions while in the Glyph window
- the text of a Glyph window (all glyphs visible in the Glyph window): choose Window > Open Font Tab (CtrlW), then Tools > Actions
- glyphs selected in the Font window: choose Tools > Actions from the Font window
- all glyphs: choose Tools > Actions and turn on Apply to entire font
Previously, when you opened the Actions dialog, you could choose a single action and click OK. FontLab would then run that action on the glyphs and layers you chose. You could repeat the same action on different glyphs with Tools > Repeat, but in order to run another action, you had to open Tools > Actions actions again.
Now, when you open Tools > Actions, the Actions dialog has a new =Run== button at the bottom. When you choose an action:
- Click OK to run that single action and close the dialog, like in older versions.
- Click Run to run that action but keep the dialog open. The OK button changes to Close, and you can change another action and click Run, and another, until you’re satisfied. Then click Close.
FontAudit»
FontAudit is FontLab’s built-in smart outline checker and fixer. You can test your glyphs for common outline problems: missing inflection points, autotrace artefacts, unbalanced handles, curve segments that can be replaced by line segments, missing extrema and other consistency issues.
In the Glyph window, turn on the “yin-yang” icon in the Toolbar, or turn on View > Show FontAudit to see FontAudit problem indicators (colorful arrows and lines). You can automatically fix most of those problems by clicking the problem indicator, or the corresponding entry in the Window > Panels > FontAudit panel.
In the Font window, choose Glyph > FontAudit Glyphs to run the enabled tests on the current layer of all selected glyphs. This will show a red corner in the Font window cells where FontAudit has found problems. Choose Glyph > Fix FontAudit Problems to perform the correction for all enabled tests.
Since automatic fixing is not always possible, run Glyph > FontAudit Glyphs again to see if any problems remain. Select the cells with the red corners and choose Window > New Glyph Tab to open a new window with all affected glyphs. Turn on View > Show > FontAudit and step through the glyphs with [/].
If you do “fix all”, you may want to disable the Weak inflection, Inflection, Unbalanced, Nearly flat curve and Curvature tests, as they tend to change the contours most.
Enabling and disabling FontAudit tests»
To enable or disable FontAudit tests of a certain type, or use the gear icon dropdown in the bottom-right of the FontAudit panel, or the new Preferences > FontAudit section.

New FontAudit tests: Irregular stem and Uncommon stem»
Uncommon stems»
With the new FontAudit Irregular stem test, you can easily check if the thickness of all vertical and horizontal stems in the current glyph layer is identical — and you can use FontAudit Fix to make them identical, which may be what you want glyphs such as O or H or n or m that have multiple vertical stems.
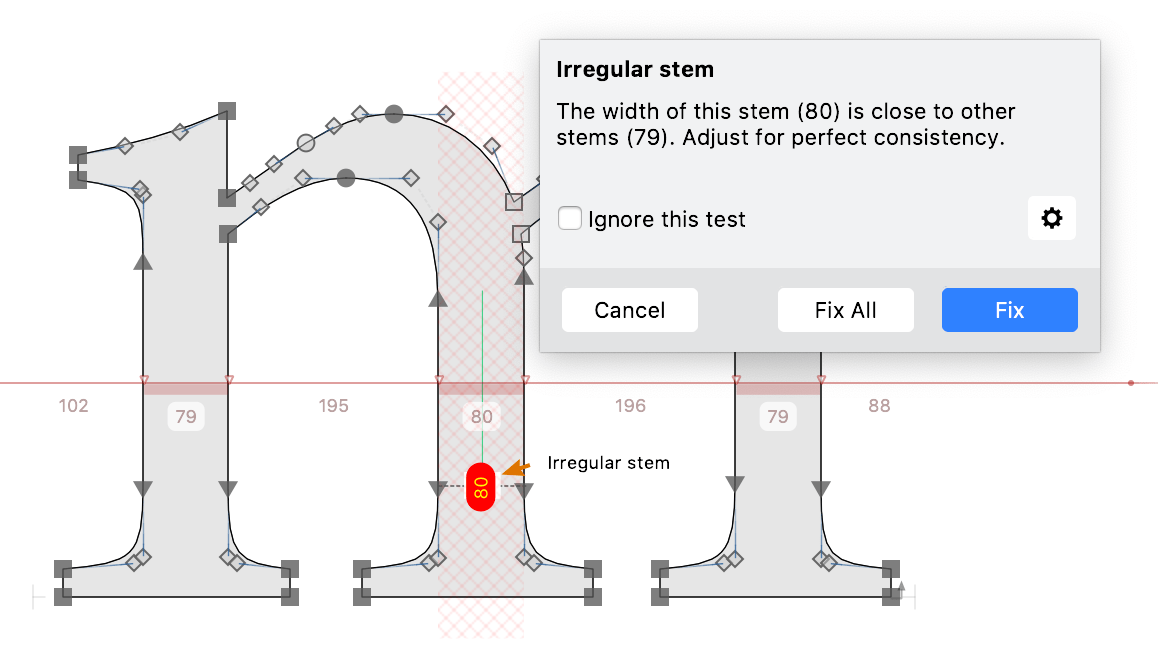
The Irregular stem FontAudit test detects if the width of one of the stems is off by a the predefined tolerance from other stems in the same glyph layer. If the stems differ, FontAudit uses the stem info in Font Info and the Measurements panel to determine which stems are “regular”, and flags the “irregular” stem with a red diagonal grid. It also shows a red badge with the yellow stem value. Click the badge and click Fix to equalize the stem: FontLab will move the nodes that belong to the stem towards the center of the glyph, so that the bounding box does not change.
Note
In a composite glyph, the Irregular stems test will show irregularities in stems that blong to different components, but automatic fixing is not available in these situations.
Uncommon stem»
With the new FontAudit Uncommon stem test, you can easily check if the thickness of vertical and horizontal stems in the current glyph layer differs from “common” stem thicknesses defined in Font Info > Stems by more than predefined tolerance. If the stem differs, FontLab flags the “uncommon” stem with a yellow diagonal grid, and shows the a yellow badge with the blue stem value. Click the badge and choose Fix to equalize the stem thickness to the closest Font Info stem.
You can change the tolerance used in the Irregular and Uncommon stem tests in Preferences > FontAudit > Irregular stem tolerance. Default is 2 font units.
New FontAudit test: Nearly flat curve»
If a curve segment has two handles that are perfectly aligned with the curve, FontAudit detects it with the Flat curve test, and can fix it by losslessly replacing the curve segment with a line segment.
If there is a tiny angle between the handles and the curve, the curve segment is “nearly flat”. Previously, FontAudit often reported an Inflection there, and offered a “fix” by inserting a node. But this often wasn’t the best fix. Now, FontAudit has a new Nearly flat curve test which will detect such situations, and will fix them by replacing the curve segment with a line segment. This is a great new method to clean up Autotrace results or pasted artwork!
Other FontAudit improvements»
-
Automatic fixing of FontAudit problems now works much better for many tests when you work in integer coordinates (with Contour > Coordinates > Round when Editing on). Previously, some fixes would introduce many extra nodes and actually made the contour worse.
-
The names and descriptions of the FontAudit tests are now much clearer. When you click a FontAudit problem indicator, the description will now tell you what Fix actually does for that type of problem, so it’s easier to decide whether to use automatic fixing or not.
Copy-paste»
FontLab 7 brings massive improvements to copy-paste: a new JSON-based human-readable clipboard format, ability to paste PDF artwork from apps like Affinity Designer, Sketch or Adobe Illustrator, copy-paste of Font Info and many others. See the subsequent sections for more info about these changes.
New JSON-based copy-paste system»
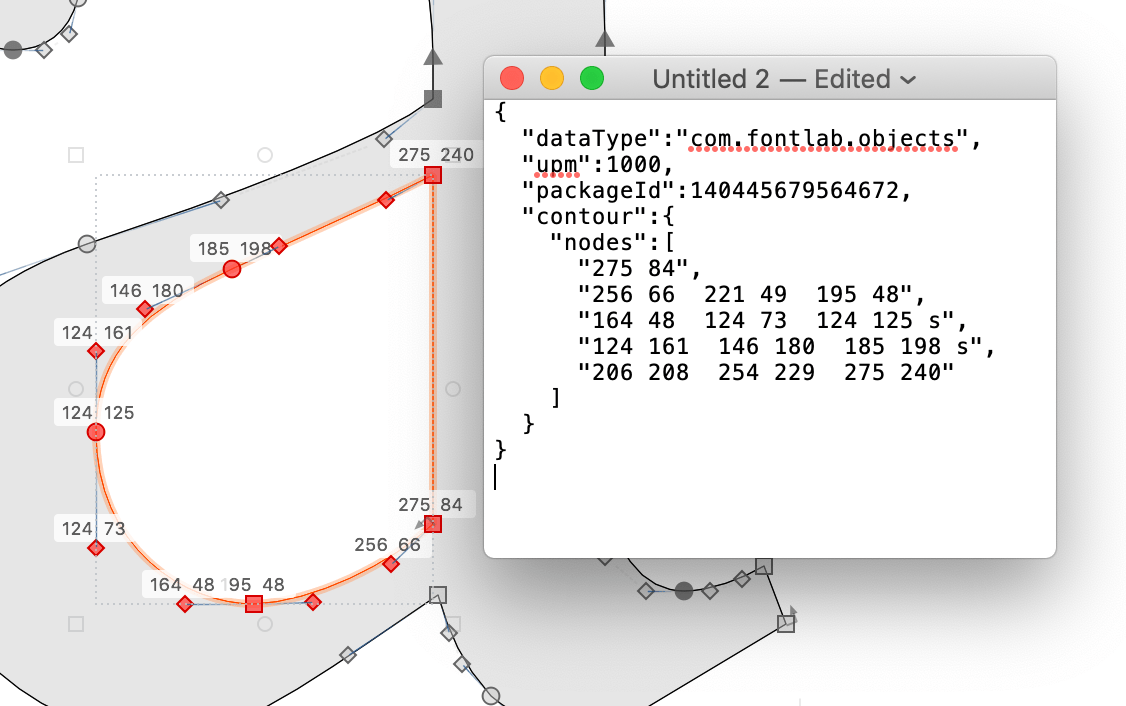
If you’re a technical font developer, you’ll be glad to know that when you copy glyph cells in the Font window, anything in the Glyph window, pairs in the Kerning panel, classes in the Classes panel or use the new Copy buttons in Font Info, FontLab 7 copies the data into the clipboard in a human-readable JSON format, which uses the same data structures as our VFJ file format.
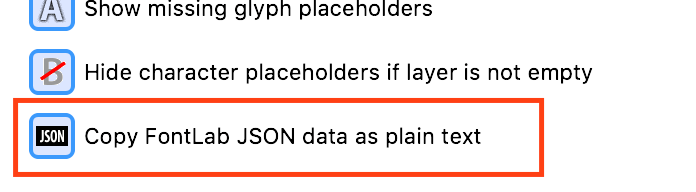
If you turn on Preferences > Editing > Copy FontLab JSON data as plain text, FontLab will also copy the data in the JSON format as plain text, so you can paste it into a plain-text editor such as TextEdit, Notepad, Sublime Text or Atom, edit the information outside, use search-replace or some scripts, and paste the data back into FontLab.
Note
FontLab’s clipboard JSON format uses a special key
"dataType"that tells the app what the JSON data is. For example, if the JSON data includes"dataType":"com.fontlab.classes", FontLab knows that the clipboard contents holds a classes definitions. The Source panel also uses the updated JSON format.
FontLab 7 Release Notes»
-
General, editing, anchors, actions, FontAudit, copy-paste
-
Metrics, kerning, Font window, Font Info, hints, guides, classes
-
Variation, imported artwork, components, auto layers, elements
-
Glyph names, OT features, text, layers, color, files, UI, Python, varia