FontLab 7 Release Notes: Part 2»
Metrics, kerning, Font window, Font Info, hints, guides, classes»
Metrics and Kerning»
-
FontLab 7 has new context menus in the Metrics and Kerning modes of the Glyph window.
-
You can now use the Font > Kerning menu to access the operations previously available only in the Kerning panel local menu (☰). You can use Tools > Commands to assign custom keyboard shortcuts to these menu items.
-
In the editing modes of the Glyph window, when View > Show > Spacing Controls is on, FontLab shows the numerical sidebearing values below the baseline. To hide these values, turn off Preferences > Spacing > Spacing controls show sidebearing values in editing modes. The sidebearing values will still be visible in Metrics mode if Spacing Controls is on.
-
FontLab now checks for invalid, extremely large kerning values when you open a font. When it finds such pairs, it shows a warning in the Output panel:
Pair glyph_name1 glyph_name2 in master master_name has incorrect value -16384, changed to -2000. FontLab flags the changed pairs red, so you can locate them in the Kerning panel and adjust the value. Previously, such pairs could trigger anOverflowErrorwhen exporting variable fonts. -
If you turn on View > Anchor Cloud in Kerning mode, the overlay of marks as they would attach via anchor-based mark attachment is now shown more prominently, and for both glyphs of the kerning pair. This lets you spot potential problems (clashes) when you export a font with both the
kernand themarkfeature.
Quick autospacing/autokerning (the “;” key)»
In the Glyph window, tap (press) the ; key:
- in the Kerning mode, to autokern the current kerning pair (FontLab will add or change the kerning pair only if the automatically calculated value is siginificantly different from the current value)
- in the Metrics mode, to autospace (automatically set the sidebearings) the current glyph
- new in FontLab 7: in all other editing modes, to autospace the current glyph if View > Lock > Glyph Metrics is off (this is useful when you draw a rough shape of your glyph and quickly want a sensible width)
The ; autospacing now also works if the glyph contains bitmap images.
Linking metrics»
When you have selected many or all glyph cells in the Font window, you can now enter metrics expressions in the Glyph panel’s advance width and sidebearing fields. Previously, this worked unreliably.
This is most useful if you want to link the width or sidebearings of, say, all glyph layers in the the Bold master to the corresponding glyph layers in the Regular master: in the Font window, choose the Bold master, choose Edit > Select all and then in the Glyph panel’s LSB and RSB fields enter :Regular. Then, when you’re spacing your Regular master, your Bold master will automatically be spaced the same way.
The Tools > Actions > Metrics > Set Sidebearings action now allows to link glyph sideberings to other glyphs the same way like in the Metrics table.
Warnings about problematic linked metrics»
When you open or change a font that has a problematic linked metrics, FontLab will now emit a more readable warning into the Output panel, e.g. Circular metrics expression 'i.sc' in LSB of 'Germandbls.sc' ('Black' layer) instead of Circular metrics reference with a metric 'Germandbls.sc:Black-LSB' and recipe 'i.sc'.
Set Kerning class»
In FontLab VI, you could create a 1st kerning class to group glyphs that have a similar right side, so that they will be kerned the same (with the same value) if they are first in the pair. You could also create a 2nd kerning class to group glyphs that have a similar left side, so that they will be kerned the same if they are second in the pair. To create 1st or 2nd kerning classes, you had to use the Classes panel.
FontLab 7 has an additional, simpler way to assign glyphs to kerning classes, create new kerning classes and remove glyphs from kerning classes: Set Kerning Class.
When the Glyph window is in Kerning mode, its status bar shows the value of the current kerning pair. The left side of the value shows the glyph or class name of the 1st glyph in the pair. Click the name to open the Set 1st Kerning Class dialog for the first glyph of the pair. The right side of the value shows the glyph or class name of the 2nd glyph in the pair. Click the name to open the Set 2nd Kerning Class dialog for the first glyph of the pair. You can also open these dialogs from the new Kerning mode context menu.
You can also open Set 1st Kerning Class and Set 2nd Kerning Class for the current glyph in the Font window status bar. When you have multiple glyphs selected in Font window, you can open Set 1st Kerning Class and Set 2nd Kerning Class for all these glyphs using the Glyph panel. Finally, you can open these dialogs the new Font > Kerning submenu.
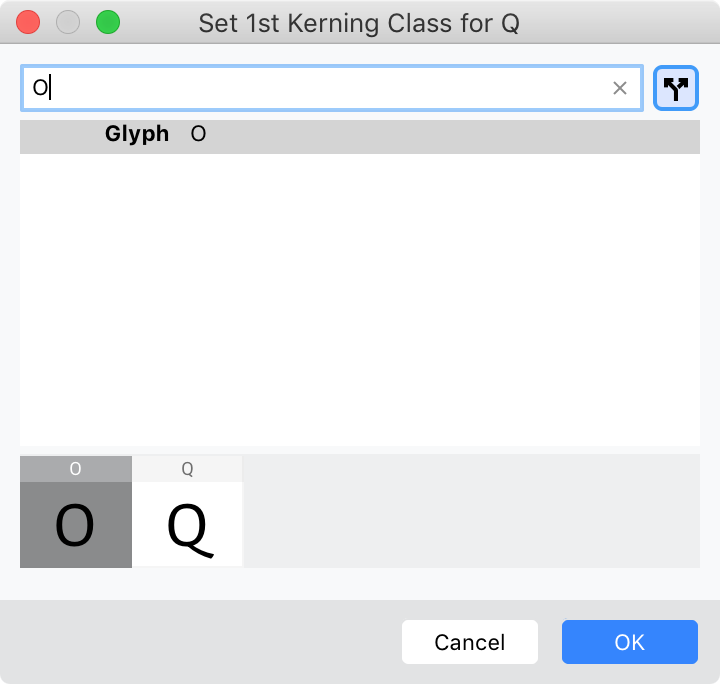
In the dialog, you can start typing and choose an existing kerning class to add the current glyph (or selected glyphs) to that class, or choose a glyph to create a kerning class. Click OK to update the class. Leave the field blank and click OK to remove current/selected glyph(s) from class. As in FontLab VI, you can use the Classes panel to review and edit your kerning classes.
To automatically build kerning classes, use Font > Kerning > Generate Kerning Classes.
In FontLab, each font master has its own kerning classes. To use the same kerning classes in all font masters, define your kerning classes in the main (default) master, then choose Font > Kerning > Match Kerning.
Both-sided kerning class»
In FontLab VI, you could group glyphs that have a similar right side in a 1st Kerning Class, and you could group glyphs that have a similar left side in a 2nd Kerning Class. But what if you want to group glyphs where both sides are similar? Now you can! FontLab 7 brings back a much-requests functioality from FontLab Studio 5: both-sided kerning classes!
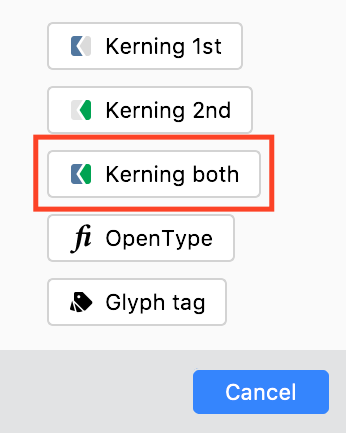
In the Classes panel, click Add class (+) and choose Kerning both to create a kerning class that can be used as either the 1st or the 2nd in a pair.
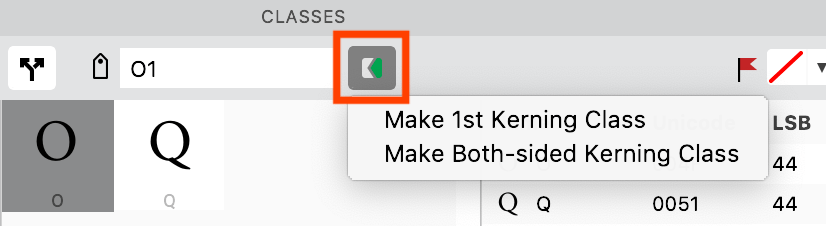
You can also choose an existing 1st or 2nd kerning class, click the class type button on top of the Classes panel and choose Make Both-sided Kerning Class.
Pairs & Phrases panel»
The Pairs & Phrases panel provides two types of text lists that consist of phrases:
- The Texts mode of the panel has a list of short texts (text phrases) that consist of a few words, useful when doing design, and especially useful when spacing.
- The Pairs mode of the panel has a list of words (pair phrases) with a marked kerning pair, useful when kerning. When you choose a pair phrase, the Glyph window activates the marked kerning pair so you can immediately adjust its kerning.
At the bottom of the panel, you can set the mode. If you choose Auto, the panel will switch to Pairs mode when the Glyph window is in Kerning mode, otherwise it will switch to Texts mode.
Use FnCmd↓/FnCmd↑ (Mac) or CtrlPgDn/CtrlPgUp (Win) to step through the phrases. When you go to the previous or next phrase, the phrase is shown in the current Glyph window. When the panel is open and Preferences > Spacing > Smart navigation with the up/down arrow keys is on, you can also step through the phrases with ↓/↑.
In FontLab 7, both the Texts and the Pairs mode can have multiple phrases lists. Click the new ☰ button at the bottom of the panel to switch between the lists.
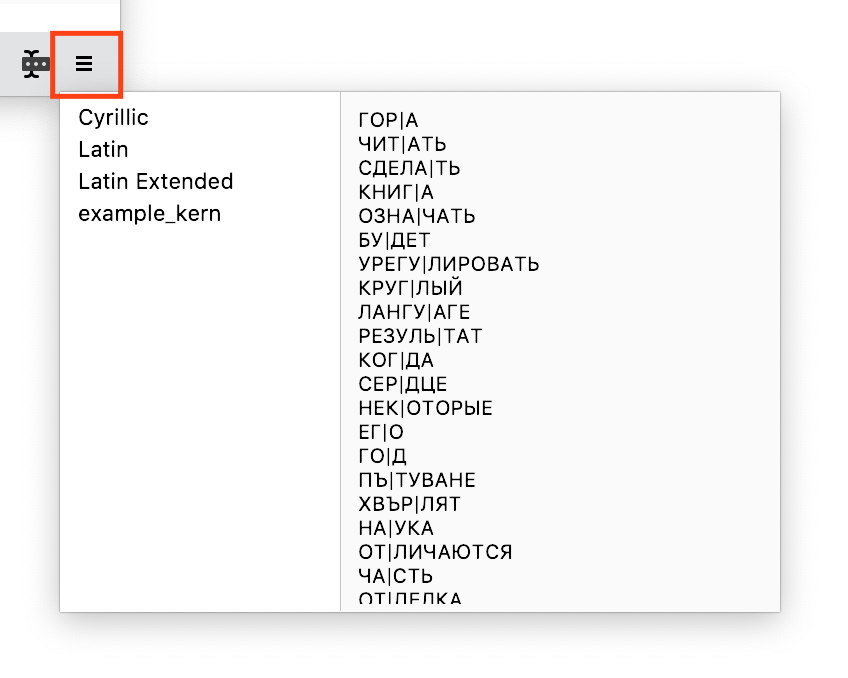
FontLab 7 also includes three built-in pairs lists that you can use to step through when kerning:
- Latin: a list of 1,000 Latin-script words with marked kerning pairs. The list has pairs for uppercase-uppercase, lowercase-lowercase, uppercase-lowercase and punctuation pairs. Each group is arranged by “kernability” of the pair — the most frequent pairs that commonly have large kerning values are listed first.
- Latin Extended: the same list, but each word is surrounded by pseudowords that show the 1st and 2nd glyph in the pair between regular letters (HOno).
- Cyrillic: a list of 700 Cyrillic-script words, arranged similarly to the Latin list.
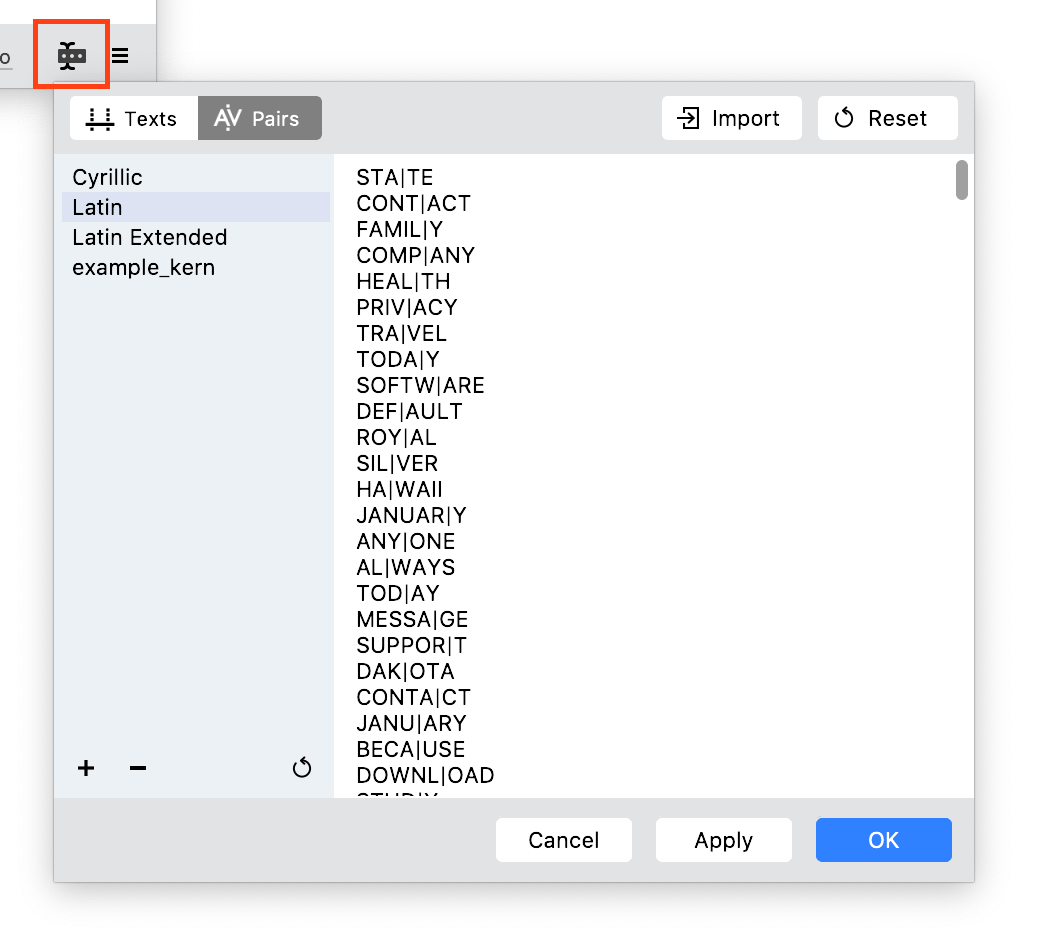
In FontLab VI, you could click the Edit Pairs & Phrases button at the bottom of the panel. In the dialog, you could edit the Text or Phairs phrases list, open the list from a text file or save it. But at any given time, you could work with just one list of text phrases and one list of pair phrases. In FontLab 7, the Edit Pairs & Phrases dialog has a sidebar where you choose from multiple phrases lists, edit the contents of the list, or a new list from a plain-text file.
Font window»
Create new glyphs»
Create new glyphs in empty Font window cells»
If you have a filter active in the Font window, and if you select some empty glyph cells (with a gray background, for glyphs that don’t exist in the font yet), you can now use Font > Create Glyphs (AltCmdN) or Create Glyphs from the context menu to create all glyphs in the selected empty glyph cells. Previously, you could double-click or press Enter to create glyphs in emtpy glyph cells, but there was no menu command.
In Preferences > Operations > New glyphs, turn on fill created glyphs with content when available to build the new glyphs if they are supposed to be composite glyphs (for example, accented letters). If you also turn on create auto layers if possible, those composite glyphs will build as auto layers, so the missing components will appear later if you add the necessary source glyphs. If the new composite glyphs are not created as auto layers, only components available at the time will be added — but you can Alt-click Glyph > Auto Layer to turn all masters of those glyphs into auto layers at any later point.
Add a new glyph to the font»
If you’re in the Font window and only have existing glyphs selected, or if you’re in the Glyph window, you can quickly add a new glyph with Font > New Glyph… (which is then shown instead of Create Glyphs). On the Mac, use AltCmdN.
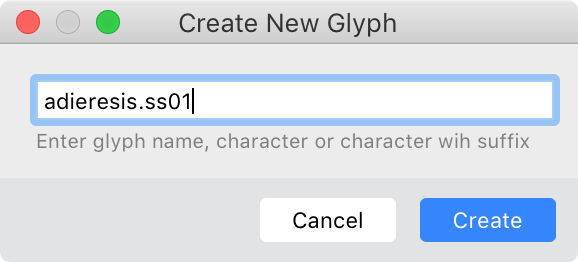
Enter a glyph name (e.g. adieresis.ss01), a character (e.g. ä) or a character with a suffix (e.g. ä.ss01) in the dialog box and press Enter. FontLab will generate the glyph using Preferences > Operations > New glyphs, and if you’re in the Glyph window, it’ll insert the new glyph into the text next to your current glyph.
Previously, you could add new glyphs to the font using Font > Generate Glyphs… or Font > Add Glyphs…, but that required using a more complex user interface. New Glyph… is quick and simple.
Paste in Font window: replace or append»
Previously, when you pasted glyphs in the Font Window, FontLab either replaced the selected glyphs, or — if the Font window filter was set to Index — it appended the glyphs, adding a suffix to the glyph names if necessary. This was reminiscent of how this worked in FontLab Studio 5, but many people found it confusing.
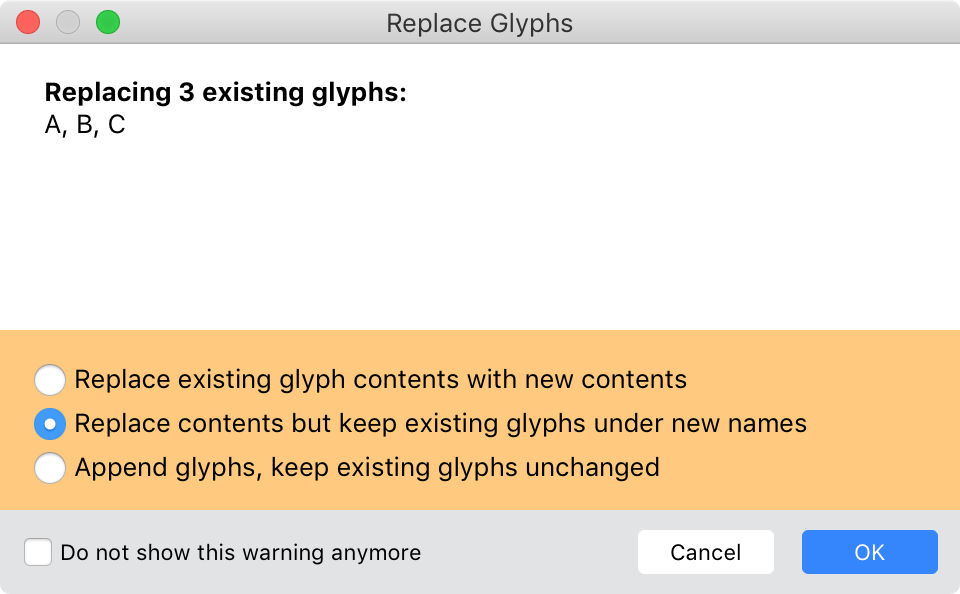
FontLab 7 behaves more clearly. When you paste glyphs in the Font window, FontLab now shows a dialog with three options:
- Replace existing glyph contents with new contents: no new glyphs are created
- Replace contents but keep existing glyphs under new names: new glyphs with a numerical name suffix will be created that hold the “backup” of the glyphs that you paste into
- Append glyphs, keep existing glyphs unchanged: this works like Edit > Append Glyphs, the pasted glyphs will be added to the font’s glyph set, and a numerical suffix will be added to the names of the pasted glyphs if necessary.
Font window filters»
When you’ve applied a Font filter in the Font window (using the Sidebar, the Search box or the Font filter dropdown in the Font window property bar), the top portion of the Font window shows the filtered glyph cells (the ones that match the filter criteria). If the Hide unfiltered glyphs toggle is on, the unfiltered glyphs are not shown, and if it is off, they are shown below the filtered glyphs. FontLab 7 brings several improvements to this:
Click Clear filter (✕) next to the Font filter dropdown to clear (remove) the filter, and to see all glyph cells in the Sorting order you choose.
When you apply a Font window filter via the Font filter dropdown or one of the sidebar choices, then use the Search box and choose Text, when you then click Clear search, FontLab will now restore the previously active filter.
When you click the Font filter type dropdown to change the filter type to Encoding, Unicode range, Codepage, Category, the next dropdown (Font filter) will show the most recently used filter of the type you chose.
Alt-click the Font filter type dropdown, choose the type, and the next dropdown will show the filter that best matches the current glyph. For example, if you click a Font window cell for a Cyrillic letter, Alt-click the Font filter dropdown, and choose Script, the Font window will be filtered with Cyrillic script. This works for scripts, Unicode ranges and categories. It even works for encodings and codepages, giving your the first filter that matches the current glyph.
The property bar Category and Script font filters now first show existing glyphs, followed by empty cells. Previously, empty cells were shown first.
Font window status bar»
The Font window status bar (at the bottom) now lets you edit the current glyph’s tags and the current glyph layer’s LSB, Width, RSB, 1st and 2nd kerning class, as well as the auto layer status of all layers of the current glyph.
The status bar only lets you edit the properties of the current glyph, not of all glyphs selected in the Font window. To edit properties of multiple glyphs, use the Glyph panel.
Font Info»
- The title bar of the Font Info dialog now shows the path to the font file, so it’s easier to work with different versions of the same font.
- All pages of the Font Info dialog now have icons, and the Preferences dialog pages have updated icons.
- FontLab 7 includes an updated database of font vendor IDs used in Font Info > Creator.
- When the number of glyph layers in the font exceeds 10,000, FontLab did not automatically calculate and show the contents of Font Info > Family Dimensions > BBox top and BBox bottom. Now, in such cases, an Update button next to BBox bottom. Click it and the fields will be calculated.
Variations in Font Info»
Please check the revised Variations and Working with Variations articles in the User Manual for more information about the FontLab 7 changes for variations in Font Info.
In a font with multiple axes, you can produce a list of predefined instances as a combination of all axis instances. FontLab also exports the axis instances into a variable font as a STAT (style attributes) table. The STAT table is a mandatory table in variable OpenType fonts, and future apps may use to let end users select instances from a series of per-axis lists of axis instances, instead of presenting end users with a huge list of predefined instances. You can define axis instances in File > Font Info > Axes using a new syntax:
AttributeName1=DesignLocation1, "Attribute Name 2"=DesignLocation2`, ...See Working with Variations for more information.

Click on the new Axis Graph button to:
- Change the axis range (minimum and maximum value) for the design coordinates, which is used inside FontLab for extrapolation and the scale of the Variation panel sliders
- Map the design coordinates range to the user coordinates range
- Define non-linear mapping, by manually or automatically adding “breakpoints” for the mapping. All variation sliders in FontLab work on the design coordinates, so you won’t see the non-linear behavior. The Axis Graph mapping does not affect the export of static instances, but when you export a variable OpenType font, FontLab will write this mapping to the
avar(axis variations) table.
The Font Info sidebar shows the numbers of Axes, Masters and Instances
The Font Info sidebar and the Masters page shows the name of the main (default) master in bold.
In the Masters and Instances pages, each axis location is shown in a separate column. You can click the column headings to sort the masters and instances. Note: sorting masters affects the order of masters in the Layers & Masters panel==.
In the Masters and Instances pages, you can now select multiple entries, and edit the information for the selection.
When you add a new axis, FontLab assigns its default location to existing masters. Previously, FontLab could assign another location.
After you delete an axis and click Apply, FontLab correctly removes the deleted axis from master locations.
Copy-paste Font Info between fonts and masters»
You can now copy-paste Font Info data between fonts and masters with the new set of buttons at the bottom-left of the Font Info dialog. You can copy-paste data for one Font Info page (except the Masters page, which is intended), or for all Font Info pages:
- from one single master to another single master in the same or in another font
- from one single master to all masters in the same or in another font
- from all masters in a source font to one or more corresponding masters in another font; corresponding masters are masters in the font into which you are pasting, which have the same names as masters in the font from which you have copied font info;
When you copy font info for a single master, you can paste font info into any other single master of the current font or of another font:

- To copy all pages or the current master, click Copy all pages (the 2nd button). Now switch to another master or another font. Since the clipboard contains info of all pages, you can change the page and click Paste page (the 3rd button) to paste into the current page of the current master.

- To copy the current Font Info page of the current master, click Copy page (the 1st button). Now Paste page will only work if you switch the font or master but stay on the same page.
When you copy font info for a single master, you can also paste font info into all masters of the current font or of another font:
- Click Copy all pages or Copy page, then Alt-click Paste page to paste the copied info to all masters of the current font, or switch to another font and Alt-click Paste page to paste the info to all masters of that font.
When you copy font info for all masters, you can paste font info to corresponding masters in other fonts.
-
To copy all pages of all masters, Alt-click Copy all pages. Switch to another font. Click Paste page to replace the current page of the current master if it is “corresponding” to the copied data (i.e. the copied info has data for a master that has the same name as the current master). Alt-click Paste page to replace the current page of all corresponding masters.
-
To copy the current page of all masters of the current font, Alt-click Copy page. As long as you stay on the same page, Paste page and Alt-Paste page will work for corresponding masters.
If you clicked Copy all pages (current master) or Alt-clicked it (all masters), you can paste info to corresponding masters in multiple fonts: click the Paste to fonts… button and in the Paste Font Info Data dialog select one or more currently open fonts.

- If Paste to all masters is off and you click OK, FontLab will paste info for all pages into the current corresponding master of the selected fonts.
- If Paste to all masters is on, OK will paste all pages into all corresponding masters of the selected fonts.
Note
Since this copy-paste uses our new JSON-based system, you can turn on Preferences > Editing > Copy FontLab JSON data as plain text, use one of the new buttons, then paste Font Info data info a text editor, edit it there, and paste it back into a font or master. This way, you can paste font info between fonts with multiple masters even if their masters don’t match by name — just edit the master names in the intermediate JSON so that they correspond to your target font, and duplicate some portions of the data if needed, before pasting.
Font Info > Overview: copy-paste and edit info in a multi-master table»
If you want to copy some Font Info data from the current master to multiple (or all) masters of the current or another font, the Copy-paste buttons in Font Info won’t help, because multiple masters cannot all correspond to one master. But there is another method:
The new Overview page of Font Info shows the most important Font Info data in form of a table, where each font master is a column. You can quickly compare the data across your masters, and you edit the values directly there.
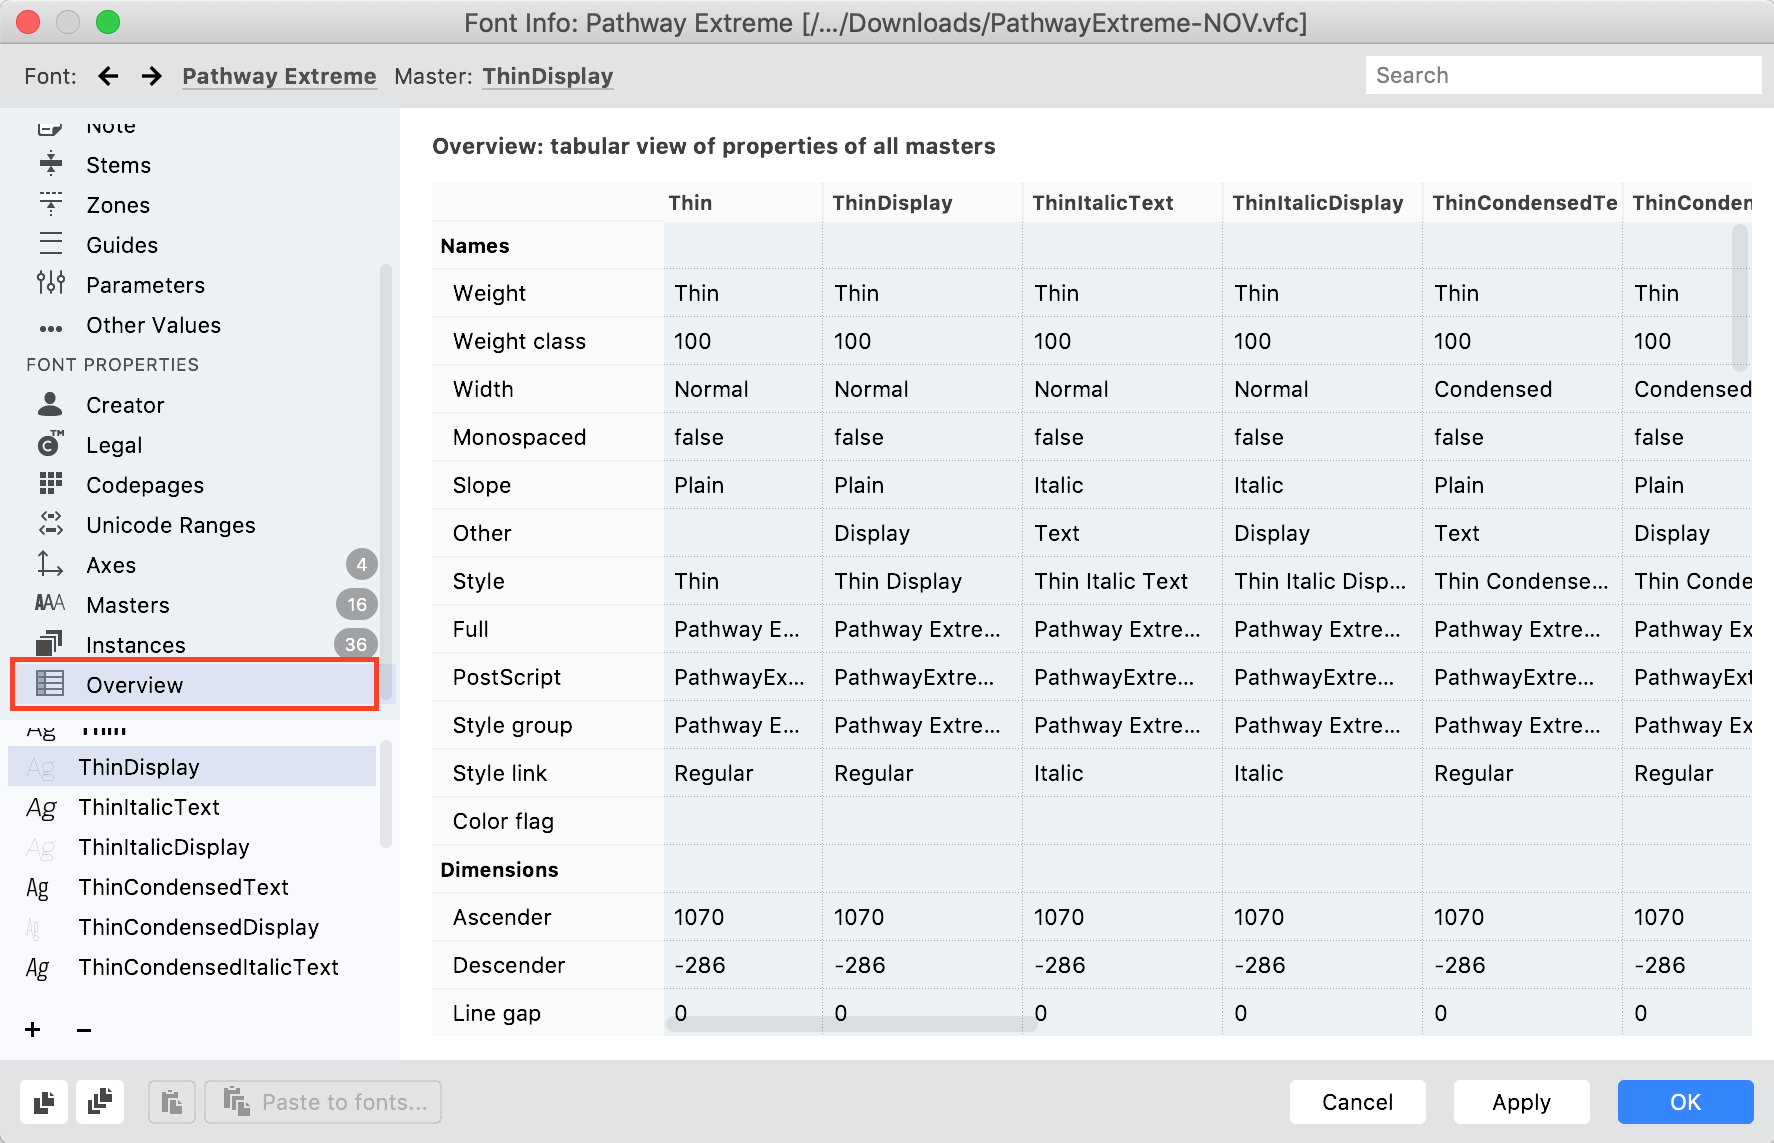
You can select and copy some cells (some settings for one master), and paste the values to corresponding cells of another master, and even to another font.
Also, you can select some Font Info > Overview cells, copy them and paste them to a text editor or a spreadsheet app (such as Microsoft Excel, Apple Numbers or Google Spreadsheets). You can edit the data there, copy, and paste back into
Font Info Overview!
Hints and Power guides»
In FontLab, font guides, glyph guides, element guides, but also zones and hints are all guides. FontLab has two types of links between nodes and guides: linked nodes, that modify the way the nodes in your glyph layer move when you move a power guide, and linked hints that change their position and width when you move the nodes.
In FontLab 7, we’ve improved the manual creation of hints, but we’ve also adjusted the user interface terminology to better differentiate linked nodes and linked hints.
Linked nodes and Power guides»
When a node is linked to a guide (which can also be a hint or zone), that guide becomes a power guide.
When you move such a power guide, the linked node follows, and “drags” the unlinked nodes of the contour along. If you link some nodes of a contour to one power guide, and you link some other nodes to another power guide, and you then move one of the power guides:
- All nodes that you link to a power guide, and all unlinked nodes that are not between two power guides, will move by the same absolute distance as the power guide.
- All unlinked nodes that are between two power guides linked nodes will power nudge, i.e. proportionally interpolate their positions. This is overall similar to how TT points behave in TrueType hinting.
To create power guides (link nodes to guides) manually, you can switch to the Magnet tool (U) and drag a node onto a guide, hint or zone. Note: A node is always linked either horizontally or vertically to a power guide, even if the guide is slanted.
To automatically link nodes to guides in the current glyph layer, use Glyph > Add Power Guides. For more advanced power guide creation, use Tools > Actions > Contour > Power guides.
When you have two vertical power guides at opposite ends of a glyph, you can use Tools > Actions > Contour > Change power width to move the power guides horizontally, and therefore make the glyph width scale.
To show or hide the visual indicators of linked nodes, use View > Show > Node Links. To unlink nodes, choose Glyph > Disconnect Power Guides, or (to do it in many glyphs and masters), Tools > Actions > Contour > Disconnect power guides.
In FontLab 7, you can no longer link nodes to font metrics. To link nodes to vertical metrics, add a guide, link it with an expression to font metrics, then use it as a power guide.
Manually adding hints with the Magnet tool»
Linked hints are traditional PostScript hints, but these hints are linked to a node (one-directional linked hint) or to two nodes (bidirectional linked hint). If you move the nodes, the linked hint will change accordingly (either move or change its width).
Previously, to link hints to nodes, you needed to select two nodes with the Contour tool, and choose Tools > Add Horizontal Hint or Tools > Add Vertical Hint.
This is still possible, but in FontLab 7, you can also use the Magnet tool to add hint links — by Shift-dragging. Tap U to activate the Magnet tool, then:
-
Shift-drag vertically from one node to another node to add a “horizontal” (y-direction) bidirectional hint link (it will move and change its width if you move any of the two nodes).
-
Shift-drag vertically from a node into to canvas to add a “horizontal” (y-direction) one-directional hint link (it will move the linked side if you move the node, but will keep its width).
-
Shift-drag horizontally — either from one node to another or from a node to the canvas — to add a “vertical” (x-direction) hint link.
-
Shift-click a node to add a “ghost” hint, which is a special horizontal one-directional hint link. You should place ghost hints if the top or bottom portion of the contour is at an edge or within an alignment zone but does not have a horizontal stem or serif where you’d normally place a normal hint (for example, at the top and bottom of a sanserif “I”). FontLab will automatically determine the proper direction of the ghost hint.
You may add hint links either from left to right and bottom to top (positive hint widths), or from right to left and top to bottom (negative hint widths). FontLab will automatically correct the negative hint values on export.
If you have unlinked hints, you can link them automatically with Tools > Link Hints to Nodes. Previously, this menu item was called Hints to Links
Note
When you export interpolated instances, FontLab always uses the hints of the main master (the one with the blue circle in Font Info > Masters) and applies them on all masters, appropriately scaled.
Autohinting»
In addition to manually adding hints, you can always use Tools > Autohint (F7) to automatically create hints, or let FontLab create them on export.
In Preferences > Autohinting, you can decide whether FontLab should remove existing hints when it automatically creates hints, and whether it should link the automatically created hints to nodes. These options are now on by default.
Classes»
-
When you add a class in the Classes panel using the + button and choose the type, you can immediately type the name of the new class.
-
When you reorder classes via drag-drop in the Classes panel, FontLab keeps this order when you switch masters. Note: When you click the column headings, the Classes panel temporarily sorts classes by name or size. This sorting is temporary and is not preserved when you switch masters.
-
When you use the glyph names text field in the Classes panel to change the contents of a class, FontLab now updates the class right after you press Enter.
-
In the Classes panel, you can use the Filter by glyph text box to show only the tags or classes that contain a given glyph. Now, you can turn on Find glyph name synonyms to filter by synonyms rather than just the exact glyph names.
FontLab 7 Release Notes»
-
Metrics, kerning, Font window, Font Info, hints, guides, classes
-
Variation, imported artwork, components, auto layers, elements
-
Glyph names, OT features, text, layers, color, files, UI, Python, varia