Release Notes: FontLab 7.1.0.7363»
2 March 2020
FontLab 7.1 brings over 70 new and improved features, plus over 80 fixes, including:
- Add simple ink traps and unlink smooth nodes with Scissors
- Duplicate nodes with Knife
- Harmonize Handles to get G3-continuous, ultra-smooth nodes
- Better control the appearance of corners with looped corners
- Customize the size of the Curvature comb
- Draw consistent glyphs with Suggest Stems and improved auto stem detection
- Paste/import AI/PDF vector artwork as simple contours, or with stroke and color
- Better manage elements in the Elements panel, copy-paste them from Gallery
- Easily copy-paste sidebearings and kerning values in Glyph window
- Edit and export the PANOSE identifier
- Export and import Encoding files to create custom Font window filters
- Better work with workspaces (panel sets)
- Keep older copies in Trash / Recycle Bin when you save or export
Editing contours»
Scissors tool: simple ink traps and blunt corners»
When you Shift-click a node (smooth or sharp) with the Scissors tool, FontLab 7.1 duplicates the node, and intelligently moves the resulting two nodes apart by the distance defined in Font Info > Font Dimensions > Ink trap width
When Edit > Match when Editing is on, this happens on all matching masters.
You can still use Smart Corners to create live, adjustable rounded corners and curved ink traps. Note: curved ink traps made with Smart Corners are live until you use Apply Smart Corner, so existing ink traps in the current font master change when you change the Ink trap width parameter. Simple ink traps made with Scissors are created immediately.
Knife tool: Duplicate nodes»
When you Shift-click a node with the Knife tool (J), FontLab 7.1 duplicates the node in place but keeps the contour closed. When Edit > Match when Editing is on, this happens on all matching masters. Previously, you could select a node with Contour tool and press CmdD (Edit > Duplicate), but Shift-click with Knife is much faster when you want to perform node duplication in many glyphs.
Simple Knife click still breaks the node, i.e. duplicates the node but creates an open contour.
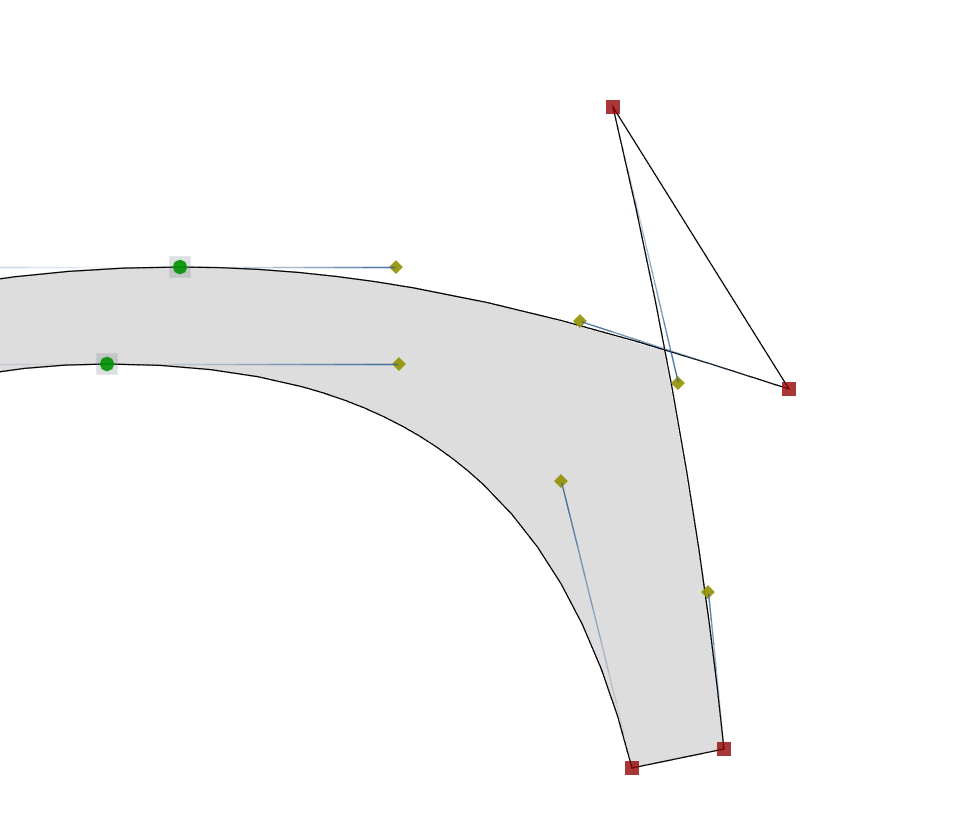
Unlink node»
Since FontLab VI 6.0, the Fill tool in FontLab has allowed you to create filled areas within intersections of open or closed contours. You can, for example, draw four open paths in the shape of a # and use the Fill tool (F key) to only fill the rectangle inside. FontLab then creates a special compound “filtered element”. The compound element contains the result of the Fill operation (filter), and contains the source contours. When you edit the source contours, the filter automatically updates the result (the filled rectangle). When you export a font that contains such filtered element, it discards the unfilled portions of the paths, closes the contours and exports the inner rectangle.
The Fill tool works together with the Scissors tool (Q key). Say you have a normal closed contour that forms a rectangle. Choose Unlink Corner from the context menu of one of the nodes, or use the Scissors tool to click the node. FontLab then unlinks the node: it cuts open the contour on that node, elongates the adjacent segments, and creates a compound element with the Fill filter applied.
Previously, you could only unlink a sharp node. In 7.1, you can also unlink a smooth node. Choose Contour > Unlink Corners to unlink all corner nodes (but not smooth nodes) in a contour selection.
The filtered result is identical to the original closed contour, but now, you have two independent “arms” that control the shape of the corner that is visible on the intersection of those arms. This gives you much more freedom in controlling the actual shape, because you can move one of the arm nodes to change the vertical edge of the rectangle, and keep the horizontal edge intact. This would be much more difficult to do with only one real corner node.
ShiftAlt-drag any of the arm nodes to elongate the arm segments further.
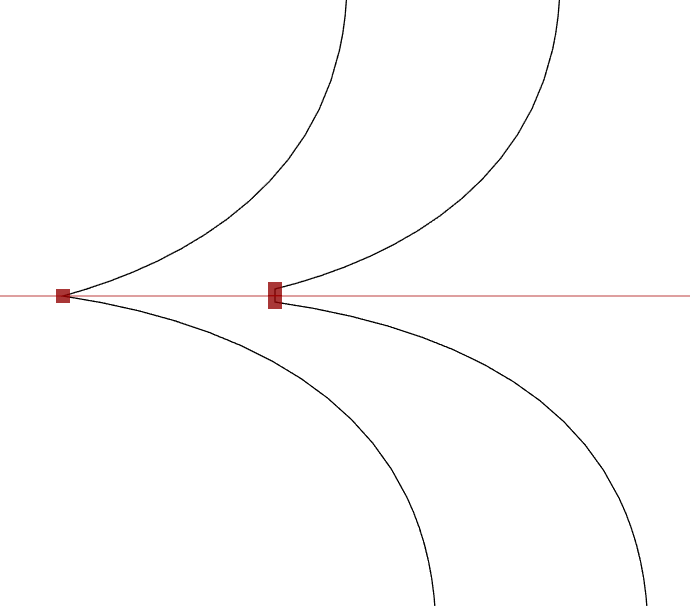
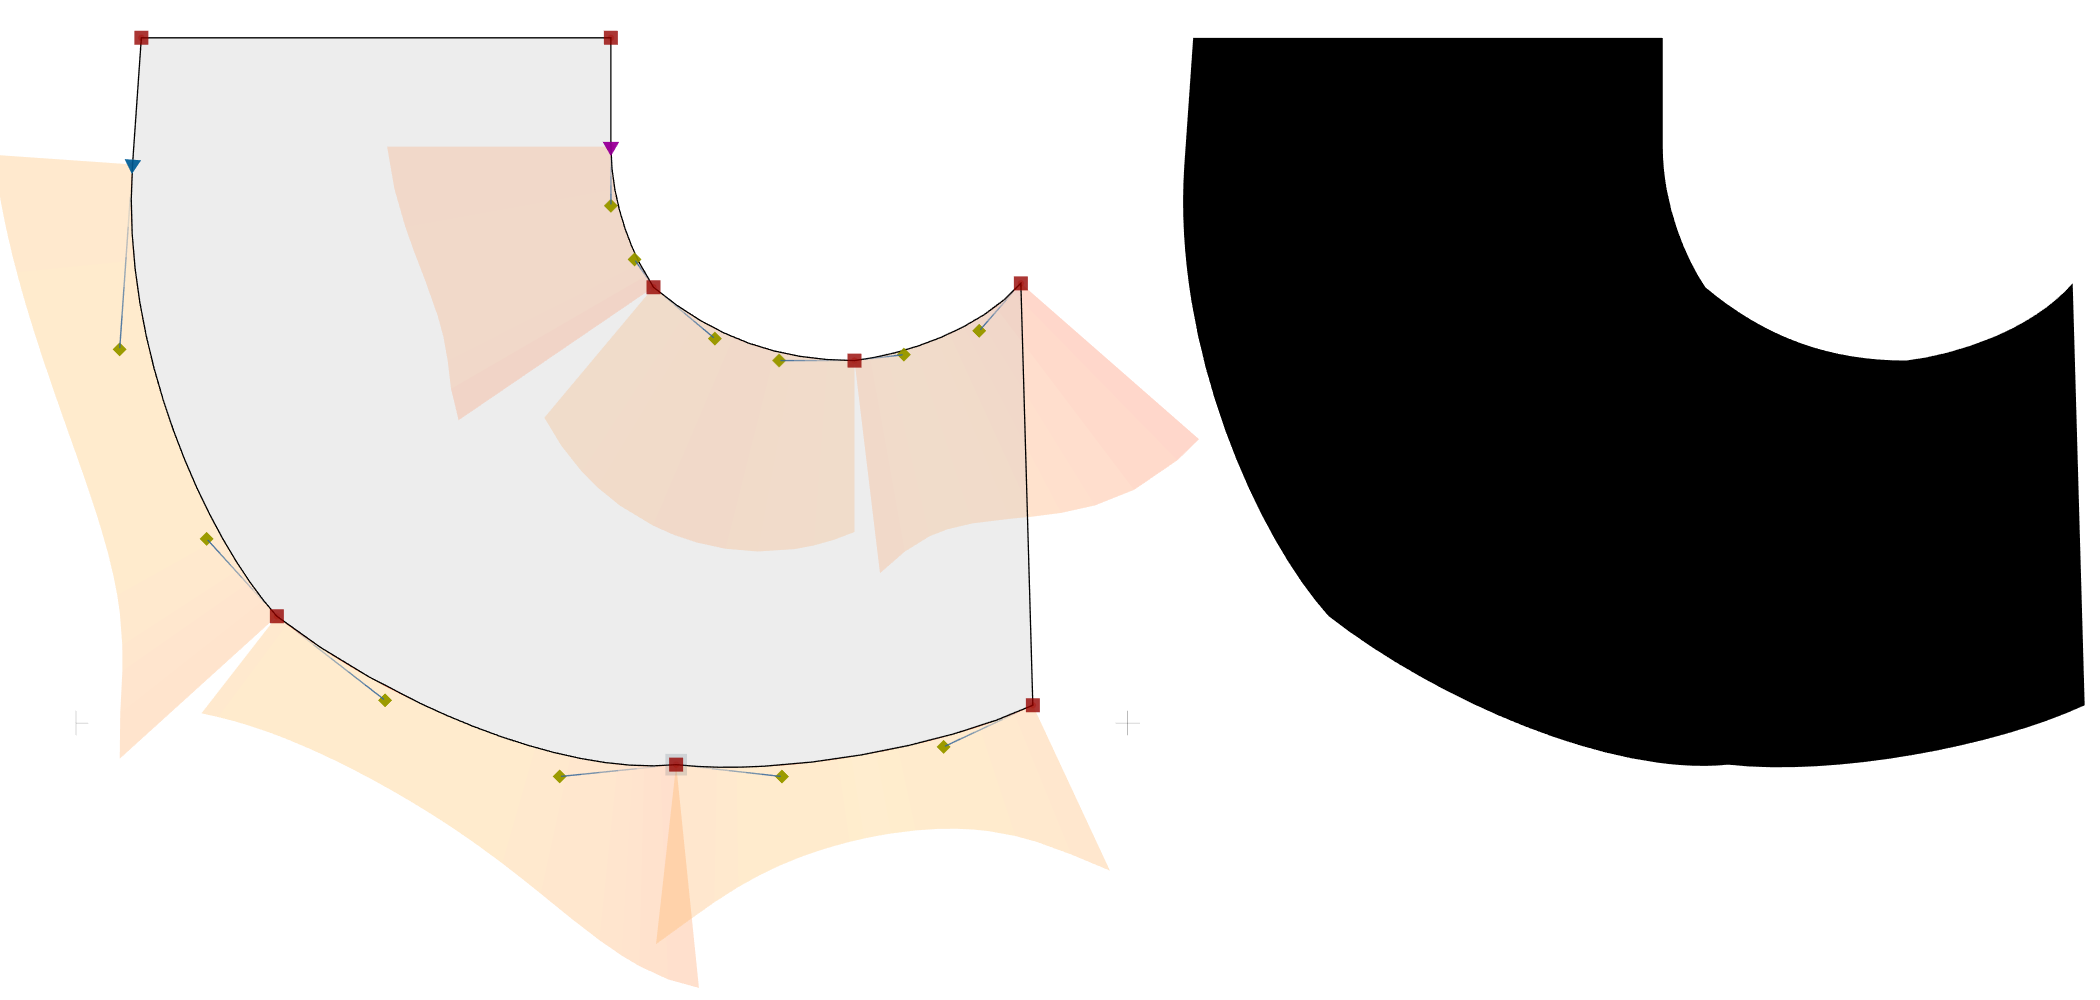
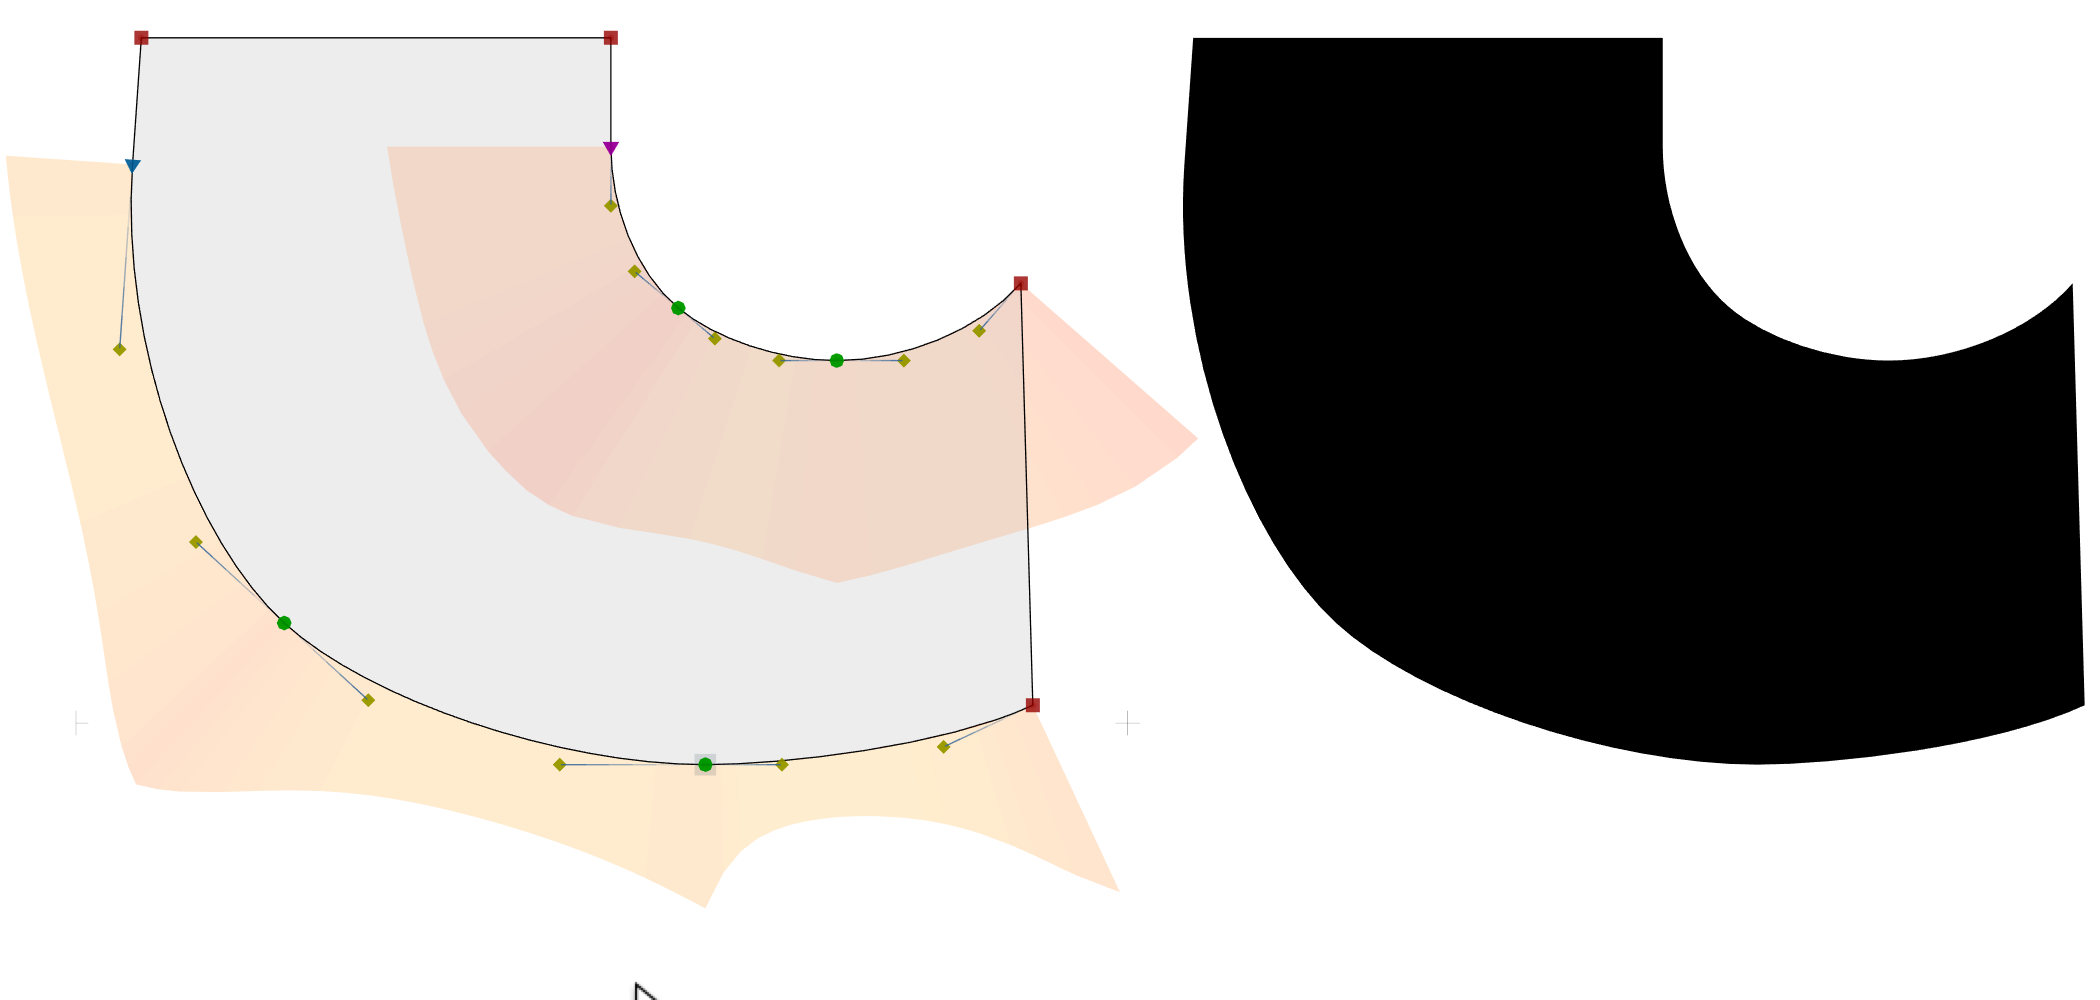
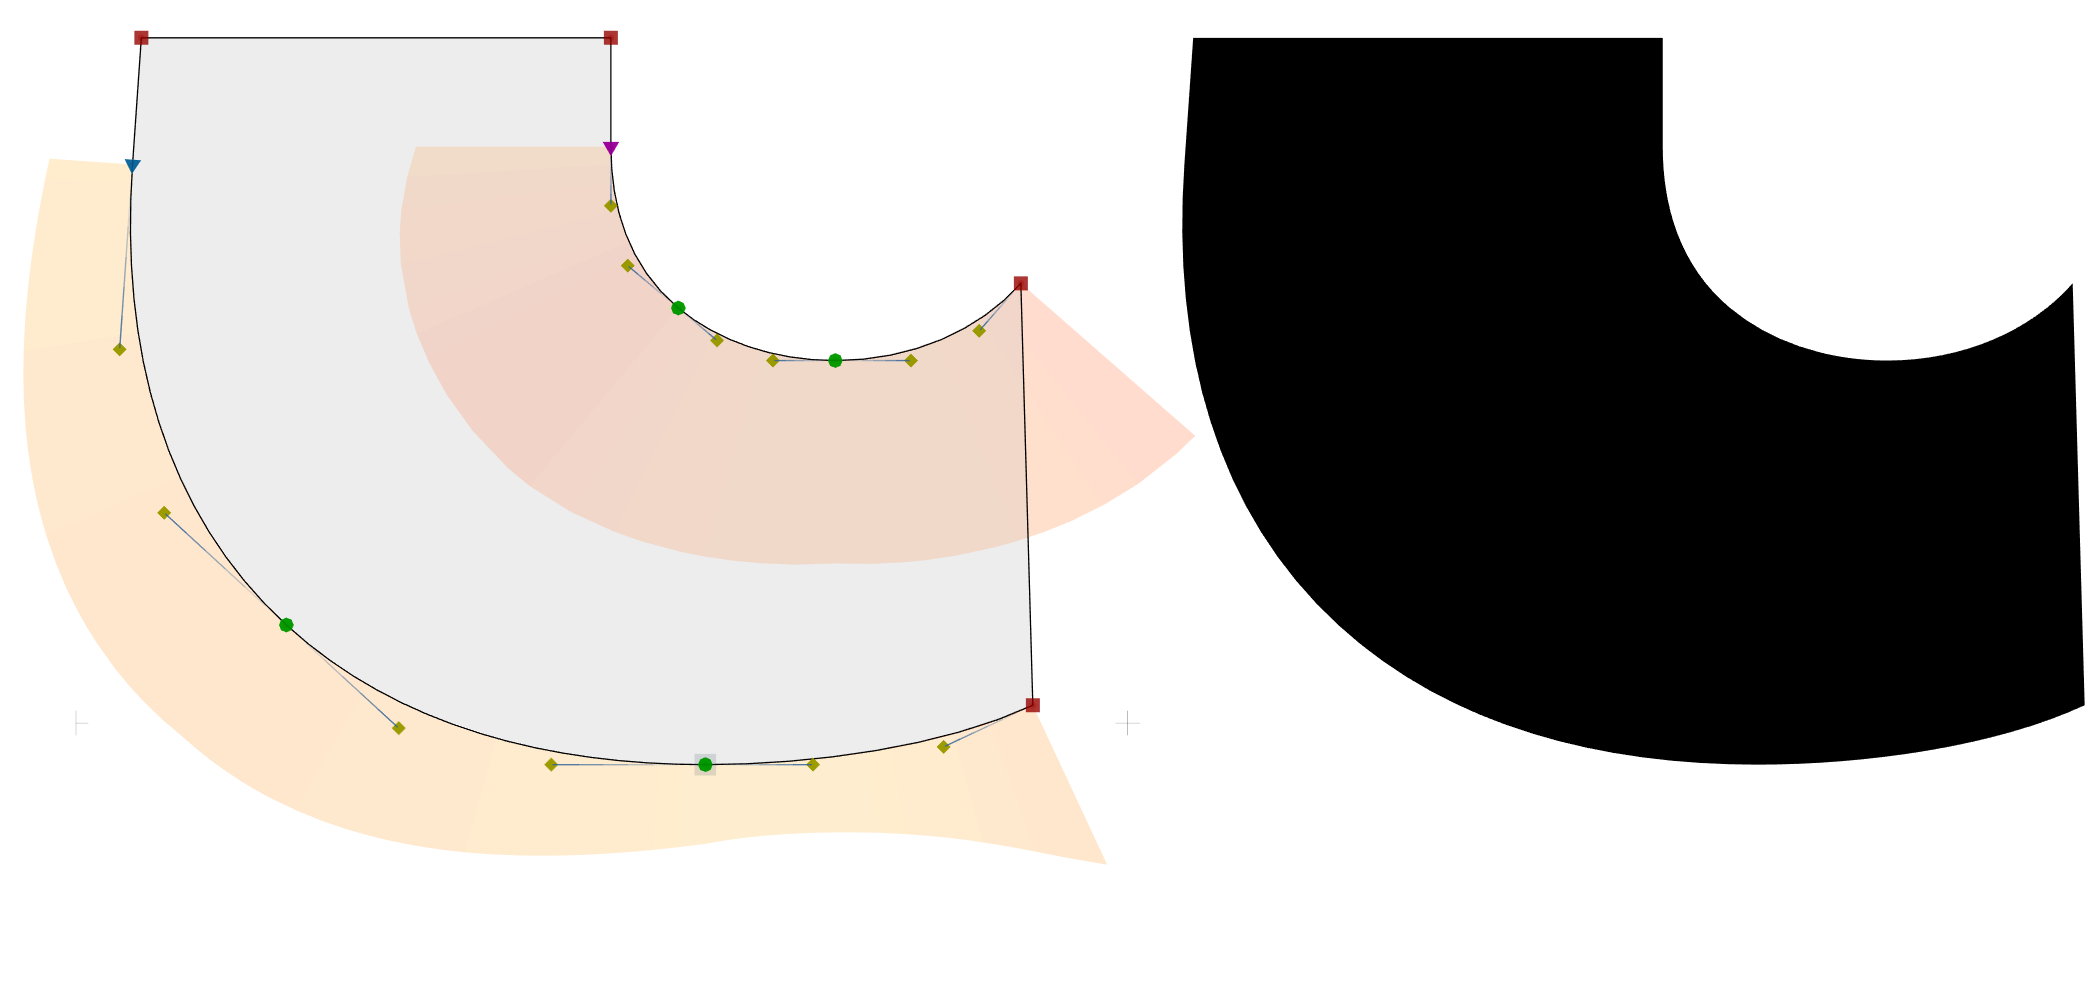
Looped corners»
In FontLab VI 6.1.2, we extended the Scissors tool with an additional functionality: looped corners. You could Alt-click a sharp node with the Scissors tool.
While Unlink Corner creates open contours, looping a corner duplicated the node and elongated the arm segments, but it kept the contour closed. So FontLab created a small triangular loop, where both arm nodes were connected with a line segment. If the loop was outside the filled area, FontLab created a filtered element and unfilled the loop, so the corner was visible at the intersection of the arms. However, we were not happy with how the looped corners worked with variation, so in FontLab 7.0.0, we disabled the functionality.
In FontLab 7.1, we are re-introducing looped corners. The new implementation does not use the Fill filter, and does not create compound elements, so it’s much simpler to use.
When you choose Loop Corner from the context menu of any node (smooth or sharp), of when you use the Scissors tool to Alt-click the node, FontLab 7.1 creates the triangular loop on the node.
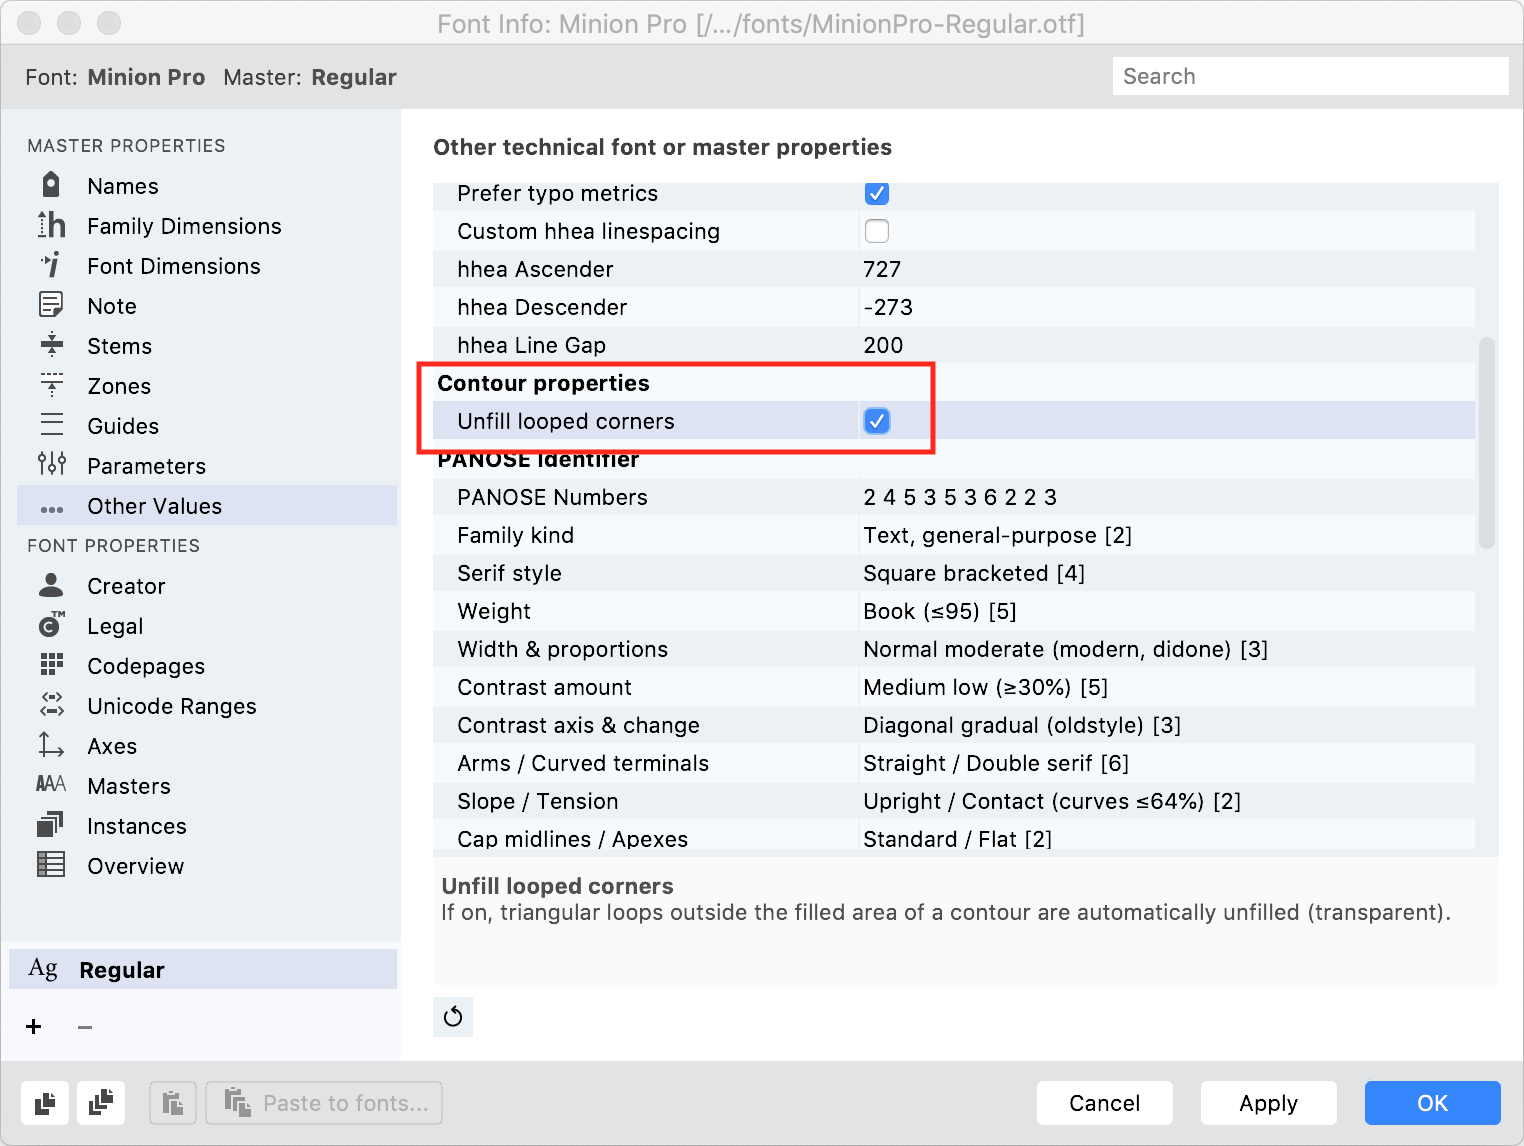
What happens then depends on the new setting Unfill looped corners in Font Info > Other Values > Contours, which is a per-master setting:
-
If the setting is off, FontLab renders the contours exactly the same way as end-user apps would render them if an outer looped corner existed in an OpenType or TrueType font, so the loop appears filled.
-
If the setting is on, FontLab automatically unfills the triangular loop if it’s outside a filled area, and removes the outer loops if you export the font into an end-user format such as OpenType.
In the export profiles for development formats, there is a new setting Outlines > Remove looped corners. If you export a font and this option is on, and if Unfill looped corners is on in Font Info, FontLab removes the triangular loops that are outside the filled areas and that are automatically unfilled. If the setting is off, FontLab keeps the loops.
- Unfill looped corners works individually per each master. Turn it on in each master where you wish to use the automatic unfilling of looped corners, or use Font Info > Overview > Unfill loops to set the value to
truein one master cell, and then copy that cell over to all other master cells. - When you open a
.glyphsfile, FontLab 7.1 turns Unfill looped corners on, as the file may contain open corners created in the Glyphs app, which are a similar concept. - When you open a file in a different format, FontLab keeps Font Info > Other Values > Contours > Unfill looped corners off. A font may contain such loops as a mistake, or as an intentional design feature, and FontLab lets you see exactly what end-users would see.
- In very thin masters, the automatic unfilling algorithm does not work well even if your glyphs don’t contain outer looped corners, just regular overlaps. You should keep Unfill looped corners off in these masters, and not use outer loops. Their benefit in very thin fonts is very limited anyway.
- Looped corners work correctly with variation inside FontLab, and export into static instances. If you experience problems with interpolation inside FontLab, turn Unfill looped corners off.
- When you make one of the arms of a looped corner curved, the visible corner will interpolate along that curve inside FontLab and in exported static instances. But when you export the font as a variable OpenType font, FontLab removes the outer loops in the masters, so the corner becomes a real corner and it will interpolate along a straight line. This is a limitation of the OpenType Variations format.
- Looped corners keep your contour element simple, so you don’t need to deal with filters. However, you can apply further filters. For example, you can add a Smart Corner on the intersection of the arms of a looped corner.
Handle selection»
When you Shift-double-click a handle to make it horizontal or vertical and the handle is close to the contour and there is no other selections, FontLab 7.1 no longer selects the contour.
Relative handle positions»
When you click a node, the Handle position relative to the node toggle in the Property bar lets you switch between showing absolute or relative position of off-curve points (handles, BCPs). FontLab 7.1 now remembers the setting between restarts of the app.
Integer coordinates and grid»
FontLab 7.1 improves the workflow with integer coordinates, the grid and the italic angle. It also introduces a new Harmonize Handles operation for G3-continuous smooth nodes.
Integer vs. fractional coordinates. Depending on Contours > Coordinates, FontLab lets you to work with fully integer coordinates for all nodes and handles (Round when Editing on), with dynamic rounding of fractional coordinates to integers on screen and export (Preview Rounding on and Round when Editing off), and with fully fractional coordinates for both nodes and handles (both settings off).
The OpenType TT (.ttf) format requires that coordinates of nodes, handles and anchors are integer, so there is an implicit grid that dictates the precision of your design. The OpenType PS (.otf) format allows fractional coordinates for nodes and handles. When you export a font that has nodes, handles, anchors or guides to a format that only supports integer coordinates, FontLab automatically rounds the coordinates to integers. Glyph metrics and kerning values are always integer.
Grid. For design purposes, you can specify an additional, visible grid, which appears if you turn on View > Show > Grid. In Preferences > Grid, you can specify the horizontal and vertical density of the grid lines, the transparency of the grid lines, and the transparency of the grid dots (grid line intersections). You can also slant the visible grid by a specified angle.
You can use the visible grid for snapping. You can set one or both transparencies in Grid Preferences to fully or almost transparent, so the grid will effectively be invisible. Snapping works only if you turn on both View > Show > Grid and View > Snap > Grid, and it works like this:
-
If you turn off Preferences > Grid > Round nodes, guides and anchors to grid points, the snapping is delayed: you can position an object anywhere but if you drag it near a grid dot and wait, it will snap to the grid.
-
If you turn that preference on, the snapping of handles (off-curve points) is delayed, all other snapping is instant.
Italic angle. In FontLab, you can define the italic for each master. When you export the font, text editing apps will slant the text cursor by the font’s italic angle. In Font Info > Font Dimensions, there are four fields that affect the italic angle:
-
The Italic angle is the angle expressed in degree. Click the Auto button to automatically calculate the angle based on your glyphs.
-
The Slope is the same angle, but expressed as two values: the lengths of the x-leg and the y-leg of the right-angled triangle where the hypotenuse is slanted by the italic angle. In other words, if the grid is slanted by the italic angle, every y vertical font units, the grid shifts by x horizontal units. When you use slope to specify the italic angle, you can use the integer coordinates much more effectively. For example, the angle 7.13° corresponds to the slope of ⅛, so the slanted grid perfectly meets the integer coordinates much more often than with the italic angle of 7° which corresponds to the slope 7/57.
-
If you use slanted sidebearings in FontLab, the Caret offset horizontally shifts the sidebearings to compensate for the slant. Click the Auto button to automatically calculate the offset based on your glyphs.
Slanted sidebearings (glyph metrics)»
In FontLab 7.1, the View menu now has an Italic Angle submenu that contains three entries that affect how the italic angle is used in connection with sidebearings and with the user-defined grid. Previously, FontLab had a 3-state menu item that had the same purpose but was less easy to use.
-
When you choose Apply to Metrics or Apply to Metrics and Grid, FontLab 7.1 visually slants the sidebearing lines (Spacing Controls) in the Glyph window by the master italic angle, and shifts them by the caret offset. FontLab also adjusts the numerical sidebearing values by the caret offset. When you use View > Measurement Line, FontLab shows the numeric values for sidebearings based on the intersections of the measurement line with the sidebearing lines that are slanted and offset.
-
When you choose Do Not Apply, FontLab 7.1 renders the sidebearing lines as upright, and does not use the italic angle or the caret offset for the numerical sidebearing values.
FontLab 7.1 will use italic angle defined in the main master when you edit metrics for a font-less glyph master.
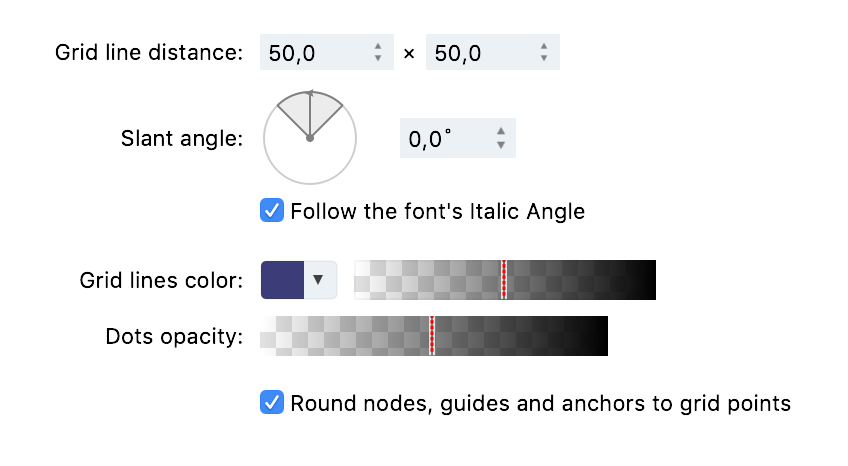
Slanted grid»
If you turn on View > Show > Grid, you can choose whether the visible grid should be upright or slanted.
-
When you turn off Preferences > Grid > Follow the font’s Italic Angle, FontLab always slants the grid by the Slant angle specified in Preferences. Set
0for an upright grid. -
When you turn on Preferences > Grid > Follow the font’s Italic Angle, FontLab 7.1 slants the grid depending on the setting of View > Italic Angle:
-
Do Not Apply: FontLab slants the grid by Preferences > Grid > Slant angle for all masters
- Apply to Metrics: FontLab does not slant the grid at all
- Apply to Metrics and Grid: FontLab slants the grid by Font Info > Font Dimensions > Italic angle, individually per master
Opening fonts with fractional coordinates»
When FontLab 7.1 opens a font source (for example an OTF or UFO) that contains fractional (non-integer) coordinates and you have Coordinates > Round when Editing on, FontLab will now show a Coordinates Rounding dialog where you can choose to round the coordinates or to turn off Round when Editing.
Working with fractional coordinates»
When you’re designing a font that has very thin strokes or very complex details, you can have “the best of both worlds”: integer nodes and fractional coordinates, like this:
- In Contours > Coordinates, turn off Round when Editing and Preview Rounding.
- Turn on View > Show > Grid and View > Snap > Grid.
- In Preferences > Grid, set both Grid line distance entries to 1, keep Round nodes, guides and anchors to grid points on, and move the Grid lines opacity and Dots opacity sliders to the left. You may move both sliders all the way to the left or keep the grid dots slightly visible.
With this setup, the nodes, guides and anchors will snap to the 1-unit integer grid as you edit, but handle coordinates will remain fractional. At any point during design, you can choose Contour > Coordinates > Apply Rounding to round both nodes and handles to integers.
- To export the font to OpenType PS (
.otf), customize the export profile and set Outline > Round coordinates to UPM grid > Keep fractional nodes and handles. FontLab will then optimize the placement of the handles so coordinates close to integers will become integer, coordinates close to 1/10 fractions of a font unit will export as single-digit decimal fractional coordinates, and other coordinates will export with 1/100 (two-digit) decimal precision. The overall size of the final OTF will only be a few percent larger than with all-integer coordinates, but will keep perfect curves. - To export the font to OpenType TT (
.ttf), customize the export profile and set Outlines > Conversion tolerance > Precise (larger file).
You can also increase the precision of both nodes and handles placement by setting Font Info > Family Dimensions > Units Per eM to a larger number such as 2000 or 4000. Both techniques can be combined.
Curvature and smoothness»
When you turn on View > Show > Curvature, FontLab draws colorful “curvature combs” alongside your PS or TT curve segments. The curvature is the curve speed, the change of the curve direction in proportion to the length of the curve.
When you drive a car on a road that is straight or flat (it changes its curve slowly), you can travel at high speed and devote most of the engine power to the movement forward. But if you enter a sharp, abrupt turn, you must brake and devote a lot of the engine power to counter-act the centrifugal force that tries to throw your car off-track.
You can think of the curvature comb in FontLab as a way to illustrate that centrifugal force. If the curvature comb is large (the distance between its top and the curve is high), and red, the curve changes abruptly at that point. If the curvature comb is small (the distance it low), and yellow, the degree of the curve change is small. Mathematically, the curvature is the derivative of the curve.
The junction of the curvature comb at a node shows the curve continuity, or smoothness of the curve at that node. See below for detailed discussion of smoothness/continuity.
G0, G1, G2, G3 curve continuity»
Two curve segments have G0 continuity if the curvature comb shows a triangular gap or overlap. This happens if the node between them is Sharp and the handles around the node have different angles. A Sharp node may produce a visible kink in the curve.
Two curve segments have G1 continuity if the curvature comb shows no triangular gap or overlap. This happens if the node is Smooth. Note: The transition between a curve and a line segment has G1 continuity if the node is Tangent. A Smooth node may produce a visible bulge in the curve.

Two curve segments have G2 continuity if the size of the comb is the same on both sides of the junction. This happens if the node is Genius or if you’ve applied Harmonize Node to it. Mathematically, G2 continuity is when the 1st derivative of the curve is equal.
Two curve segments have G3 continuity if junction of the comb is smooth, that is, if there is no visible kink at the top of the comb. This happens you’ve applied the new Harmonize Handles operation to the node (see below). Mathematically, G3 continuity is when the 2nd derivative of the curve is equal.
FontLab 7.1 provides automatic ways in which you can avoid visible bulges on a Smooth node, and achieve G2 continuity (Harmonize Node and Genius node) or G3 continuity (Harmonize Handles). Remember: these operations give a certain “mathematical” local smoothness at and around a node.
Think of them as quick short cuts, they are not a replacement for your eye. If you use the operations, check if the results are consistent with your design intentions, and use your eyes to judge the overall flow of the curves. You may use them as a learning tool: harmonize a node or its handles, and see how FontLab places the nodes and handles. Move the nodes and handles, see how the curves change.
Often, a good way to achieve smoothness is to just remove the node — the longer curve segment will naturally flow smoothly. Also, not all typefaces need ultra-smooth curves! Many designs use abrupt changes or conscious bulges and kinks to express the design intent.
Size of the Curvature comb»
In Preferences > Glyph window > Curvature, you can use the transparency slider to change the transparency and color intensity at which FontLab draws the curvature comb. FontLab 7.1 adds a Size of the Curvature comb selector to this preference. This selector controls the scale at which FontLab draws the comb alongside the curves, so it also controls the maximum size of the comb at very abrupt curves.
- small (default) is the same size as in previous FontLab versions
- medium is 2x the small size
- large is 3x the small size; note: if Preferences > General > OpenGL is off and Curvature is visible, the screen redrawing with a “large” comb may be sluggish as you edit your curves
- auto smoothly changes between the “medium” size in far zoom levels, and “small” size in close zoom levels; this lets you see the comb junctions in far zoom levels, but does not pollute your screen with huge yellow areas in close zoom levels
Auto-detection of Smooth nodes (G1)»
When you work with integer coordinates (i.e. Contour > Coordinates > Round when Editing is on), the resolution (density) of the coordinates is limited.
- When you declare a node Smooth, FontLab tries to place both handles of the node so that the direction (angle) of both handles towards the node is the same.
- When you declare a node Tangent, FontLab tries to place the handle on the curve side of the node at the same angle as the line side of the node.
If you place handles of a Smooth node or the handle and the line of a Tangent node diagonally (not vertically or horizontally) on integer coordinates, then the real angles on both sides of the node may be slightly different. If the distances from the Smooth node to both handles or from the Tangent node to the handle and opposite node are different, and especially if they are short, the angle difference may be quite large, so you get a weak smooth connection between the segments: as smooth as the integer coordinates permit, but not truly smooth.
FontLab 7.1 has detailed improvements when it classifies node connections as Smooth.
When you open OpenType fonts or when you perform certain operations that significantly change the contours (e.g. Remove Overlap, Flatten Glyph, Apply Smart Corner), FontLab performs smooth auto-detection: it checks which nodes it should classify as Smooth or Tangent. This happens the following way:
- When Round when Editing is off (so you work in fractional coordinates), FontLab sets the node connection to smooth (Smooth between two curve segments, Tangent between a curve and a line) if the angle difference is 1° or less.
- When Round when Editing is on (so you work with integer coordinates), FontLab is slightly more tolerant: it will also set the node connection to smooth if the node is weak smooth (as smooth as the integer coordinates permit).
- If the distance between the node and the handle is extremely short (2 font units or less), FontLab will not classify the node connection as smooth.
When you perform Contour > Nodes > Detect Smooth, FontLab is more tolerant than during smooth auto-detection. It will allow for slightly larger differences, and it will intelligently adjust the position of the nodes or handles. If one side of the node is perfectly horizontal or vertical, it will adjust the position of the other side. If it’s a node between a line and a curve segment, it will adjust the position of the handle. If it’s a node between two curve segments, it will adjust the position of the longer handle.
The Font Audit test Nearly smooth is even more tolerant.
-
Remove Overlap has been improved to minimize contours distortion.
-
The Expand Stroke operation is improved to process thin strokes better.
Harmonizing Nodes (G2) and Handles (G3)»
Harmonize Node. FontLab’s Harmonize Node operation makes the curvature on both sides of a Smooth node the same, that is, makes G2 continuity between two curve segments.
- To harmonize a single Smooth node, Alt-double-click it.
- To harmonize all Smooth nodes in a selection, choose Contour > Harmonize, or press CtrlShiftH, or choose Harmonize Node from the context menu of the node or the selection.
When you change a Smooth node to a Genius node, it will change its position when you move the surrounding handles to always stay harmonized.
- To convert a single Smooth node to a Genius node, ShiftAlt-double-click it.
- To convert all Smooth nodes to Genius in a selection, choose Contour > Nodes > Genius, or turn on Genius in the context menu of the Smooth node or of the selection that does not contain other Genius nodes.
Harmonize Handles. FontLab 7.1 adds Harmonize Handles: a new operation, which adjusts the position of both handles around a Smooth and Genius node and makes G3 continuity between two curve segments.
- To harmonize handles on a single Smooth or Genius node, CtrlAlt-double-click the node.
- To harmonize handles on all Smooth or Genius nodes in a selection, or choose Harmonize Handles from the context menu of the node or the selection.
Harmonize Handles implements the Make G3-continuous math developed by Linus Romer, which the author documents and illustrates in his Curvatura package, with additional discussion on TypeDrawers.
In FontLab 7.1, you can Harmonize a node or the handles, separately:
- When you harmonize a smooth node, it moves to a G2-continuous position but the handles stay in place.
- When you harmonize the handles, the handles move. The surrounding segments get an elliptical tension (of around 55%). The node stays in-place but also gets harmonized, because G3 continuity implies G2 continuity.
- When you make a smooth node Genius, the node moves to a new position to stay harmonized whenever you move the handles. Normally, when you make a Smooth node a Genius node, it moves. It will stay in place if you first harmonize the handles.
Harmonizing handles gives you a quick way to get a series of segments that have a particular mathematical smoothness, and a rather “round” shape. It’s not a universal solution for all types of design, and it tends to change the visual character of the curves quite a lot.
Whether Harmonize Handles is useful to you depends on the kind of project you’re working with, and on your design intentions. It may help you solve a local problem if you’re trying to get a long smooth curve, and you’re facing an odd visual imbalance of a node with diagonal handles. It won’t be useful in condensed, “squarish” designs, and will rarely help on extremum nodes.
Note
This new functionality is a quick way to get reasonable defaults for a Smooth node: CtrlAlt-double-click it. (For a Sharp node, Alt-double-click also gets you reasonable defaults of a different kind, and you can repeat it.)
Genius nodes: Power Nudge & Servant»
Previously, it was possible to declare a node Genius, and then also declare it X-Servant or Y-Servant. When you moved surrounding nodes, such a Genius Servant node behaved very erratically, and often “went haywire”. The same happened when you moved some nodes with Contour > Power Nudge turned on ==, and the contour contained a normal Genius node. This could led to crashes. The automatic positioning of the Genius node, and the relative movement (interpolation) of Servant nodes (or the “auto-Servant” nodes with Power Nudge), are two functionalities that have never worked well together.
In FontLab 7.1, Power Nudge and the Servant property have no effect on Genius nodes. We’ve removed the “crazy genius servant” behavior. So when you use Power Nudge or if a node is X-Servant or Y-Servant, and it also is Genius, that node’s handles will stay in place, and therefore the node will not move except within the handles (to keep the G2 continuity).
You can still use normal nudge with Genius by CtrlAlt-dragging a neighboring node. If you wish to use Power Nudge, use Contour > Nodes > Clear Servant & Genius. You can do it for the current layer of selected glyphs in the Font window.
Paste or import vector artwork»
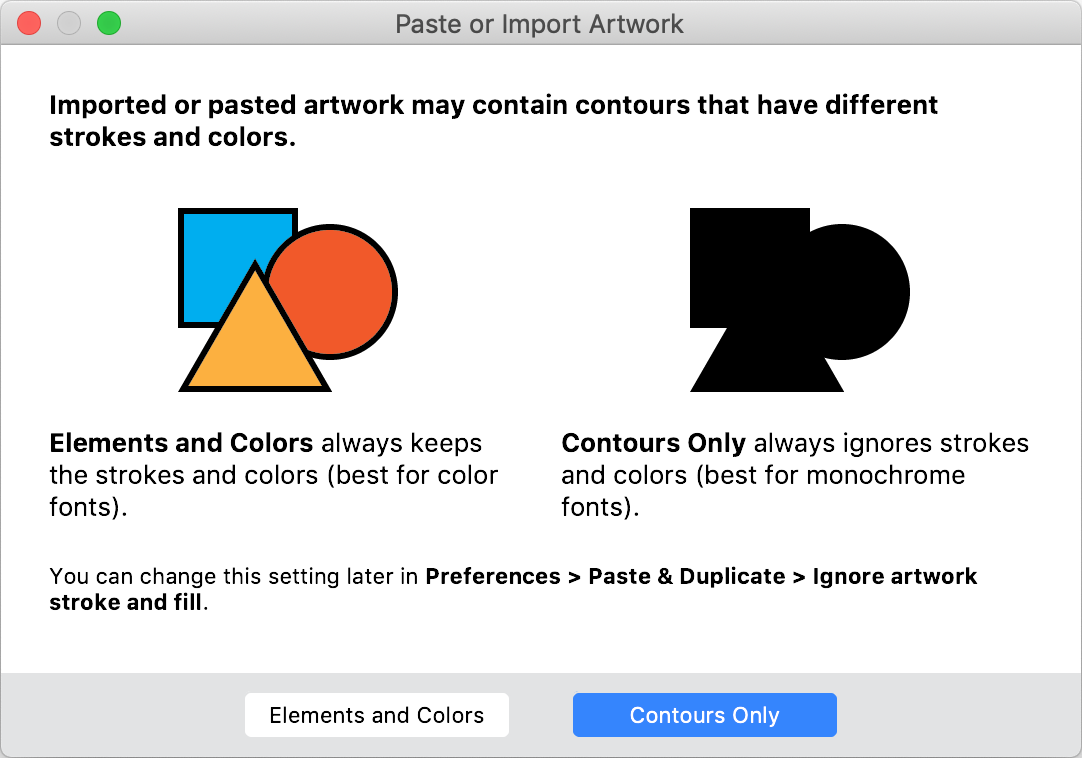
When you paste artwork from a vector-drawing app like Adobe Illustrator or Affinity Designer for the first time, or when you import AI, EPS or PDF artwork for the first time via File > Import > Artwork or via drag-drop, FontLab 7.1 now shows a Paste or Import Artwork dialog where you can choose if FontLab should paste or import:
- Elements and Colors: FontLab will create separate elements, and each element preserves the appearance (stroke thickness and color, and the fill color) found in the artwork. This setting is best for color fonts. When Contours > Coordinates > Round when Editing is on, and the artwork has fractional coordinates, FontLab shows an additional Coordinates Rounding dialog, where you can round the coordinates immediately, temporarily keep fractional coordinates until you edit them, or turn off coordinate rounding altogether.
- Contours Only: FontLab will add the contours of the artwork to the current element, and will ignore the strokes and colors. This setting is best for monochrome fonts. When Contours > Coordinates > Round when Editing is on, FontLab immediately rounds the coordinates to integers.
FontLab shows the Paste or Import Artwork dialog only once, and remembers your choice. To later change this choice:
- Hold Alt and choose Edit > Paste Artwork, and the dialog will show up again.
- Alternatively, go to Preferences > Paste & Duplicate, and turn Ignore artwork stroke and fill on to import/paste Contours Only, or turn it off to import/paste Elements and Colors.
FontAudit»
When you edit contours in a Glyph window, FontLab 7.1 now only runs the FontAudit tests only if the FontAudit panel is open or if View > Show > FontAudit is on. This makes screen redrawing a bit faster when FontAudit is off.
Anchors»
A tiny dot appears in the Glyph window above the anchor if the anchor has an Y expression, and to the right of the anchor if it has an X expression.
Guides, Measurement, Stems»
Guides»
-
You can no longer move horizontal or vertical font or glyph guides with the Guides tool. Instead, you can use the Guides tool to measure the distance between a guide and other objects. To move a horizontal or vertical guide while in the Guides tool, switch to Contour tool or hold A to temporarily activate the Contour tool and then move the guide.
-
When you double-click a guide once, automatic markers appear on the guide at locations where the guide intersects a contour. When you move the guide, the position of the automatic markers adjusts. When you double-click the guide again, the markers become fixed, and you can drag the markers to change their position. When a guide has fixed markers, the Markers field in the Guide panel shows a list of the marker positions. Previously, these positions were shown as fractions. FontLab 7.1 shows them as percentages, which is more readable.
-
You can remove (Reset) all font guides of the current master with Font Info > Guides > ×, which works like Tools > Remove Font Guides.
Quick Measurement»
-
When View > Show > Quick Measurement is on, the Quick measurement details (as configured in Preferences > Glyph Window) now appear not only on contour elements, but also on components.
-
Quick Measurement and the automatic guide markers give more accurate measurements when you work with fractional coordinates.
Auto-stems and Suggest Stems»
FontLab 7.1 now detects common stems when you click the Auto-detect stems button in Font Info > Stems even if your font has only 1-2 glyphs. This is very useful when you use Suggest Stems to draw a new font:
- Draw a glyph or two.
- Go to Font Info > Stems and click Auto-detect stems. FontLab will add the most common horizontal and vertical stem values based on your drawing. Change or add more stems if needed, close Font Info.
- Turn on View > Suggest > Stems.
- Now, when you draw new glyphs or edit existing contours, FontLab will visually suggest snapping points that are the stem width away from existing segments. This way, you can draw many glyphs quickly and consistently, without having to measure all the time.
You can remove (Reset) all stems of the current master with Font Info > Stems > ×.
Brush tool»
When the Brush tool is active, the Property bar lets you change the size of the brush and choose one of the presents. Now you can double-click the brush shape preview in the Property bar to open the Brush panel, where you can tune additional aspects of the brush (the contrast and modulation).
Composite glyphs and auto layers»
When you generate a glyph or specify an auto layer recipe using the extended syntax, you can now use % to specify placement in percentages. For example, = A + ogonek@90%,10% places the ogonek so that:
- 90% of the distance from the right edge to the left edge of the box of
ogonek(leftwards) is aligned horizontally at 90% of the distance from the left edge to the right edge of the box ofA(rightwards), - 10% of the distance from the top edge to the bottom edge of the box of
ogonek(downwards) is aligned vertically to 10% of the distance from the bottom edge to the top edge of the box ofA(upwards).
Elements»
-
The names in the Element > Element Reference > Add Element Reference dialog are now listed in alphabetical order starting with elements and then glyphs.
-
You can now remove all element transformations with the new Element > Remove Transformation menu command. This is equivalent to clicking all three Reset buttons in the Elements panel
Elements panel»
The Elements panel now has a + button. Click it to open a popup that lets you:
- create a new empty Contour Element
- add a Component by glyph name
- add an Element Reference by element or glyph name
- Duplicate the selected element as an unlinked copy
- duplicate the selected element as an Element Reference
- create a new Sticker
The buttons at the top of the Elements panel for changing the visual stacking order of elements have a new design.
The panel now shows a colorful icon next to elements that have a color fill or a stroke.
Gallery panel»
The Gallery panel shows named elements in the current master. If you assign a name to an element, it will appear in the Gallery. Elements that have the same content and name that are used in different glyphs within the same master are called element references. In FontLab 7.1:
In the Gallery panel, you can select one or more elements, then use BkSp and Del to remove the elements selected in the Gallery. When you remove an element from the Gallery, FontLab removes its name (so the element no longer shows up in the Gallery), but keeps the elements in the glyphs.
You can also select one element in the Gallery panel and use Edit > Copy (CmdC / CtrlC). When you then activate the Glyph window:
- Edit > Paste (CmdV / CtrlV) will paste the content of the copied element as an unlinked copy into the current glyph layer
- Edit > Paste Element Reference (CmdShiftP / CtrlShiftP) will paste an element reference into the current glyph layer (same as using the Place button in the Gallery panel)
When you activate the Font window, you can paste into the current master of the selected glyphs.
Variation»
By default, all settings are now on in Preferences > Variations > Synchronize in matching masters when Edit > Match when editing is on.
So when you turn on Edit > Match when Editing, you can add and remove nodes, and the changes will happen in all matching masters, so the masters will remain matching as you edit. To work in current master only, turn off Edit > Match when Editing.
Paste Special»
When you use Edit > Paste Special in Font window on a empty glyph cell, FontLab 7.1 now creates the glyph, just like with the normal Paste.
Metrics»
Copy-paste sidebearings»
When the Glyph window is in Metrics mode, and you Copy (CmdC / CtrlC), FontLab 7.1 copies the current glyph layer metrics (sidebearings and the advance width). When you navigate to another glyph, or switch to another master, and then Paste (CmdV / CtrlV), FontLab pastes the copied sidebearings (not the advance width) to the current glyph layer. If the copied sidebearings contained expressions, FontLab will paste those expressions.
Linked metrics»
You can link the width or sidebearings of the glyphs on one master to the width or sidebearings of the same glyphs on another master using the expression :mastername (e.g. :Regular). When you enter such an expression into the Tools > Actions > Set width dialog, FontLab 7.1 now correctly writes this expression into the glyph. This way, you can quickly link metrics from one master to another for multiple glyphs. To use a more complex expression, surround the colon-prefixed master name in single or double quotes, like ":Regular" * 1.2.
When you open a font in .vfc, .vfj or .glyphs format that has glyphs which contain expressions in all three glyph metrics (advance width and both sidebearings), FontLab 7.1 shows a Linked Metrics Conflict dialog that prompts you to remove the width expression (replace it with plain metrics values). If you choose not to remove them, you should manually remove the expression of your choice itself. If you keep them, FontLab will ignore the expression in the advance width. It’s not possible to evaluate all three expressions: they may contradict each other, and one has to “give way”.
When you use metrics expressions, FontLab 7.1 now rounds the position of an element to integers.
Kerning»
When the Glyph window is in Kerning mode, and you Copy (CmdC / CtrlC), FontLab 7.1 now copies the current kerning pair and value. When you navigate to another text pair, or switch the master, and then Paste (CmdV / CtrlV), FontLab pastes the copied kerning value to the current pair.
When you open the Glyph window in the Kerning mode using the Window > New Kerning Window/Tab command and there are kerning pairs selected in the Kerning panel, FontLab 7.1 now puts those pairs in the new opened window/tab.
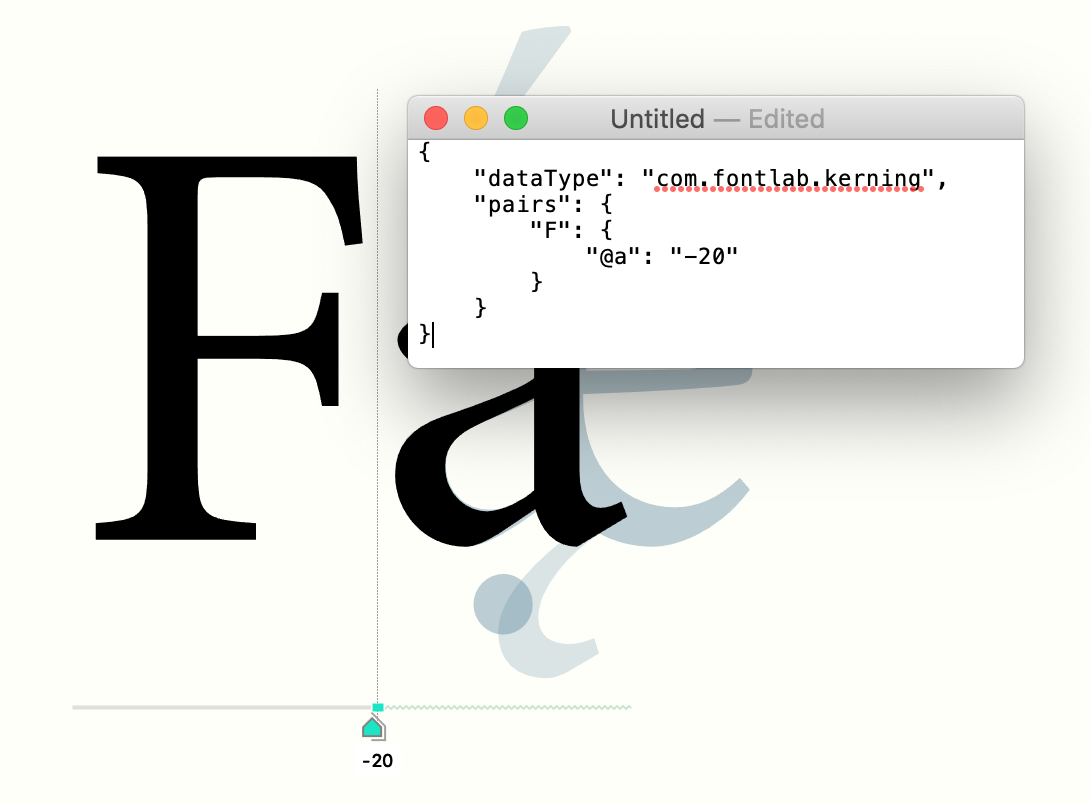
When you copy in Kerning or Metrics mode, FontLab copies the data in FontLab JSON format. If you turn on Preferences > Editing > Copy FontLab JSON as plain text, FontLab also copies the FontLab JSON as plain text that you can paste into any plain-text editor, modify, and then paste back into FontLab.
Hints»
Both method of manually creating ghost hints now give consistent values.
The Type 1 font format specification permits both top and bottom “ghost” hints to have the value of -20 or -21, but common hinting practice is to set top ghost hints to -20 and bottom ghost hints to -21.
When you click a node at the top of a glyph and use Tools > Add Horizontal Hint, FontLab creates a -20 ghost hint, as expected. When you Shift-click a top node with the Magnet tool, FontLab 7.1 now also creates a -20 ghost hint. Previously, it created -21.
When you click a node at the bottom of a glyph and use Tools > Add Horizontal Hint, FontLab creates a 21 hint, which it converts to a -21 ghost hint on export. This happens for certain technical reasons. When you Shift-click a bottom node with the Magnet tool, FontLab 7.1 now also creates a 21 ghost hint. Previously, it created 20.
Text in Preview panel»
When turn on Echo Text in the Preview panel (using the toggle in the bottom-right corner, or in the Content dropdown of the panel sidebar), the text in the panel will always match the text of the current Glyph of Font window.
In FontLab 7.1, when you apply features in the Glyph window (using the Features dropdown in the Property bar of the Text mode, or the window sidebar in all modes), the same features will be applied in the Preview panel.
Font Info»
Other Values page»
The new Contours > Unfill looped corners setting turns on automatic unfilling of outer looped corners (see above).
At the bottom of Font Info > Other Values, there is now an Auto button. Click it to automatically calculate the content of the Other Values section. This includes a very simple calculation of the new PANOSE identifier.
PANOSE Identifier»
Font Info > Other Values now has a PANOSE Identifier section. PANOSE 1.0 is a system of classifying fonts developed by Benjamin Bauermeister in 1982. The system uses 10 numbers, each describing a typographic property of the font. The system is primarily suitable for Latin-script and symbol fonts, though font developers have used it to classify non-Latin fonts as well.
The OpenType font format stores the 10-number identifier in the OS/2.panose field. Microsoft Windows uses the PANOSE identifiers to determine the similarity between fonts. When the current font used in a document does not include glyphs for characters found in the text, Windows uses the most similar font installed on the system. Microsoft Word stores the PANOSE identifier alongside the font name used in a document when it saves in the .docx, .doc, .rtf or .html format. When the document is opened on another machine that does not have the font with the stored name installed, Word will substitute the closest-matching font using PANOSE.
In the PANOSE identifer, any number (field) with the value 0 indicates that the property is variable in the font, or that the font vendor has not assigned a value. Value 1 indicates that none of the predefined values for the given property is suitable for the font.
The first PANOSE number (Family kind) describes the general type or purpose of the font: 2 is a text font suitable for general-purpose use, 3 is a handwritten or calligraphic font, 4 is a decorative, ornamented font, and 5 is a non-alphanumeric font with symbols, dingbats, icons or emoji. The other 9 PANOSE numbers change their meaning depending on the Family kind value you choose.
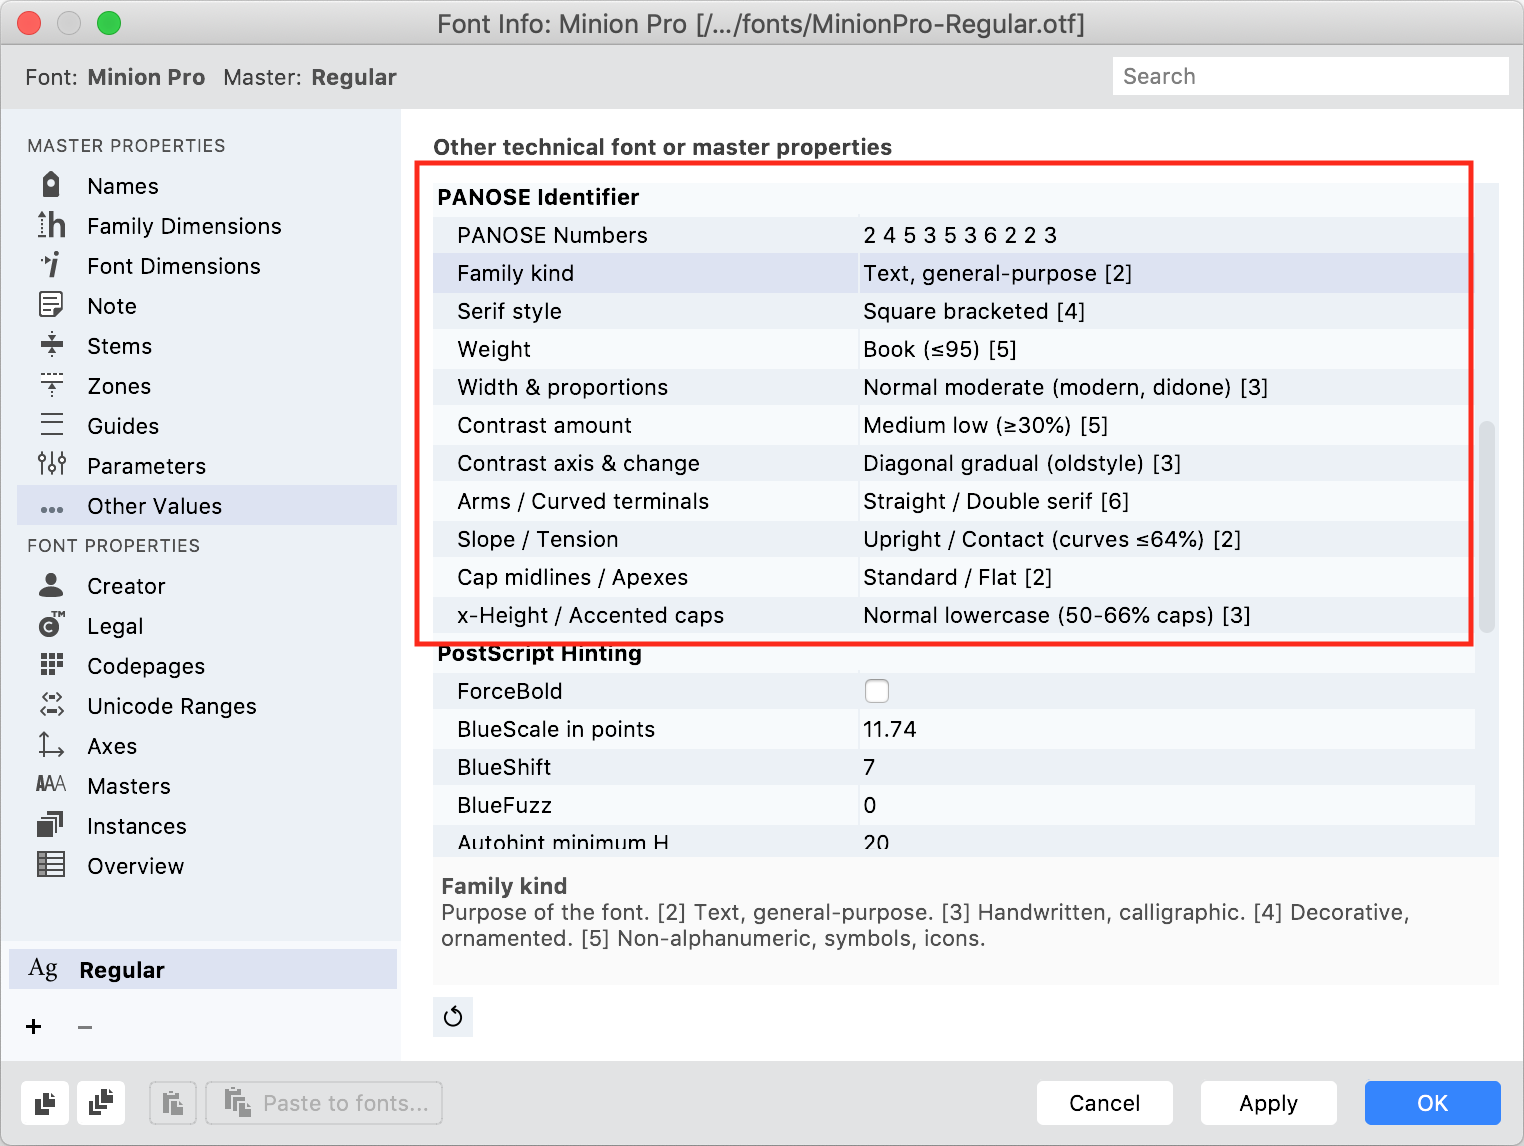
In FontLab 7.1, you can edit the PANOSE identifier using a set of dropdowns in Font Info > Other Values, or you can edit the text representation (10 space-separated integers) directly. Click each property name to see an extended description in the lower part of the dialog. You can easily change the text representation for many masters using Font Info > Overview > Other > PANOSE.
The PANOSE 1.0 specification describes in detail how you can calculate the different values based on precise measuring of some key letters. We have found that font vendors rarely do the precise calculations. Instead, they often choose the values intuitively, or leave the entire PANOSE identifer unspecified (all 10 numbers are 0).
Since the PANOSE 1.0 specification is more than 20 years old, it contains some terminology that today seems antiquated. In FontLab 7.1, we have updated the terminology to make it more understandable, and more compatible with terms used by FontLab, OpenType and modern type design practice. We have also “converted” some measurements to more familiar units.
For example, if Family kind (field 1) is 2, the descriptions for the predefined values for field 3 (True typographic weight) include numeric values that describe stem thicknesses in font units, based on the assumption that the caps height is 700 and the UPM value is 1000. This lets you measure your dominant stems or use the Font Info > Stems value and quickly choose the most adequate PANOSE value.
Note
PANOSE Weight is different from Names > Weight class. PANOSE Weight should reflect the true stroke thickness in your design. Weight class is used to organize styles within a font family in relation to each other. For single-style families, Weight class should always be Regular, while PANOSE Weight may be Thin or Heavy or whatever best describes the actual design.
PANOSE and monospaced fonts»
When you turn on Font Info > Names > Monospaced and export an OpenType font, FontLab turns on the post.isFixedPitch OpenType field. FontLab 7.1 now also sets the OS/2.panose.bProportion field to 9. This helps apps and systems recognize the font as monospaced.
Reset Font Info page data»
In the Font Info dialog, the Stems, Zones, Guides and Parameters pages now have a Reset button (×) that lets you quickly remove the data on the page for the current master.
Font Info panel»
At the bottom of the Font Info panel, there are two more numeric values that are otherwise accessible via File > Font Info > Font Dimensions, and apply to the current font master:
- Corner is corner tension used in smart corners
- Ink Trap is ink trap width used in “negative” smart corners and with the new ink trap operation (Shift-click with Scissors tool)
The Font Info panel previously contained stem values and allowed you to auto-calculate the stem values. This implementation was inconsistent with the behavior of the Stems page in the Font Info dialog. We have decided to remove the stem info from the Font Info panel, and we recommend that you use File > Font Info > Stems.
Glyphs & tags»
Glyph names»
FontLab 7.1 updates its built-in standard.nam to version 4.2.0. It adds 5,207 new glyph names and fixes a few bugs, making a total of 52,326 entries.
- The additions include Friendly and Alternative names for Unicode 12.1, bringing it up-to-date with the glyphNameFormatter and GlyphsInfo projects.
- The additions also include a number of synonyms, primarily for Arabic, including suffixed names for Arabic presentation forms.
Spaces in tag names»
FontLab no longer allows spaces in tag names, because they lead to errors when compiling OpenType features.
Unicode in CJK fonts»
FontLab 7.1 exports the Windows-compatible OpenType cmap subtable 3.1 with format 4 more efficiently. This means that fonts with large glyph sets (>20,000 glyphs) now export correctly in more cases. Note: Because of the limitations of the OpenType format, there is no 100% guarantee that this will always work. To achieve additional optimization, do Font > Sort Glyphs > Unicode before exporting the font
Encodings & font filters»
Export and Import Encoding»
With File > Export > Encoding…, you can now export the list of glyph cells visible in the Font window as a .enc file, and use the result as an “Encoding” font filter. With File > Import > Encoding…, you can easily add an existing .enc file to the list of built-in Encoding filters, and apply it to the current Font window.
When you use a Font filter in the Font window sidebar, the property bar filter dropdown or the search box, FontLab shows the glyph cells that match a particular criteria.
- If the Hide unfiltered glyphs toggle in the Font window property bar is on, the Font window only shows the filtered cells, that is, cells that match the filter. The unfiltered cells, that is cells for glyphs that don’t match the filter, are hidden.
- If the toggle is off, the Font window first shows the filtered cells, then it shows the glyph cells that don’t match the filter.
Font filters in the property bar dropdown are prospective: they match cells for glyphs that are in your font, and they match empty cells, which are placeholders for glyphs that you could add that would also match the criteria. Sidebar filters that have subtotals are also prospective. Other filters only match glyphs that exist in your font.
The simplest type of prospective filter in FontLab is an Encoding. A FontLab encoding is just a list of glyph names arranged in a particular order. You can apply an Encoding filter if you choose Encoding in the Font filter type dropdown in the Font window property bar, and then choose an encoding from the next dropdown. The filtered cells will then show:
- all glyphs that have names which exactly match the glyph names specified in the Encoding
- if Preferences > Font Window > Encoding filter also finds synonyms is on, also glyphs that have names which are different but compatible with those in the Encoding (for example, the
Ecircumflexgraveglyph in the font will appear where the Encoding specifiesuni1EC0) - also empty glyph cells for glyphs that are listed in the Encoding but don’t exist in the font
In FontLab 7.1, when you choose File > Export > Encoding…, you can save an .enc file that contains an Encoding with all glyph names visible in the Font window, in the order that is visible in the Font window. If Hide unfiltered glyphs is off, this will include the currently filtered and unfiltered glyphs.
The Export Encoding dialog opens the Encoding subfolder of your User data folder. Type a file name for the .enc file, and choose Save. The exported Encoding will then appear in Font window property bar Encoding dropdown, under the group based on your font’s family name, and with the name that you gave the .enc file.
With File > Import > Encoding…, you can choose an existing .enc file located anywhere on your drive. FontLab then copies the .enc file into your User data folder, and applies it as a Font window Encoding filter to the current font. The imported Encoding appears in the Encoding font filter dropdown so you can apply it to other fonts.
Tips:
- By default, your User data folder is in
~/Library/Application Support/FontLab/FontLab 7on macOS and in%userprofile%\AppData\Roaming\Fontlab\FontLab 7on Windows, (where~and%userprofile%stands for your user folder). You can choose a different folder as your User data folder in Preferences > General, and restart FontLab. You need to copy the content of your old User data folder to the new folder to see your custom encodings. - An Encoding (an
.encfile) is a simple text file that you can edit in any plain-text editor. - Temporarily change Font Info > Names > Family name before exporting the Encoding to change the group name under which the Encoding appears in the dropdown.
- FontLab exports the glyph names into an Encoding in the order that is visible in the Font window. Before you export the Encoding, choose an automatic Sorting in the Font window property bar, or switch the Font filter type to Index and drag-drop glyph cells to sort the glyphs manually.
- FontLab exports the glyph names into an Encoding exactly as they appear in the Font window. Bulk-rename all your glyphs to the Friendly, Alternative or Production naming scheme with Font > Rename Glyphs, export an Encoding, rename again, export another encoding with a different name. Now you can use Font > Rename Glyphs > Custom… > Rename by encoding and choose both encodings to flip between the two glyph naming schemes, and you can further customize both
.encfiles in a text editor.
Find characters and categories»
Finding Unicode character names and categories now allows multiple substrings. For example, when you type a string such as la ca into the window search box or into Edit > Find Glyphs, FontLab 7.1 now finds glyphs with Unicode character names that contain LAtin CApital. When you enter cu sy, the search shows the Unicode category CUrrency SYmbols.
User interface»
In Element menu, Remove Filter is now above Remove Stroke, so it’s consistent with the order Expand Filters and Expand Stroke.
Font Dimensions»
In previous versions, linespacing values such as Ascender, Descender, x-Height and Caps Height were called “Dimensions” in Font Info and “Font Metrics” View menu. In FontLab 7.1, they’re consistently called Dimensions. So Ascender, Descender, x-Height and Caps Height lines are now called Font Dimensions in View for showing and hiding, View > Snap for snapping, View > Lock for locking them so you cannot change them by dragging in the Glyph window (you can still change them in Font Info).
Preferences»
FontLab 7.1 cleans up the Preferences > Editing section.
- Show scroll bars is now on the Glyph Window page
- Zoom with pinch gesture and Force snap are now on the Distances page
- Pasting contour to another element preserves appearance is now on the Paste & Duplicate page
- The other options on the Editing have now a more consistent terminology and a more logical visual structure
In the Preferences > General section Show keystrokes is now called Show keys and works slightly better.
Panels List»
When you turn on Window > Panels List, you can now resize that toolbar-like panel so that it is a vertical bar with all buttons in one column. To drag that panel, hold Cmd (Mac) or Ctrl (Win).
Docking windows as tabs»
On both macOS and Windows, when you set Preferences > General > Windows and tabs configuration to Windows and you open a font, FontLab 7.1 no longer makes the windows dockable, so you cannot accidentally dock a window (turn it into a tab within another window). If you want to dock a window as a tab inside another window, you need to first turn on Window > Docking > Window is Dockable.
Workspaces on macOS»
On macOS, you can now use AltCmd1 to AltCmd6 to switch between the predefined workspaces (panel sets).
Workspaces on Windows»
When you run FontLab 7 on Microsoft Windows, Preferences > General > Windows and tabs configuration is set to Tabs be default. In this UI configuration:
- All fonts that you open, and all font and glyph windows that you open for each font, open as tabs that are all docked inside one application window.
- In FontLab 7.1, when you now load one of the predefined workspaces using Window > Workspaces, all panels of the selected workspace will now also be docked inside the application window rather than to the edges of the screen. When you resize or maximize the window, the positions of the panels will follow.
When you change Preferences > General > Windows and tabs configuration to Windows and tabs or to Windows, and then load one of the predefined workspaces:
- The panels will be docked to the edges to the screen. Note: This is also the behavior in all UI configurations on macOS. This was also the behavior of the Tabs UI configuration on Windows, but it was problematic: if you maximized the window, the panels would partly cover it.
- When you maximize the window in this UI configuration, the panels that are docked to the edges of the screen will no longer cover the window.
Note: When you change Preferences > General > Windows and tabs configuration on Windows, you need to load the workspace again using Window > Workspaces for it to re-dock to either screen or window.
On Windows, the main application window holds the app menu. When you work with separate (undocked) windows, you can now reduce to size of the main app window to just show the menu bar, without the gray background.
Hardware-accelerated rendering on Windows»
FontLab 7 can render the content of the Glyph window in two ways: with hardware acceleration (OpenGL) on or off. With OpenGL, the rendering is faster. In FontLab VI, Preferences > General > OpenGL was on by default on macOS but was off by default on Windows.
In FontLab 7, we made the setting on by default on Windows as well. However, users report that on some Windows computers, the pre-installed OpenGL drivers have problems, so when OpenGL rendering is on in FontLab 7, no windows appear after the app starts.
In FontLab 7.1 for Windows, OpenGL is off by default again. You can turn Preferences > General > OpenGL on but if you’re experiencing any screen refresh problems, or you see black window contents, or if no windows appear, please turn OpenGL off, or install OpenGL drivers suitable for your graphics card.
Quick Help»
When you hover over a user interface element (a panel, button, text box, slider etc.) and hold F1 or FnF1, a Quick Help balloon will appear that shows a description of the UI element. Release F1 and the balloon disappears. Or tap F1 or FnF1 to turn Quick Help permanently on or off.
In FontLab 7.1, Preferences > General > Other now has a new Large help setting. Turn it on and the Quick Help balloons will have a much larger font size. We have also added and revised the Quick Help descriptions for many UI elements.
Open and save»
Opening fonts»
-
FontLab 7.1 can now also open the XML Plist flavor of
.glyphsfiles in addition to the default flavor. -
FontLab 7.1 now imports PostScript hints more correctly when it opens a
.glyphsfile. -
FontLab 7.1 can now open
.vfjfiles that are larger than 128 MB. -
When FontLab 7.1 opens a font that contains fractional coordinates in you have Contour > Coordinates > Round when Editing on, a dialog lets you decide whether to keep the coordinates fractional or round them.
Safer saving»
In Preferences > Save fonts:
-
When you turn on Autosave open fonts, FontLab periodically autosaves the fonts that you’re working on in
~/Library/Application Support/FontLab/FontLab 7/Autosaveon macOS and in%userprofile%\AppData\Local\Fontlab\FontLab 7\Autosaveon Windows. Previously, FontLab deleted the autosaved files when you quit the app, or if the app restarted after a crash. FontLab 7.1 now moves the files to the Trash (Recycle Bin) instead, so you may retrieve your files if you accidentally quit the app without saving. -
When Existing font files is set to Rename, the option Save backup files to subfolder is now more accurately called Save renamed files in subfolder.
-
The Existing font files dropdown has an additional setting Move to trash. When you select it, whenever you save a working font manually, FontLab 7.1 renames the previous saved version and moves it to the Trash (Recycle Bin). This lets you keep older saved versions in the Trash until you empty it.
Parallel saving as VFJ»
When you saved VFC files in older versions of FontLab 7 and in FontLab VI, in Preferences > Save Fonts, you could choose to also save the FontLab VFJ (JSON representation of the FontLab native file), the FontLab Studio 5-compatible VFB and UFO in the same folder.
FontLab saved all masters in the VFC and in the VFJ, but in the VFB and UFO, it only saved the default master. This was confusing. So in FontLab 7.1 we have removed the ability of “parallel saving” of VFB and UFO, but you can still save VFJ alongside your VFC.
Use File > Export Font As and choose:
- FontLab Classic (.vfb) and choose the Masters tab to export your project to FontLab Studio 5, TypeTool 3 or Fontographer 5
- DesignSpace + UFO to export your project to RoboFont or fontmake
Export»
Export Profiles»
The File menu item Profiles… is now called Export Profiles… for more clarity. It opens the dialog where you can customize export profiles, add, import and export them. Note: When you open File > Export Font As… and choose a profile, you can click Customize…. If the profile was a built-in profile, FontLab will duplicate it. Then, you can edit its properties. But the Export Profiles dialog is more comprehensive.
Family name visible when exporting instances»
When you predefine the instances in a multi-master font using Font Info > Instances, you can assign different Family Name for each instance. This is useful if you’re working on a multi-axis design and want to export your fonts so that several font families appear in the user’s for menus, each having multiple instances.
Now, when you choose File > Export Font As, choose a static font format such as OpenType PS and choose the Instances tab, the list of instances shows the Family name for each instance. Previously, only the Style name was shown. If you only want to export some instances, you can now click the Family column heading to sort the list by the family name, and check/uncheck the blue checkboxes to decide which instances to export.
Move to Trash / Recycle Bin»
In the File > Export Font As dialog, the Existing font files dropdown also has a new Move to trash setting. When you export fonts repeatedly into the same location, FontLab 7.1 renames the previously exported versions and moves them to the Trash (Recycle Bin).
Exporting looped corners»
If you turn on Outlines > Remove looped corners in an export profile for a development format, and if Unfill looped corners is on in Font Info, FontLab 7.1 removes the triangular loops that are outside the filled areas and that are automatically unfilled. If the profile setting is off, FontLab keeps the loops. To keep the outer triangular loops in end-user formats, turn off Font Info > Other Values > Contours > Unfill looped corners.
Exporting Variable fonts»
-
If your font contains intermediate font-less glyph masters, and it contains positioning features defined manually in the Features panel, you can now export this font into Variable PS (.otf) or Variable TT (.ttf) formats.
-
If a font has a
kernfeature definition in the Features panel, and you export a Variable font or an instance, FontLab now always rebuilds thekernfeature from the visual kerning. -
When you export a Variable font, FontLab now writes the version string specified in Font Info, and it correctly writes the Style name of the default master into the
name 17OpenType field.
Bundled Adobe FDK for OpenType (AFDKO)»
FontLab 7.1 includes version 3.2.0 of the Adobe FDK for OpenType (AFDKO) package. FontLab uses AFDKO primarily to export the CFF table in OpenType PS fonts, and to compile the feature definitions in the GSUB and GPOS tables. AFDKO 3.2.0 included many fixes compared to the version that was previously bundled with FontLab.
Thanks to that change, FontLab no longer hangs when subroutinizing certain OpenType PS (.otf) fonts during export.
Color fonts»
-
When you export color fonts that also need a monochrome variant, FontLab creates bitmaps from the color glyphs and then autotraces them. In 7.1, the tracing algorithm produces fewer contours and points, and exports OpenType+SVG fonts more correctly.
-
The Elements panel now shows a colorful icon next to elements that have a color fill or a stroke.
-
The Properties section of the Font window sidebar now shows the Colored property in a colorful way. Click it to show in the filtered section of the Font window the glyphs where at least one layer has an element that has a color fill or a stroke.
Bug fixes»
-
When you open a UFO package that contains an empty
openTypeOS2Typearray in thefontinfo.plist, FontLab now correctly sets Font Info > Legal > Embedding to Everything is allowed. -
When you turn off Echo text in the Preview and turn on Show glyph names in the panel sidebar, FontLab will show the current glyph in place of the character
@that you input in the custom text of the panel. Now, when you go to the previous or next glyph in the Glyph window with [ and ], FontLab correctly refreshes the Preview panel. -
FontLab 7.1. now correctly interpolates zones when exporting instances.
-
Detailed improvements in reading and exporting UFO include better support for color flags, guides and anchors that had empty names or had names containing
". -
In rare cases, FontLab exported an invalid UFO package. This is fixed now.
-
When you turn on Font Info > Other Values > Custom hhea linespacing, FontLab now correctly exports the values defined there into the
hheatable. -
When you use
@in the text of the Preview panel, FontLab shows the current glyph in this place. This now also correctly happen when you use Cmd[ / Cmd] to switch the current glyph in the Font window. -
ShiftAlt-double-clicking and CtrlAlt-double-clicking a node now works as expected on Windows.
-
FontLab no longer crashes when opening certain VFB files.
-
Show: grid and Show: mask are now in the Tools > Commands palette.
-
When you switch to the Parameters tab in the Font Info panel, turn on Font dimensions and drag any of the sliders that represent Ascender, Caps Height, Descender and x Height, FontLab no longer crashes.
-
When FontLab 7.1 opens a FontLab Studio 5-made VFB file that contains the Background or Mask layers, it no longer issues irrelevant warnings in the Output panel such as
We have a problem with the component 'varia' in glyph 'iotavaria:img'or...in glyph 'iotavaria:mask'. -
FontLab now only turns on Unfill looped corners in all masters when you open a
.glyphsfile. It keeps the setting on in VFC/VFJ files where you explicitly turned it on. When you open existing fonts in other formats, or older VFC/VFJ, the setting is off in all masters. -
When select a node with the Contour tool, you hold Alt and start using the arrow keys to move the node, the pointer no longer shows a small
+sign erroneously. -
When you make a contour selection with the Contour tool, you hold Alt and then start dragging, the pointer shows a small
+sign to indicate that you are duplicating the contour. Previously, the pointer only showed+for Alt-dragging with the Element tool. -
When use Font > Rename Glyphs > Friendly, FontLab no longer generates names such as
teh_heh-ar.medi.medibut instead uses the suffixed Friendly names defined instandard.nam, such asteh_heh-ar.medi. -
In Font > Generate Glyphs, you can now use glyph names that contain hyphens (
-). Previously, the dialog removed the hyphens from the glyph names it generated. -
When you merge visible layers, FontLab merges layers correctly even if layers have different component/element structure.
-
When you turn on View > Control Bars > Glyphs Bar, a single-line bar appears at the bottom of the Glyph window. Double click a glyph cell on this Glyphs Bar to insert a glyph into the Glyph window text. The buttons on the right side of the Glyphs Bar that let you move the bar between the top and bottom of the window and let you close it work more correctly.
-
When you switch to a new empty layer, FontLab no longer renders the phantom blue handle from the smart corner on the previous layer.
-
When you remove an element from Gallery and then Undo, the removed element now correctly re-appears in the Gallery.
-
When you switch the current font with the Glyph window property bar, the window title now always shows the correct font file path.
-
When you export masters or instances from a variable font, FontLab correctly interpolates and exports kerning individually for every master or instance.
-
When you move the selected contour segment using CtrlAlt-arrows, FontLab no longer changes the segment shape.
-
In some cases, when you exported into OpenType PS an instance that had the same axis location as a master, FontLab would export incorrect PostScript hints. Now FontLab correctly exports interpolated hints.
-
When you paste or import PDF vector artwork (for example when you paste from Adobe Illustrator with Preferences > Paste & Duplicate > Prefer legacy AI clipboard off), FontLab no longer creates additional nodes on extrema when it resolves clipping paths of the pasted artwork.
-
FontLab no longer crashes when you compile features in a font where the feature definitions contain a syntax error.
-
When you add a ghost hint to an element that is flipped, FontLab now creates the ghost hint with the correct direction.
-
When Preferences > Glyph window > Show scroll bars is on, you can click on the scroll bars of a Glyph window to jump-scroll to the desired location. This now works better if the window contains multiple lines of text.
-
When you have multiple fonts open and you click the Font Info button in the property bar of a Font window, FontLab now always shows the Font Info for the font that the window belongs to.
-
When you have multiple contours in an element that has a name, and you have no contours selected and you use Edit > Separate Contours to Elements, FontLab creates new unnamed elements for each contour. Now, FontLab no longer keeps the empty named element.
-
When the option Preferences > General > Font Map and Fonts panels control fonts is selected and you use the Tools > Actions command for glyph cells in the Font Map, FontLab now applies the actions to the selected glyphs.
-
Select All and Deselect buttons work now as expected in the Paste Font Info Data dialog.
-
When you delete classes and/or kerning pairs and/or features, then delete some glyphs, then undo glyphs deletion, FontLab restores the glyphs but no longer restores classes, kerning pairs or features with this single Undo operation.
-
When you adjust many kerning pairs using the Font > Kerning > Adjust Pairs command, FontLab performs the operation instantly and no longer hangs.
-
When you copy contours from a Glyph window, you can now paste them into the Sketchboard even if the Sketchboard is empty.
-
FontLab now correctly opens
.glyphsfiles that contain quadratic (TrueType) curves -
When you adjust kerning using the Adjust Kerning dialog (Font > Kerning > Adjust Pairs), FontLab no longer rounds kerning if the option ==Round kerning values to [some value]” is off.
-
When you have glyph names that start with
_and export the font with a built-in OpenType profile, FontLab no longer removes the leading underscore from the glyph names. -
When you copy a composite glyph and use that to create a second composite glyph, , and then decompose the second glyph, FontLab no longer empties the component in the first glyph.
-
Expressions in anchors location fields now work as expected on Windows.
-
When you select composite glyphs in Font window and choose Element > Element Reference > Component to Reference, FontLab will no longer incorrectly shift the elements.
-
The Irregular stems FontAudit test no longer triggers false warnings in glyphs that consist of components that point to glyphs that contain multiple elements.
-
The Record command in the Tools > Rewind menu is no longer disabled when the current glyph in the Glyph window contains editable contours.
-
In the Glyph window, if you select a contour in one layer, then switch to another layer using Alt. and Alt,, and then perform some editing (e.g. press Del), FontLab no longer performs those edits on the selection in the now inactive layer.
-
When you have a long string of glyphs in the Glyph window and you switch between masters, FontLab aligns the string so that the current glyph is always visible.
-
FontLab no longer adds empty lines at the end of the features code when you click on Compile in the Features panel.
-
When Preferences > Operations > Fill created glyphs with contents… is off and you create new glyph, FontLab no longer reverses the order of masters in the Layers & Masters panel for this new glyph.
-
In the ==Font > Generate Glyphs= dialog, the glyphs preview now always shows the correct master.
-
When you copy a cell in the Font Map panel, you can now Paste Special into another glyph cell.
-
When you copy a cell in the Font window for a glyph layer that includes multiple elements, choose another glyph cell and use Paste Special with Contours and images on, FontLab retains the original element structure in the destination glyph. If as references was on, it will also retain element references. If as references was off, it will paste the standalone elements. Previously, FontLab merged all contours into one element.
-
When you select a glyph in the Font Window, Copy, then Append Glyph, FontLab no longer creates element references pointing to the original glyph.
-
When you have a composite glyph and use Element > Element Reference > Component to Reference, FontLab now correctly handles nested components (components that point to a glyph that also uses components).
-
When you undo Remove Smart Corner, FontLab no longer erroneously removes the contour.
-
Undo for Decompose now works correctly in glyphs with linked metrics.
-
FontLab now correctly redoes certain operations (such as using Fill) after you Undo them and then Redo them.
-
When you press ++BkSp++, FontLab now correctly deletes a selected contour that has an unlinked corner.
-
If you export a font with Overwrite selected in the Export Font dialog, and FontLab cannot overwrite the existing file (e.g. because the existing file is open in the Windows font viewer), FontLab no longer reports a success. Instead, FontLab shows an error message.
-
Deleting all contours in a glyph with linked sidebearings removes linking and sets both LSB and RSB to zeroes. FontLab no longer crashes in this case.
-
When you turn auto layer with custom recipe off and then back on, FontLab no longer misses nested components and no longer crashes.
-
When you change contour and Font > Live Update > Live Metrics is on, FontLab updates glyph metrics instantly now.
-
When you perform Contour > Remove Overlap and then Glyph > Create Overlaps, undoing Create Overlaps works correctly.
-
When you use the View > Scoreboard floating widget that shows numerical values such as point coordinates or metrics, FontLab no longer hides the Scoreboard behind windows and panels.
-
FontLab no longer crashes when exporting some bitmap glyphs in the OpenType+CBDT format.
-
When you have applied some OpenType features to the Glyph window text in Metrics or Kerning mode, and you Cmd-double-click the glyph (or double-click if Preferences > Spacing > Double-click to glyph… is on), FontLab now opens the correct glyph in a new Glyph window/tab. Previously, it opened the default glyph as if the features were not applied.
-
When you duplicate a master with Font Info > Add Master > Duplicate master, copy glyph layers, FontLab no longer creates cross-layer components that point to another layer.
-
When Edit > Edit Across Glyphs is on, and you use Quick measurement in an inactive glyph, FontLab now correctly measures the distance to the right sidebearing line.
-
FontLab now correctly performs Glyph > Create Overlaps.
-
In FontLab 7, you can link glyph metrics using expressions. The LSB, RSB or Width fields can contain an expression that optionally starts with
=. Generally, the initial=can be omitted. If you use=, FontLab now correctly calculates the glyph metrics in auto layers. -
FontLab now correctly restores the custom text in the Preview panel when you restart the app.
-
When you use the command Apply Italic Angle to Metrics and Grid and the Grid is visible, FontLab redraws the Glyph window contents correctly.
-
In the TTH Zones dialog of the TrueType Hinting tool, you can now delete TrueType hinting zones.
-
When you paste bitmap images to the Font window cell, FontLab no longer flips pasted images. FontLab also respects Scale artwork options selected in the Preferences > Paste & Duplicate section.
-
When you Unlink Corners or Add Power Brush, Flatten Layer and then Undo, FontLab no longer fails to undo the Flatten Layer operation.
-
If an element or group of elements is rotated, the angle applied is properly shown in Elements panel.
-
Guides and new masters. FontLab 7 correctly preserves the guides with tags and expressions after creating a new master filled with contents from an existing layer.
-
The Flatten Layer operation no longer changes the stroke join attribute unexpectedly.
-
When you hold Alt and drag a corner node that has handles, the node no longer jumps to the position of the handle.
-
FontLab no longer crashes in rare circumstances when exporting a font.
-
When you export fonts as static OpenType PS or OpenType TT instances, FontLab now correctly writes the Font Info > Legal > Embedding info into the
OS/2.fsTypefields. Previously, all instances got the Print & Preview setting. -
FontLab now correctly auto-calculates the strikeout size value in Font Info > Other Values.