Release Notes: FontLab FontLab 7.1.1.7382»
26 March 2020»
Highlights»
Quickly select composites, components and related glyphs • See layers that are present in only some glyphs • View multiple masters in the Preview panel • Import & paste vector artwork more easily • Support for the full Unicode 13 character set • Many detailed improvements & bug fixes
Glyph design»
Contour tool “cheat sheet”»
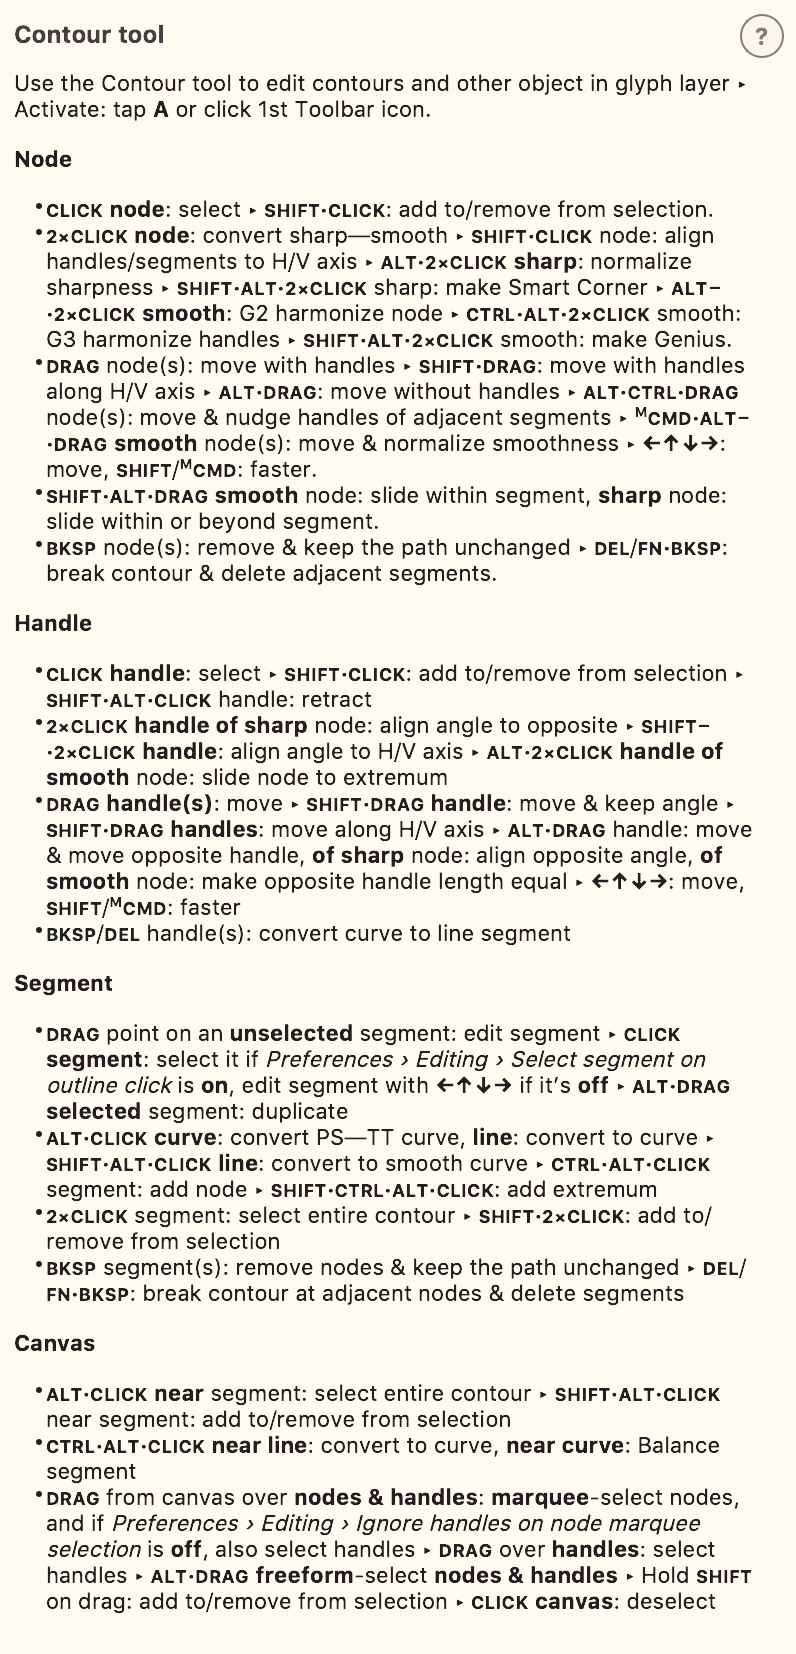
FontLab 7.1.1 has a new “cheat sheet” for the Contour tool. When you’re in the Glyph window and the Contour tool is active, tap ShiftF1 or open Help > Help Panel. Resize the panel and dock as needed. Now you always have all the powerful keyboard shortcuts of FontLab’s contour editor at a glimpse. Tap ShiftF1 to hide the Help Panel again.
The Help Panel is contextual — it changes its contents when a tool or a large dialog is active. You can also hover over a specific UI element and hold F1 (without Shift) to see Quick Help, the ultra-compact help balloons.
Rectangle and Ellipse tools»
If you use the Rectangle or Ellipse tool to draw a new contour in an existing contour glyph, FontLab makes the contour direction of the new contour compatible with the existing contours, so if the glyph has contours that go in the PostScript (CCW) direction, the new rectangle or ellipse will also have that direction, and if the existing contours go in the TrueType (CW) direction, same goes for the new rectangle or ellipse.
When you hold Cmd (Mac) or Ctrl (Win) as you draw the rectangle or ellipse, the contour gets the opposite direction, so it visually cuts out the existing contour.
However, in previous versions, if you used Rectangle or Ellipse in a blank glyph, the contours would get the TrueType direction — so if you copy-pasted them into an existing glyphs with PostScript contours and direction, you’d get the cutouts. FontLab 7.1.1 changes that — when you draw in a blank glyph, the contours will have the PostScript (CCW) direction (or the opposite with you hold Cmd/Ctrl). This is better for most users who draw using PS curves.
Looped corners»
FontLab 7.1 introduced looped corners. If you Alt-click a sharp node with the Scissors tool, FontLab creates a small triangular self-intersecting loop. If you add such a “looped corner” in the inner contour (counter) of a “D”, the loop extends into the filled area — we’d call this loop an “inner looped corner”. If you loop a sharp node in the outer contour of a “D”, the loop extends into the unfilled (blank) area — we call it an “outer looped corner”.
If you turn on Font Info > Other Values > Unfill looped corners (per master):
- FontLab automatically makes the outer looped corners transparent, but it keeps the inner looped corners untouched
- When you export a font, FontLab removes the unfilled outer loops
- FontLab 7.1.1 now matches an outer looped corner in one master with a single node in another master, so they interpolate. In other words, FontLab now treats unfilled outer looped corners as variation-compatible with single nodes
Regardless of the Unfill looped corners setting, FontLab treats an inner looped corner like two ordinary nodes. To match it, the other masters also need two nodes (for example an ink trap or a looped corner).
When you turn off Unfill looped corners, FontLab treats the outer looped corners like two ordinary nodes as well. They become visible as small filled triangles, and they match with two nodes on other masters.
Genius nodes and Power Nudge»
In FontLab VI and FontLab 7.0, if a contour had some Genius nodes and you dragged some other nodes with Contour > Power Nudge on, the Genius nodes moved (nudged) in unpredictable ways. We turned off nudging for Genius nodes with Power Nudge in FontLab 7.1. Due to popular demand, FontLab 7.1.1 makes it again possible to nudge Genius nodes with Power Nudge — this time in a more predictable fashion.
Measurement»
Lengths and angles measurement in the Glyph window is now better visible when True Fill is on
Transform panel»
When you click the action buttons on top of the Transform panel (for Flip or Align), FontLab instantly returns the focus to the active window, so you can continue working on the glyph using the keyboard.
Variation»
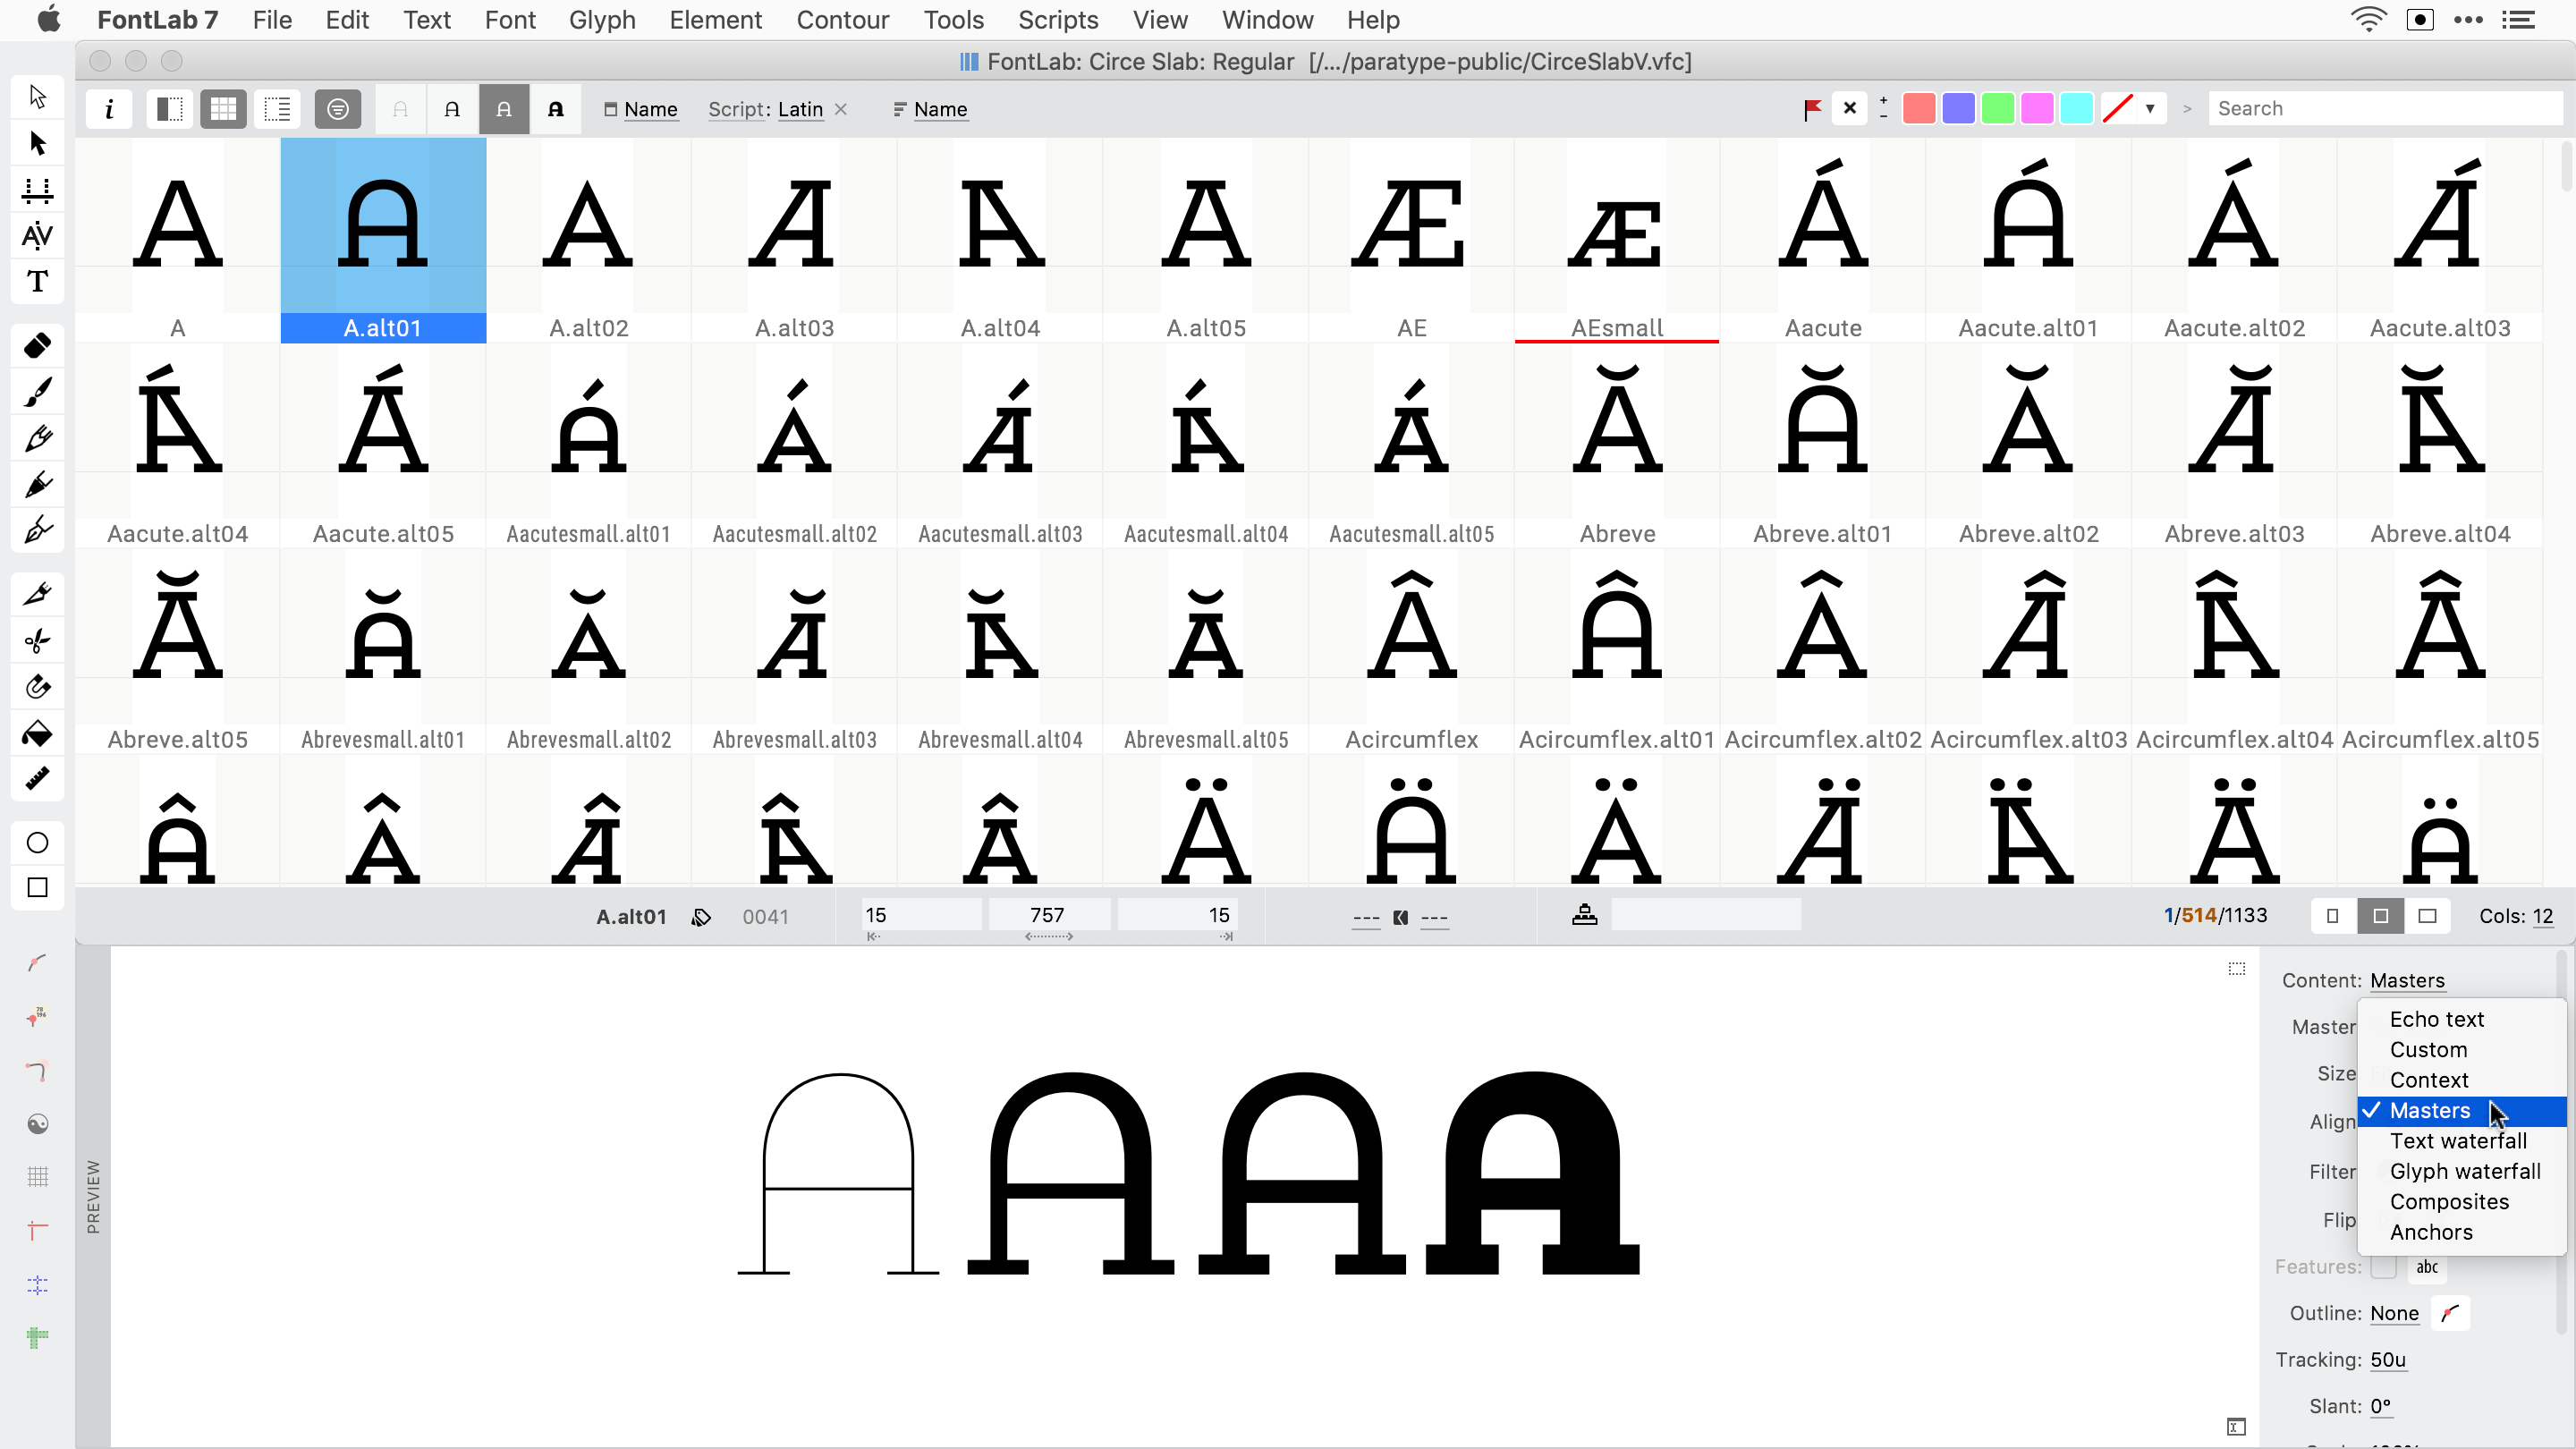
Preview panel: Content > Masters»
The Preview panel sidebar now includes a new Content setting: Masters. When you choose it, the Preview panel shows the master layers present in the font. Note: This is the initial implementation. We plan to improve this.
If no master layers are set to “visible” using the eye icon in the Layers & Masters panel, the Masters preview shows all masters. If any master layers are “visible”, it only shows those masters. This is the same way the Matchmaker tool works.
Open the Preview panel sidebar and change the preview settings. You may turn on nodes and render an outline instead of the filled preview, you can change the size (you can also pinch-zoom), and you can apply tracking, different colors and additional effects.
If the Font window or the Font Map panel is active, and only one glyph cell is active, the Preview panel shows the masters of the current glyph side-by-side.
If the Font window or the Font Map panel is active, and multiple glyph cells are selected, the Preview panel shows each master of all selected glyphs per line.
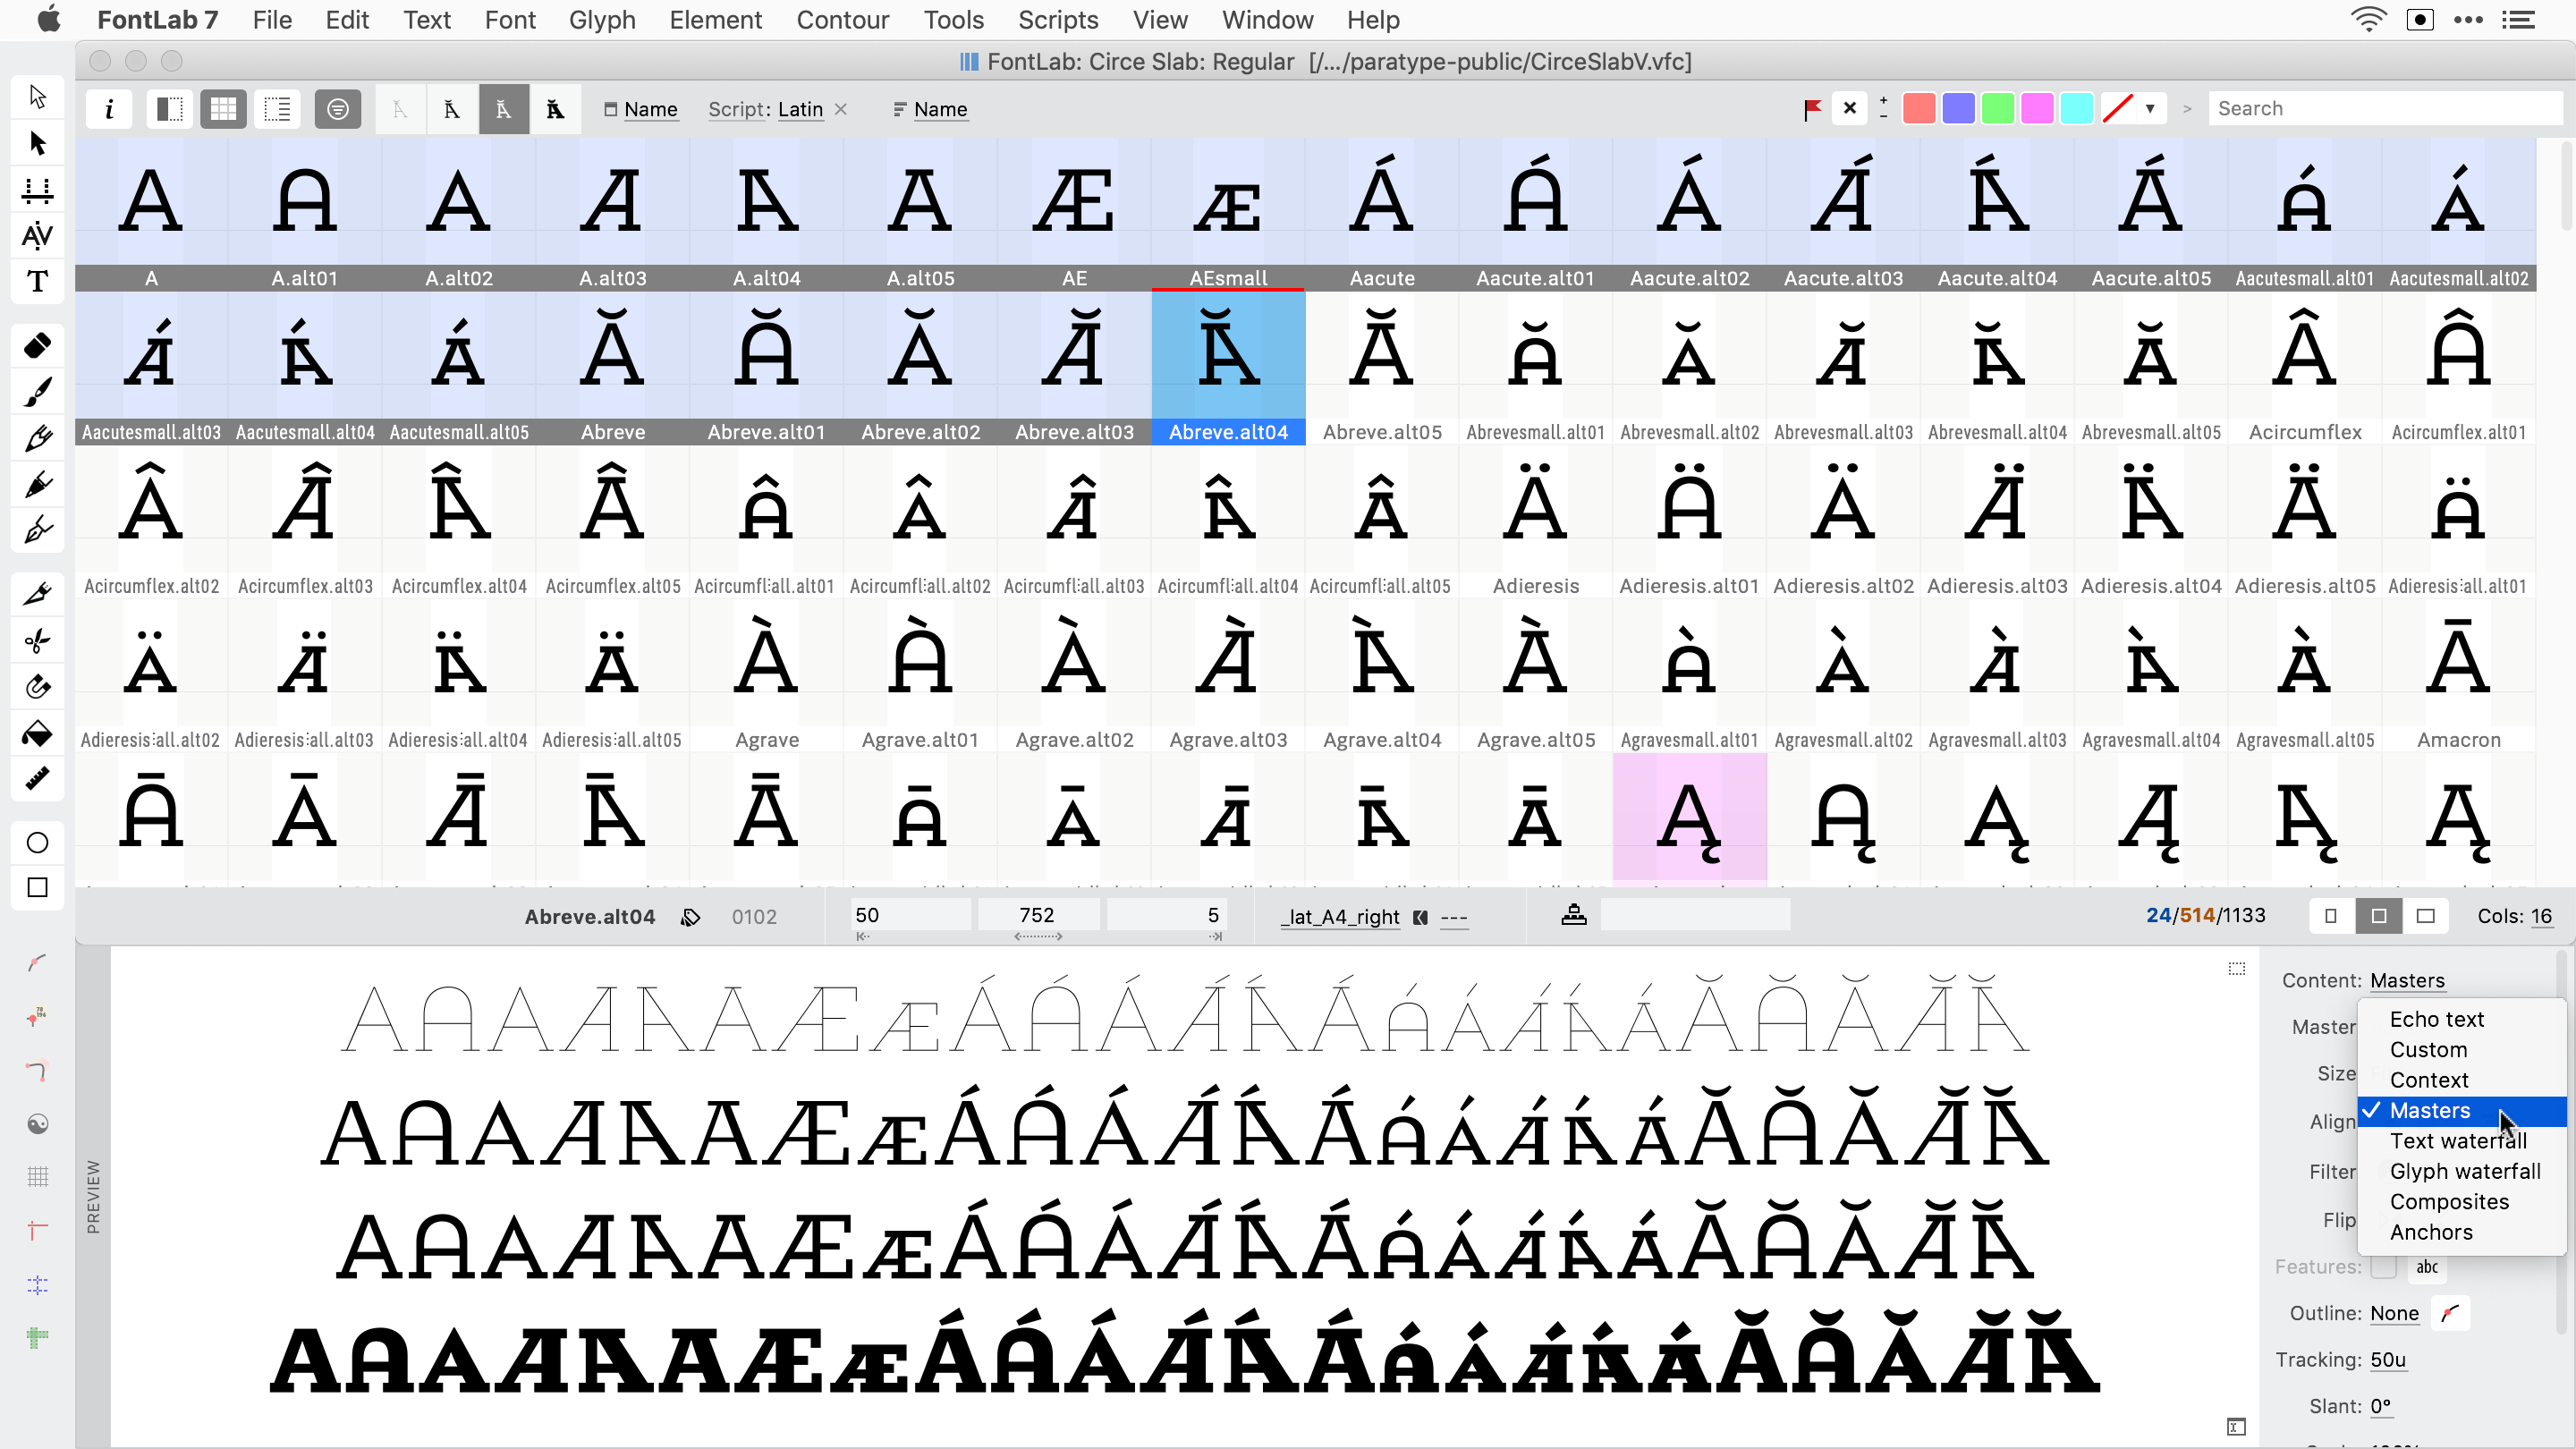
If the Glyph window is active, the Preview panel shows the masters of the current glyph side-by-side.
When you’re in the Glyph window, open the Font Map panel, enlarge it, turn off the sidebar and turn on Hide unfiltered glyphs in the property bar. Then make the panel small and dock it next to the Preview panel.
Click the Search box in the Font Map panel, enter any text (you can use the /glyphname notation) and press Enter, them CmdA (Mac) or CtrlA (Win). The panel shows all glyph cells of the text that you searched for, and selects them.
As long as the Font Map panel is active, the Masters preview in the Preview panel shows all masters of that text, line-by-line. When you activate the Glyph window, the Masters preview shows the current glyph masters side-by-side. Click the Font Map panel again to show the text line-by-line.
You can use the same technique (Search box) in the Font window.
Axis Graph»
With the Axis Graph for each variation axis (the graph icons in Font Info > Axes), you can:
-
Map the design coordinates of masters and instances (which you use within FontLab) to user coordinates (which will be visible in end-user apps of Variable OT fonts). All axis locations of masters and instances within FontLab are defined in design coordinates.
-
Create non-linear mapping between the design and user coordinates. FontLab exports this mapping as the
avarVariable OT table and themapelement of a.designspace. -
Change the design range (minimum and maximum design coordinate). All axis locations of masters must be within its design coordinates range.
-
Change the user range (minimum and maximum user coordinate). The user range is used only within the Axis Graph to help you position the mapping of the endpoints of the graph.
You can use the Variations panel sliders to extrapolate outside the masters up to the minimum and maximum axis coordinate.
When you export a Variable OT font, FontLab uses the masters range (minimum and maximum coordinate of the actual masters on the axis) to determine the axis range, so all instances predefined in Font Info > Instances must be between the extreme masters.
When you export instances, you can also set up predefined instances that are extrapolated: they can be outside the masters range, but they must be within the design range defined in the Axis Graph.
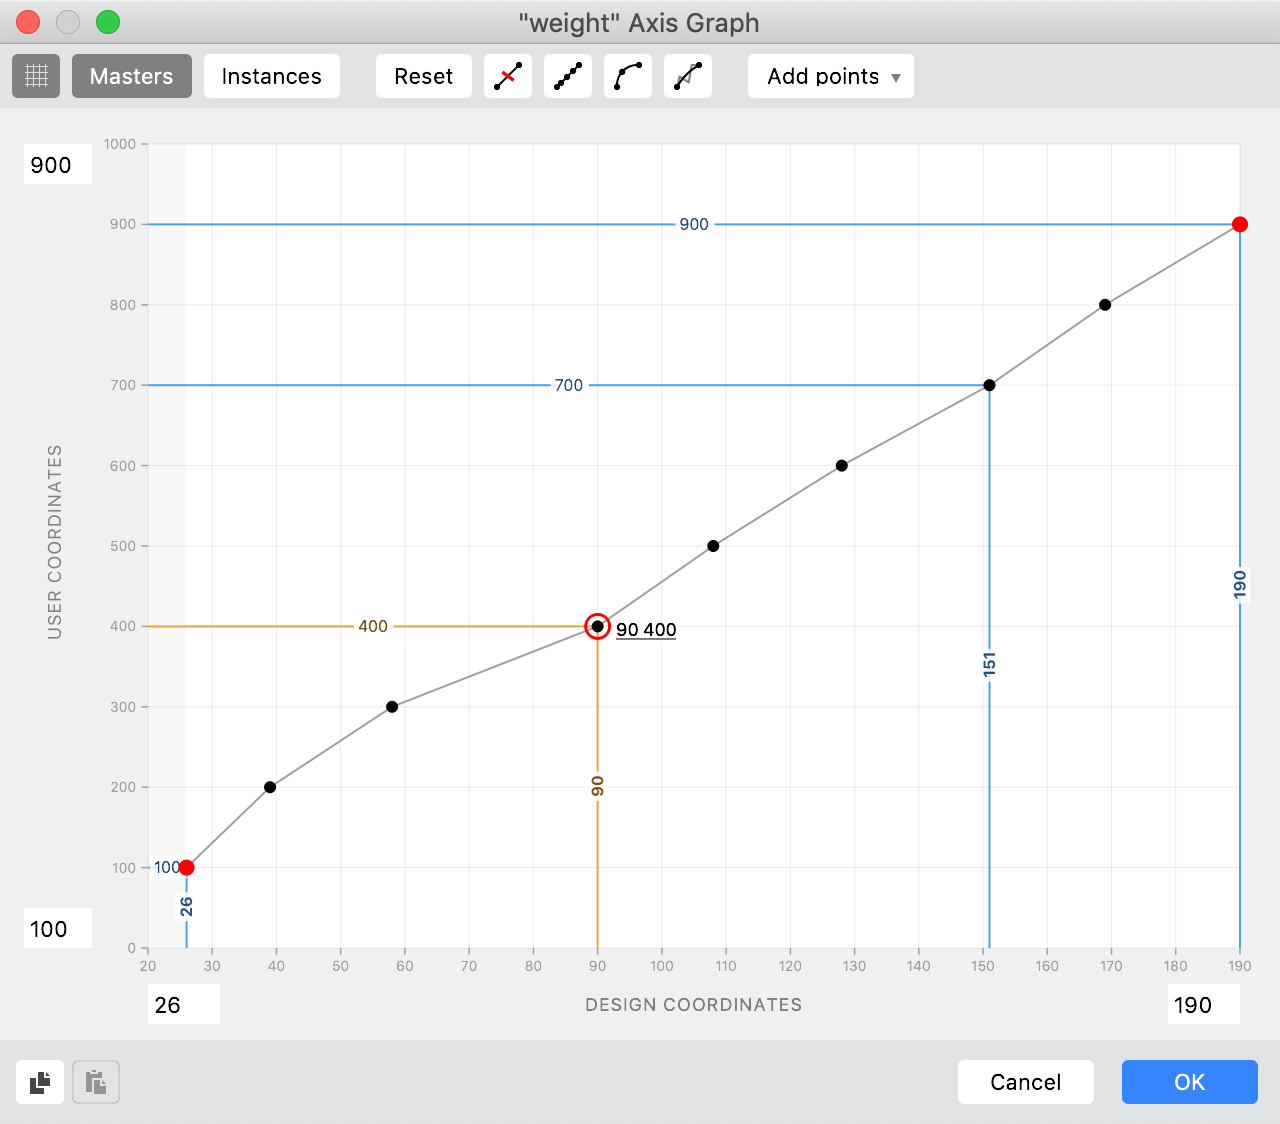
In FontLab 7.1.1, the precision of the Axis Graph adapts to the ranges that you define. For example if you define the Italic ( it / ital ) axis with the design range 0–1000 and the user range 0–1, and if you add some graph points, then when you move a graph point horizontally along the design axis, it will move in integer coordinates, but if you move it vertically along the user axis, it will move with 3-digit decimal precision.
When you double-click the Axis Graph line to add a graph point, FontLab now intelligently rounds the point that you’re adding to a master or instance line, or to the visible grid. But when you double-click the Axis Graph line not near a grid, master or instance line, FontLab adds the point on the coordinate, taking the precision of the axis into account
The Axis Graph now shows fractional locations as nnn. (where nnn is the integer), and when you click on coordinates, the full fractional value is shown. When the axis range is small, FontLab always shows the full fractional values
When you click the coordinates next to a graph point, you can now enter a new coordinate with up to 3-digit decimal precision.
When you use arrow keys to move a graph point, FontLab rounds the coordinate to the nearest coordinate, taking the precision of the axis into account. When you hold Alt and use the arrow keys, FontLab always moves the graph point by 0.1.
The Axis Graph dialog now has contextual Quick Help descriptions: move your pointer over any UI element and hold F1 or CmdF1 to see the Quick Help balloon until you release the key. Or tap F1 to turn on Quick Help until you tap the key again.
Variation panel»
If a variation axis has a small range such as 0–1, the Variation panel sliders now give you more resolution (two decimal places rather than one).
Spacing»
Metrics expressions are now visible in the spacing controls of the Glyph window if they are long and complex.
Font window»
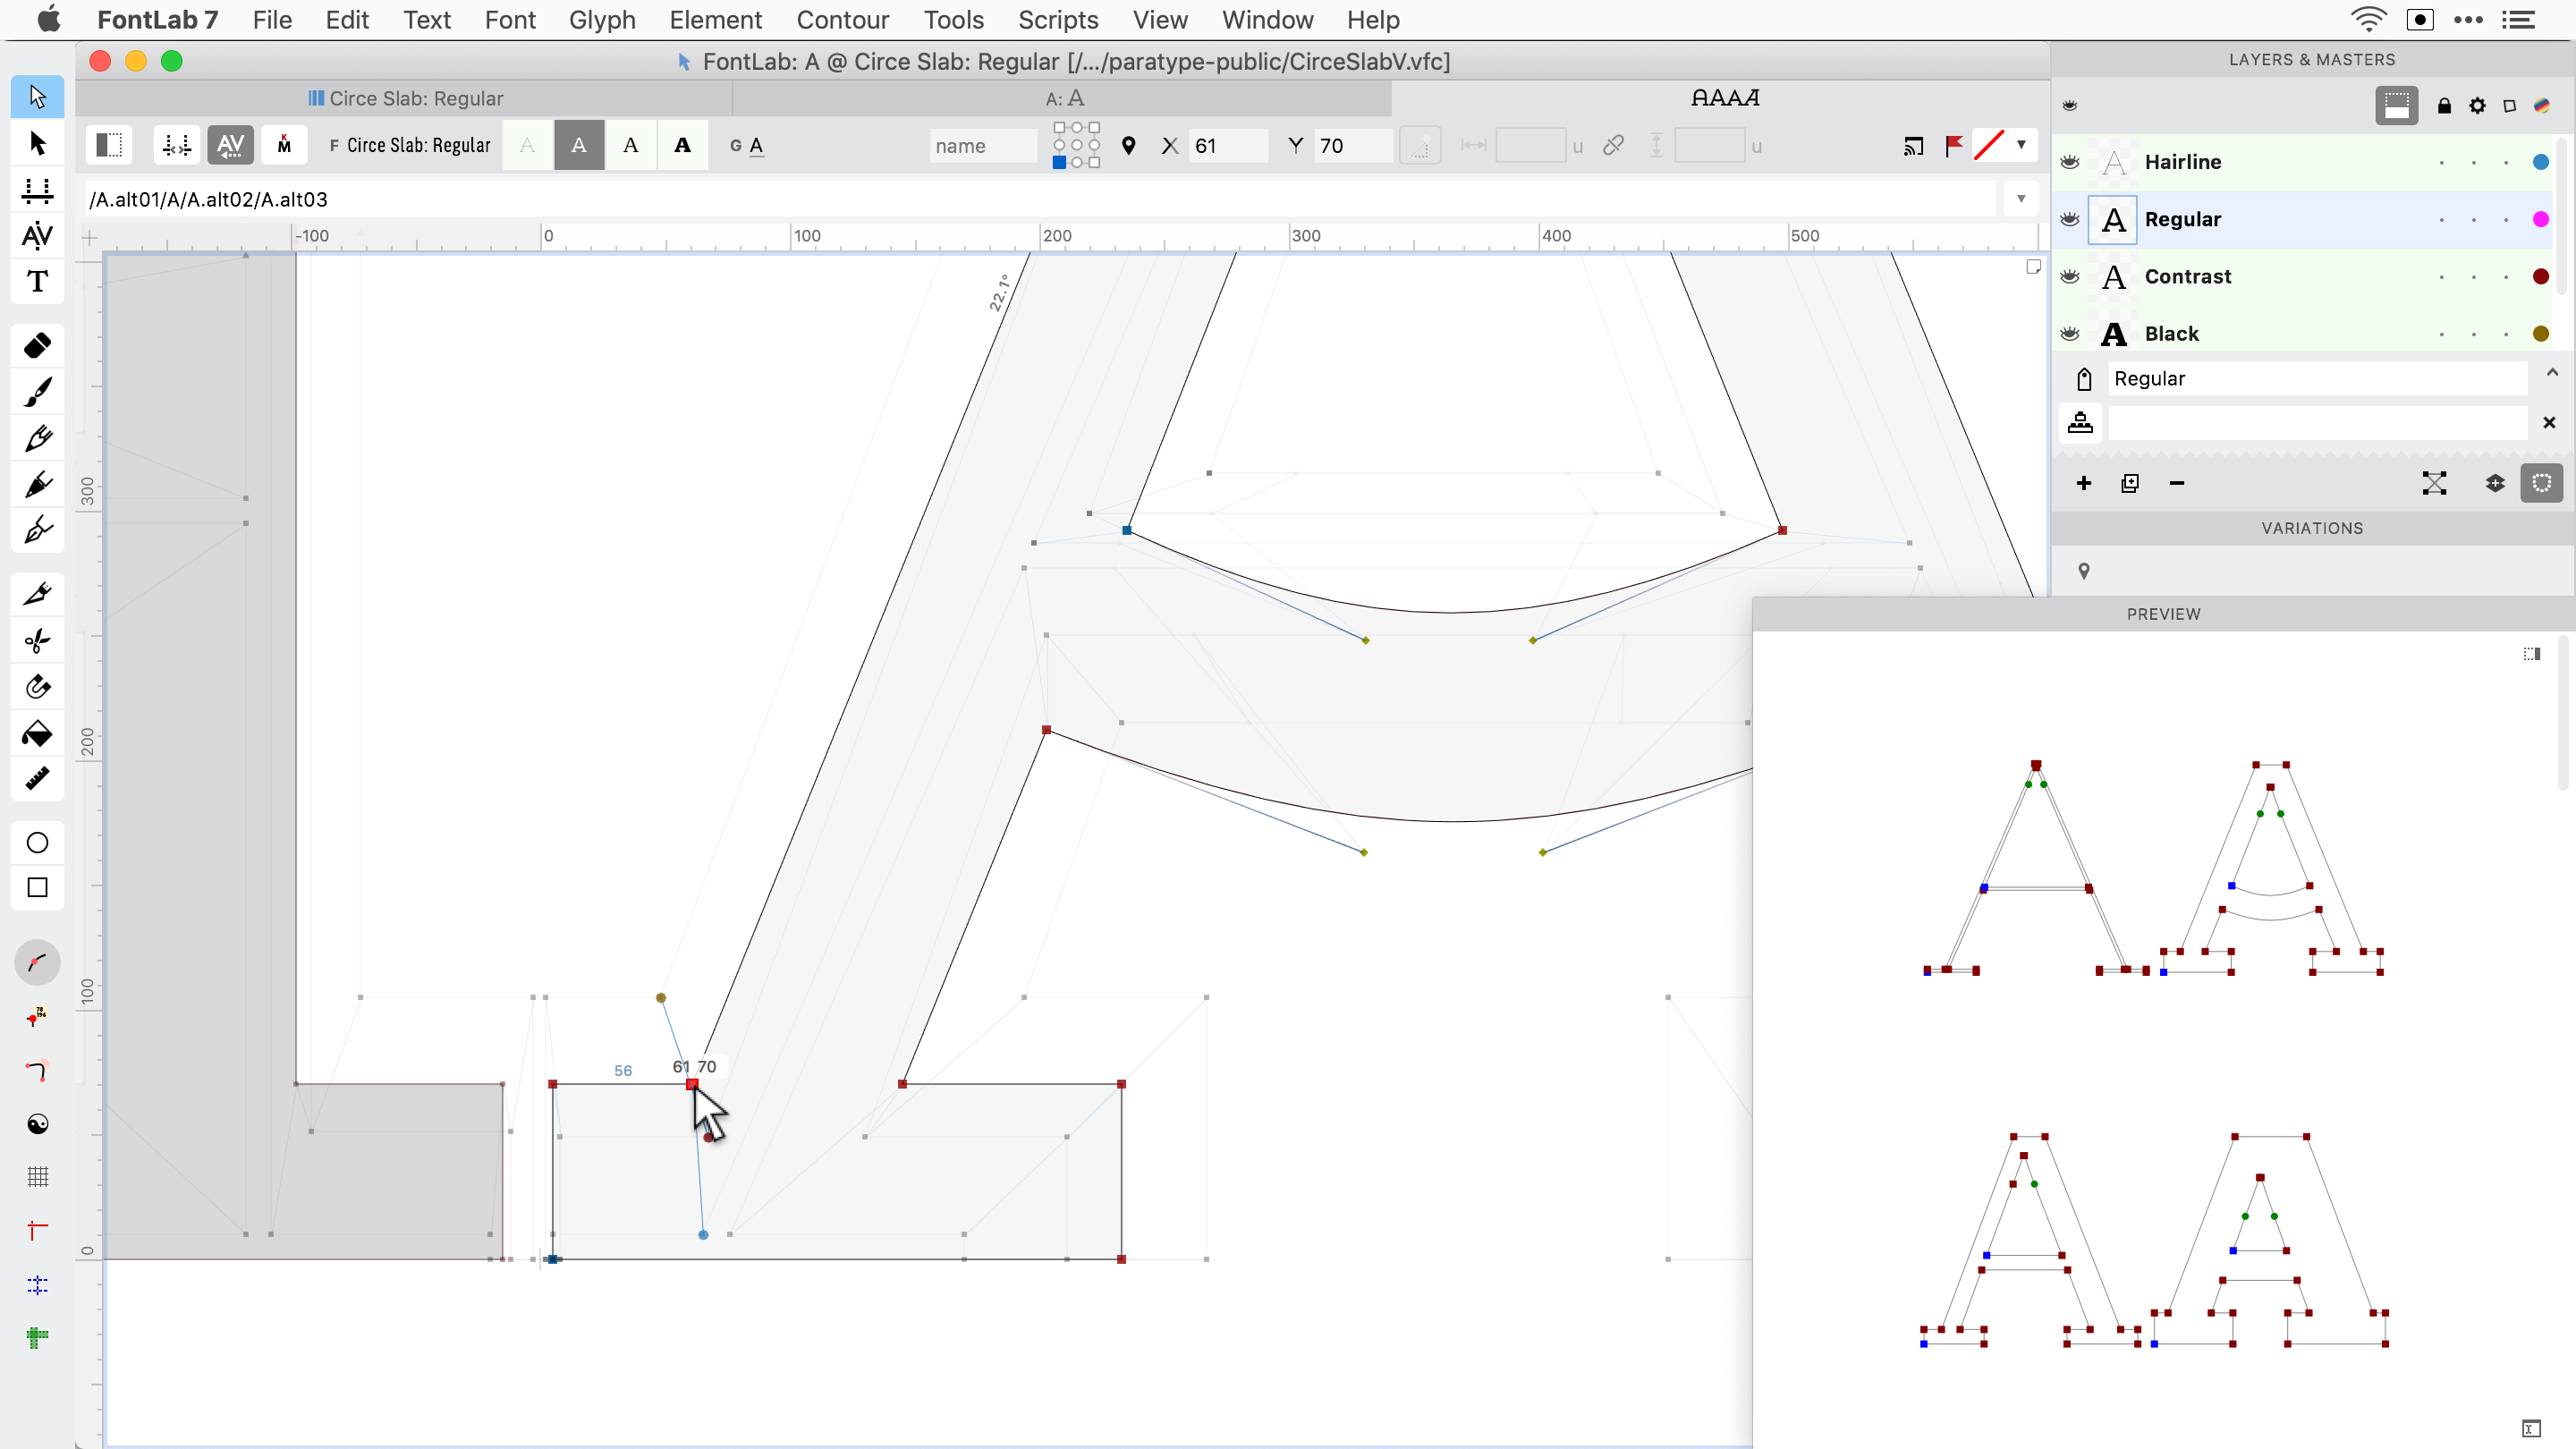
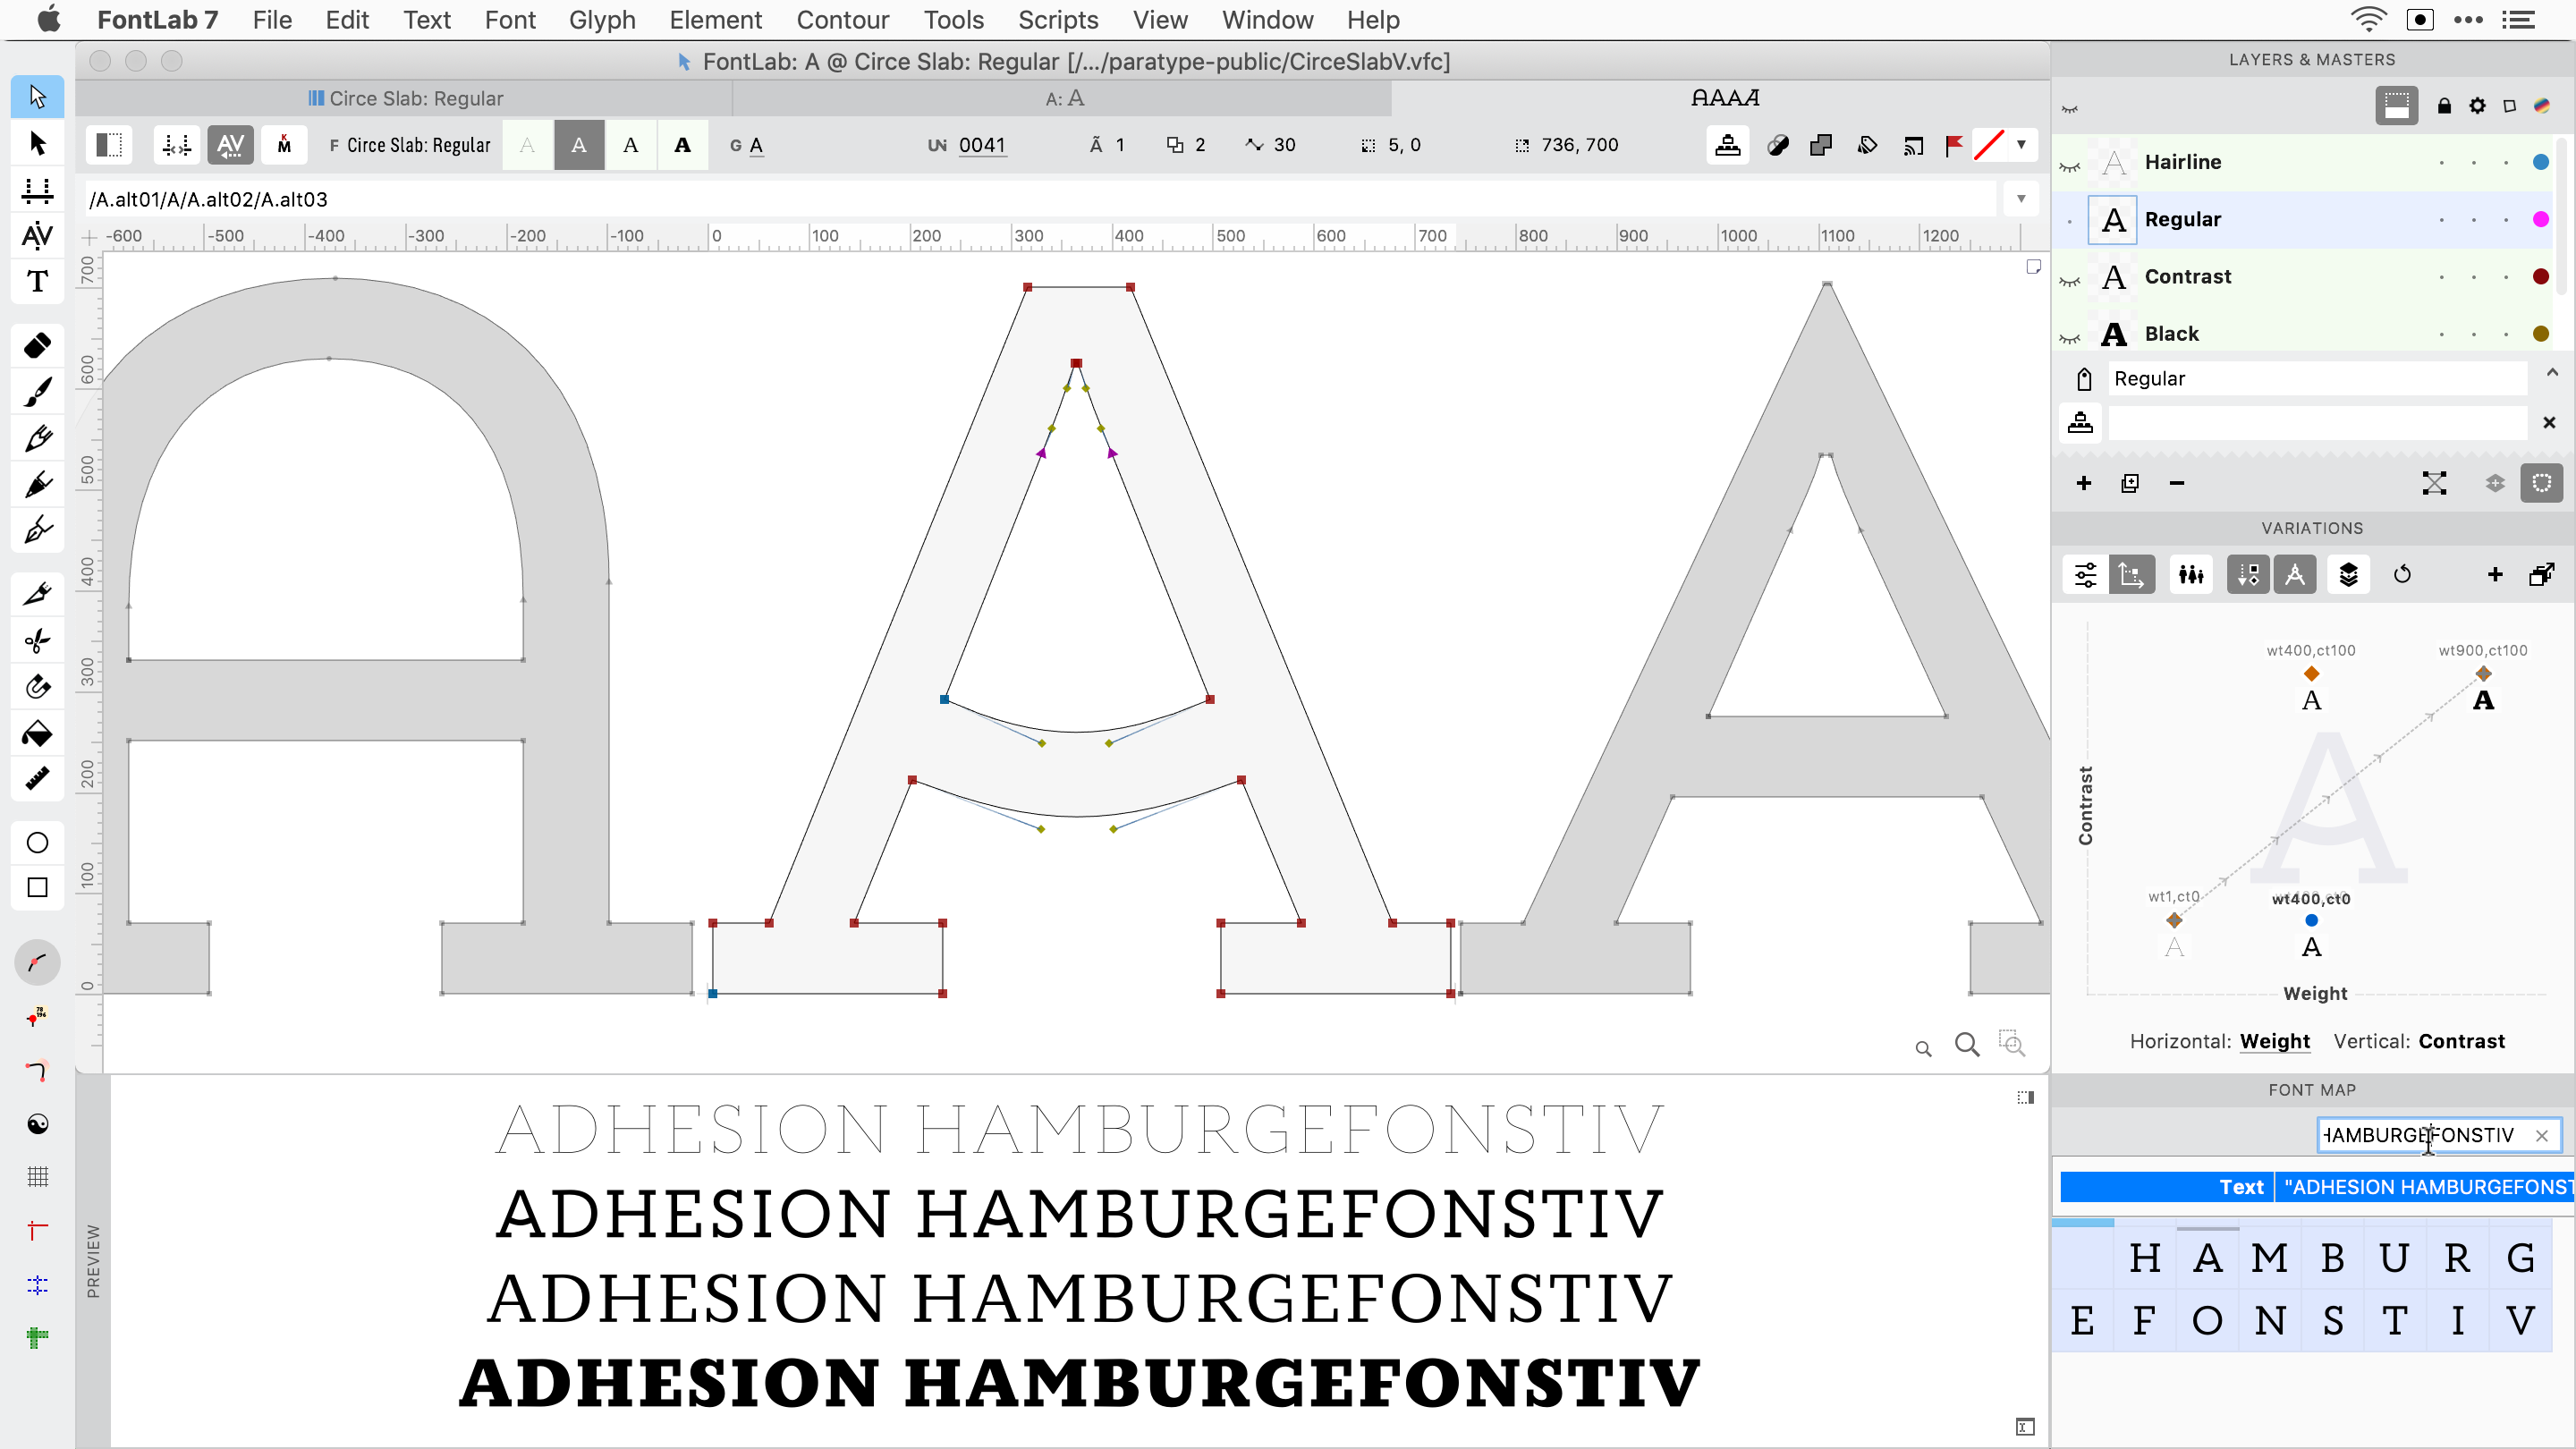
Layers & Masters in Font window sidebar»
The Font window sidebar has a Layers & Masters section that lists all unique layer names found in the font. When you click any of the layer names there, the Font window:
- applies a filter that shows glyphs that have that layer
- makes that layer current so you can see the glyph layers in the Font window cells
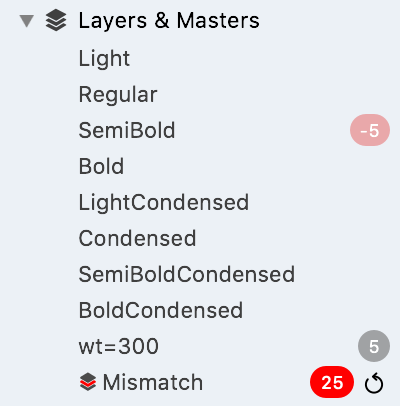
If a layer is not present in all glyphs, the Layers & Masters section now shows a number next to the layer name:
- If the layer exists in <10% glyphs, shows in how many glyphs the layer is present, and is shown on gray background
- If the layer exists in 10–90% glyphs, shows that percentage
- If the layer is in >90% glyphs, shows in how many glyphs the layer is missing (negative, relative to the total number of glyphs), and is shown on red background
The Non-matching entry in the section is now called Mismatch, and the number of glyphs where masters do not match is now shown on red background
Rendering of selected and current glyph cells»
In the Font window, FontLab 7.1.1 no longer renders a checkered pattern on glyph cells that you select. Instead:
- Selected glyph cells: glyph preview has a darker, slightly bluish background; caption has white text on dark gray background
- Current glyph cell, selected: glyph preview has an even darker, bluish background; caption has white text on blue background
- Current glyph cell, not selected: glyph preview has a gray background; caption has black text on gray background; you can select a range of cells and then Cmd-click to deselect the current cell.
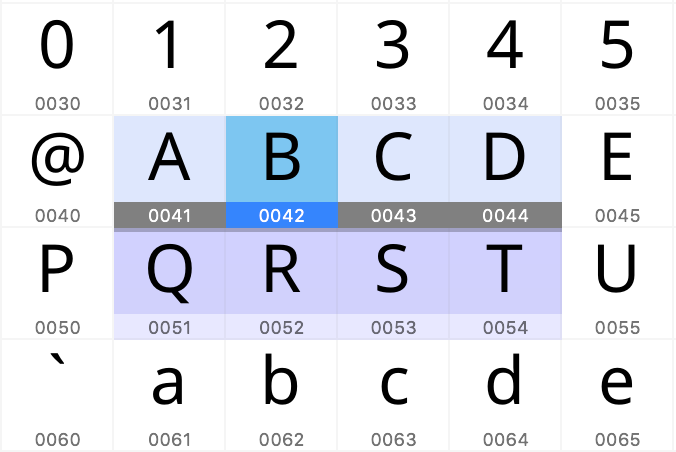
This works well with color flags, and with colorized cell captions. If a caption has white text, the cell is selected. If it has black text, the cell is not selected
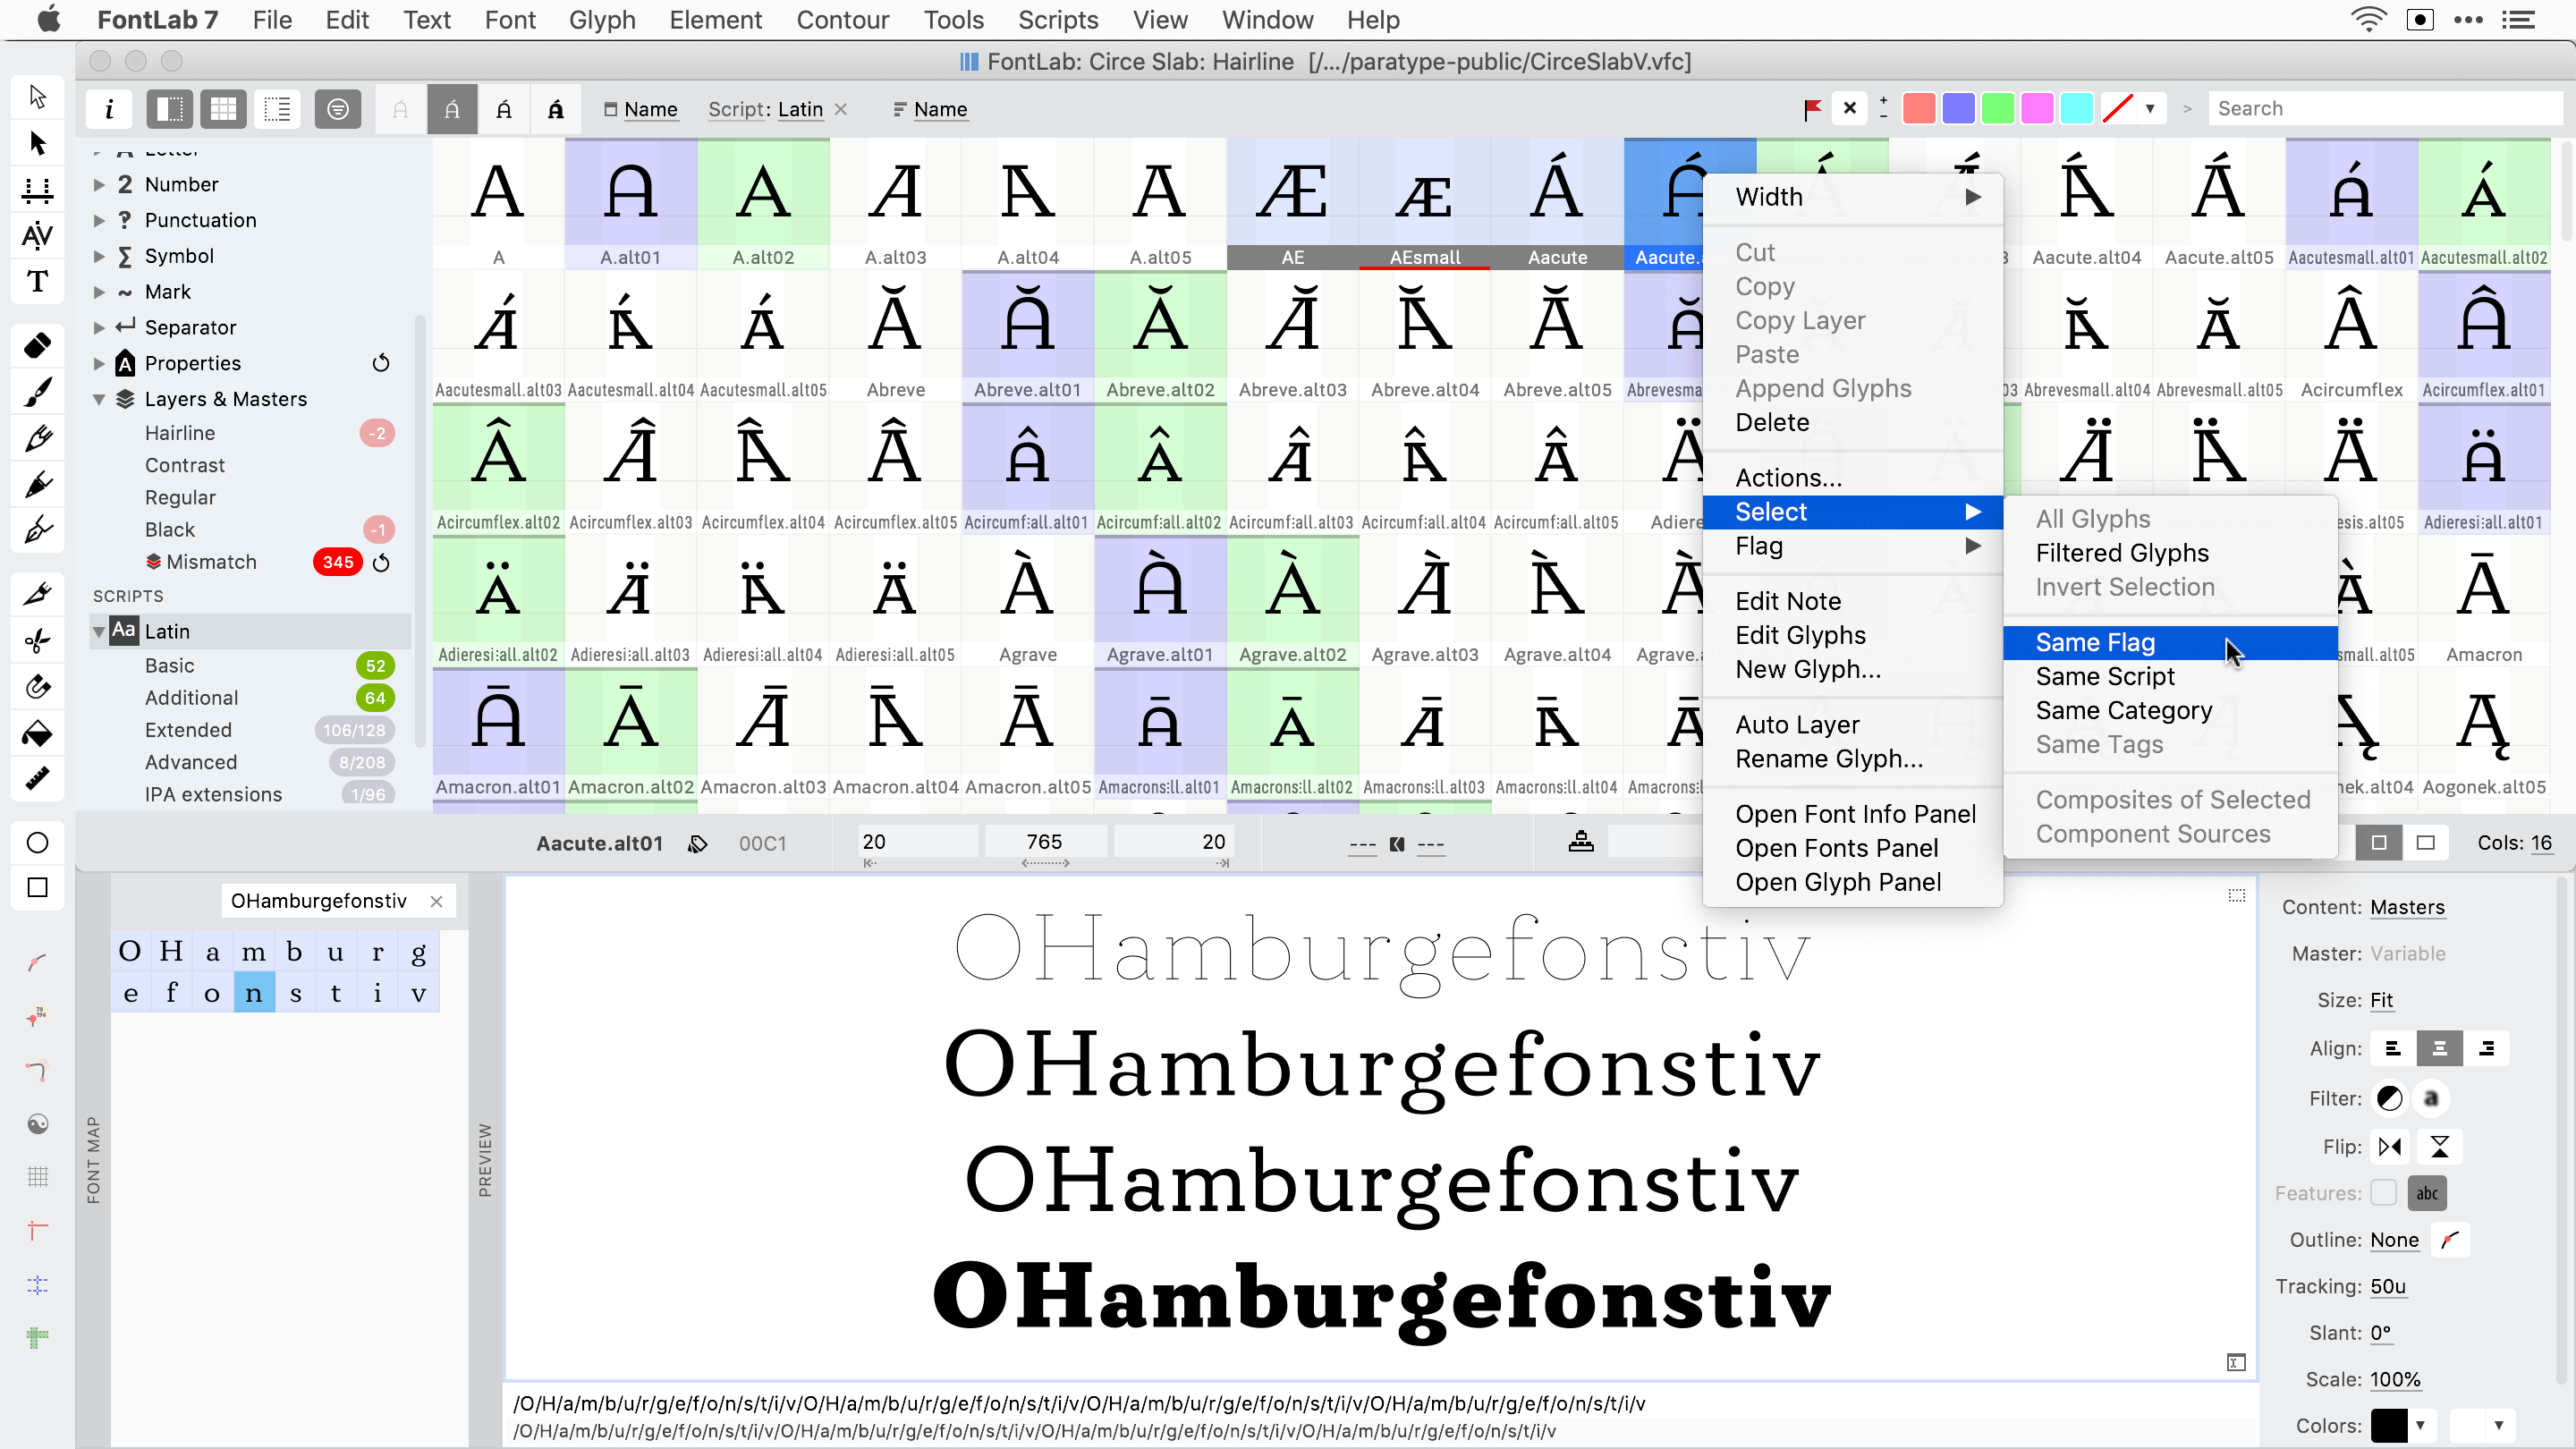
Font window: Select in context menu»
FontLab 7.1.1 adds a Select > submenu to the context menu of the Font window (right-click or Ctrl-click)
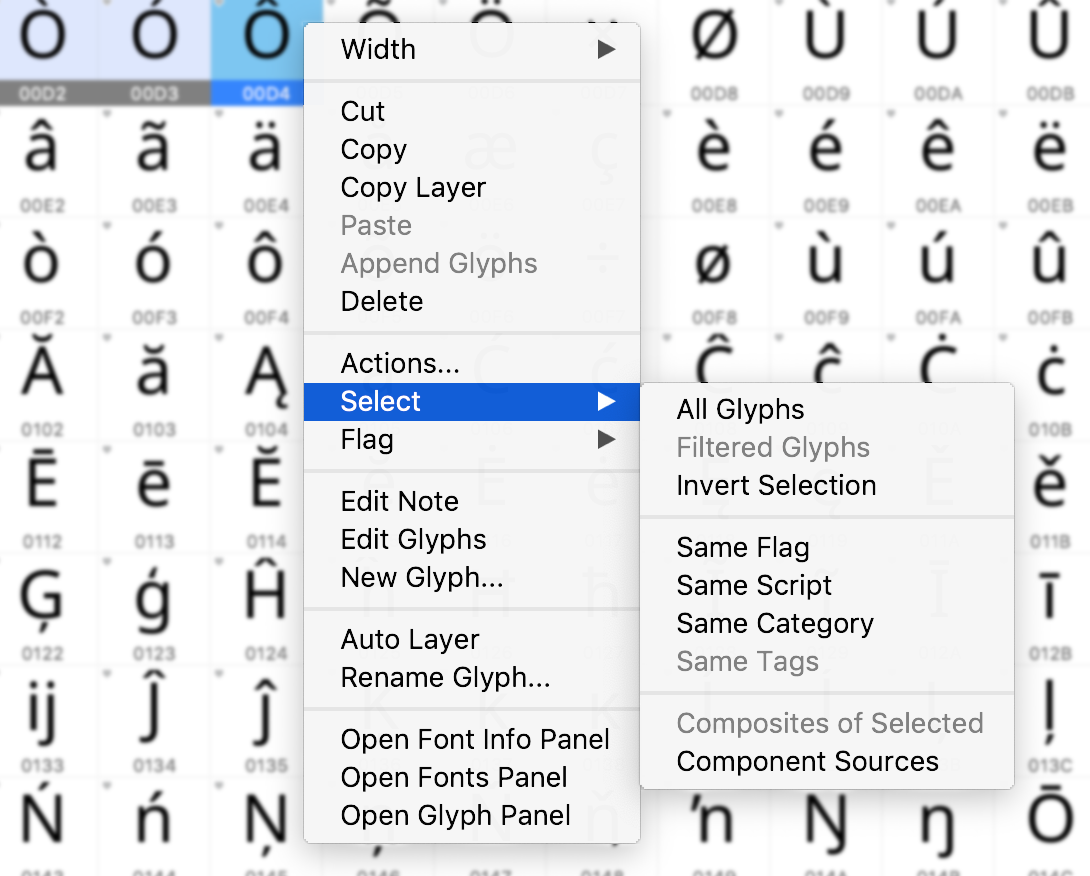
With the Select submenu items, you can select any glyph cells that are visible, based on several criteria.
- When the Hide unfiltered glyphs toggle in the Font window context bar is on, only glyphs within the current Font window filter can be selected.
- When the toggle is off, FontLab can select any glyphs in the font.
General selection»
In the Select context submenu:
All Glyphs
- if Hide unfiltered glyphs is off, selects all glyph cells (like CmdA / CtrlA)
- not available if Hide unfiltered glyphs is on
Filtered Glyphs
- selects all glyph cells that match the current Font window filter (Encoding etc.)
- if Hide unfiltered glyphs is on, selects all visible glyph cells (like CmdA / CtrlA)
Invert Selection
- inverts the selection, and switches the current glyph to the closest selected glyph
- if Hide unfiltered glyphs is on, works only within the filtered cells
Same as current glyph selection»
The current glyph in the Font window (the glyph cell that has a white caption on a blue background, and a dark glyph cell preview) may has particular properties that interest you. In the Select context submenu:
Same Flag
- selects all glyph cells that have the same color flag as the current layer of the current glyph
- if the current glyph has no color flag, selects all glyphs that have no color flag
Same Script
- selects all glyphs that belong to the same Unicode script as the current glyph; for example if your current glyph is “A”, selects all Latin letters
- also selects alternate glyphs that have no Unicode
Same Category
- selects all glyphs that belong to the same Unicode category as the current glyph; for example if your current glyph is “A”, selects all uppercase letters
Same Tags
- selects all glyphs that have the identical set of tags as the current glyph
- to select glyphs by individual tag, use the Classes panel
- to assign tags to multiple glyphs, select them in Font window, open the Glyph panel (CmdI) and in the Tags field, enter the tags prefixed by
+
If you have multiple glyph cells selected, and you open the context menu and navigate to the Select submenu:
- click any of the Same… menu items to select only the glyph cells that match the single current glyph
- Shift-click the menu item to add the matching glyph cells to your current Font window selection
Component-related selection»
Select one or more glyph cells and use the Select context submenu like this:
Composites of Selected
- click to select only glyphs that, in the current layer, use any of the selected glyphs as components; for example if you select “A” and “C”, it selects “À”, “Á”, “Ä”, “Ç”, “Ć” etc.
- Shift-click to select these composite glyphs but keep the source glyphs selected
Component Sources
- click to select only glyphs that, in the current layer, are sources of components used in the selected glyphs; for example if you select “Á” and “Ć”, it selects “A”, “C” and
acuteoracutecomb - Shift-click to select these source glyphs but keep the composite glyphs selected
Note
The component-related selection operations also work with components that are added dynamically via Auto Layers.
More selections»
In addition to the methods above, you can use other ways to select glyph cells by criteria.
-
Open the Font window List view with the 4th button in the property bar, click the gear icon in the top-right, turn off Sync and turn on all columns of interest. Now click on the column headings to sort the list, and select multiple glyph cells
-
Use Edit > Find Glyphs (CmdF), type a search criteria, choose the result category, click the Select button in the top-right of the search popup and press Enter
-
If you have a complex selection process, make one selection, use color flag to flag the glyph cells, then make another selection and flag with the same color, and another — and finally click one glyph cell with that color and choose Select > Same Flag from the context menu.
-
Use the Search box, the Property bar or the Sidebar to apply Font window filters, and then choose Select > Filtered glyphs from the context menu, or turn on Hide unfiltered glyphs and press CmdA to select all filtered glyphs.
Saving selections and filters»
When you have a selection:
-
Drag the glyph cells to the Sidebar Bookmarks section to make an ad-hoc filter, and click that bookmark again at any time.
-
Use Text > Copy Text As > /Names, and paste a glyphtext string (like
/A/Aacute/B/C/Ccedilla) to a text editor. Paste several one after another as one line, then select this glyphtext, and paste into FontLab’s Search box in the Font window property bar — you’ll get a filter again.
When you have a filter applied:
-
Turn on Hide unfiltered glyphs and choose ==File > Export > Encoding… == to save the glyph names of all visible glyph cells as an
.encfile. -
The encoding then appears in the Encoding filter dropdown of the Property bar.
Placing artwork»
When you paste contours from FontLab Studio 5, the contours in FontLab 7 now have the same contour direction and start points as in FontLab Studio.
When you import or paste artwork from another app into FontLab 7 for the first time, or when you hold Alt and choose Edit > Paste Artwork, FontLab shows a dialog where you can decide how FontLab should treat the position, scale, fill and stroke of the artwork
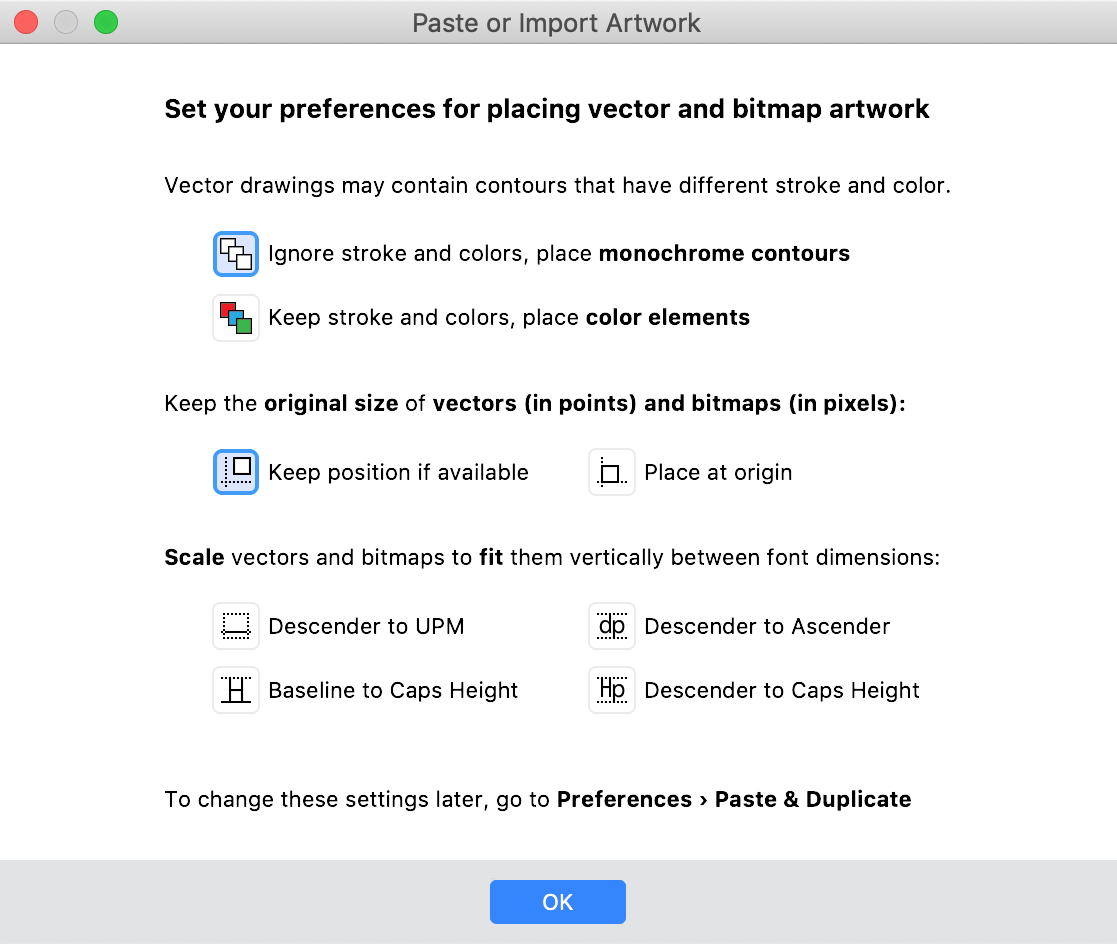
Click OK, and FontLab saves the preferences, and places your artwork with these settings. Change these settings later in Preferences > Paste Duplicate. The dialog and the preferences page are now redesigned for clarity and consistency.
Vector artwork section»
Choose how FontLab should import vector artwork when you File > Import > Artwork or drag-drop a .pdf or .ai file, or when you copy-paste from a vector graphics app (Adobe Illustrator, Affinity Designer, Sketch), or from another font editor. This section does not apply to bitmap images.
Ignore stroke and colors, place monochrome contours: FontLab combines all paths into a single monochrome element with simple editable contours, and ignores fill & stroke. Choose this if you make a traditional monochrome font
Keep stroke and colors, place color elements: FontLab creates separate color elements for all paths that have a unique fill or stroke. Choose this if you make a color font
Import original position: prefer AI vector format:
- On: Pastes using the AICB format. With Keep position if possible, retains the global ruler position in points. With Keep stroke and colors, pastes a group where all compound paths with the same fill & stroke make one element
- Off: Pastes using the PDF format. Better supports clipping paths and complex fills. With Keep artwork size, aligns the bottom-left corner to the origin (0, 0). With Keep stroke and colors, pastes a group where each compound path is one element
- When only PDF or only AICB is in the clipboard, FontLab uses that format
Keep artwork size section»
Choose these settings to keep the size of a bitmap image (1 px = 1 font unit) and of vector artwork (1 pt/px = 1 font unit) when you File > Import > Artwork a .pdf , .ai or bitmap image file, or when you copy-paste from an image editing app, from a vector graphics app, or from another font editor. When you drag-drop, FontLab places the artwork where you drop it.
Keep position if available: Places AI vector artwork at the same position in font units as the artwork had in points on global rulers. Places other artwork at origin (0, 0).
Place at origin: Places all artwork at origin (0, 0)
Fit artwork section»
When you File > Import > Artwork a .pdf , .ai or bitmap image file, or when you copy-paste from an image editing app, from a vector graphics app, or from another font editor, choose these settings to place (align) the bottom of a bitmap image or vector artwork at a specific Font Dimension line, and to scale (fit) the vector artwork: Descender to UPM, Descender to Ascender, Baseline to Caps Height or Descender to Caps Height.
Bitmap images are not scaled. When you drag-drop, FontLab places the artwork where you drop it.
Glyph Names and Unicode»
The built-in Unicode information (codepoints, ranges, scripts, character names) in FontLab 7.1.1 now matches the new Unicode 13.0 standard
Fonts panel»
When you open multiple versions of a font that has identical font names, FontLab no longer automatically appends numbers (2 etc.) to the Style name of the fonts in the Fonts panel.
However, when you double-click the Style name or the Styling Group name of one of such fonts in the Fonts panel, and press Enter, FontLab will still rebuild the font names and resolve duplicate naming. This is intentional. For precise control of the naming, please use File > Font Info.
Save»
File > Save All now saves all fonts that are open. Previously, it saved the fonts that were selected in the Fonts panel
We have redesigned Preferences > Save Fonts where you control how FontLab saves files (first save, saving UI configuration, backups and additional formats, autosave), and how FontLab exports bitmap color font formats.
First save»
Choose how the app saves the file when you create a new font, or you open a font in a format other than VFC/VFJ, and then you choose File > Save. This also applies to File > Save All.
- Ask for location: FontLab shows a Save As dialog that lets you choose the save location and enter the file name
- In source folder (new in 7.1.1): For imported fonts, FontLab saves the font in the same folder as the original font file. For new fonts, FontLab saves the font in the folder specified below
- In folder: FontLab saves the font in the specified folder with an automatically generated file name
Existing files»
When you save, and a same-named file exists in the save location, FontLab can Overwrite the existing file, Move to Trash/Recycle Bin, or Rename it. When you choose Rename, FontLab adds the current date and time to the older file, and if Save renamed files in subfolder is on it moves the older file to a .backup subfolder.
Include in VFC»
When you save/export into the native FontLab 7 VFC (FontLab Compact) format, FontLab can include in the VFC file the content of the Font and Glyph Windows that the font has open, and/or the positions of the open Panels. When you open the VFC, FontLab restores windows/panels if Preferences > Open Fonts > Restore workspace is on.
Include in VFJ»
The VFJ format (FontLab JSON) is a human-readable, JSON-compatible representation of the same information as the VFC format. When you save/export into VFJ format, FontLab can include in the VFJ file the , Windows, the Panels and/or also Session (the )timestamps of last modification of the glyphs). VFJ saved without Session are more suitable for version control systems. When you open the VFJ, FontLab restores windows/panels if Preferences > Open Fonts > Restore workspace is on.
Turn on Prettify VFJ for larger, more human-readable FontLab JSON files or turn it off for minified files that don’t include line breaks or indentations. When you save a VFC and Save VFJ when saving VFC is on, FontLab also saves VFJ file in the same folder.
Autosave»
When Save copy in Autosave folder is on FontLab automatically saves a copy of the open fonts in the Autosave folder in the interval specified in the field (0.2 will autosave every 12 seconds). After a crash, FontLab prompts you to open the autosaved files. When you open them, or when you quit the app, FontLab moves the contents of the autosave folder to the Trash/Recycle Bin. Click the new Reveal button to open the Autosave folder in Finder/File Explorer.
Bitmap fonts»
When your font does not have a ppm.NN layer and you export it into a bitmap font format (OpenType+sbix), all glyphs are rasterized at the PPM specified in Rasterize if needed. Choose 127 or less to export into the OpenType+CBDT format.
Open and Export»
-
When you open a
.glyphsfile, FontLab now correctly reads multiple Unicodes assigned to a single glyph. When you export a.glyphsfile, FontLab correctly writes multiple Unicodes assigned to a single glyph -
When you export a font as Variable OT and the font contains masters with different names but the same axis location, FontLab now shows a
Duplicated masterswarning in the Output panel
Bug fixes»
-
When the Apply OT Features checkbox is off in the Preview panel, FontLab should not perform the international text processing (Unicode, bi-di) and OT features processing in the Panel. But when activated the Font window, FontLab silently turned the processing on, even though the checkbox remained off. Now, FontLab turns on Unicode & OT features processing in the Preview panel only when you explicitly turn on that checkbox, or click the Features label and turn on the checkbox in the dialog, or when the Preview panel Content is Echo Text and the Glyph window. Known issue: If you have features processing on in the Glyph window, and Preview panel is set to Echo Text, and you switch to a Font window, the Preview panel will treat the selected glyph cells like text, and will perform Unicode & OT features processing there.
-
When you use Contour > Unlink Corners, FontLab creates an open contour and applies the Fill filter to it. When you hover over one of the contour intersections, a blue rectangle appears. When you right-click it and choose Make Node, FontLab creates the node, and now it no longer corrupts the fill.
-
When you drag a segment where one of the handles of a smooth node has zero length with AltShift keys pressed, FontLab no longer hangs.
-
If you open fonts in a format other than VFC/VFJ, and you use Save All to save all opens fonts, the file path visible in the title bar of the Font window now instantly updates to show the new path.
-
If any glyphs have conditional tags like
~it>0.5, the Text mode now correctly switches to the conditional glyphs when you use the Variation panel sliders. -
Previously, when you opened an OpenType font, FontLab erroneously did not read some class-based kerning pairs in some fonts. FontLab 7.1.1 correctly reads all kerning pairs
-
When you turn on or compile the Features in a Glyph window, a Sketchboard text frame or the Preview panel, and you then click Turn on default features, FontLab now turns off the visual kerning and turns on the
kernfeature only if thekernfeature is actually shown in the Features selector, so you can turn it off. _Note: FontLab does not show thekernfeature is the Features selector if your font has visual kerning but thekernfeature is not explicitly defined in the Features panel -
When you open a DesignSpace+UFO, that contains intermediate masters stored as layers within some of the UFOs, FontLab now reads those intermediate masters as separate font masters, and no longer overwrites the location of one and the same font master several times
-
When you’re in Glyph window Text mode and type a glyph that does not exist in the font, then switch to Contour mode and double-click the non-existent glyph entry, FontLab now creates the glyph as it did, but no longer removes the preceding glyph from the window text
-
When you align text in the Preview panel, and kerning is turned off, FontLab no longer takes kerning into account when calculating the text width in the panel
-
The selected master in the Variations panel is now always in sync with the selection in the Layers & Masters panel
-
In the Pairs & Phrases panel, when you open Edit Pairs & Phrases, and you remove a Text file or a Pairs file with the – button in the bottom-left, the removed text no longer re-appears when you open Edit Pairs & Phrases again. When you add a Text or Pairs file there, the text now appears correctly
-
In Preview panel, a new line in text no longer adds extra horizontal space when tracking is on
-
In the Kerning panel, when you choose Sel in one of the top filters, the panel shows only the pairs where the 1st or 2nd glyph is selected in the Font window. When you click a pair, FontLab now no longer switches the Font window selection (for the 1st glyph). When you change the selection, FontLab now correctly updates the panel content (for the 2nd glyph)
-
When you open a font that has multiple Unicodes assigned to a glyph, and you use Unicode as a Font window cell caption, FontLab no longer slows down or crashes
-
When you bind the sidebearings in a glyph layer, so they have a form
=nnnwherennnis a value, and you then use the Align buttons on the Transform panel, FontLab now respects the bound sidebearings. Previously, the bound sidebearings were ignored until you used Font > Update Glyphs -
When you change a kerning pair in the Glyph window Kerning mode, the Kerning panel preview of the kerning pair now updates correctly
-
When you assign double Unicode codepoints by hand with the Rename Glyphs dialog, and a Unicode-based Font window filter is active, the Font window now instantly updates so that the glyphs appear in the correct cells
-
FontLab 7.1.0 mis-identified certain triangular shapes (such as a “4” made out of a single self-intersecting contour) as a looped corner, so the Fill tool and Remove Overlap worked incorrectly. This is now fixed
-
When you have hints visible, and select a segment that overlays with a green hint line, you can now see the red selection
-
When you open a UFO package that contains an empty
openTypeOS2Typearray in thefontinfo.plist, FontLab now correctly sets Font Info > Legal > Embedding to Everything is allowed -
In the Font window List view, you can now sort glyphs by 1st or 2nd kerning class