Release Notes: FontLab 7.1.2.7432»
11 May 2020»
FontLab 7.1.2.7432 is our newest feature-packed release that brings nearly 100 enhancements and fixes.
- Use friendly glyph names when you add new glyphs
- See length of diagonal handles and line segments
- Easily link a sidebearing to the opposite sidebearing
- Easily remove metric expressions across masters
- Font export and batch automation with Python scripting
- Choose how FontLab decompiles OT classes and substitutions
- Shift anchors with contours
- Customize appearance of anchors and pins
- Make SVG Editable more faithfully
- Drag-drop
.gliffiles - Better drag-drop of many vector and bitmap artwork files
- Copy-paste improvements
- See and fix invalid components with FontAudit
- Use the same element for filled shapes and for unfilled counters
- Combine and join contours across elements
- Refined Font window scrolling
- Many user interface tweaks
- Updated TypeRig with new Delta Machine tool
Contour editing»
Slide node»
With ShiftAlt-drag, you can slide a node along a curve. Previously, when you were sliding, FontLab would suggest snapping points to nearby nodes, but the node you were sliding would not actually snap to those nodes.
Now, when Edit > Coordinates > Round when Editing is on, the node that you are sliding actually snaps to the suggested nodes. When Round when Editing is off, the node that you are sliding does not snap. However, FontLab shows the red dotted line that points to a suggested node, but no longer shows the red circular snapping point.
Lengths and angles»
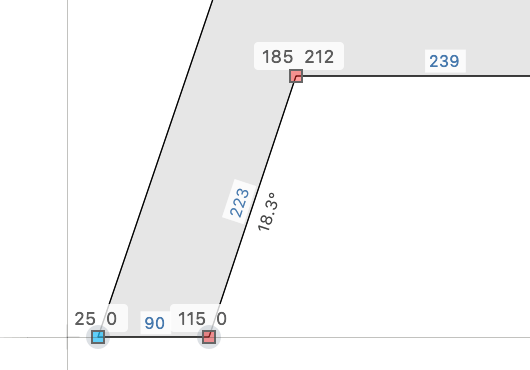
When you turn on Preferences > Glyph Window > Lengths & angles, and you hover or select a handle on a curve segment, or when you select a line segment or a flat curve segment, FontLab now always shows the length in font units. It also shows the angle in degrees if not horizontal or vertical.
Copy-Paste»
FontLab Studio 5»
When you copy contours in FontLab Studio 5 and paste into the FontLab 7 Glyph window, FontLab now selects the pasted content.
When you copy contours in FontLab Studio 5, FLS5 creates an AICB (simplified EPS) representation of the contours in the clipboard. In this representation, it always writes a final node of a contour at the same location as the start point, plus a zero-closepath.
This happens regardless of whether the final segment of the contour is a real closepath or a real segment with a zero-closepath.
Previously, when FontLab 7 pasted these contours, it always pasted the same representation as FontLab Studio 5 created. Now, when you paste such contours, FontLab will replace the final line segment plus the zero-closepath with a real closepath.
When you copy contours in FontLab 7, FL7 creates an AICB representation in the clipboard. FontLab 7 will now use a real closepath if the final segment of a contours is a line. When you paste such contours into FontLab Studio 5, there will be only a single node, not duplicated start and end nodes.
Adobe Illustrator»
When you copy vector artwork in Adobe Illustrator, and then paste it into the Glyph window with Preferences > Paste & Duplicate > Ignore stroke and colors selected, FontLab now selects the pasted content.
When you copy vector artwork in Adobe Illustrator, and then you paste it into the Glyph window with Preferences > Paste & Duplicate > Keep stroke and colors chosen, FontLab now activates the Element tool and selects the pasted artwork.
Mask layer»
When you have content in the Mask layer and you choose Tools > Paste Mask, FontLab selects the pasted content.
Element references»
When you have a glyph that contains element references, and you use Glyph > Duplicate Glyph or Copy, and then you choose Edit > Append Glyphs or you choose Edit > Paste Glyphs and then Append, the new glyph retains these references. Previously, FontLab created the new glyph with standalone, unreferenced elements.
Components»
When you open a UFO or .glyphs font file, or modify components via scripting or the Source panel, a glyph contains a component that points to a glyph that does not exist in the font, or does not contain a corresponding glyph layer. This may be legitimate, as you may want to create component glyphs before the base glyphs exist.
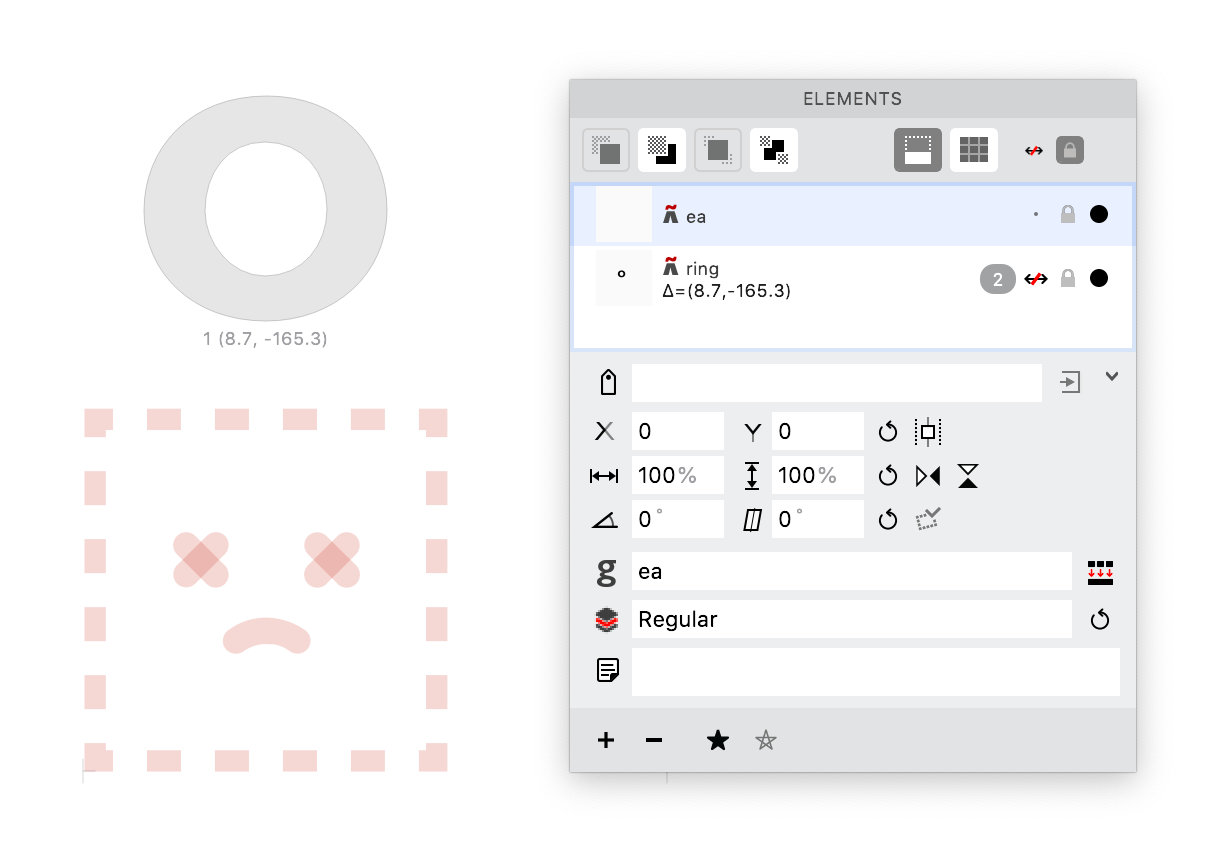
If the current glyph layer contains an invalid component, the Glyph window now shows a pale red placeholder. If the component represents a “known” character, FontLab shows the corresponding character from the Preferences > Font window > Placeholder font, otherwise it shows a “sad face” graphic.
FontAudit»
FontLab is now much faster when it automatically fixes FontAudit problems in many glyphs at once:
- In Preferences > FontAudit, turn on the problems you’d like to fix
- Select all glyphs in Font window, choose Glyph > FontAudit Glyphs, then Glyph > Fix FontAudit Problems, repeat for every master
FontAudit now has a new Invalid component test.
- If a component in the current layer refers to a glyph that exists but that does not have the current layer, the Fix button will point the component to a different layer.
- If a component refers to a non-existing glyph, the Fix button will find a suitable glyph (by dropping the suffix or finding a synonym glyph) or will remove the component.
Elements»
Combine Contours to Element»
In Font window, when you select glyph cells that contain multiple elements in the current layer, you can now choose Element > Combine Contours to Element. FontLab converts the current layer in those glyphs into simple contours in a single element. Previously, this command only worked for the current glyph in the Glyph window.
Join open contours across elements»
When you have multiple elements that have open contours (which may be the case if you’ve used the Pencil or Brush tool, or you’ve imported/pasted drawings from another app), and you turn on Edit > Edit Across Elements, you can now join the end nodes of the open contours across the elements in several ways:
- drag one end node onto the other
- use the Pen tool to click one end node, then the other
- select the end nodes of the contours and choose Contour > Join (CmdJ / CtrlJ) — this will join the end nodes with a line segment
FontLab 7.1.2 combines the contours into a single contour in a single element. Previously, you could not use Join. You could drag or use the Pen tool, but the results were inconsistent.
Unfill element references in element groups»
When you group some elements, use the Fill tool with Alt to “unfill” (make transparent) any enclosed area that is part of that element group.
Since elements within a group can be references, create an element that has a particular form, place this element as a reference in several glyphs alongside other elements, and then in some glyphs, group the elements and then unfill all or some contours within that element reference. The contours of the element references remain linked to the other occurrences of the element.
Use this to create digits inside black circles or squares: add element references (not components) that point to the original digits, and element references that point to the original circle or square, or convert components to element references. Then group the elements, turn on the Fill tool (F), hold Alt and click the portions you want transparent.
Stroke»
In the Stroke panel, the thickness slider is still limited to 100 units, but you can now manually enter stroke thickness up to 1000 units.
Anchors»
Custom appearance or anchors and pins»
You can now change the appearance of anchors and pins. By default, an anchor is displayed as a red rhombus, and a pin (used inside elements) is displayed as a blue circle. If the anchor or pin is filled, it’s active, which means that it participates in anchor-based mark attachment or pin-based element attachment. You can use the Anchors & Pins panel to make an anchor or pin active or inactive.
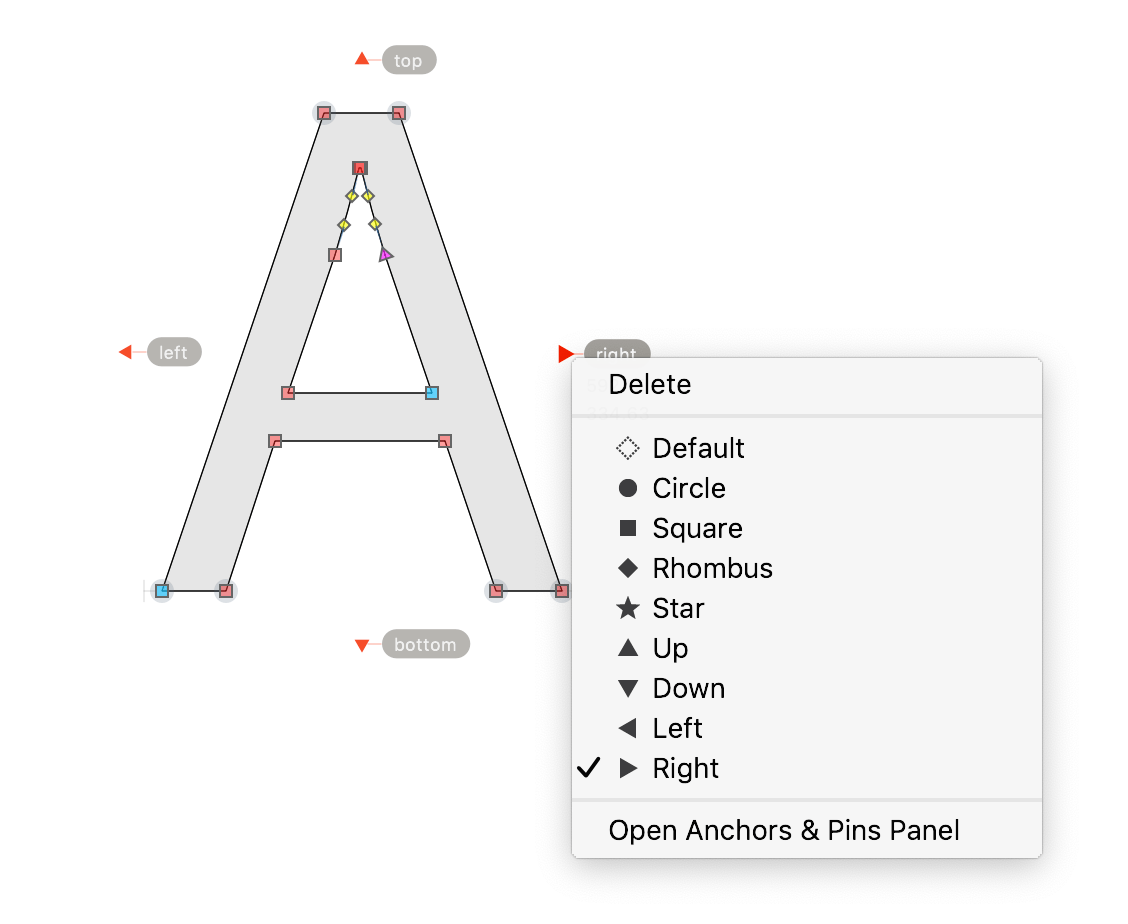
In FontLab 7.1.2, you can right-click an anchor or pin and change its appearance to a circle, square, rhombus, star or one of four triangles pointing in different directions. You can also use the Appearance dropdown in the Anchors & Pins panel next to the name field, or in the Glyph window property bar.
Appearance of automatically-named anchors»
When you choose Glyph > Add Anchor (CtrlR) or right-click the Glyph window canvas and choose Add Anchor, FontLab automatically adds an anchor. When you do it once, and the glyph is a mark glyph, it adds a _top anchor, otherwise a top anchor. When you do it again, FontLab adds _bottom for a mark glyph or bottom. Once again: _left or left, then once again: _right or right. When FontLab 7.1.2 adds these anchors, it assigns them the triangle appearance. The triangle always points to the direction of the attachment. For example, when you add a top anchor this way, it’s displayed as an upwards-pointing triangle, and when you add _top, it’s displayed as a bottom-pointing triangle.
Shift anchors with contours»
Tools > Actions > Shift now has a Shift anchors toggle. Turn it on to shift the anchors alongside the contours and other content.
Variations»
When you duplicate a font master in Font Info and enter the new name for the master, FontLab uses that name to set the axis location of the new master (for example, if you name the master Bold, it will automatically get the location wt=700).
If FontLab cannot decode the location from the name, it now uses the same location as the source master. Remember to change the location afterwards, you won’t be able to export fonts if two masters have the same location.
Metrics»
Negative widths»
FontLab 7.1.2 no longer allows the advance width to be negative. When you enter a negative value or an expression that results in a negative value, FontLab sets the advance width to 0.
Negative advance widths are not permitted in OpenType fonts, and exporting fonts that contained negative widths to OpenType failed.
Opposite sidebearing»
When you link sidebearings with expressions, use the | operator (the vertical bar) which means the opposite sidebearing.
Use | (the vertical bar) to link one sidebearing to the opposite sidebearing of the same glyph. For example, in glyph d, enter |p in both sidebearings to link the LSB of d to the RSB of p, and the RSB of d to the LSB of p.
- When used in the LSB field, it’s equivalent to
r() - When used in the RSB field, it’s equivalent to
l()
Use |other to link one sidebearing to the opposite sidebearing of another glyph, where other can be a glyph name or a single Unicode character. For example, in glyph D enter |*0.5 in the RSB field to make the RSB equal to half the LSB of the same glyph.
- When used in the LSB field, it’s equivalent to
rsb("other") - When used in the RSB field, it’s equivalent to
lsb("other")
Combine the | operator with other expression operators and functions, for example |n+10.
Metric expressions in Glyph panel»
The fields for the advance width and the sidebearings now take the full width of the Glyph panel. Enlarge the width of the panel to comfortably enter long metric expressions.
Copy expressions to masters in Glyph panel»
When you enter an metric expression into the LSB, RSB or Width field of a glyph (in the Metrics Table, or in the property bar of the Glyph window in Metrics mode, or in the Font window status bar, or in the Glyph panel), FontLab applies the expression to the current layer.
When you delete the expression, FontLab replaces the expression in the current layer with the actual metrics value.
In Font window, you can use Font > Remove Metrics Links to replace metric expressions with actual values for the current layer in multiple glyphs.
FontLab 7.1.2 improves the way the Copy expressions to masters button in the Glyph panel works. When you select one or more glyphs in the Font window, and you click that button, for every selected glyph:
- If a metric field (LSB, RSB, Width) has an expression in the current layer, FontLab copies that expression onto all other font masters.
- If a metric field does not have an expression in the current layer, but has a normal numeric value, FontLab removes all expressions in that field in all other font masters, and replaces them with the actual values (separately for each master layer).
Previously, if you only selected one glyph cell in the Font window and the current layer did not have any expressions in any metric fields, the Copy expressions to masters button was disabled. Now you can click that button (in the Glyph panel), and it will remove all expressions in all font masters for that glyph.
To remove all expressions for all or selected glyphs, select the glyph cells in Font window, choose Font > Remove Metrics Links, then click Copy expressions to masters in the Glyph panel.
Import Metrics»
When you choose File > Import > Metrics…, the Import Metrics setting in the dialog is now on by default.
Glyph names and Unicode»
Preferences > Operations page has a new Glyph names and Unicode subsection. Use it to better control the glyph naming for new glyphs, and the mapping between glyph names and Unicode codepoints.
Choose the glyph naming scheme that FontLab uses when you generate a new glyph name or add a new glyph for a Unicode character. This works with empty Font window cells with Unicode-based filters (Script, Unicode Range, Codepage), with Add Glyphs, Generate Glyphs, Rename Glyph and Glyph panel Update glyph name. When you create a new glyph by name, FontLab uses that name.
The four built-in naming schemes are:
- friendly: human-readable names suitable for design work
- production: compatible with Adobe recommendations for shipping fonts; human-readable for Western glyphs, uniXXXX for most other glyphs
- alternative: human-readable names frequently used in
.glyphsfiles - uniXXXX: algorithmic names derived from the Unicode codepoints;
uniprefix for 4-digit Unicodes,uprefix for 5-digit Unicodes
Previously, FontLab used the production names when you added new glyphs for Unicode characters, but in Font > Add Glyphs it used the setting from Preferences > Open Fonts.
When you’re adventurous, specify your custom Unicode-name mapping (this setting was previously in the General page). FontLab 7 bundles its own standard.nam file that has a format similar to the .nam files used in FontLab Studio 5 and FontLab VI, but with an additional extension:
- names without prefix are used as production, friendly and alternative names
- names with
>prefix are used as friendly and alternative names - names with
<prefix are used as alternative names - names with
!prefix are used as synonyms, so they are only used when FontLab generates a Unicode from a glyph name, or lookups up a synonym, but are not used to build glyph names from Unicodes
In preferences, choose a custom .nam file that needs to adhere to the syntax. You need to restart FontLab so it picks up the custom .nam.
When you use Font > Rename Glyphs, and choose one of the naming schemes, FontLab now correctly renames glyphs that have a Unicode and a glyph name suffix, like zero.inferior. Previously, FontLab always kept the suffix.
When you use Font > Rename Glyphs and turn on Replace existing suffix, when the glyph has multiple suffixes like one.onum.ss01, FontLab replaces the portion after the last .. Previously, it replaced the the portion after the first .
Font Info»
Italic angle»
FontLab now limits the Font Info > Font Dimensions > Italic angle value to -/+60°.
We found larger italic angles to be present in fonts not as the designer’s intent but as a result of a bug in certain 3rd party font making apps. If you need a larger italic angle, please use the Tables panel or Python post-production.
User interface»
Preferences»
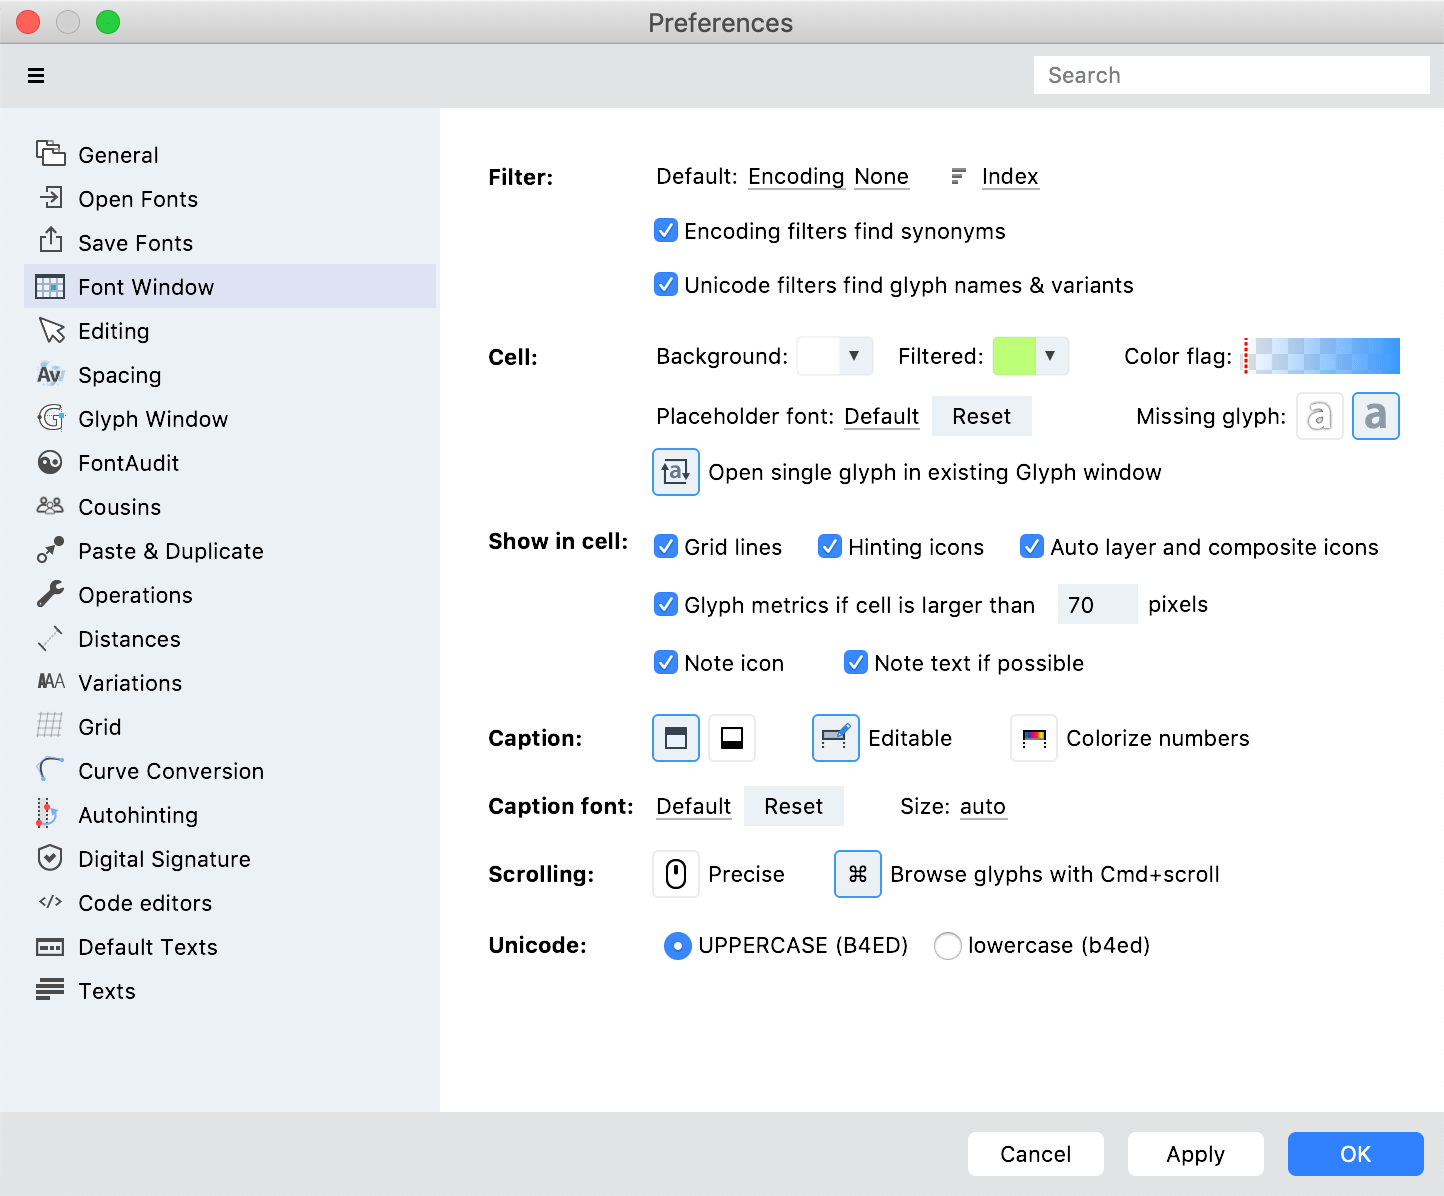
We have redesigned the Preferences pages: General, Open Fonts, Font Window, Glyph Window and Operations. We also added some new functionality. The settings are now organized in subsections, similar to our recent redesign of the Save Fonts and Paste & Duplicate preferences pages.
We have eliminated some longer wording, but there is always Quick Help: hold F1 or FnF1 over a UI item in the dialog, and you’ll see a longer explanation.
Scrolling»
The new Preferences > Font window > Scrolling section lets you customize the scrolling behavior.
Precise scrolling. This new preference affects what happens when you scroll in the Font window with the trackpad, and with a mouse that has a precision wheel that emulates a trackpad and allows both X and Y scrolling. This does not affect scrolling with a simple mouse wheel.
- On: Optimizes the scrolling for a mouse with a precision wheel. One tick of the wheel scrolls by one cell row. Scrolling with the trackpad may be “jumpy”. This is the old behavior.
- Off: Optimizes the scrolling for a trackpad. You need to turn the precision mouse wheel more than one tick to scroll by one cell row. This is a new behavior in 7.1.2, more comfortable if you use a trackpad.
Browse glyphs with Cmd+scroll. When this is on, in the Glyph window, when you hold Cmd and scroll (using the trackpad or the mouse wheel), FontLab goes to the previous or next glyph (same as using the , and . keys). Turn it off and scrolling with Cmd will behave the same way as without the modifier key. (This setting does not affect the Font window)
Focus highlight»
A user interface item that has focus is selected to receive (keyboard) input. In General > Focus, choose whether FontLab should draw a thin blue highlight:
- minimal: only around small UI items like the text editing fields
- controls: also around larger UI items like the layers list in the Layers & Masters panel
- always: also around the canvas of the Glyph and Font window
This does not change the way the focus works, just reduces the visual feedback that some users find annoying.
Numeric text fields»
Most numeric text fields (controls) in FontLab’s panels and the control bar, for example for node coordinates or for sizes, have hidden functionality:
- When you click such a field, use ↑/↓ keys to increase/decrease the value by 1, with Shift by 10.
- Enter simple expressions like
50/2or20+5, or complex expressions likelog(30)*sin(80)+85. FontLab evaluates the expression and inserts the result into the field.
In FontLab 7.1.2, if you click on the number in the text field, FontLab selects the value, but if you click to the right of the number, FontLab does not select the value but places the text cursor to the right of it.
Keyboard shortcuts»
Tools > Commands is now called Tools > Commands & Shortcuts, as this command serves both as a command launcher and as a place where you can customize keyboard shortcuts.
Press ShiftCmdP (Mac) or ShiftCtrlP (Windows), type a partial name of a command (e.g. pr p for Preview Panel) and press Enter, and FontLab performs the command. Think of the ShiftCmdP/ShiftCtrlP followed by a few typed characters and Enter as an “multi-keystroke shortcut”. It’s faster than mouse clicks. It’s slower than the direct shortcuts, but there’s typically a limit of the shortcuts you can memorize. Tools > Commands & Shortcuts offers an excellent middle-way.
You can also use Tools > Commands & Shortcuts to customize the keyboard shortcuts assigned to menu items. In recent FontLab 7 versions, the customizations were lost after the app restart on some computers. FontLab 7.1.2 remembers them correctly.
Keyboard shortcuts on Windows»
On Windows, FontLab 7.1.2 no longer maps the same keyboard shortcut to two different commands:
- CtrlAltShiftC is now Contour > Clean Up (not Element > Combine Contours to Element)
- CtrlShiftC is now Glyph > Replace Component (not View > Show > Coordinates)
- CtrlAltShiftM is now Glyph > Match Masters (not ==Window > New Metrics Tab)
On Windows, CtrlAltShiftF maps to Edit > Find Outline. Unfortunately, in Windows 10 version 1903 or newer, the shortcut does not work. This is a confirmed Windows bug. We suggest that you reassign the shortcut to something else.
Sketchboard»
The color of the Sketchboard tab is now no longer yellow but the same as of the other tabs.
OpenType features»
Compiling features»
FontLab uses the FEA syntax to describe the way OpenType Layout features will work in the final font. You can edit these features definitions in the Features panel. FontLab compiles the feature definitions into binary OpenType Layout tables when you export an OpenType font, or when you click the Compile button in the Features panel or the Features sidebar in the Glyph window, or the Features dialog in the Preview panel or Glyph window property bar. FontLab uses the industry-standard Adobe FDK for OpenType library to compile the features.

When there is a problem in the feature definitions and FontLab 7.1.2 compiles them, the Output panel now shows problem messages that are much more meaningful. They include the name of the feature and/or lookup in which the problem occurs. The messages now use the following prefixes:
[N]means Note: informative message about a potential problem that FontLab automatically corrects[W]means Warning: shown in bold, the message indicates a more serious problem; FontLab can still compile the features, but the resulting features may not work as you intended[E]means Error,[F]means Fatal Error: shown in red and bold, the message points to a serious problem in the feature definitions that prevents FontLab from compiling the features completely. FontLab may still export the font, but the font will contain no features.
Opening .fea files»
When you drag-drop a .fea file onto the FontLab app icon or the Font window or Glyph window, or if you open it via File > Open Fonts…, FontLab now not only imports the features into the current font but also opens the Features panel.
Decompiling features»
When you open an OpenType font, FontLab decompiles the binary OpenType Layout tables into feature definitions in the FEA syntax, and places these definitions in the Features panel. You can now use Preferences > Open Fonts > OT features to control how FontLab decompiles the features.

Decompile to Features panel. When this is on, FontLab decompiles all GSUB and GPOS features found in the font into the FEA syntax and puts the definitions in the Features panel. When this is off, FontLab converts the kern feature into visual kerning, and converts the mark and mkmk features into anchors, but only writes the languagesystem statements into the Prefix section of the Features panel, no feature definitions.
Classes with n glyphs to Classes panel. When you opened an OpenType font in older versions of FontLab, the app converted some OpenType GSUB classes directly to unnamed FEA classes ([a b c]), and other classes into named classes in the Classes panel. With the Classes with n glyphs to Classes panel preference, you can now change the OT class conversion threshold numeric value (default: 8).
If a class has the threshold number of glyphs or less, the class will be placed directly in the FEA code as an unnamed class, with glyph names in square brackets. In the OT class conversion method dropdown, choose where a class that has more than threshold number of glyphs will be placed:
- Classes panel: as a named OT Class in the Classes panel, so you can edit it visually. Increase the threshold to create fewer named classes, set the threshold to
0to only create named classes. - Features Prefix: as a named FEA class (
@name) in the Prefix section of the Features panel. Similar to the previous setting but does not create OT classes in the Classes panel. - Feature definitions: as an unnamed FEA classes, same as a class below the threshold. Choose this and FontLab will not create any named classes.
This setting does not apply to GPOS features, or to class kerning — only to GSUB classes.
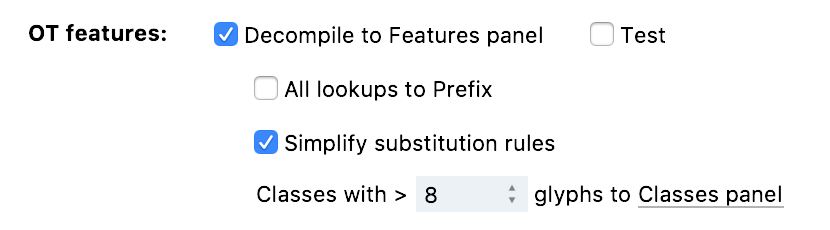
All lookups to Prefix. When FontLab decompiles features, it integrates most lookup definitions directly into the FEA feature definition entries in the Features panel. If lookups are re-used or their order is complex, FontLab always them as named FEA lookups in the Prefix.
Turn on the new All lookups to Prefix preference, and FontLab will decompile all OpenType FEA lookups into named lookups, and will place them in the Prefix section of the Features panel. The feature definitions will refer to the lookups by name.
Simplify substitution rules. GSUB LookupType 1 describes substitutions of one glyph by another glyph. When FontLab decompiles these lookups, it represents them as class-by-class substitutions. Depending on the Classes to Classes panel threshold, FontLab creates named classes in the Classes panel, and writes the feature definitions that refer to them, like sub @sups1 by @sups2;, or writes FEA classes directly, like sub [one two] by [one.sups two sups];.
Turn on the new Simplify substitution rules preference, and FontLab will instead decompile such lookups as a series of glyph-by-glyph substitutions, like:
sub one by one.sups;
sub two by two.sups;
Features panel»
When you turn on the new Preferences > Code editors > Word wrap setting and restart FontLab, the FEA code in the Features panel will automatically wrap at the edge of the panel (no horizontal scrolling). Turn the preference off and restart to only allow manual line wrapping in the panel.
Stylistic Set features (ssXX)»
The + menu of the Features panel now lists Stylistic Set features:
- When your font includes glyphs with a suffix suitable for building a Stylistic Set feature (e.g. for
ss01, it’s.ss01or.alt1), but the Features panel does not have the corresponding feature definitions, the menu lists allssXXfeatures that FontLab can auto-generate. - In addition, the menu lists one Stylistic Set feature that you can manually add. If no
ssXXfeatures are defined in the panel, the menu shows Stylistic Set 1 (ss01). But if the font hasss01, the menu shows Stylistic Set 2 (ss02), etc.
A bullet next to the feature name in the + menu shows that FontLab can auto-generate its content.
Previously, the menu did not include the ssXX features which FontLab could build based on the glyph set, but FontLab did build them when you chose ☰ > Add Auto Features.
Adding features with or without auto-generated content»
When you click + in the Features panel, and choose one of the predefined features that have a bullet, or when you choose ☰ > Add Auto Features, FontLab immediately generates the auto-feature content.
But When you click +, choose Empty Feature (xxxx) and type a feature name such as frac or ss01, FontLab now creates that feature as a manual feature (the star next to the feature tag in the left-side list is outlined). To fill the feature with auto content, click the filled star on top of the panel.
Kerning»
In the Glyph window Kerning mode, and in the Kerning panel of FontLab 7 you can visually define “typical” horizontal left-to-right pair-based kerning with classes. FontLab’s visual kerning is the same kerning model as used by most graphical font editors. A kerning pair consists of the 1st glyph or class, the 2nd glyph or class, and an adjustment value. You can assign glyphs to 1st and 2nd classes via Font > Kerning > Set Kerning Class or in the Classes panel. One glyph can only be in one 1st class and in one 2nd class. The adjustment value expresses the change of the advance width of the 1st glyph or class when it is followed by the 2nd glyph or class.
If you export a font that has such kerning into OpenType, FontLab compiles an OpenType kern feature and puts it into the GPOS table. It can optionally also include the legacy TrueType kern table which does not support classes. When FontLab opens an OpenType font, it decompiles the kern feature and tries to convert the OpenType kerning into visual kerning.
From the kern feature to visual kerning»
If the font was created in FontLab or other popular graphical font editors, FontLab can convert the kern feature into visual kerning completely. However, if you create an OpenType font with other tools such as Microsoft VOLT, that font can have a much more complex kern feature. FontLab cannot losslessly convert every potential aspect of a kern feature into visual kerning. For example, the kern feature can:
- have two or more class-based subtables: each of these subtables contains separate classes, and the same glyph can be part of one class for a particular side in one subtable, and part of a different class on the same side in another subtable.
- be “progressive” (multi-step): one lookup can perform major corrections for very broad classes, and further lookups can perform refinements.
- include positioning that not horizontally changes the advance width of the first glyph or class in a pair, but also changes the advance width or positioning of the 2nd glyph or class, horizontally or vertically.
- include contextual positioning
All these aspects are valid in OpenType but cannot be represented in visual kerning.
When FontLab opens an OpenType font, it always interprets the kern feature found in the GPOS table, and it tries to convert the OpenType kerning into visual kerning (and puts it into the Kerning panel), and it tries to convert the OpenType kerning classes into visual kerning classes (and puts them into the Classes panel).
If Preferences > Open Fonts > Decompile to Features panel is on, FontLab also decompiles the kern feature into FEA syntax. FontLab 7.1.2 changes the way the decompilation works. The Preferences > Open Fonts > Classes with > n preference has no influence on this process.
When the All lookups to Prefix preference is off, FontLab puts a separate set of “decompiled kerning classes” inside the kern feature definition. These decompiled kerning classes only exist in the Features panel. They have the prefix @_, and are a precise representation of the classes found in the OpenType kerning. The entire kern feature definition is self-contained after you decompile it.
When the All lookups to Prefix preference is on, FontLab puts all kern-related lookups in the Prefix section of the Features panel, along with the @_-prefixed decompiled kerning classes. Inside the kern feature definition, FontLab only references the kerning lookups.
From visual kerning to the kern feature»
When you change the visual kerning, FontLab asks you to remove the decompiled kern feature. When export the font to OpenType, FontLab will build a new kern feature based on the visual kerning and the visual kerning classes. In the Features panel > ☰ menu, when you choose Create [kern] feature, FontLab also converts the visual kerning of the current master into a new kern feature definition.
When FontLab 7.1.2 builds the kern feature, it prefixes the kerning classes with @_ and puts them inside the kern feature definition.
If you decompiled features with the All lookups to Prefix preference on, and FontLab rebuilds the kern feature and compiles the features, you will get a warning in the Output panel: Stand-alone lookup was not referenced from within any feature, and will never be used. You can ignore that warning, or you can manually remove the now-orphaned “decompiled” kerning lookups from the Prefix section.
Include or Import Kerning classes»
When you turn on Features panel > ☰ > Include Classes > Kerning, FontLab will convert the visual kerning classes into FEA classes on the fly and include them in the Prefix section. If you choose Import Classes, FontLab will write these classes into the Prefix section. But in this case, the FEA classes have the @ prefix (without the underscore).
Normally, you don’t need to Include or Import the Kerning classes. FontLab does not use those FEA classes for the kern feature.
You can use this functionality if you want to use the visual kerning classes in your FEA code just like OT classes. For example, if you write your own kern feature, or you write extra contextual lookups in the kern feature, or you write some other lookups in some other feature where the grouping you’ve done in the kerning classes is useful.
Opening and exporting fonts»
We’ve redesigned the Preferences > Open Fonts page. Note: FontLab uses the settings on that page when it opens fonts in formats other than VFC and VFJ. When FontLab opens VFC or VFJ, it only uses the settings from Preferences > Open Fonts > VFC/VFJ, and ignores the other settings (for example, for glyph renaming).
Glyph names»
In Preferences > Open Fonts, the Glyph names section lets you assign new glyph names to fonts that you open (in formats other than VFC/VFJ). Choose one of the built-in naming schemes, and then:
- Turn on Glyph names to rename the glyphs when you open a font in the formats
.ttf,.glyphs,.vfb,.ufo, and also name-keyed.otfor Type 1 - Turn on CID to rename the glyphs when you open a CID-keyed
.otfor Type 1 font
OpenType tables»
In the Open Fonts > OT tables section, if you turn off Decompile to XML in Tables panel, FontLab will not import any binary OpenType tables into the Tables panel. If you turn it on, FontLab will import the tables except the ones listed in the text area below. Add table tags to skip the import, or remove the table tags to import them.
If you remove all entries, FontLab will attempt to decompile all binary font tables into TTX-compatible XML syntax that you can edit in the Tables panel, and that you can copy-paste to the Tables panel of other VFC fonts.
.glyphs files»
When you open a .glyphs file, FontLab now handles the | metric key in a compatible way (“opposite sidebearing”).
Export to the .glyphs format is improved in several areas including export of Unicode codepoints assigned to glyphs.
UFO packages»
FontLab now reads the caret offset correctly from UFO, and correctly writes it into UFO. This improves rendering of the glyph metrics in italic UFOs in editors such as RoboFont.
FontLab now also writes the Weight class and Width class into UFO correctly.
Last-used export profile»
When you export a font with File > Export Font As… and choose an export profile and then export settings, you can later use File > Export Font to quickly export the font with the same profile and settings.
FontLab 7.1.2 remembers the last-used export profile and settings even when you restart the app, both in the “quick” File > Export Font menu command and in the File > Export Font As… dialog. Previously, after a restart, FontLab defaulted to the OpenType TT profile.
Importing artwork»
SVG artwork»
When you paste or import an SVG graphic with any of the Preferences > Paste & Duplicate > Fit artwork settings, or when you resize the SVG, FontLab applies a live transformation to the SVG element.
When you have Contour > Coordinates > Round when Editing on and you choose Make SVG Editable from Element > Image or the context menu, FontLab now converts the original SVG to editable contours, then applies the transformation and then rounds.
Previously, FontLab first rounded and then applied the transformation, which resulted in exaggerated distortions.
Drag-drop artwork onto the Font window»
You can drag-drop artwork files from Finder or File Explorer onto the Font window to create glyphs and import the dropped files into them. FontLab supports vector artwork (.pdf, .ai, .eps, .svg) and a variety of bitmap image formats.
When you drag-drop files into the Font window, FontLab uses the file name of each dropped file to determine the names of the created glyphs. If the file name is a valid glyph name (e.g. Aacute.pdf, uni20AC.svg), FontLab uses it directly. If the file name is a Unicode character, FontLab creates the appropriate glyph name for it (for example ą.pdf imports as aogonek). FontLab also correctly decodes hybrid file names, so that ą.smcp.ai imports as the aogonek.smcp glyph.
When you Alt-drag-drop into Font window, FontLab 7.1.2 now uses the selected Font window glyph cells to determine the names of the created glyphs. If the glyph cells are empty (i.e. a prospective Font window filter is active), FontLab creates the glyphs, and imports the artwork files into the current font master layer of these glyphs.
If a glyph with a given name exists, FontLab creates glyphs with a numerical suffix (.1) and imports the dropped artwork there.
Drag-drop .glif files»
You can drag-drop Glyph Interchange Format (.glif) files into the Font window. FontLab creates a new glyph, with a layer for the current font master, and loads the contents of the .glif file into that layer.
FontLab builds the name of the new glyph from the glyph name inside the .glif file, and if that is not present, it uses the contents.plist file in the same folder or, finally, the file name.
Known issue: The Layers & Masters panel incorrectly renders the content for glyphs created from dropped .glif files.
Python scripting»
Execute .vfpy and open .py Python scripts»
In FontLab 7.1.2, you can open a Python script:
- by choosing it in File > Open Fonts…
- by drag-dropping it from Finder or File Explorer onto the FontLab 7 app icon, or onto the Font window or Glyph window
- by starting FontLab 7 via command line with the path to the Python script as a command line argument
The file extension of the Python script decides what FontLab 7 does with it:
- if the file has the extension
.py, FontLab opens the Scripting panel and loads the Python script into it; you can click Run script to run it - if the file has the extension
.vfpy, FontLab executes (runs) the script immediately, without opening the Scripting panel
Double-click a .vfpy file in Finder on macOS or File Explorer on Windows, and FontLab 7 will start if it’s not running, and will run the script. On Windows, the very first time you double-click a .vfpy file, you may need to confirm that Windows should start FontLab 7.
With .vfpy Python scripts, you can use FontLab 7 for batch processing and automated workflows, see example below.
TypeRig with Delta Machine»
The TypeRig by Vassil Kateliev is a powerful extension package for FontLab 7. It includes TypeRig Panel, a floating side panel aimed at glyph and outlines manipulation; TypeRig Manager, a set of tools for editing various font-related parameters; and TypeRig Filter, assorted outline modifiers.
TypeRig now also includes Delta Machine, an advanced tool for adaptive outline scaling based on the research paper by Tim Ahrens “A Multiple Master based method for scaling glyphs without changing the stroke characteristics”, published in Digital Creativity, 19:2 (2008, 105-123, DOI. If your font already includes a Weight axis with at least two masters, you can use Delta Machine to create a variable Width axis, as well as small caps, superscript or subscript glyphs.
TypeRig is free and opensource (BSD license). Run Scripts > Update / Install Scripts to install the newest version of TypeRig.
Note
Currently, there is little to no documentation regarding using TypeRig and Delta Machine. We are working with Vassil to improve that.
Additions to the FontLab 7 Python API»
The flShapeData class now has isComponent, componentGlyph and componentLayer.
The flPreferences class now exposes all settings that are available in the Preferences dialog.
Exporting fonts via Python»
FontLab 7.1.2 has a new Python class ExportControl in the fontlab module. You can use it to export a font that is open in FontLab, into any format that FontLab 7 supports, using any of the profiles that are active in your File > Export Profiles….
Below is sample script that:
- Opens a
.vfcfile with the same file name and location as this script (if the script is.vfpy), or opens a font file that you choose in a file open dialog. - Exports the predefined instances of that font as OpenType PS (.otf) into a subfolder within the folder in which the opened font is stored. The subfolder will have the same name as the font’s family name.
- Quits FontLab.
import os.path
# Access the font-specific logic of FontLab 7 with
# the `fontlab` package
from fontlab import *
# Access the entire Qt application framework that powers
# FontLab 7 with the `PythonQt` package
# `PythonQt.QtGui` exposes the full Qt GUI toolkit to build
# simple and most complex UIs
from PythonQt import QtGui

# Checks if a `.vfc` file with the same file name as this
# script file exists in the same folder
loc = [os.path.dirname(__file__)] +     list(os.path.splitext(os.path.basename(__file__)))
fontPath = os.path.join(loc[0], loc[1] + '.vfc')
# If there is no such file, opens a file open dialog with
# `QtGui.QFileDialog`, so you can pick a font file or Cancel
if not os.path.exists(fontPath):
    fontPath = QtGui.QFileDialog.getOpenFileName(
        None, 'Choose font', loc[0], '')

# If there is a font file, export its instances as OTF
if fontPath:
    # `fontlab.flWorkspace` instance is the FontLab 7 app
    # seen as the font editor
    ws = flWorkspace.instance()
    # `.mainWindow` is the graphical interface of FontLab 7
    main = ws.mainWindow

    # `.loadFont` opens a file in the FontLab GUI
    main.loadFont(fontPath)

    # `.currentPackage` is the active `fontlab.flPackage`,
    # which is a font inside FontLab
    fp = ws.currentPackage

    # `fontlab.flPreferences` has the FL7 preferences
    # that hold numeric constants that represent values
    # in the Export Font As dialog settings
    pref = flPreferences()

    # New `fontlab.ExportControl` class corresponds to
    # the settings of File > Export Font As...
    ec = ExportControl()
    ec.profileName = "OpenType PS"
    ec.destinationMode = pref.DestinationFolder
    ec.conflictMode = pref.ConflictOverwrite
    ec.contentMode = pref.ContentInstances
    ec.destinationFolder = os.path.dirname(fontPath)
    ec.groupProfiles = False
    ec.groupFamily = True

    # `flWorkspace.exportFont` exports the `flPackage`
    # with `ExportControl` settings
    ws.exportFont(fp, ec)

# `QtGui.QApplication` instance is the FontLab 7 app
# seen as a graphical app that uses the Qt framework
qapp = QtGui.QApplication.instance()
# Quit the FontLab 7 app
qapp.quit()
User data folder»
In General > User data, click the new button Open user data folder in Finder/Explorer to “reveal” the location where you can place your own encodings, Python scripts and files like alias.dat. No need to navigate to it in a complicated way.
Access the user data folder location in Python with fontlab.flPreferences().dataPath.
Scripting panel»
When you turn on the new Preferences > Code editors > Word wrap setting and restart FontLab, the Python code in the Scripting panel will automatically wrap at the edge of the panel (no horizontal scrolling). Turn the preference off and restart to only allow manual line wrapping in the panel.
Bug fixes»
-
When you turn on Preferences > Open Fonts > Detect > Composites and open a TTF, FontLab now correctly converts contour glyphs into either full composite glyphs that consist only of components, or into partial composite glyphs that consist of contours and components. Previously, FontLab dropped to some components in the partial composites and reported problems.
-
When you use the Swatches panel to change the element’s fill color, and then Undo, FontLab correctly undoes the fill color change.
-
FontLab no longer crashes when you use the context menu Remove Smart Corner on the last element’s smart corner.
-
In editing modes, when the mouse pointer approaches a sidebearing line, FontLab correctly switches the pointer icon to a left-right arrow if View > Selection Frame is on.
-
If Font Info > Names > Family Name is empty and you save a VFC, FontLab no longer has problems opening such a file, adding kerning etc.
-
When you apply a live transformation (shift, slant, rotate) to an element, and then Undo, FontLab correctly undoes the operation.
-
In Font Info > Axes, if you click to place the cursor in any field, FontLab moves the focus to that axis. If you then delete an axis, FontLab deletes the correct one.
-
Quick measurement correctly updates on screen when you move a point or segment with cursor keys.
-
The Help link on the Welcome screen is now correct.
-
When you export a font and Remove overlaps is on in the export profile, FontLab no longer keeps an overlap in glyphs that use a certain form of element references.
-
When you assign a stroke to an element that has the same color as the element fill, and you use Element > Expand Stroke, FontLab now correctly adds an outer contour at the distance of half the stroke width from the original contour. Previously, it added the contour at the distance of the stroke width, which effectively resulted in Expand Stroke producing the result that was twice as thick as the assigned stroke.
-
When you copy a Font window for a cell that has a Smart fill applied to an element group, and then Paste the glyph and choose Append, FontLab could occasionally crash. This is now fixed.
-
When you select a cell and Paste Component (ShiftCmdV), FontLab now immediately updates the content of the Elements panel.
-
When Preferences > Font window > Caption > Editable is on, and you enter a Unicode codepoint directly into the caption of a Font window glyph cell, FontLab no longer opens the Search field and correctly updates the Elements panel.
-
When you run Font > Link Glyph Metrics, FontLab no longer creates invalid, circular expressions where the first glyph links to the second, the second to third, and the third back to the first.
-
When you create a glyph guide and make it wide, FontLab no longer makes the color of the guide intense red. The guides are semitransparent as they should be.
-
FontLab no longer removes parts of metric expressions such as
(width("space")-b())/2. Previously, it removed the part after the-and then complained about the missing closing paranthesis. -
When you hide the Table view of the Font Map panel, then collapse the panel with the > button and restore it again, and then show the Table view, FontLab now correctly shows the glyph cells.
-
When View > Lock > Glyph Metrics is off in the Glyph window editing modes you choose Tools > Free Transform, and you drag one of the transformation handles, FontLab no longer moves the sidebearings instead, even in far zoom levels.
-
When you put Unicode characters into Font > Generate Glyphs > Custom, FontLab now produces correct glyph names that correspond with the naming scheme selected in Preferences > Operations
-
When you run the Autohint action on some glyphs, element groups in those glyphs now correctly keep their live transformations.
-
When you turn on Text > Echo Text in Glyph window, the contents of that Glyph window will automatically reflects the glyph content of another active Glyph window, or the cells selected in the Font window or in the Font Map panel. Previously, if you opened the List view of a Font window or Font Map and selected multiple glyphs, the Glyph window with Echo Text would show the multiple glyphs only when you clicked that window (otherwise, it would only show the current glyph). This now works correctly.
-
When you have the
/atglyph shown in the Preview panel text and you switch between fonts in the Fonts panel, FontLab no longer removes that glyph from the Preview panel text. -
When you open a UFO and then export it, FontLab no longer changes an empty
stringelement in the GLIFlibto an emptyintegerelement. -
When you apply Element > Expand Transformation, then Undo and then apply Element > Expand Transformation again, FontLab no longer crashes.
-
When you open a VFC where a master has the italic angle –/+90°, FontLab no longer hangs. Instead, it changes the italic angle to –/+60°. The 90° italic angle is a common malformation in certain UFOs produced by a 3rd party app.
-
When you export a font into OpenType PS using the built-in profiles, FontLab now correctly removes overlaps in glyphs that use a flipped component where the source glyph has overlaps.
-
When you open a
.glyphsfile and choose Tools > Actions, FontLab no longer shows incorrect spacing. -
When you use the Pen tool to add to existing contours, FontLab no longer corrupts the contour
-
When you open a VFC, the path of the file instantly appears in the window title.
-
The Add Element Reference dialog box keeps the state of the Apply to all masters toggle between sessions.
-
When you click the Apply button in the Transform panel to transform selected Font window glyph cells, and you click it again, FontLab now correctly performs the transformation again.
-
FontLab no longer hangs when switching from one Glyph window to another.
-
When you export a Variable font, FontLab now once again writes OpenType kerning into the
GPOStable of each master.ttf, so the resulting VF has variable kerning. -
In Font Info > Instances, you can now click the blue toggle to enable/disable a given instance for export, or Cmdclick to toggle them all.
-
In Font Info, when you add a font master and copy the content of an existing master that extensively uses element references, FontLab no longer crashes
-
When your masters have overlaps and you export a very thin instance with automatic overlap removal enabled in the export profile, FontLab no longer errorneously drops certain parts of contours.
-
When you rename a feature and export a font, FontLab now always recompiles the feature code before exporting. Previously, it occasionally exported the outdated feature code.
-
When your glyph contains TTH commands in at least one master, and you choose Match Masters, FontLab no longer removes the node names and the TTH commands.
-
When you assign a Stroke to an element, and you shift and flip that element, the stroke now renders in the Glyph window with the correct thickness.
-
When you export a font as TTF, FontLab no longer crashes in some situations when it autohints the glyphs.
-
When a glyph name is long, the Font window status bar glyph name field switches to a condensed font.
-
On Windows, Shift2×click on a handle aligns the BCV to horizontal or vertical, and Shift2×click on a contour adds the whole contour to the selection. This functionality got broken in an earlier version and is now restored.
-
When Preferences > General > OpenGL is on, and you zoom in and hover over a node, a red rectangle no longer appears around the Glyph window canvas.
-
When you run Contours to PS as an Action on a font that has TTH commands, FontLab no longer removes some components from composite glyphs.
-
When you run Contours to PS as an Action on a font that has TTH commands attached to TT offcurve points, FontLab no longer crashes, and correctly removes those commands while keeping the TTH commands that are attached to nodes.
-
When you run Contours to PS as an Action for multiple masters on specific glyphs, FontLab no longer produces unexpected coarse PS contours in some masters
-
FontLab no longer crashes after you open a
.glyphsfile and then perform some Tools > Actions. -
When you save a file with dots in the name (for example, “My New Font v2.1.2.vfc”), FontLab no longer truncates the base file name at the first dot (“My New Font v2.vfc”).
-
When changing the glyph left sidebearing the Preview panel shows sidebearings correctly even when the Horizontal Flip is turned on.