Release Notes: FontLab 7.1.3.7495»
14 July 2020»
FontLab 7.1.3.7495 contains 25 new or improved features and over 30 fixes.
- View angles with Knife
- View details across glyphs
- Improved Remove Overlap
- Redesigned Preview panel
- Preview multiple masters as lines or glyphs
- Reinterpolate master from other masters
- Use custom or dynamic auto layers
- Create or make blank glyphs
- Quickly add contours from an existing element to the current
- Change opacity of guides and font dimension lines
- Annotate your glyphs visually with simple stickers
- Streamlined linked metrics
- Better export of classes
- Export OTFs with only y-direction (horizontal) hints
- Fresh Toolbar and many user interface tweaks
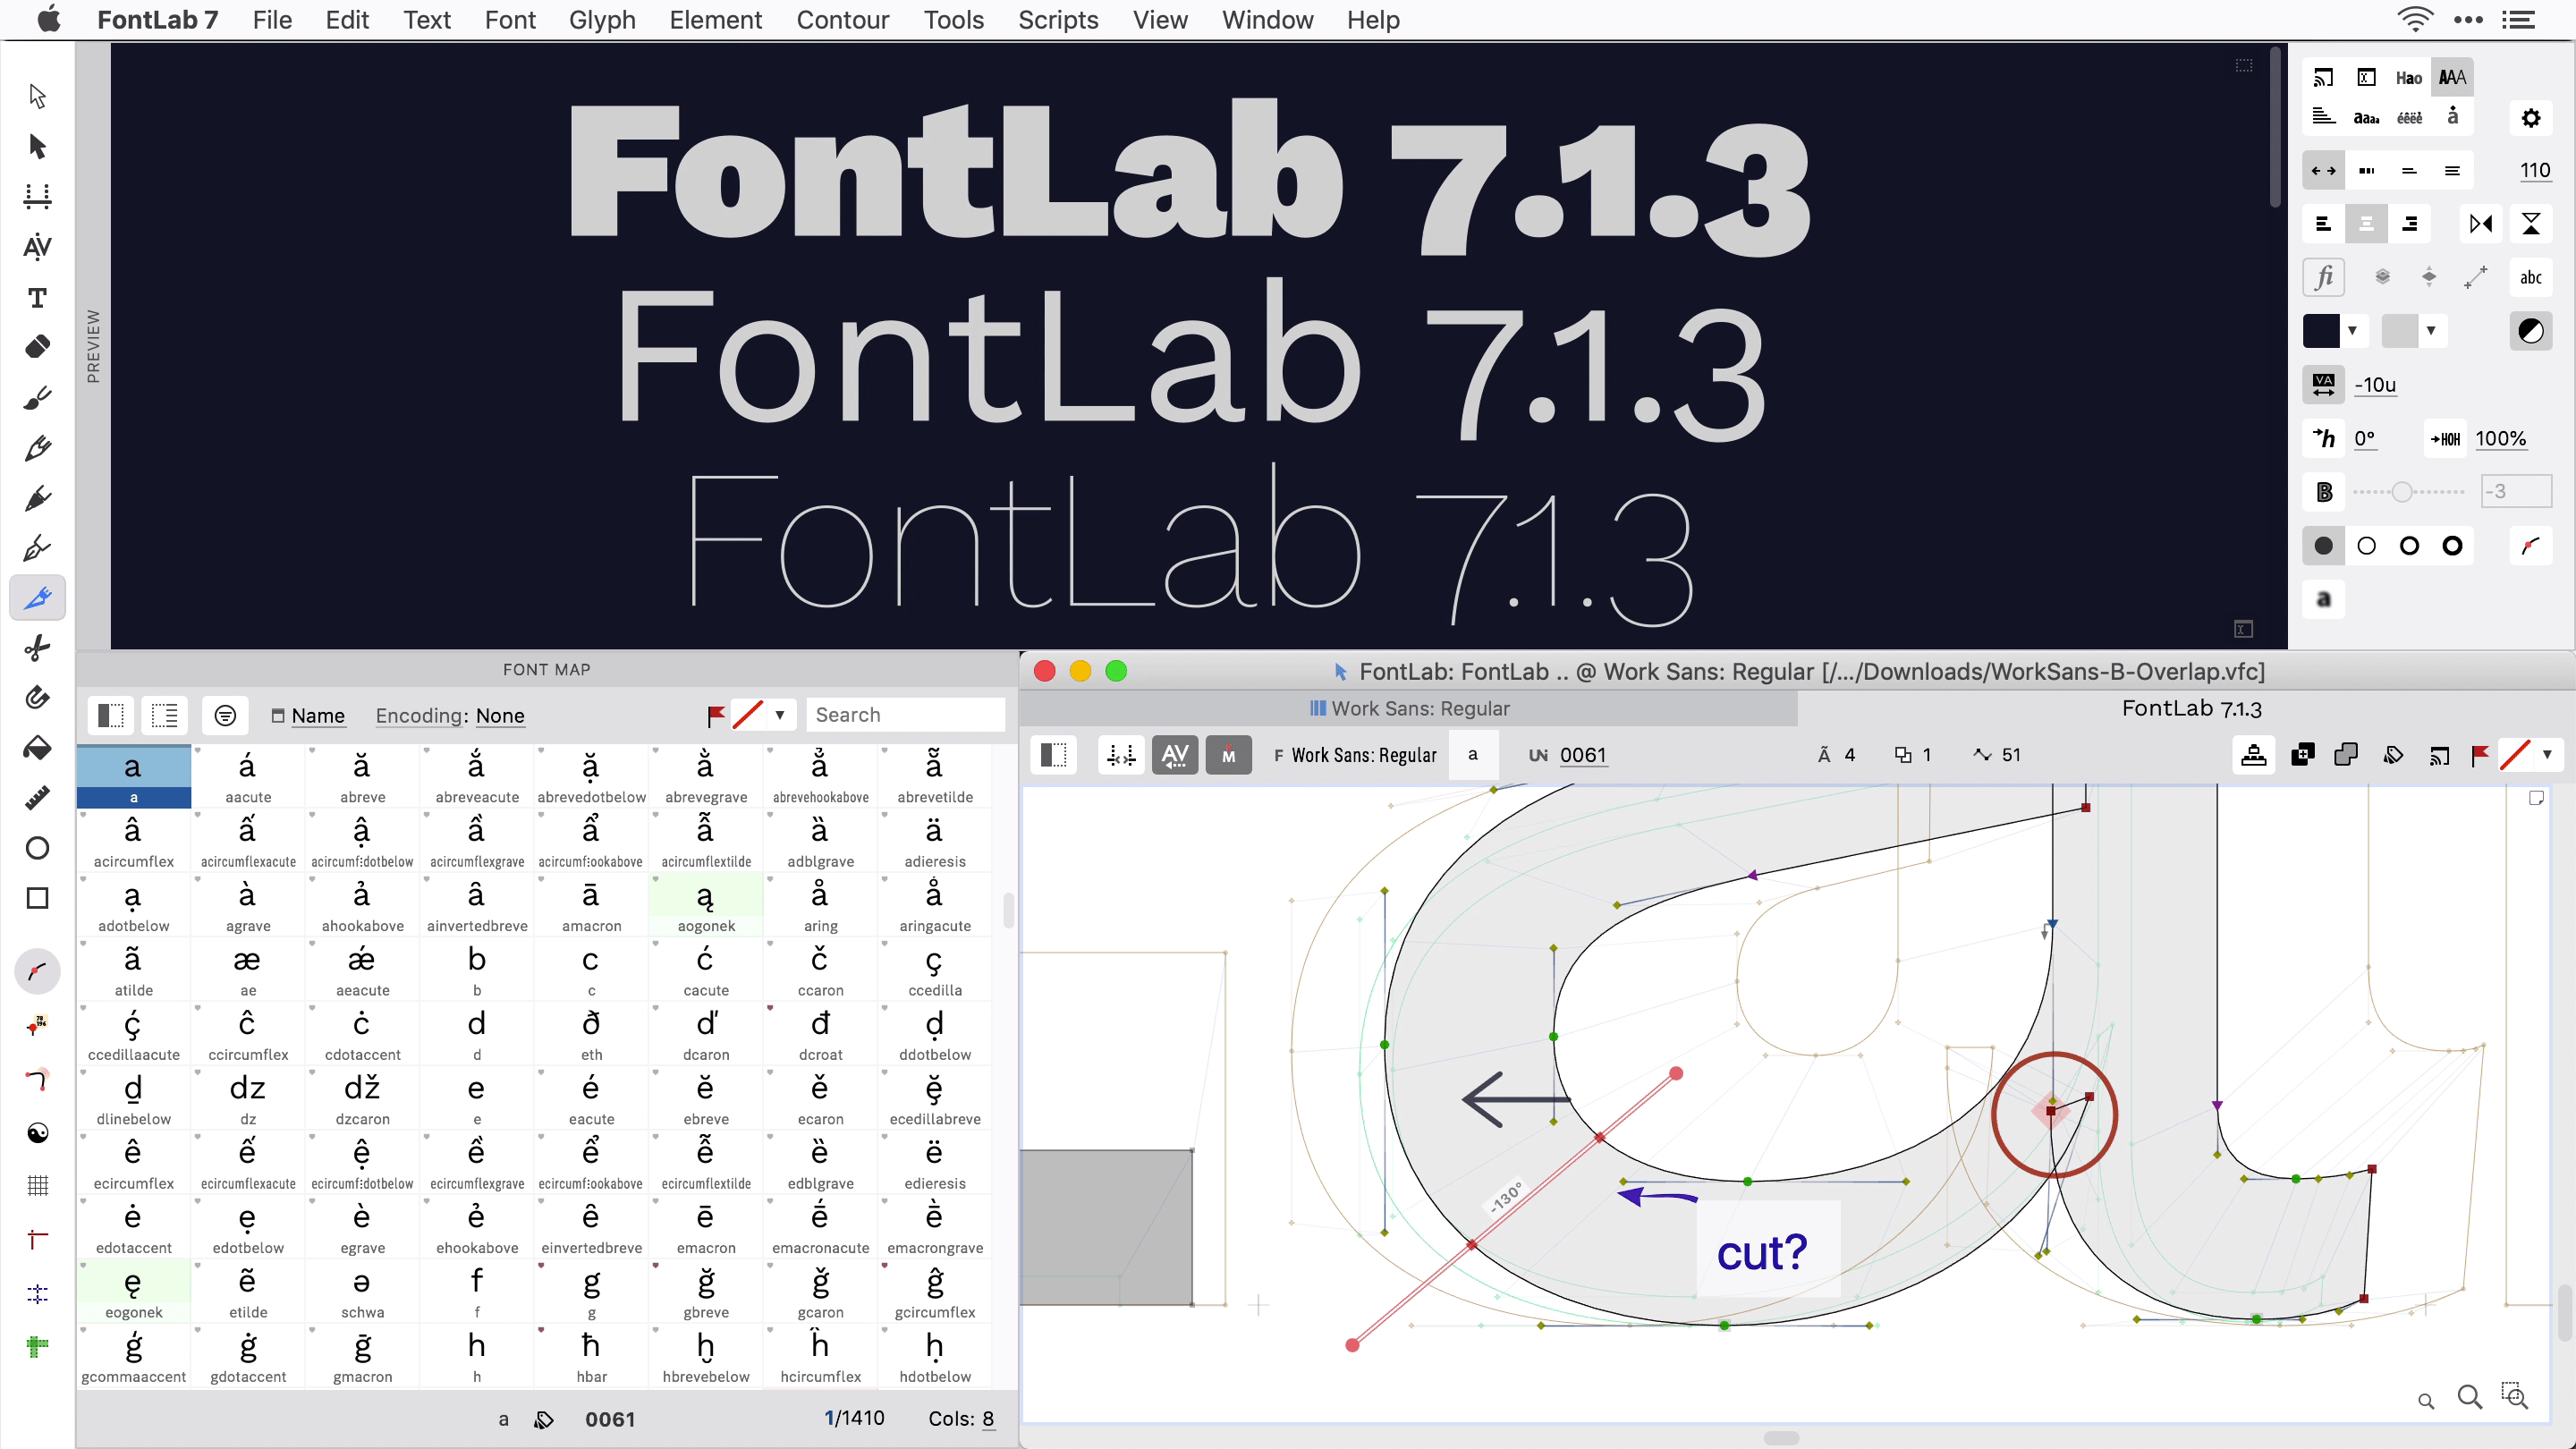
Knife tool»
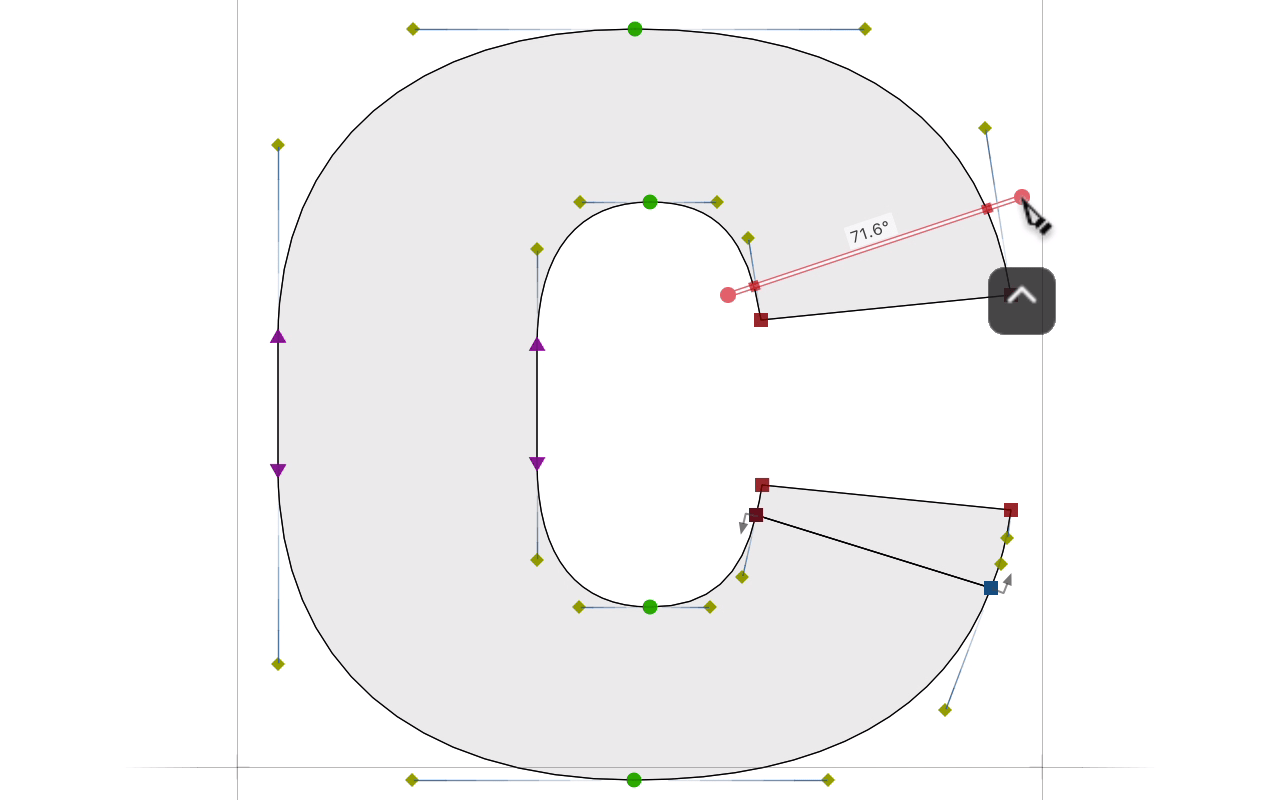
When you activate the Knife tool (J) and drag to add nodes, Alt-drag to add and break nodes or Ctrl-drag to slice, New the Knife indicator now shows the angle. This is most useful when slicing at non-right angles.
Remove Overlap»
New We have rewritten our Remove Overlap algorithm, which FontLab uses when you choose Contour > Remove Overlap (CmdF10 CtrlF10), and when you export fonts with a profile that has Outlines > Remove Overlaps on. The new algorithm is much faster and should result in fewer errors in complex glyphs, but please test it in complex situations, especially those that involve self-intersections, and many elements.
Opacity of guides and font dimensions»
New In Preferences > Grid & Guides you can now customize the opacity (transparency) at which the Glyph window displays font dimension lines, font guides (also applies to zones), glyph guides (also applies to hints) and elements guides when they’re turned on in the View menu. If you drag the opacity sliders down to 20-25%, these lines are still visible but no longer visually disturb your content.
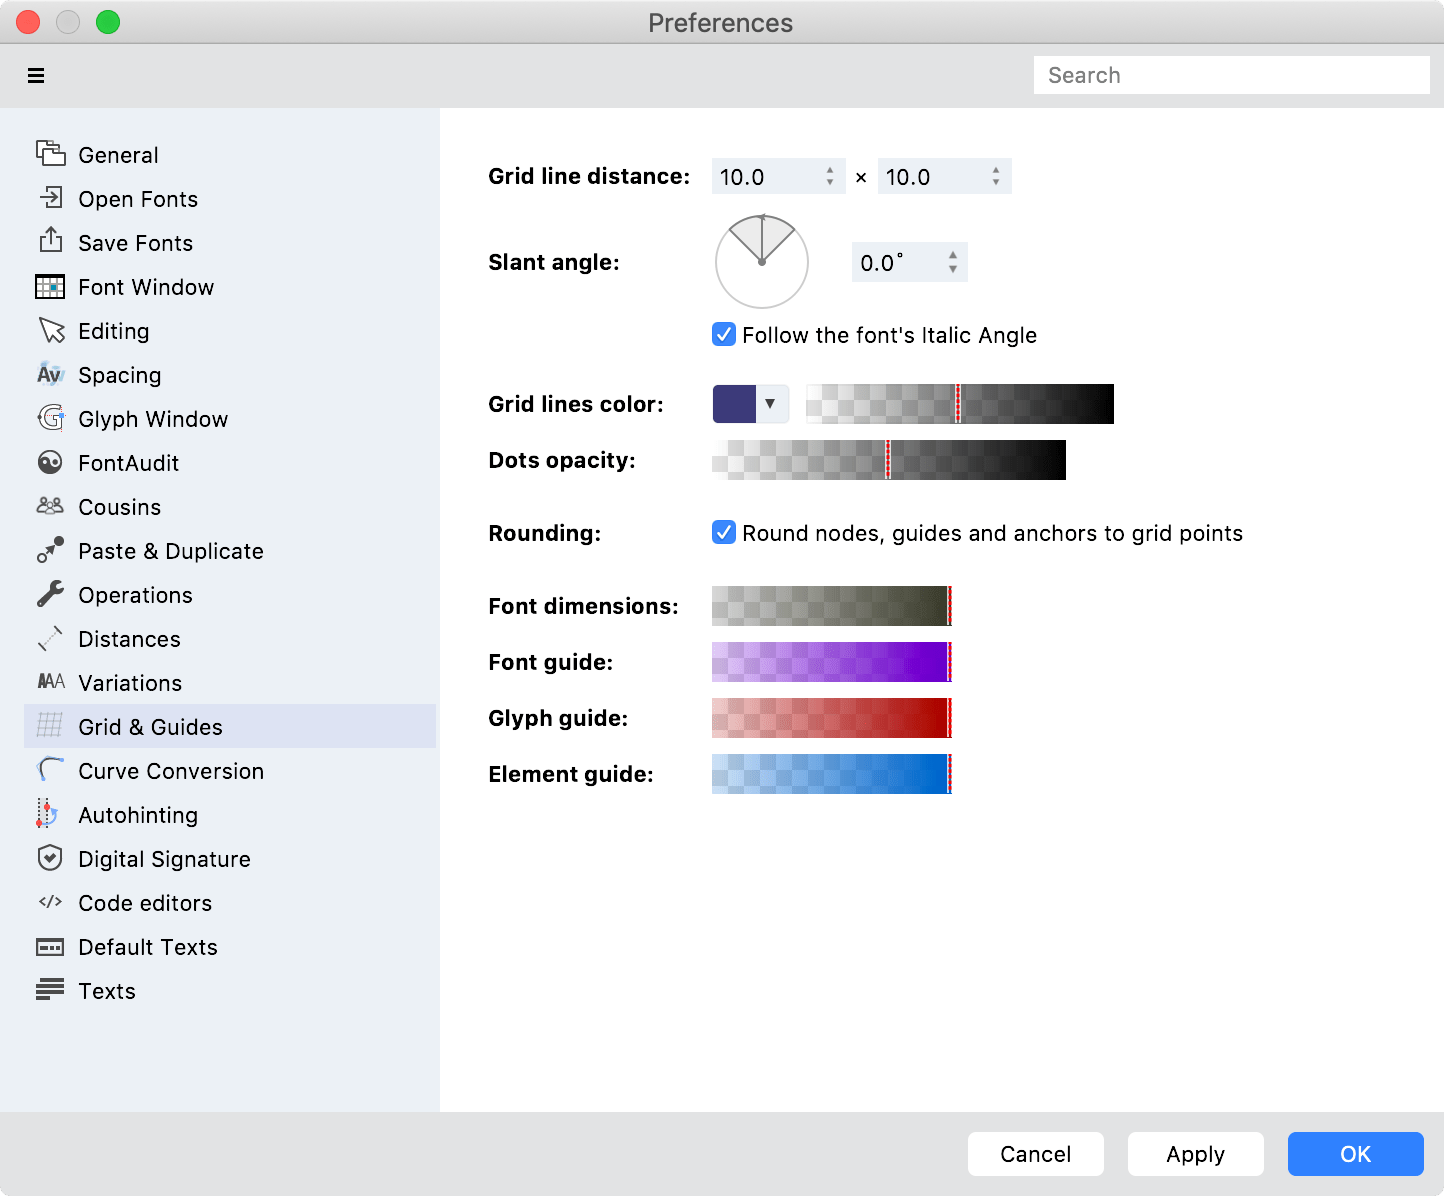
If the lines are not locked in View > Lock, then when you hover your pointer over one of these lines, or when you click one of them, or when you drag some content so that it snaps to these lines, FontLab will draw the lines at full opacity — so you still know which line is active.
Summary: View and edit multiple glyphs in Glyph window»
Note
Here’s a recap of how you can change the text content of the Glyph window, how you can customize the view details of the current and non-current glyphs, and how you can edit across glyphs and layers. FontLab 7.1.3 brings detailed enhancements in some of those areas.
Glyph window modes»
Depending on the tool selected in the toolbar, the Glyph window works in several modes:
- Editing mode when the Contour, Eraser, Knife, Scissors, Magnet, Fill or Guide tool is chosen
- Element mode when the Element tool is chosen
- Metrics mode when the Metrics tool is chosen
- Kerning mode when the Kerning tool is chosen
- Text mode when the Text tool is chosen
- Drawing mode when the Brush, Pencil, Pen, Rapid, Ellipse or Rectangle tool is chosen
- Matchmaker mode when the Matchmaker tool is chosen
- TTH mode when the TrueType Hinting tool is chosen
Glyph window views»
In the Glyph window, FontLab can principally render each glyph in three ways:
- Detailed view, where the glyph content is either semi-filled or fully filled (depending on View > True Fill), and some structural details are visible. Use the View menu or the View panel to decide which structural details are visible, and further customize these details in Preferences > Glyph Window.
- Inactive view, which is like detailed view but not all details are visible. Control the size of nodes and the visibility of handles for inactive view in Preferences > Glyph Window > Inactive.
- Preview, where the glyph content is fully filled, and no structural details are visible.
Current glyph details»
The current glyph of the Glyph window is the glyph you are currently editing. FontLab shows the name of the current glyph in the property bar and in the Glyph panel. Other panels such as Layers & Masters, Elements, Transform and many others work on the current glyph.
The Metrics and Kerning modes of the Glyph window always shows all glyphs as preview, but you can show or hide some structural details for the current glyph: Spacing Controls (sidebearing and kerning lines), element & Glyph Guides, Hints, Anchor Cloud, the cloud of Kerning classes and Cousins. All other glyphs (the inactive glyphs) are shown as preview. These modes can also show some structural details for all glyphs: Font Guides, Zones and Grid.
The Editing mode shows the current glyph in detailed view. Use the View menu or panel to show or hide all the structural details discussed above plus additional details for the current glyph: hovered vs. All Nodes, hovered vs. all Handles, Coordinates for current vs. selected/all nodes & handles, Quick measurement, Tunni Lines, Anchors & Pins, Curvature comb, FontAudit problems, Node Links, Master Relations, Contour Direction, Element Frame, Selection Frame, Stickers, the Mask layer and the Global Mask. Instead of hints, guides and zones, you can show/hide Metrics & Hinting Shadows.
The Element mode shows all contours in the current glyph in inactive view.
The Drawing mode shows existing contours in the current glyph in inactive view. It shows the contours you are drawing in a special way.
The Text mode always shows all glyphs as preview, without any structural details.
The TTH mode and the Matchmaker mode show the current glyph in their own way.
Glyph window text»
The FontLab Glyph window can display multiple glyphs of the same layer. Therefore, we call the content of the Glyph window “text”. It’s different from normal text that you use in text editors, because you can directly enter specific glyphs:
- Use the Text tool, and when you type, tap / to enter a glyph by name, or tap # to enter it by Unicode.
- Turn on View > Control Bars > Text Bar or turn on the Glyph window sidebar to enter the text using glyphtext: in addition to normal Unicode text, you can enter
/-prefixed glyph names like/adieresisor/adieresis.sc,/-prefixed characters with suffix like/ä.sc,\u-prefixed Unicodes like\u0061. Enter a space to type normal text again after a prefixed glyph. - Choose multiple glyph cells in a Font window and open a new Glyph window from the Window menu.
- Use the Text dropdown in the Glyph window sidebar to enter one of the built-in texts defined in Preferences > Text. You can add your own text to the built-in texts.
If your font does not include a particular glyph for a character that you enter and Preferences > Show missing glyph placeholders is on, FontLab displays a placeholder using the font specified in Preferences > Font Window > Font.
Glyph window view sets: basic view and alternative view»
For each Glyph window modes that can show details (Metrics, Kerning, editing), FontLab stores two view sets, controlled by View > Alternative View and the A/B icon in the View panel.
- When Alternative View is off, the basic view set is active. Turn view details on and off to your liking.
- When Alternative View is on, the alternative view set is active, that separately remembers which details are visible and which are hidden. Turn view details on and off to your liking.
In addition to the structural details, each view set remembers additional settings from the View menu, such as Control Bars and Ruler.
Press Cmd/ Ctrl/ to toggle between the basic and the alternative view set. This lets you quickly toggle between two different configuration of view details.
Non-current glyph details»
If the Glyph window text has multiple glyphs, the current glyph is the glyph that you are currently editing. The other glyphs in the window are non-current glyphs. Non-current glyphs render and behave slightly differently than the current glyph. Depending on the window mode, click or 2×click a non-current glyph to make it current, or use the Text menu. Press Esc in the window several times to deselect the current glyph, so all glyphs in the window become non-current glyphs.
Details Across Glyphs»
New With the new View > Details Across Glyphs toggle (ShiftAltSpace), you can now quickly switch between two ways of rendering the non-current glyphs:
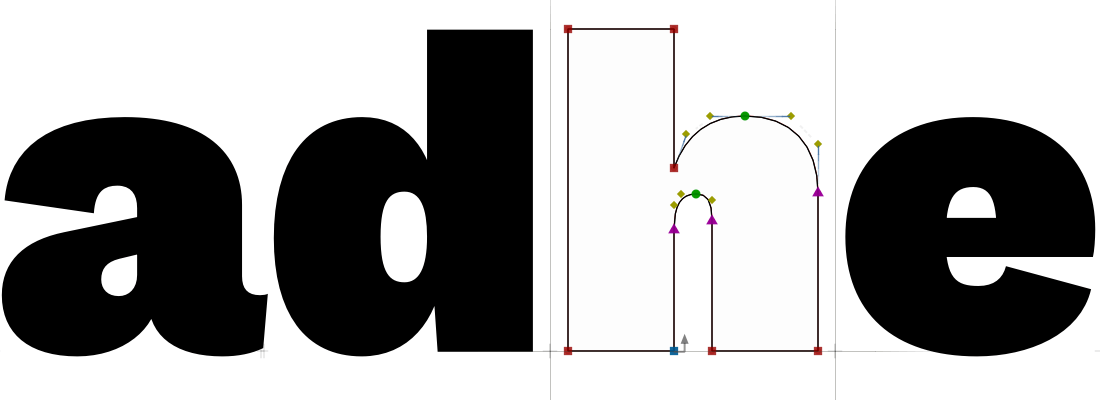
When Details Across Glyphs is off, the non-current glyphs are shown as preview. They are fully filled and without any structural details. Other visible masters & layers, Mask etc. are hidden.
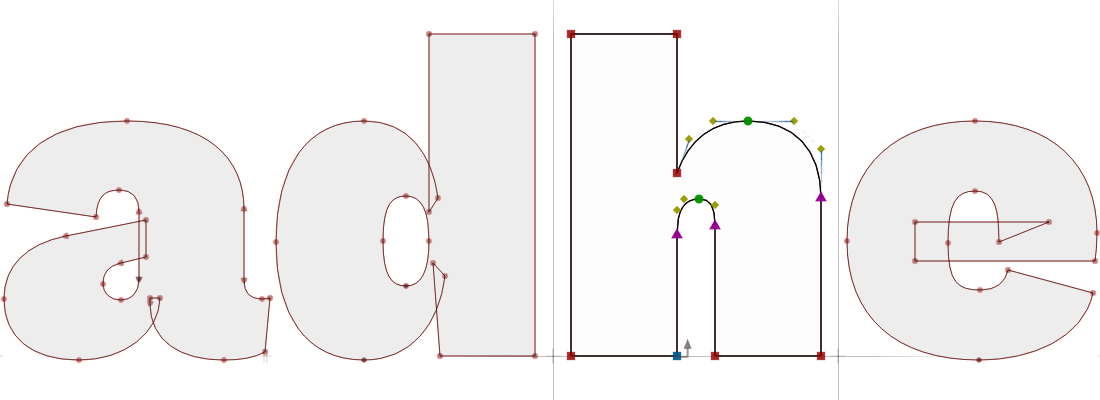
When Details Across Glyphs is on, the non-current glyphs are shown as inactive view, with some structural details, depending on the View menu/panel settings.
The current glyph, and the non-current glyphs in inactive view are fully filled (with other details visible) if View > True Fill (ShiftSpace) is on. If True Fill is off, they are semi-filled with the Preferences > Glyph Window > Fill opacity.
So now you can:
- Tap ShiftAltSpace to show non-current glyphs as preview (fully filled, no details), or as inactive view (some details visible).
- Tap ShiftSpace to show current glyph filled or unfilled (with details still visible), and to show non-current glyphs filled or unfilled if they’re shown as inactive view (with details).
- Hold Space or ` to temporarily show all glyphs as preview, fully filled without any details.
- Tap T to switch to Text tool to show all glyphs as preview. Tap Esc to switch to the previously-active tool.
FontLab remembers Details Across Glyphs separately for basic and alternative view sets. So you can set up basic view with Details Across Glyphs off, alternative view with Details Across Glyphs on, and then use Cmd/ Ctrl/ to toggle between the the two view sets.
Edit Across Glyphs»
New When you turn on Edit > Edit Across Glyphs in Editing, Matchmaker and TTH modes, FontLab shows all non-current glyphs as detailed view. View > Details Across Glyphs becomes disabled, and in Editing mode, you can make selections and perform contour editing in the non-current glyphs. More advanced operations still only apply to the current glyph.
If Edit > Edit Across Glyphs is off: FontLab shows all non-current glyphs as preview or as inactive view depending on the View > Details Across Glyphs, and you cannot edit them.
If Edit > Edit Across Elements is off, FontLab makes only the current contour element of the current glyph and of the non-current glyphs editable, and shows it as detailed view.
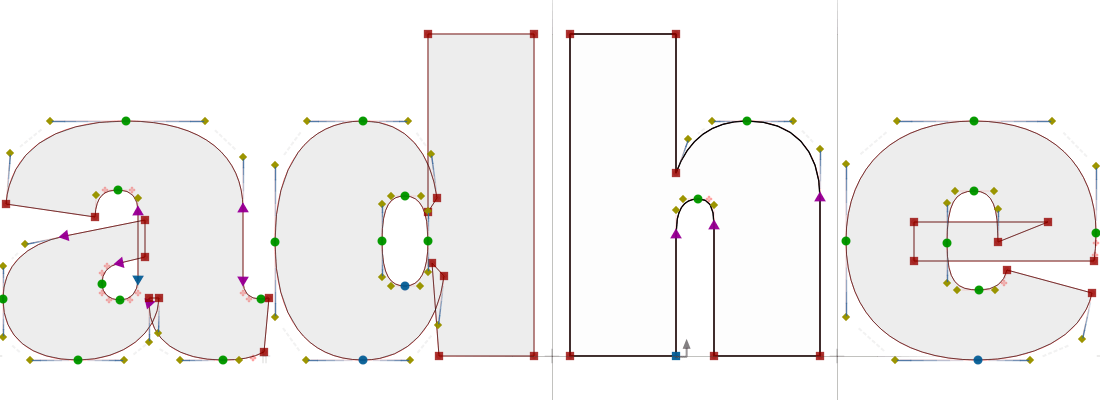
If Edit Across Elements is on, FontLab makes all contour elements of the current glyph and of the non-current glyphs editable, and shows them as detailed view.
In earlier FontLab versions, Edit Across Glyphs worked differently: if it was on but Edit Across Elements was off, FontLab showed all elements of the non-current glyphs as inactive view. Now, you can get the same effect when Edit Across Glyphs is off, but the new View > Details Across Elements is on.
Edit Across Layers»
To make multiple layers visible, click the “eye” in the first column of the Layers & Masters panel next to the layer you want to make visible. New Altclick the “eye” column heading to toggle visibility of all layers.
When Preferences > Variations > Show inactive layers as wireframes is:
- off, FontLab fills the content of all visible layers when showing them as preview or if True Fill is on. This is useful for multi-layer color fonts.
- on, FontLab fills the content of only the current layer when showing it as preview or if True Fill is on. This is useful for multi-master variable fonts.
When you turn on Edit > Edit Across Layers, FontLab shows all visible layers editable and shows them as detailed view. New This setting now depends on Edit Across Elements the same way as Edit Across Glyphs does.
Summary: Re-use portions of glyphs»
Note
Here’s a recap of how you can re-use portions of glyphs in FontLab 7. FontLab 7.1.3 brings detailed enhancements in many of those areas.
In FontLab, each glyph consists of layers. A glyph layer that is variable (participates in the interpolation) is called a glyph master. The name of a layer in a glyph decides the role of the layer.
- If the glyph layer has the same name as a font master, it belongs to that font master. A font master has its own location in the variation space, and also has its own kerning and some other metadata.
- If the glyph layer name has the format like
:wt=350,wd=75, it’s a font-less master, and the name defines the location in the variation space.
A glyph layer has an advance width (the amount of horizontal space the glyph layer occupies during typesetting), and may have some content. The distance from the origin point to the left edge of the content is the left sidebearing (LSB). The distance between the right edge of the content and the advance width is the right sidebearing (RSB).
In FontLab, the glyph layer content always consists of one or more elements. An element can be a collection of vector contours, an image, a component (a pointer to same layer of another glyph, or to a different layer of any glyph), a group of elements, or a compound element that is a result of a filter (an automated contour processing step).
You can interpolate an instance from a variable glyph, which is a glyph in which all masters match: they have the same structure of elements and contours.
FontLab has several ways in which you can re-use glyphs or their parts in other glyphs:
copied contours or elements, element references, components and auto layers.
Copied contours»
The traditional, simple way to copy-paste parts of glyph is useful if you want to change these pasted contours freely, or combine them with the existing contours. It works best with a single master:
- In the Glyph window, navigate to the glyph and layer from which you want to copy. With the Contour (A) tool, select some contours or segments. Then choose Edit > Copy Contours (CmdC CtrlC).
- Switch to another glyph or layer, and choose Edit > Paste Contours (CmdV CtrlV). This adds the copied contours to the current element of the current layer, and selects the pasted contours.
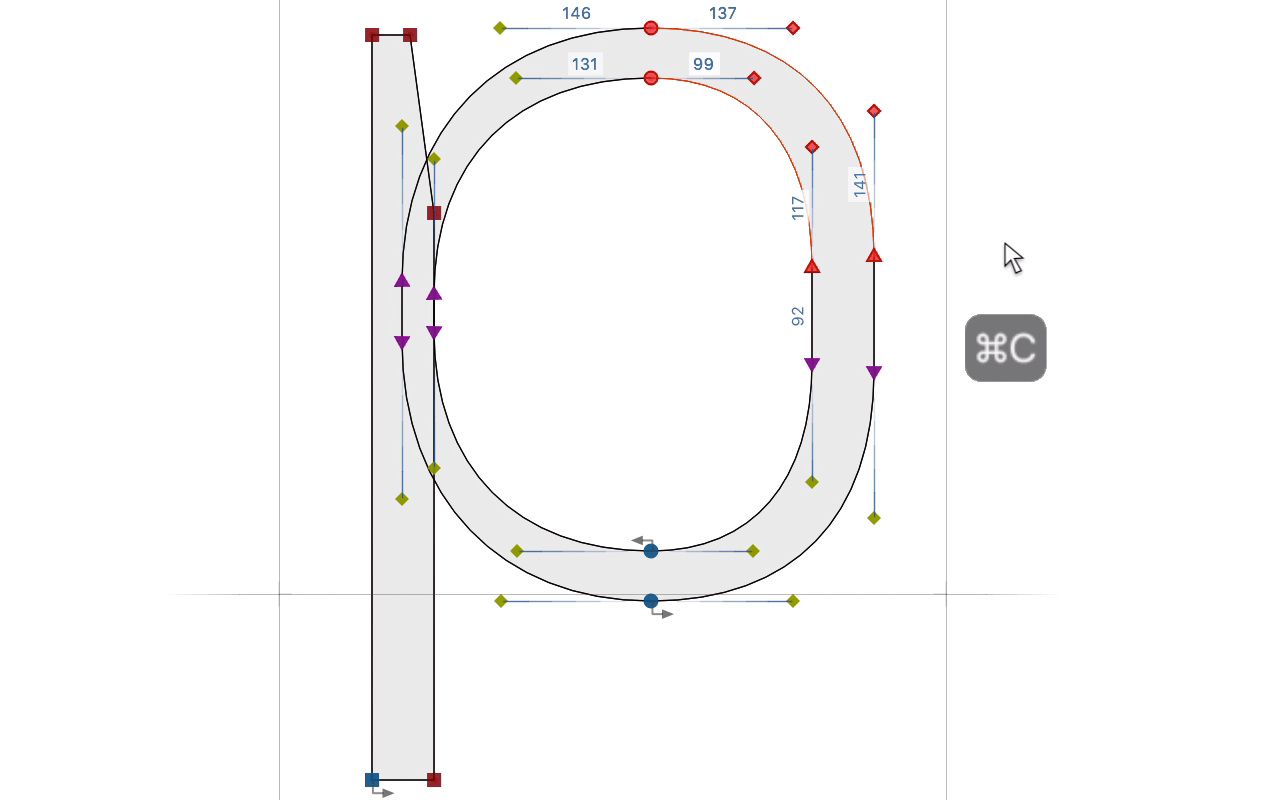
If you have multiple masters, the current glyph no longer matches, because Paste only pasted the contours to the current master. Choose Edit > Copy to Masters (CmdY CtrlY), and FontLab will add the current selection (which is the just-pasted contours) to all other masters of the current glyph. This works if you want to paste the same contours into all masters.
Add Element Reference > Add Contours»
New If you have multiple masters and you want to copy-paste the content of each master of one glyph into the corresponding master of another glyph, you can now use the new Add Contours operation.
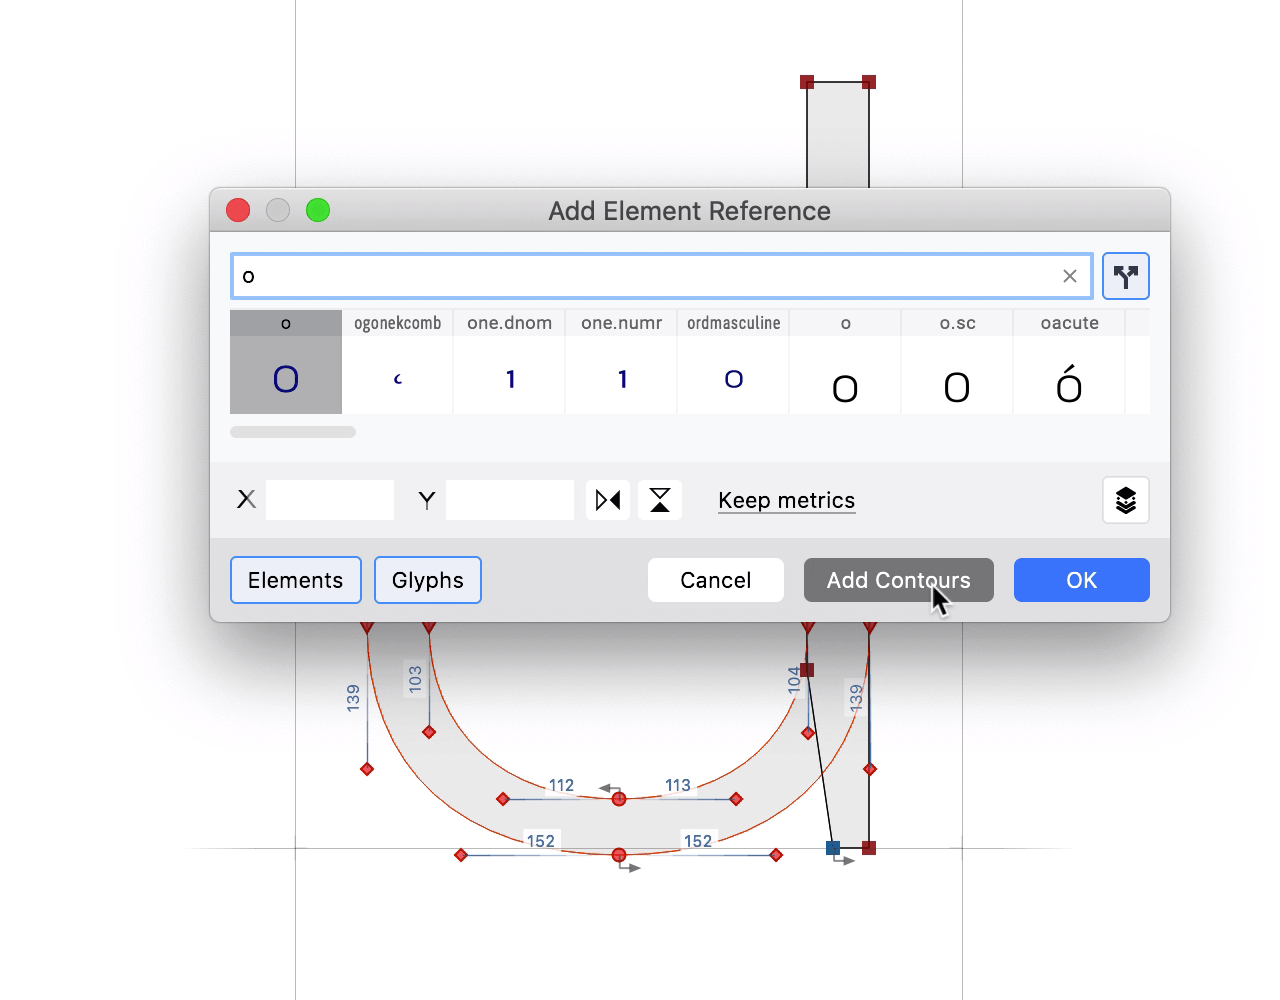
Navigate to the glyph into which you want to add the contours, and choose Element > Element Reference > Add Element Reference (CtrlI CtrlAltShiftI). In the dialog, type the name of the source glyph, and turn on Apply to all masters. Click Add Contours or press CmdEnter CtrlEnter, and FontLab will insert the contours of the source glyph to the current glyph, matching master by master.
Turn off Apply to all masters in the dialog, and the result will be the same as Paste Contours.
Copied elements»
If you want to re-use some contours as element references in multiple glyphs, or if you want to assign a different color or stroke to some contours, or if you want to apply a different filter such as Power Brush to contours, you can create independent, separate elements based on existing contours or elements.
In the Glyph window, navigate to the glyph and layer from which you want to copy.
If you want to copy entire contours or just some segments, then with the Contour (A) tool, select some contours or segments, and choose Edit > Copy Contours (CmdC CtrlC). Navigate to the glyph and layer where you want to paste, and choose Edit > Paste New Element (ShiftCmdV CtrlShiftV). FontLab creates a new element, and pastes the copied contours there.
If you want to copy one or more elements, then with the Element (V) tool, select the element(s), choose Edit > Copy (CmdC CtrlC). Navigate to the glyph and layer where you want to paste, and choose Edit > Paste Elements (CmdV CtrlV).
Element references»
An element reference is a pointer to the content of an existing element. The referenced element must be already used in the same layer of the current or another glyph, or must be stored in the Gallery panel. When you assign a name to an element in the Elements panel, the element appears in the Gallery panel. Element references only work within the same layer of different glyphs, not across different layers.

All references to the same element are linked to each other so that their content (contours, images) is always the same, so if you change the contours within an element reference, the change affects all other references to the same element. However, each reference that links to the same element has its own independent placement, transformation, color and stroke.
In the Glyph window, navigate to the glyph and layer from which you want to copy. With the Element (V) tool, select the element(s), choose Edit > Copy (CmdC CtrlC). Navigate to the glyph and layer where you want to paste, and choose Edit > Paste Element Reference (ShiftCmdV CtrlShiftV). FontLab will create a reference that points to the same element content.
You can also go to the target glyph and choose Element > Element Reference > Add Element Reference (CtrlI CtrlAltShiftI). Type a glyph name or a name of an element (that appears in the Gallery panel). Turn off Apply to all masters to create an element reference only in the current glyph layer. Turn it on, and FontLab will try to create element references in all masters of the current glyph, provided that a glyph with the specified name has the same masters, or that an element with a specified name appears on all masters. Press Enter or click OK.
You can use the Elements panel to assign names to elements. Elements with names appear in the Gallery panel. When you’re in the Glyph window, you can choose an element in the Gallery panel and click Place or drag-drop to add a reference to that element in the current glyph layer. When you’re in the Font window, you can Place a reference to the selected Gallery element to the current layer of one or more selected glyphs.
You can also select an element in the Gallery panel, and choose Edit > Copy (CmdC CtrlC). Then choose Edit > Paste Element Reference (CmdShiftV CtrlShiftV) to paste an element reference (same as Place), or choose Edit > Paste (CmdV CtrlV) to paste the copied element as an independent, unlinked element.
Components»
When you add a component in a glyph layer at certain x,y position, FontLab creates a pointer to a source glyph layer. The source glyph layer can be the same layer of another glyph, a different layer of any glyph in the font, or an interpolated instance of any glyph. When you view a glyph layer that has a component, FontLab dynamically places the entire content of the source glyph layer so that the origin point (0,0) of the source glyph layer is placed at the x,y position of the component. A component always inherits the full content of its source glyph layer, including the placement, transformation, color and stroke.
A glyph that contains components is called a composite glyph. If a Font window glyph cell has an downwards-pointing light gray icon in the corner, the glyph layer is a full composite layer, so it only has components. If the icon is dark rouge, the glyph layer is a partial composite layer, so it has both components and other non-component elements.
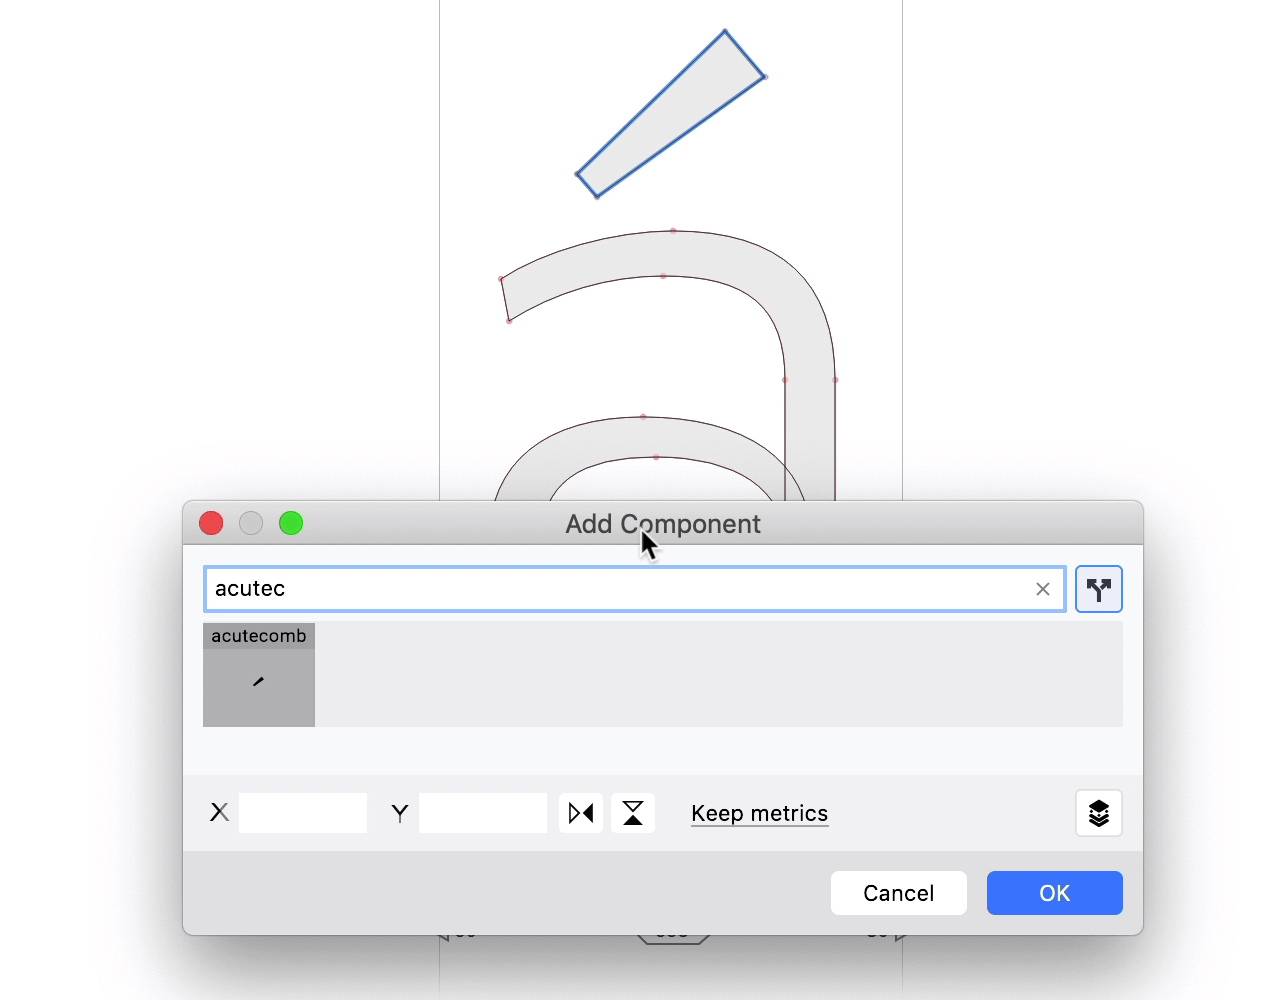
With Glyph > Add Component (ShiftCtrlA AltIns), you can add a component that points to the same layer of another glyph. In the Add Component dialog, you specify an additional x and y shift of the component, flip the component, choose to replace the advance width of the current glyph with the width of the component source glyph, and choose to add the component to the current master or all masters.
In Font window, you can also Copy a glyph cell and then Edit > Paste Components onto another glyph cell.
Once you have a component, when you click Show element properties and Expand properties in the Elements panel, you can set the Base layer name to point the component to another layer, or click Select component instance to make an interpolated component.
When you double-click a component in the Glyph window, FontLab opens the source glyph for editing.
If you edit the contours of the source glyph, its components in all composite glyphs are affected. If you move, scale, rotate or slant the contours or elements of the source glyph, the composite glyphs are affected. If you change the colors or stroke of the elements within the source glyph, the composite glyphs are affected.
Components inherit more information than element references. Element references only link the content of an element (contours or image) but each reference that links to the same element has its own independent placement, transformation, color and stroke.
Changes that you make to the composite glyphs don’t affect the source glyph of a component.
To replace a component with a full independent copy of the content, which you can then directly edit in the composite glyph, choose Glyph > Decompose.
Auto layers»
An auto layer is a glyph layer that is fully assembled from components (pointers to other glyphs in the font). If a Font window glyph cell has an upwards-pointing bright blue icon in the corner, the glyph layer is an auto layer. You can see all glyphs that have auto layers in the Font window sidebar Properties section.
Custom auto layers»
New A custom auto layer that uses a custom recipe is the default auto layer that FontLab 7.1.3 makes when you add new glyphs.
FontLab builds the content of the auto layer from a text-based recipe that can specify base, ligature and mark component glyphs and ways to position, attach and transform them.
FontLab bundles a built-in alias.dat file that contains alternative recipes for many composite glyphs such as Aacute. When you create an auto layer for a composite glyph, FontLab tries to find the best-matching recipe for that glyph in alias.dat. For Aacute, it first tries to build the glyph using A and acute.case, if any of those glyphs don’t exist, it tries A and acutecomb, and failing that, it tries A and acute and so on.
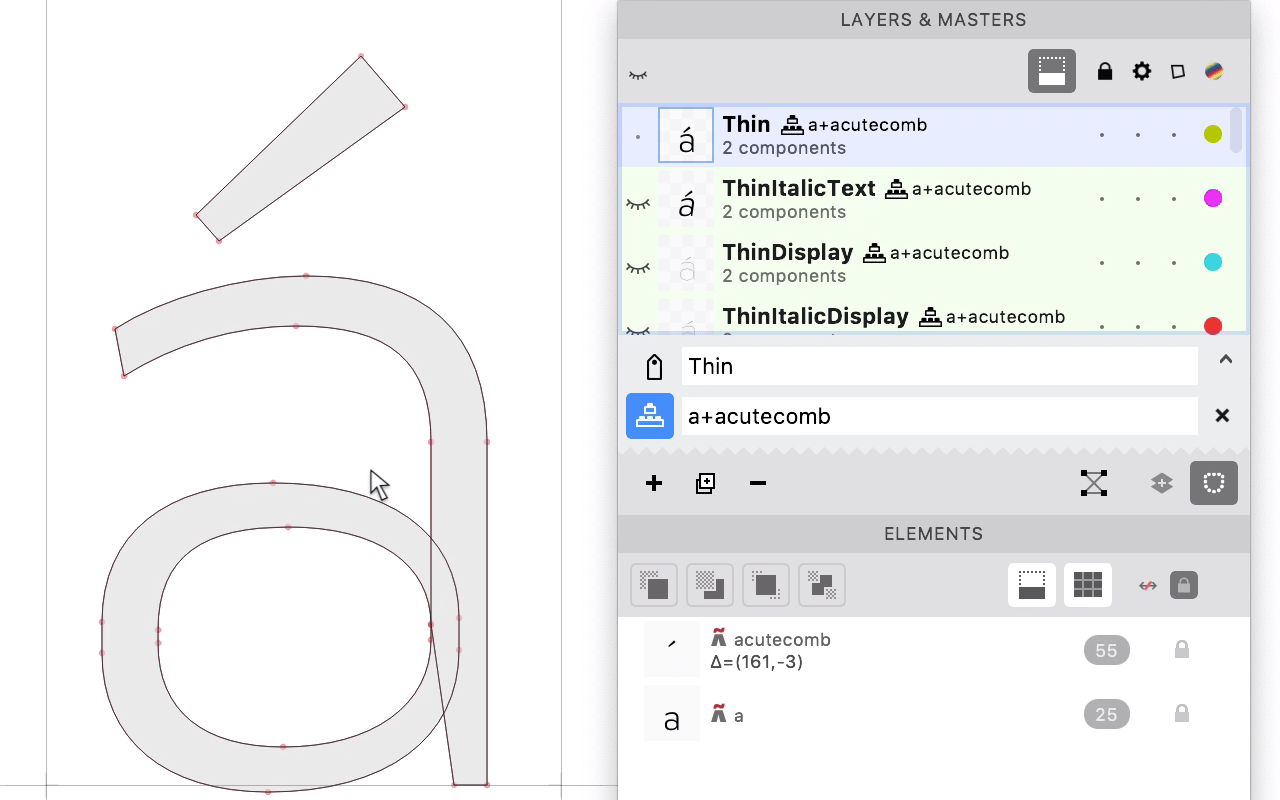
Once a custom auto layer is created, the content will not change if you keep adding “better” glyphs. If you first create A and acutecomb, then Aacute as a custom auto layer, FontLab will build Aacute from the A+acutecomb recipe and store it. When you then create acute, the custom auto layer will stay the same. Conversely, if you first create A and acute, then Aacute as a custom auto layer, FontLab will build Aacute from the A+acute recipe and store it. When you then create acutecomb, the custom auto layer will not change. However, when the metrics, content or anchor positions in the component glyphs change, FontLab updates the auto layers.
You can edit the recipe or write your own. You can override the glyph metrics of an auto layer but you cannot manually edit its content. For custom auto layers, FontLab stores the recipe inside the VFC/VFJ, so the auto layers you create today on your machine will look the same on different machines and in future versions of FontLab.
Dynamic auto layers»
A dynamic auto layer that uses the built-in recipe builds a glyph in a more automated but less portable way than a custom auto layer. A dynamic auto layer does not store the recipe in the VFC/VFJ. This is still the default type of auto layer that FontLab makes when you convert existing glyph layers into auto layers.
When you open a file with dynamic auto layers, FontLab looks up the glyph names in the alias.dat file used in your copy of FontLab, and rebuilds those auto layers. If you open a VFC/VFJ on a machine that has a customized or newer alias.dat, the content of auto layers can change.
As you add component glyphs to your font, the content of dynamic auto layers may also change. If you first create the glyphs A and acute, and then Aacute as a dynamic auto layer, FontLab will build it from A+acute. If you then create acutecomb, FontLab will rebuild Aacute from A+acutecomb. If you create acute.case, FontLab will once again rebuild Aacute, this time from A+acute.case.
Creating new glyphs as auto layers»
When you created a new glyph with auto layers, older versions of FontLab by default created dynamic auto layers, or (more recently), put an “implicit” recipe as a custom recipe in the auto layer: if you created Aacute, the recipe was Aacute. FontLab still looks up such recipes in the current alias.dat and rebuilds the auto layer, so effectively, these auto layers were dynamic. With the implicit recipe, you could not easily see which glyphs FontLab uses or needs to use when building the auto layer.
New When you create new glyphs, FontLab 7.1.3 now creates custom auto layers by default. Depending on Preferences > Operations > New glyphs, when you double-click an empty glyph cell in the Font window to create the composite glyph such as Aacute:
If the add components preference is off, FontLab simply creates a blank glyph.
If the add components preference is on, FontLab creates the glyph, puts the components that are specified by the built-in recipe, and that are present in the font at that time, into all master layers of the glyph — and then it explicitly puts the built-in recipe as a custom recipe in the Auto Layer recipe field. This guarantees that once the auto layer was created, the actual recipe used to create it is stored in the VFC/VFJ.
-
If the create auto layers preference is off, FontLab makes composite layers. You can manually move the added components and manually add other components. The recipe has no effect, but if you turn on Auto Layer, FontLab will attempt to build the content of the glyph using it.
-
New If the create auto layers preference is on, FontLab 7.1.3 now makes custom auto layers and attempts to build the content of the glyph using that recipe.
To quickly create a new glyph for empty glyph cells in the Font window, select these glyph cells, and choose Font > New Glyph… (AltCmdN CtrlAltN).
If Preferences > Operations > add components is on, FontLab creates the glyph, and if FontLab has a built-in recipe for that glyph, it adds components to the glyph. If Preferences > Operations > create auto layers is on, the new glyph becomes a custom auto layer.
To quickly create a new glyph with a name of your choice, select an existing glyph cell in Font window, or activate a Glyph window, and choose Font > New Glyph… (AltCmdN CtrlAltN). FontLab opens the Create New Glyph dialog. Type the glyph name.
- If Preferences > Operations > add components is on, and you click Create or press Enter in the Create New Glyph dialog, FontLab creates the glyph, and if FontLab has a built-in recipe for that glyph, it adds components to the glyph. If Preferences > Operations > create auto layers is on, the new glyph becomes a custom auto layer.
You can also create new glyphs with Font > Generate Glyphs. New When you turn on Create auto layers, FontLab now creates custom auto-layers. If you have not used your own recipe, FontLab now copies the built-in recipe into the recipe field.
Creating dynamic auto layers in existing glyphs»
To replace existing content in existing glyphs with dynamic auto layers:
-
To turn on Auto Layer for all masters of a glyph, select its glyph cell in Font window and in the Font window status bar, turn on Auto Layer. This converts all masters of that glyph into dynamic auto layers. Alternatively, Alt-click the Glyph menu and choose Auto Glyph or Alt-click the Auto layer button in the Layers & Masters panel or in the Glyph window property bar. This only works for one glyph at a time.
-
To turn on Auto Layer for the current glyph layer, choose Glyph > Auto Layer, or click the Auto layer button in the Layers & Masters panel or in the Glyph window property bar.
Turning dynamic auto layers into custom auto layers»
To make a dynamic auto layer to a custom auto layer for all masters of a glyph, select its glyph cell in Font window, and click Edit recipe in the Font window status bar or New Altclick Edit recipe in the Layers & Masters panel. This will store the built-in recipe in of the glyph.
You can also click Edit recipe in the Layers & Masters panel. This will store the built-in recipe as a custom recipe in the current auto layer.
Finally, you can select existing glyph cells in the Font window, choose Font > Generate Glyphs, turn on Create auto layers and Rebuild existing glyphs. New FontLab will now create custom auto-layers.
Working with auto layers»
New To turn all custom auto layers in a glyph into dynamic auto layers, Altclick Reset recipe (✕) next to the recipe field. The auto layers will then use the built-in recipes. Altclick the button again and the dynamic auto layers will become custom auto layers.
To turn one custom auto layer into a dynamic auto layer, click Reset recipe (✕) next to the recipe field, click again to make custom auto layer.
To turn any auto layer into a composite glyph layer, turn off the Auto Layer property of a glyph layer. You can then manually edit the content of the glyph layer.
- To turn off Auto Layer for all masters of a glyph, Alt-click the Glyph menu and choose Auto Glyph or Alt-click the Auto layer button in the Layers & Masters panel or in the Glyph window property bar, or click the Auto layer button in the Font window status bar.
- To turn off Auto Layer for the current glyph layer, choose Glyph > Auto Layer, or click the Auto layer button in the Layers & Masters panel or in the Glyph window property bar.
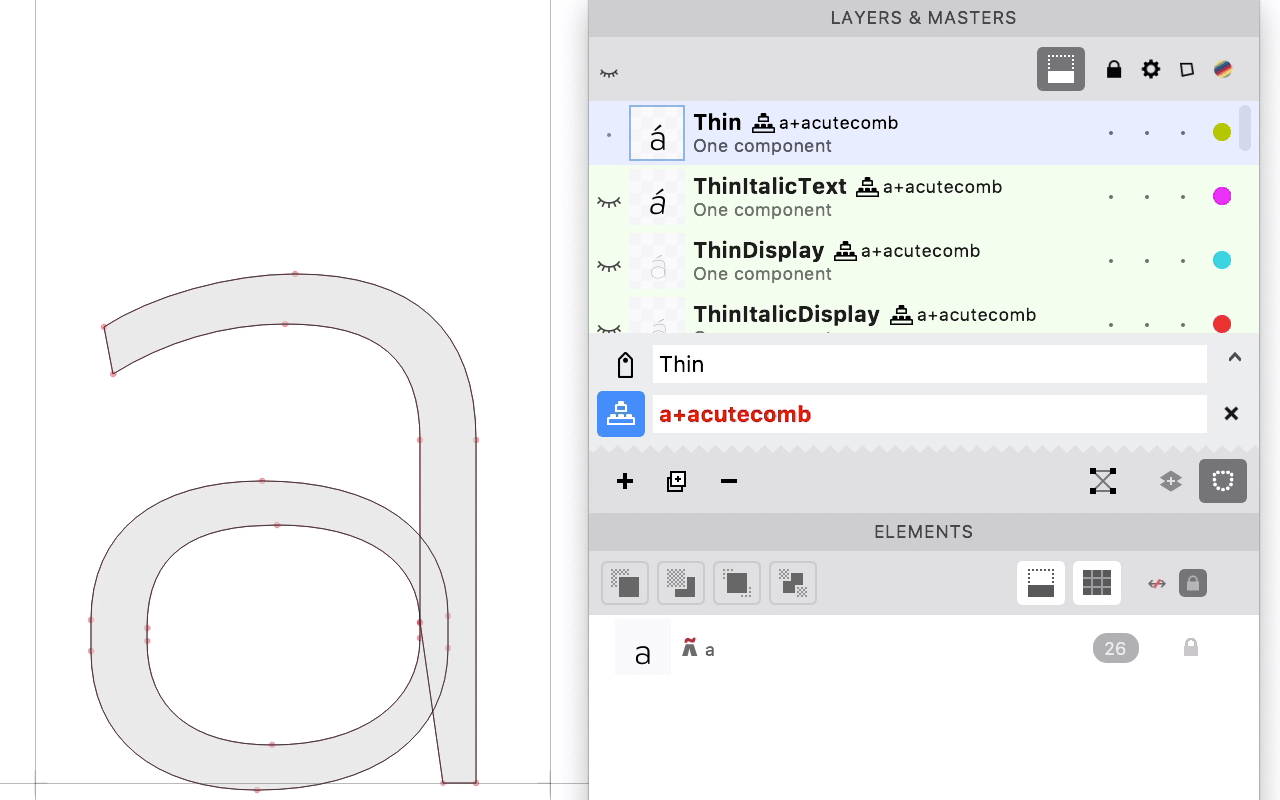
If the font does not contain all necessary component glyphs specified by the custom recipe or by any of the built-in recipes for that glyph (e.g. the font only contains A but no matching mark glyph like acutecomb or acute), the text of the recipe is shown red.
If Font > Live Update > Live Auto Layers is on, FontLab rebuilds auto layers automatically. This may be slow, so you can turn off Live Auto Layers and force rebuilding autolayers with Font > Update Glyphs. Occasionally, you may need to invoke Update Glyphs even if Live Auto Layers is on.
When you have a font that uses composite layers or auto layers, you can select the glyph cells in Font window and choose Text > Copy Text As > Recipes. FontLab will copy the auto layer recipes, and even simple “ad-hoc” recipes made from normal composite glyphs, into the clipboard. You can then edit that text in a plain-text editor as needed, and paste it into Font > Generate Glyphs > Custom to re-create the component and auto layer structure in another font.
Making blank glyphs»
Creating a new blank glyph»
New Select an existing glyph cell in Font window, or activate a Glyph window, and choose Font > New Glyph… (AltCmdN CtrlAltN). FontLab opens the Create New Glyph dialog. Type the glyph name. Click the new Create Blank button or press CmdEnter CtrlEnter, and FontLab will create a new glyph with no content.
Making existing glyphs blank»
New To make existing glyphs blank, i.e. to remove content (elements, components, contours) from them, select the glyphs in Font window, then choose Tools > Actions… > Contour > Remove layer content.
On top of the dialog, choose the layers in which FontLab should remove the content. At the bottom, choose Apply to entire font to remove content from all glyphs.
- Turn on Remove metrics expressions to keep existing metrics expressions
- Turn off the option to also remove existing metrics expressions
Variations»
Reinterpolate»
New If you have a glyph that has more than two masters, you can switch to any of those masters and then choose Glyph > Reinterpolate. FontLab will use all other active masters to interpolate an instance at the axis location of the current master, and will replace the content of the current layer with the interpolated instance.
For example, if you have 3 masters: Light at 100, Regular at 400 and Black and 900, you can switch to the Regular and reinterpolate it based on Light and Black, or you can switch to Black and reinterpolate it based on Light and Regular.
When you reinterpolate the current master layer, FontLab takes all variable masters of the glyph into account. You can temporarily deactivate some of these masters: in Layers & Masters panel, turn on Service layer (☼ column) next to the master that you want to exclude from interpolation. Turn off Service layer again once you’re done with reinterpolation.
With Glyph > Reinterpolate, FontLab reinterpolates the content of the glyph layer, not kerning or some Font Info parameters.
You can reinterpolate the content of multiple glyphs at one: in Font window, select any glyph cells. FontLab will check if the selected glyphs have the same master layer as the layer active in the current glyph, and will reinterpolate that layer. This way, you can quickly reinterpolate multiple font-less glyph masters named :ax=loc,... easily.
If a glyph has two masters, Reinterpolate will just copy the content of the other master to the current.
Layers visibility»
New In the Layers & Masters panel, you can now Altclick the column headings to toggle visibility, lock, service status and wireframe status of all layers. You can also Cmdclick as in previous versions.
Adding layers and masters»
When you change the dynamic instance in the Variations panel, there are now several ways to create a font master at that instance. Regardless of which of the methods you choose, FontLab now correctly interpolates dimensions, zones and other Font Info values.
These methods will create a blank layer if a glyph is not variable (i.e. not all masters match):
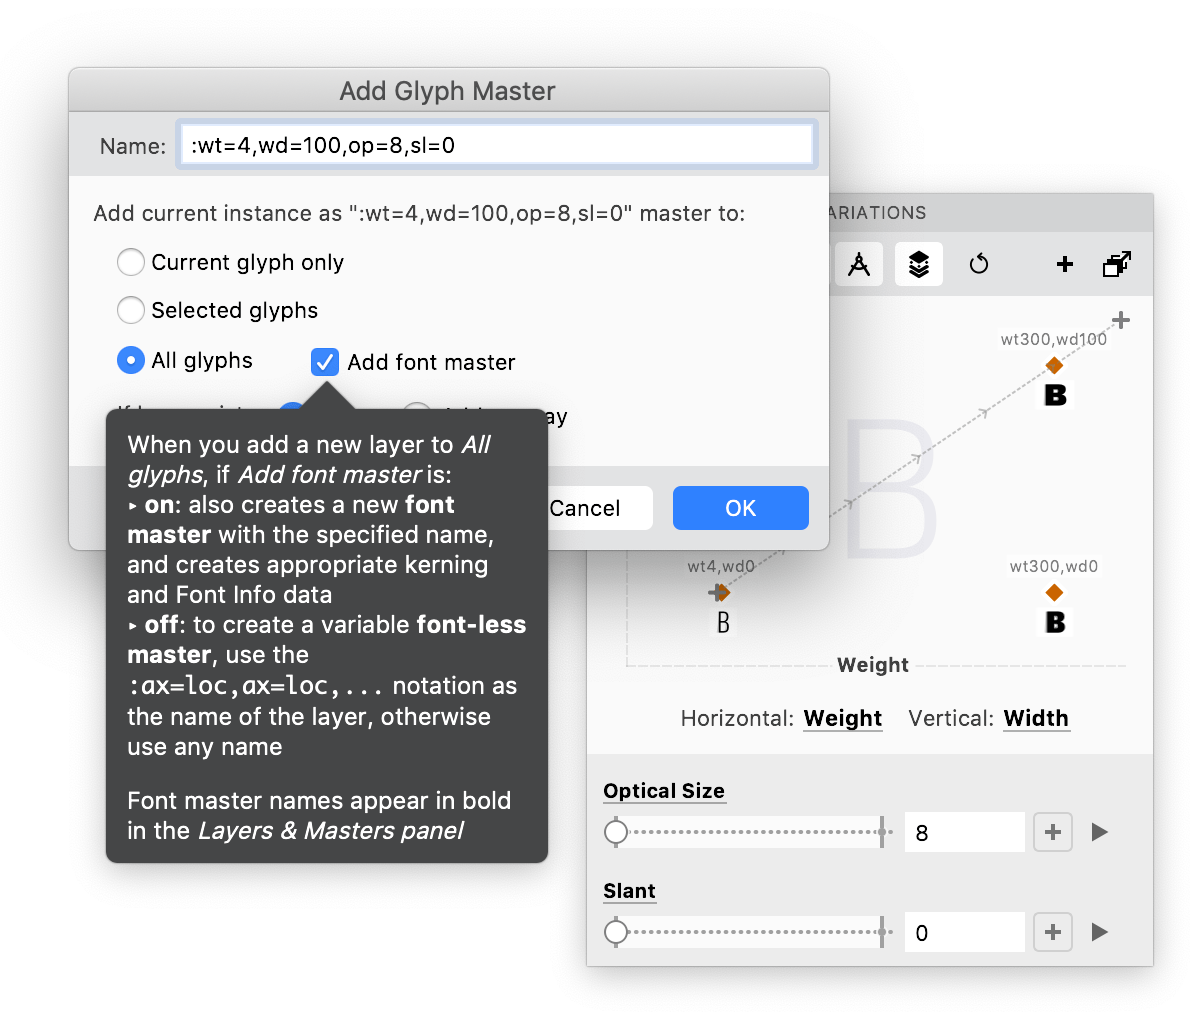
- In the top-right corner of the Variations panel, click + (Add glyph master). Enter the name for the new font master, choose All glyphs, turn on New Add font master, and click OK.
- In the top-right corner of the Variations panel, click ♂️ (Add current instance as font master or create as font), and in the popup choose Add as Master. FontLab will automatically generate the name of the new font master.
- Choose Font > Generate Instance and choose Add as Master. Name will be autogenerated.
With the following method, you can specify a “fallback master”. The new master will have the content of the dynamic instance for all glyphs that are variable, and the content of the fallback master if a glyph is not variable:
- In the Layers & Masters panel, click + (Add layer). Enter the name for the new font master, choose All glyphs, turn on New Add font master. Turn on Fill layer with content of this font and turn on Use instance layer if available. Then click the underlined font name above and choose the font & master to use as fallback. Click OK.
Note
When you Add glyph master in the Variations panel and choose Current glyph only or Selected glyphs, you must use the
:ax=loc,ax=loc,...notation in the name of the layer (like:wt=350) to make the new layer a variable font-less master. If you use a different name, the glyph layers will have the content of the dynamic instance, but will not participate in the interpolation.
We have updated the Quick Help in the Add Glyph Master dialog that you can open with the + (Add glyph master) button on the Variations panel, and the Add Layer dialog that you can open with the + (Add layer) button on the Layers & Masters panel. Hold F1 over the user interface items in these dialogs to see the updated explanations.
Renaming font masters and their layers»
To change the name of the font master and the associated glyph layers later:
- either 2×click the name in the Layers & Masters panel, enter the new name, press Enter and choose Font Master in the popup
- or open File > Font Info > Masters, 2×click the name, enter the new name and click OK.
New When you try to change the master name in Font Info to an empty string, FontLab now reverts the change. Font masters with empty names cause problems.
Annotate glyphs visually with stickers»
With stickers, you can visually annotate “points of interest” inside a glyph layer. These stickers are special FontLab elements that appear in the Glyph window, but they don’t export to final font formats.
You can now show or hide all stickers with View > Show > Stickers.
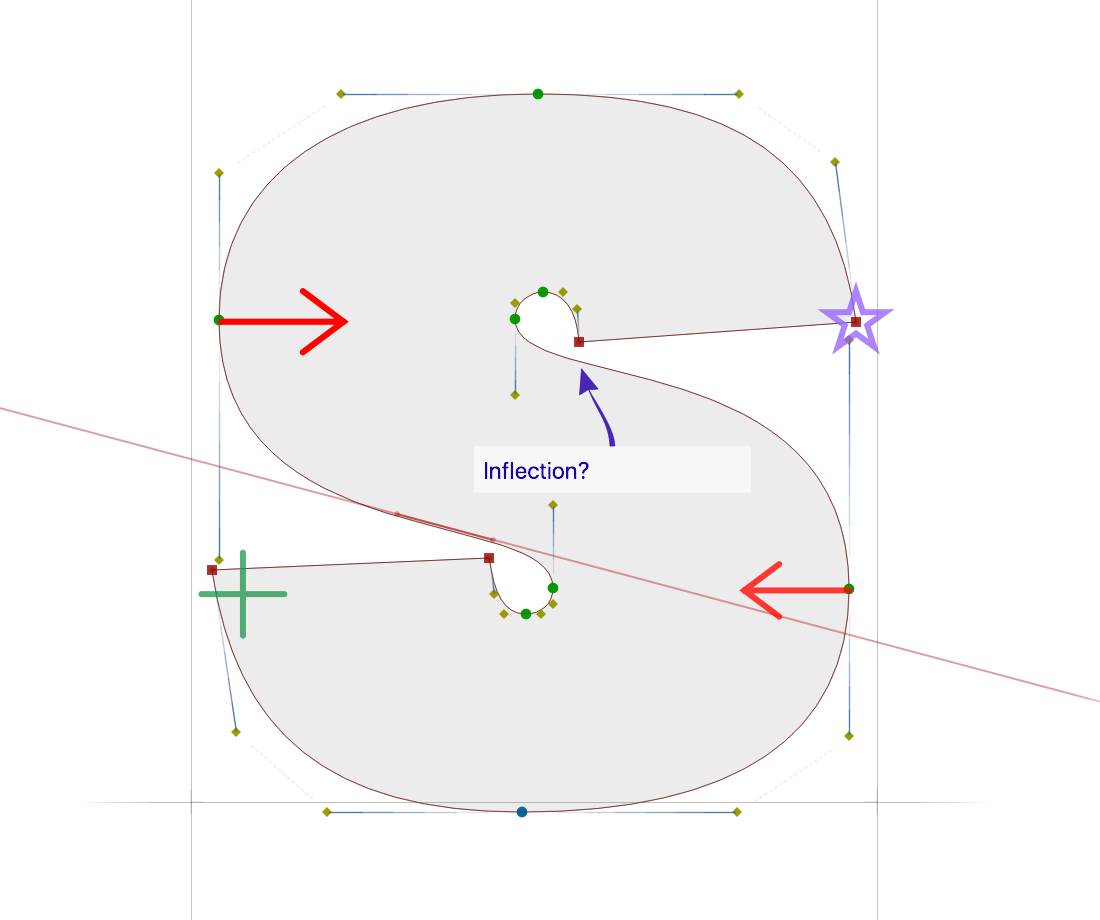
Simple stickers»
New FontLab 7.1.3 adds a set of new simple stickers: arrow, circle, square, plus (cross), line and star.
-
To add a simple sticker in the current glyph layer, choose Element > New Sticker and choose the sticker type, or hold G to temporarily activate the Guides tool and click the appropriate sticker button on the right side of the Glyph window property bar. The new sticker will have the same size as the last simple sticker of the same type that you scaled. Hold Alt when adding a simple sticker and the new sticker will have the default size (5% UPM).
-
Click the sticker outline on the canvas to activate it. Drag the outline or fill of the active sticker to move it. Click – in the Elements panel or tap BkSp to remove the sticker.
-
Drag the circular unfilled sticker handle to scale the sticker (change its size) and to rotate it. Shiftdrag: scale & rotate by 45°. The scaling will also affect all new stickers of the same type unless you hold Alt when adding them.
-
Change the sticker outline color in the last column of Elements panel. For circle, square and star stickers, change the sticker fill color in Color or Swatches panel.
Text stickers»
As in earlier versions, you can also add Text stickers inside the Glyph window. A text sticker is a text box with customizable text, and with optional arrows that you can drag out of the edges of the box. New In FontLab 7.1.3, we have simplified the design of text stickers.
-
To add a text sticker in the current glyph layer, choose Element > New Sticker > Text, or press CtrlT CtrlAltShiftT, or hold G to temporarily activate the Guides tool and click the Text sticker button on the right side of the Glyph window property bar.
-
Click sticker on the canvas to activate it. Click – in the Elements panel or tap BkSp to remove sticker.
-
Drag sticker box to move. Drag one of the two unfilled handles to resize. Drag one of the six filled handles to pull out an arrow, 2×click the filled handle to remove the arrow. Drag the arrow tip to move it, drag the gray arrow handle to change the arrow curve.
-
Click the sticker text box to edit the text. Change the default text used for new stickers in Preferences > Default Texts.
-
Change text box color in Color panel. Change color of the text and the arrows in the last column of Elements panel.
Metrics»
Measurement Line»
When you turn on View > Measurement Line, FontLab a special violet horizontal guide with a circled “M”, and displays sidebearing values calculated at the intersection of the glyph content with that line. You can move the Measurement Line vertically and use it for measuring sidebearings at different heights of the glyph.
The Glyph panel and the Metrics mode property bar have small fields that, for the current layer, always show both the absolute sidebearings and advance width (above), and the sidebearings and content width based on Measurement Line (below).
New When Measurement Line is on:
- The editable sidebearing text boxes in the Glyph panel and the Metrics mode property bar display a violet background. When the line is off, the background is white.
- When you turn on View > Metrics Table, the sidebearing fields in the 1st column also show violet background. The 1st column is now more compact and uses icons.
- When you turn on View > Lock > Font Guides, the Measurement Line is not locked so you can still move it. To lock/unlock the Measurement line, right-click it and choose Lock from its context menu.
New Change the opacity of the Measurement Line in Preferences > Grid & Guides > Font Guides.
Linked metrics and Live Metrics»
Let’s say you have glyph A which has an italic master that has a non-0 Italic angle (e.g. Black Italic) and an upright master (e.g. Black). In the left sidebearing field of the Black Italic master, you enter an expression :Black. This makes the LSB of the Black Italic of the A glyph a linked metric, and it makes the LSB of the Black master of the same glyph a source metric.
In principle, whenever the source metric changes, the linked metric (which contains the expression) follows that change. When you use Font > Update Glyphs, FontLab updates all linked metrics in all masters of the font. If you have many masters and many expressions, this may be slow.
Therefore, FontLab has the checkbox Font > Live Update > Live Metrics. If this setting is on, FontLab updates linked metrics as you edit the glyphs, but with some limitations. New Live Metrics now works as intended when you link italic master sidebearings to upright master sidebearings, and if View > Italic Angle > Apply to Metrics and Grid is on.
Specifically, when Live Metrics is on:
- If you use the Glyph window editing mode to change the contour in the
Black Italicmaster, FontLab updates the linked sidebearing in that master to match the source sidebearing in theBlackmaster. Previously, Live Metrics updating between italic and upright masters worked incorrectly. - If you use the Glyph window editing mode to move the sidebearing line in the
Black(source) master, FontLab updates all linked sidebearings in the whole font (including theBlack Italicmaster). - If you use the Metrics mode to change the source sidebearing in the
Blackmaster, FontLab updates all linked sidebearings in the whole font. - However, if you use the editing mode to change the contour in the
Black(source) master, FontLab does not update the linked sidebearing in theBlack Italicmaster. You have to use Font > Update Glyph. This is by design: Live Metrics updating of all linked metrics on every change of a contour in a source master would be too slow.
New You can now hold/tap F1 over the Advance width, Left sidebearing and Right sidebearing fields in the Font window bottom bar, in the Glyph panel or in the property bar of the Glyph window Metrics mode to see extended Quick Help that includes a cheat sheet for metric expressions.
Classes and Kerning»
-
Font > Kerning > Match Kerning now works much faster, especially on fonts with many masters.
-
New When you export classes with File > Export > Classes, you can now choose between two export formats: Legacy class files (*.flc), which is single-master only and is compatible with FontLab Studio 5, and JSON classes files (*.json), which supports multiple masters and is a subset of the FontLab JSON (VFJ) format.
Font window»
Cell size»
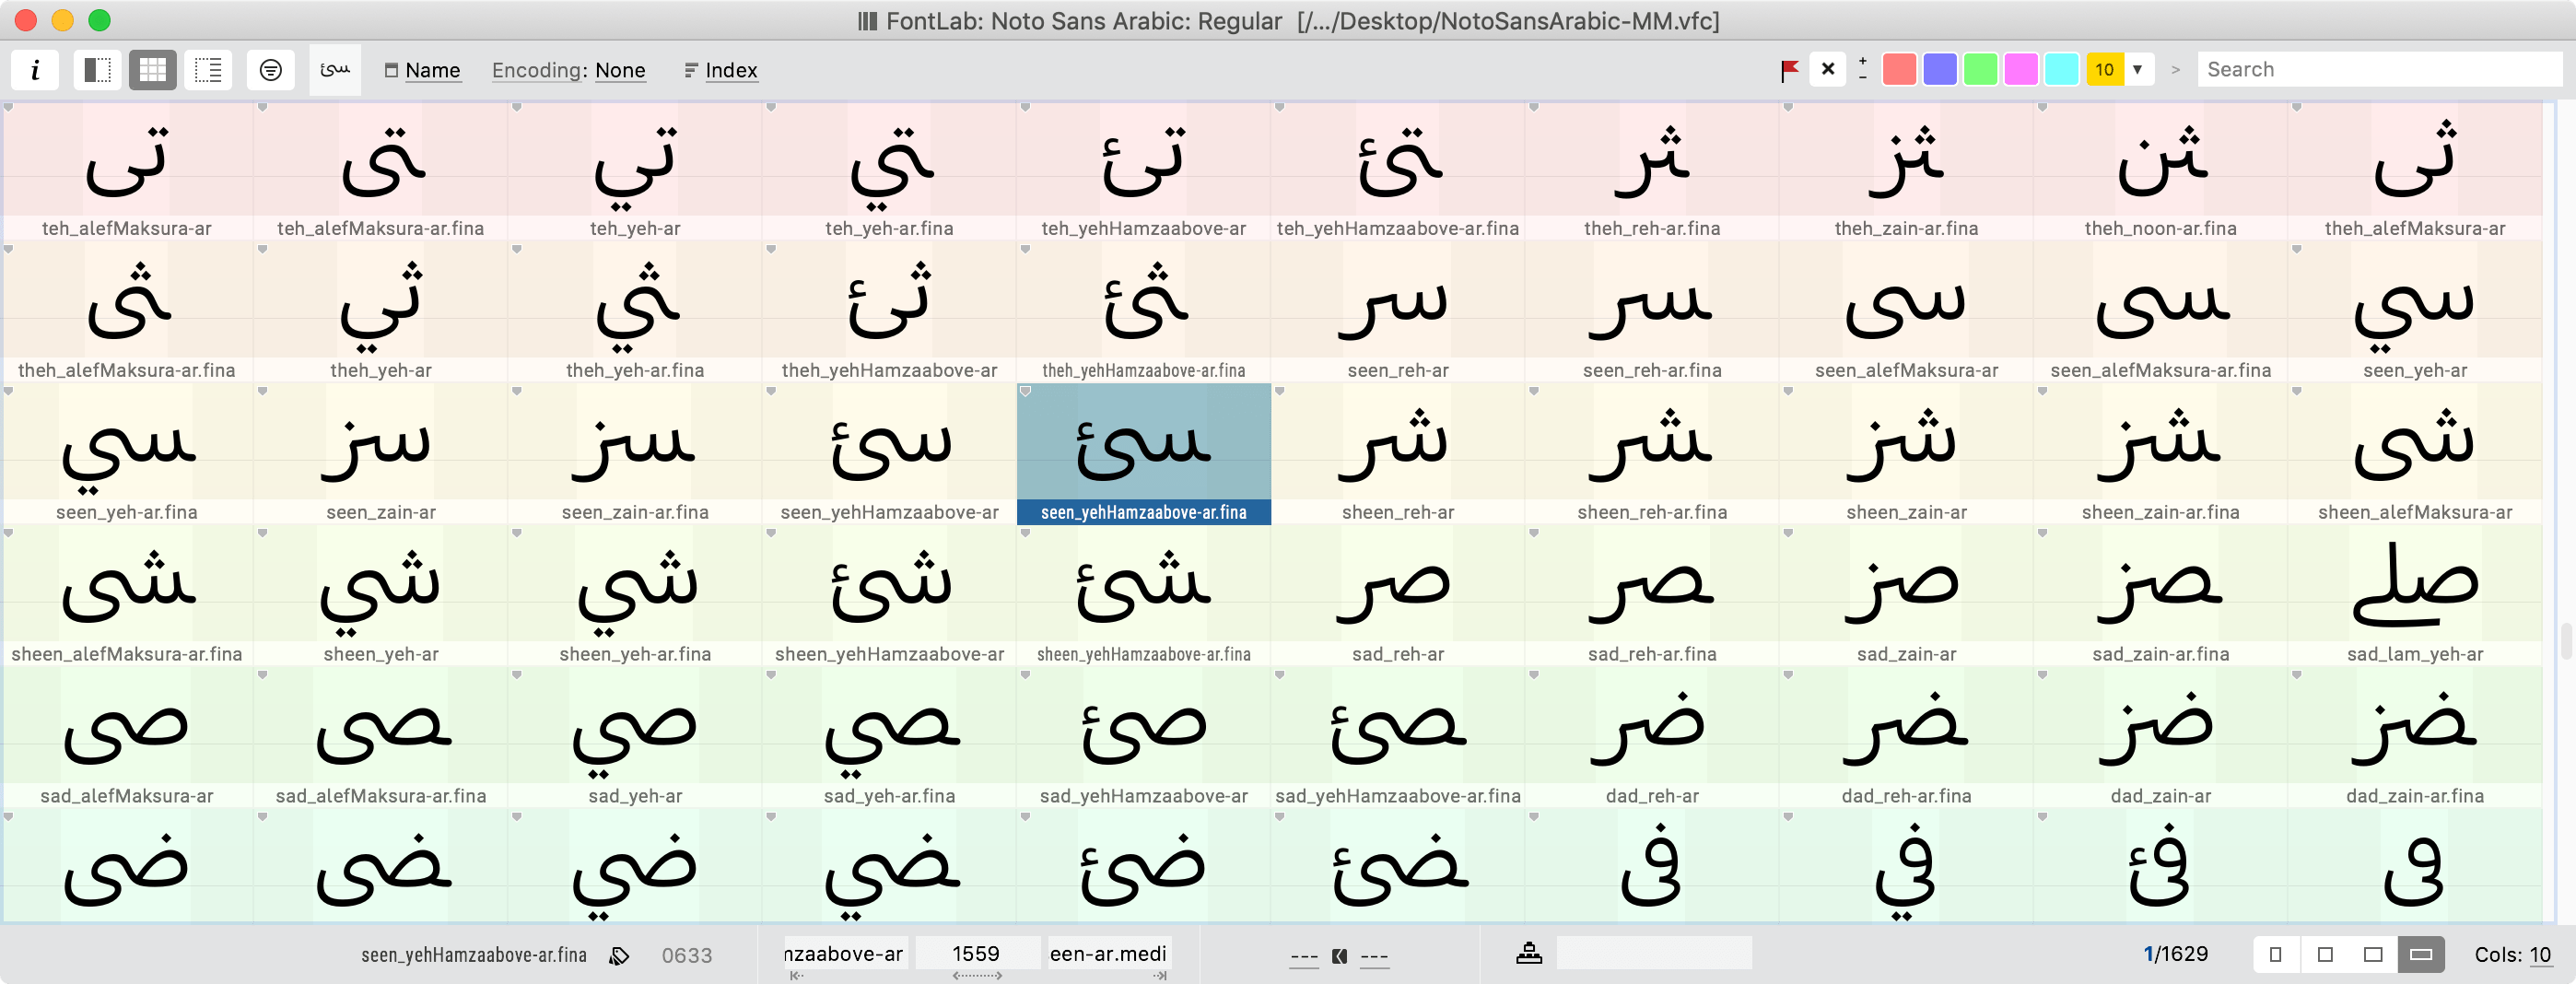
At the bottom-right of the Font window, click the New Extra wide button to give the Font window cells 16:9 proportions. This is particularly useful for calligraphic fonts, for fonts that contain many ligatures, and for scripts like Arabic or Mongolian.
Scrolling»
The Glyphs bar shows a line with all glyph cells sorted by Index at the top or bottom of the Glyph window. Turn on View > Control Bars > Glyphs Bar and hold F1 over the Glyphs bar to see new Quick Help.
New Preferences > Font window > Scrolling > Space controls what happens when you hold Space on a Font window cell, or on a Glyphs bar cell:
- on: (new) drag to scroll the Font window or Glyphs bar
- off: quick preview of the chosen glyph appears, with the current name, synonyms, a preview, metrics, Unicode codepoint and Unicode name
Preview panel»
The Preview panel (Window > Panels > Preview) renders text in the current font, with a variety of settings and filters. Click the top-right Show/hide Sidebar to show the New redesigned sidebar.
Redesigned Preview panel sidebar»
The sidebar design is more compact. If used regularly, it’s much faster to use thanks to icons and buttons instead of text and dropdowns. Hold F1 over the panel items to see revised Quick Help.
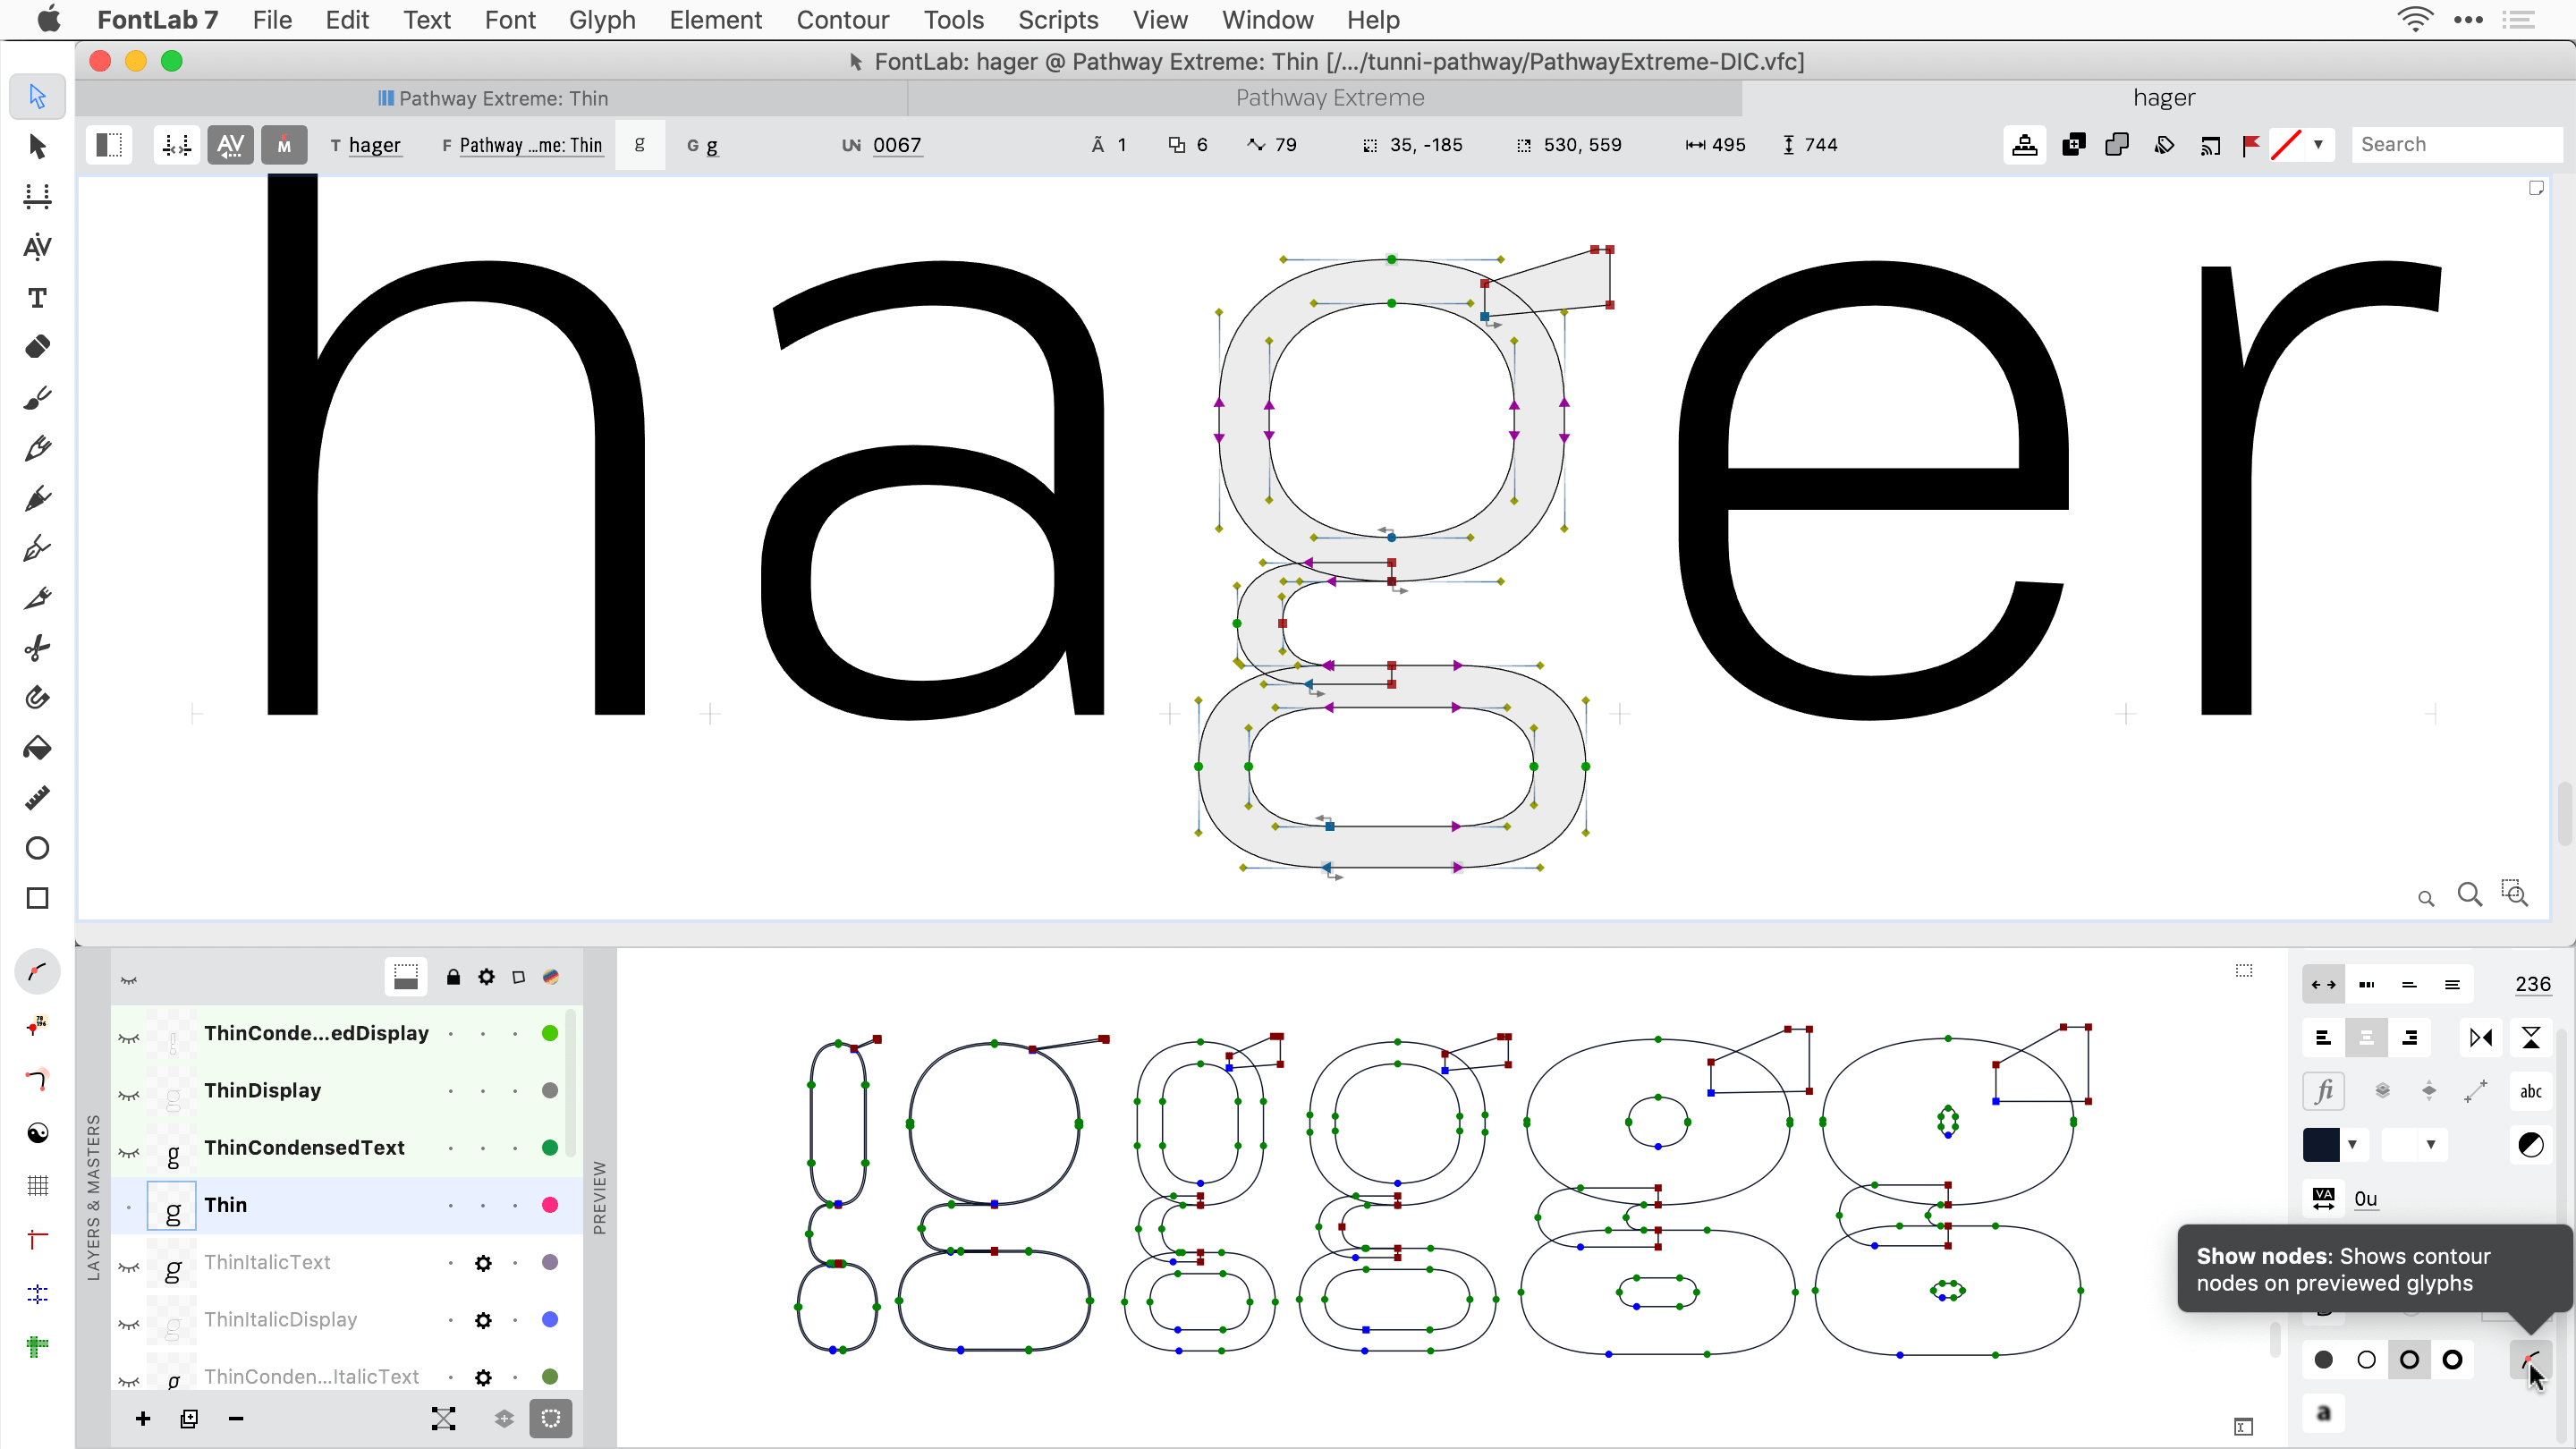
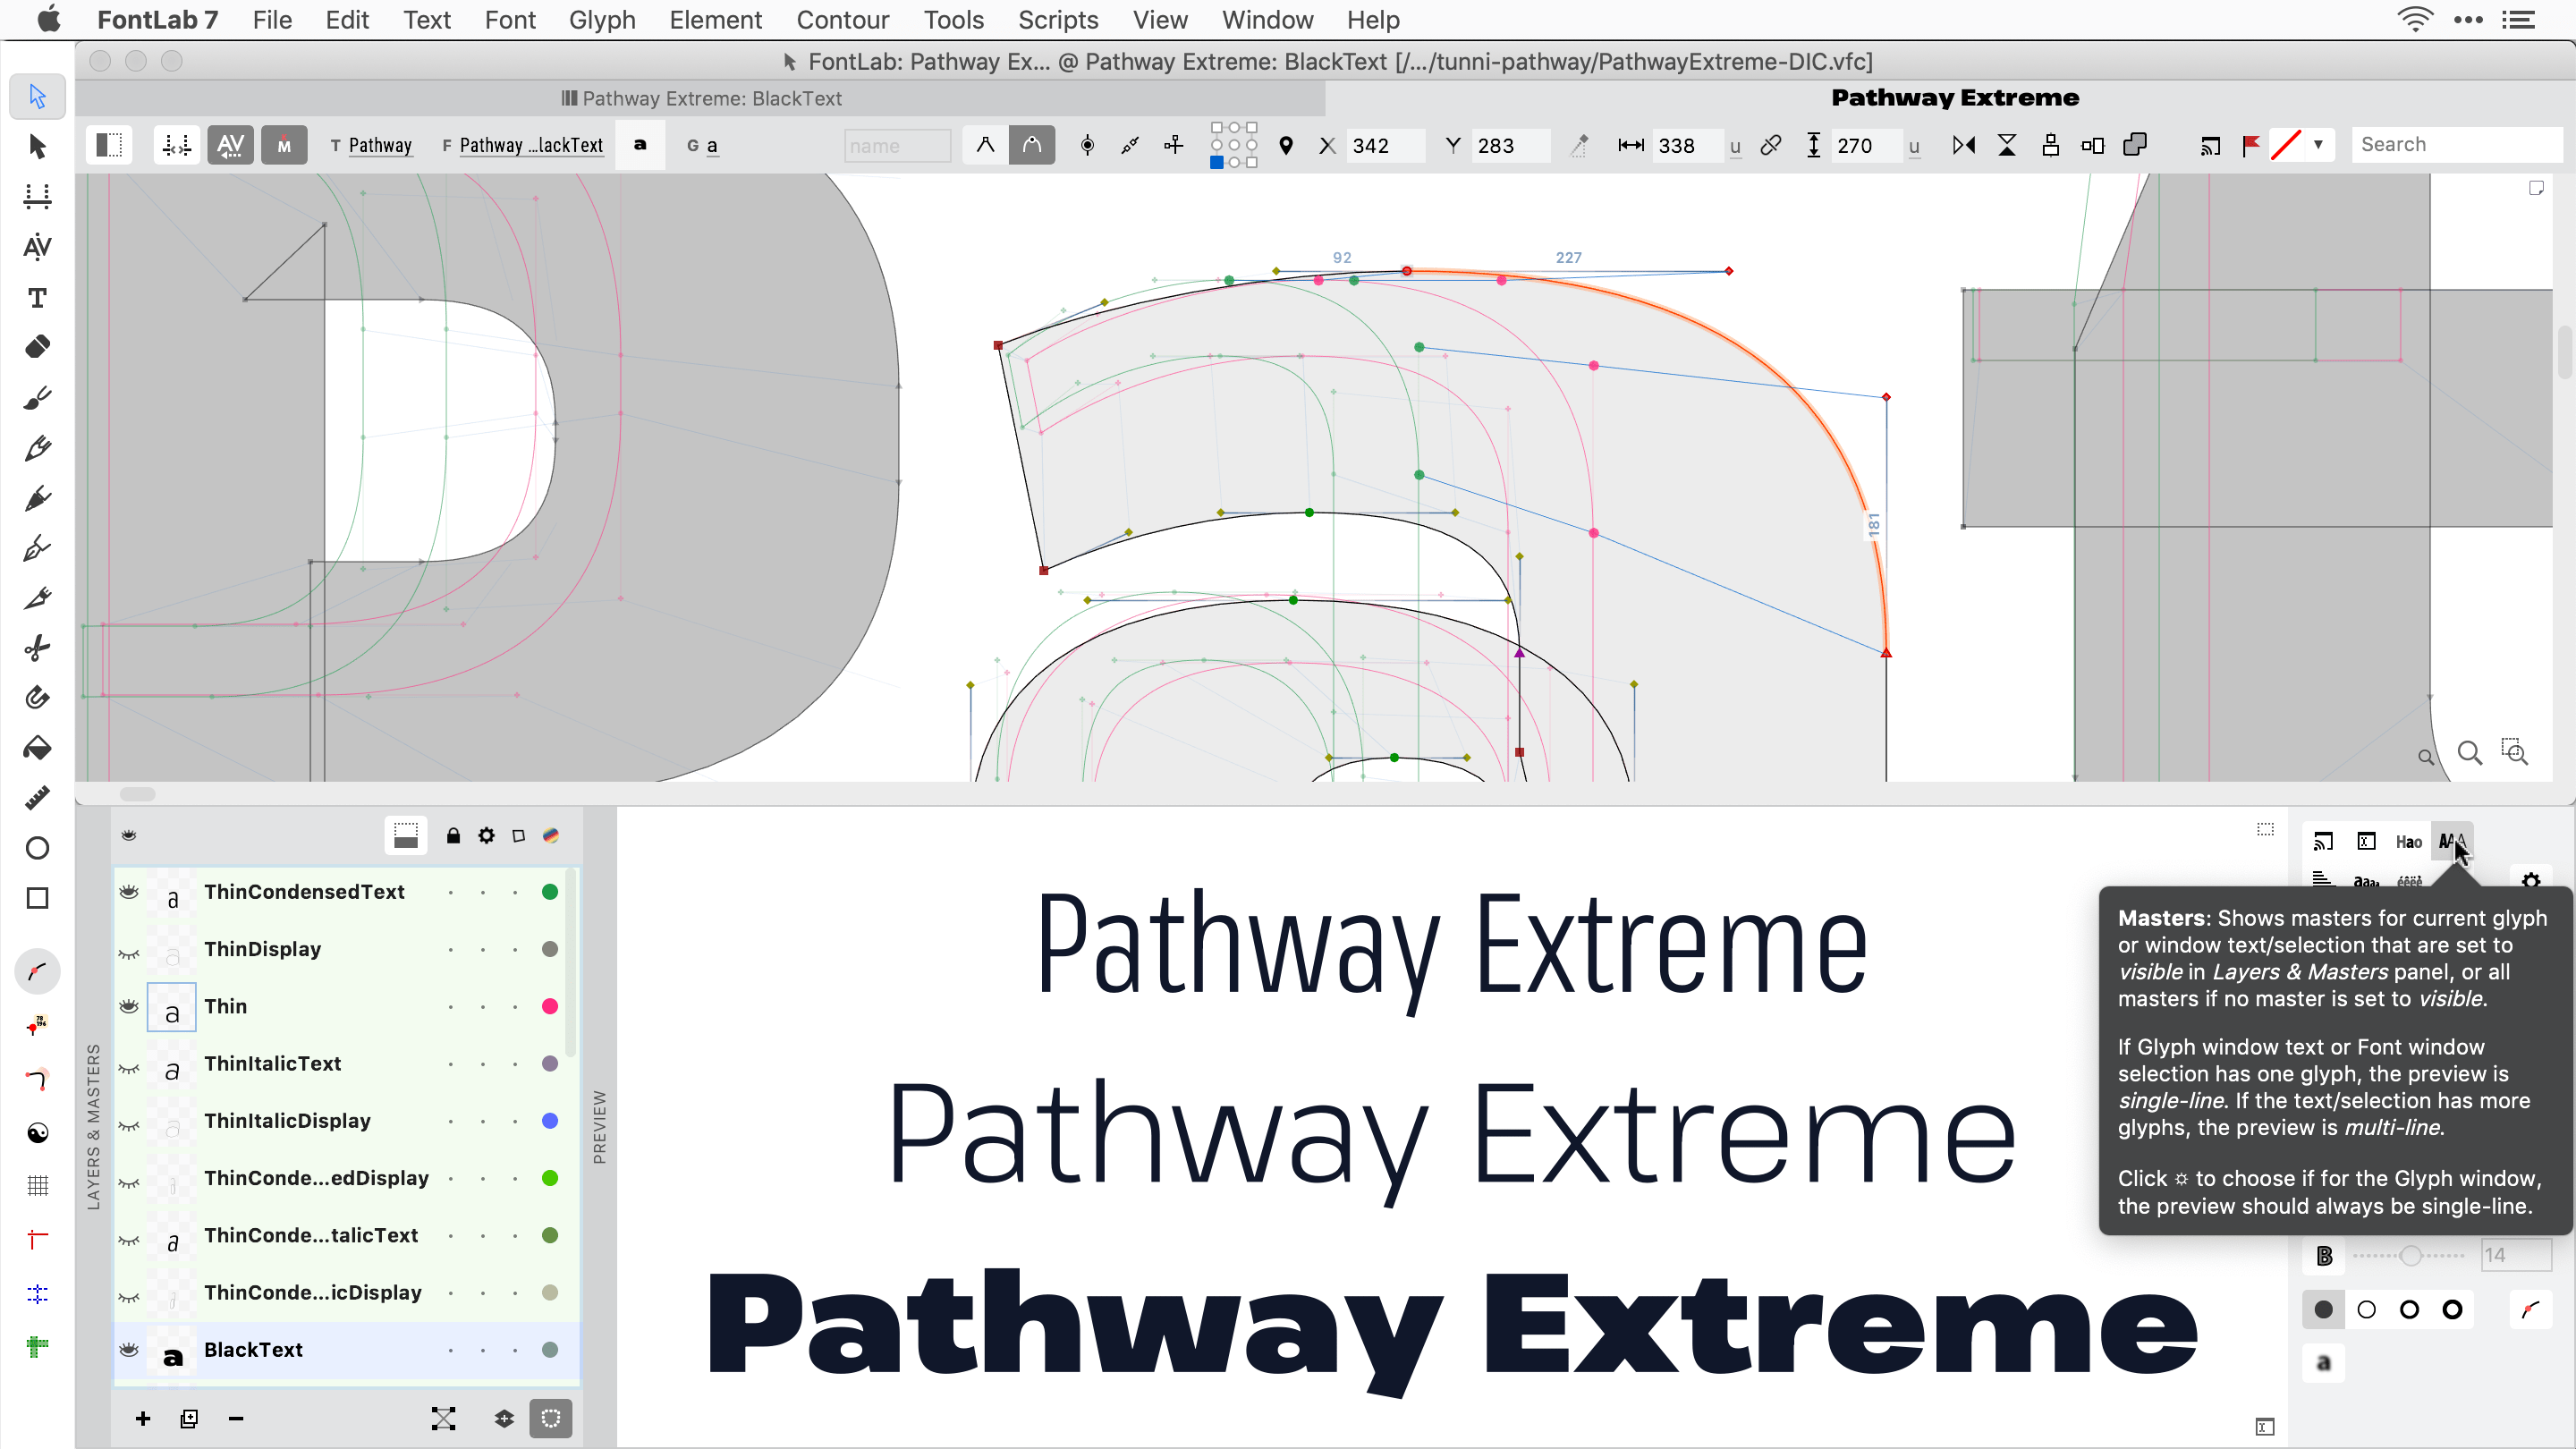
Preview of multiple masters»
The 4th icon in the 1st row of the Preview panel sidebar (All or visible masters) shows the masters for the current glyph, or the masters for the Glyph window text or the Font window selection. The panel shows the masters that are set to visible in Layers & Masters panel (using the “eye” column), but if no master is set to visible, it shows all masters.
If the Glyph window is active and its text has one glyph, or if the Font window or Font Map panel is active and its selection has one glyph, the preview is single-line: it shows the masters of the current glyph, side-by-side.
If the Font window or Font Map panel is active and its selection has more glyphs, the preview is multi-line: it shows each master of the selected glyphs, line-by-line
New If the Glyph window is active and its text has more glyphs, you can now click Content settings (☼), and in the dialog set For Glyph window, prefer single-line preview to:
- on: the preview is single-line and shows the masters of the current glyph only
- off: the preview is multi-line and shows the masters for the entire Glyph window text
When you turn off For Glyph window, prefer single-line preview, you can still easily see a single-line masters preview for the current glyph: Cmdclick Ctrlclick any glyph in the Preview panel or in the Glyph window, and FontLab opens just this glyph in a new Glyph tab or window. Then, the Preview panel will show the single-line masters preview. Go back to the previous Glyph window to see the multi-line preview.
Warning
Currently, the multi-line Masters preview uses kerning from the current master in all master previews. Therefore, the multi-line Masters preview is not suitable for proofing of kerning.
Toolbar»

New The Toolbar has a bigger, surer design, but not so transparent. Let us know what you think!
Export»
Font Info Slope and sorting of styles in font menus»
In Font Info > Font Dimensions, you can set the font italic angle in two ways: you can specify the italic angle in degrees in the Italic angle field, or you can specify the slope using two integer values. The Slope fields define the optimal length of the X and Y legs of a right triangle where the hypotenuse has the italic angle.
To draw italic glyphs on an integer grid with highest chance of placing nodes or handles along the italic angle, use small Slope X & Y values instead of “round” italic angles. Examples: slope 1/15 corresponds to the angle 3.81°, 1/12 = 4.76°, 1/10 = 5.71°, 1/9 = 6.34°, ⅛ = 7.13°, 1/7 = 8.13°, ⅙ = 9.46°, ⅕ = 11.31°, 2/9 = 12.53°, ¼ = 14.04°
New When you export OpenType fonts, FontLab 7.1.3 now correctly writes the first Slope field as hhea.caretSlopeRun and the second field as hhea.caretSlopeRise, and correctly interpolates the values between different masters. Previously, when you exported font instances, FontLab would always export hhea.caretSlopeRun as 0 and hhea.caretSlopeRise as 1, like in upright fonts that have the italic angle of 0°.
When users select and edit text in end-user apps, some of those apps use the caret offset field to move the bottom of the text cursor by the specified number of font units (to the left if the value is negative), and use the caret slope run and rise fields to determine the angle of the text cursor.
Also, some apps (such as Adobe InDesign) use the OS/2.usWeightClass field (Font Info > Names > Weight class) and OS/2.usWidthClass field (Width Class) to sort the menu of font styles for a family. If those fields are the same for multiple styles, the apps put the style with the higher caret slope value (typically, an “Italic” style) after the style with a lower caret slope value (typically, a “Regular” style).
Instances exported from older versions of FontLab had the same caret slope for both upright and italic fonts, so apps like InDesign sorted the styles alphabetically (“Italic” before “Regular”). If you export instances in FontLab 7.1.3, “Italic” will appear after “Regular” in the font style menus of those apps, as expected.
Hinting in OTF»
If you customize the OpenType PS (.otf) export profile, turn off Hinting > Use x-direction hints, and export an OTF using that profile, the font will only have horizontal hints, and no vertical hints. This may be useful for italic fonts.
New Previously, the Use x-direction hints setting only worked for OpenType TT (.ttf) export, while OTF fonts always had both horizontal and vertical hints.
Color fonts»
When you have color glyphs and you don’t have an extra bw layer, and you export a font into a color OpenType format that requires both color and monochrome versions of glyphs (such as OT+SVG), FontLab produces the monochrome glyphs by rasterizing the color glyphs and autotracing them.
New Now, when you set the current layer to the layer that contains the color glyphs and you export the Current Layer of the font using the OpenType PS profile, the autotraced monochrome glyphs have fewer contours and nodes, which does not inflate the font size that much.
To manually control the form of the monochrome glyphs, create a bw layer in all glyphs that contain the color version, and draw simple contour glyphs there. You may also export the font into OpenType PS, open the -SVG.otf font back in FontLab and manually clean up the contours in the bw layer. Then switch to the layer that contains the color glyphs and export that font again with the Current Layer setting.
Bug fixes»
-
When exporting Variable TT fonts, FontLab no longer fails to export specific variable kerning into the
GPOS. -
When you use auto-glyph recipes containing glyph name synonyms and component transformation commands, FontLab transforms components as expected now.
-
When you edit an element in the Glyph window and then undo your edits, FontLab no longer hides the number of element references in the Elements panel.
-
When you edit an element in a glyph with multiple grouped elements and then undo your edits, FontLab no longer merges grouped elements in one element.
-
You can select the text in the Guides tool property bar, but you no longer get stray text cursors in those text boxes.
-
In fonts with multiple masters, stickers now only appear in the master they belong to.
-
If Font Info > Font Dimensions > Caret offset is fractional, when you export DesignSpace+UFO, FontLab now rounds it to integer when writing
openTypeHheaCaretOffsetinfontinfo.plist. This is mandated by the UFO3 spec. -
When you measure distances with the Guides tool in an element that has a live transformation applied, the Guide tool measuring (on the canvas and in the property bar) now shows distances in absolute (transformed) font units, not in element (untransformed) units.
-
When you set a width in a blank glyph, FontLab no longer occasionally sets the width lower by 1 unit
-
When you select and move multiple contours in a glyph that has many (more than 50) contours, FontLab no longer lags when moving the contours.
-
When you perform Tools > Actions > Shift, then Undo Actions, and then click an anchor, FontLab no longer erroneously adds Move anchor operations to the History panel.
-
If you reconfigure the axes in the Variations map of the Variations panel and then click on another glyph cell, FontLab now keeps the same setup of the axes in the panel.
-
When you open a VFC file that has 0 bytes in size, FontLab no longer crashes.
-
When you type a negative value in the Font Info > Font Dimensions > Slant angle field (for backslanting), FontLab now correctly updates the Slope fields.
-
FontLab now correctly reads and exposes the Font Info > Other Values: Unfill Looped Corners settings after opening a VFC file.
-
When you use Tools > Actions > Shift and Move anchors is off, FontLab no longer moves anchors unexpectedly.
-
When you remove the value in one of the Tools > Actions > Shift fields so the field is empty, FontLab now correctly treats this field as having the value of 0.
-
In the Prefix section of the Features panel, when you remove the last line break, FontLab no longer merges the last line of the prefix with the first line of the first feature definition
-
When you have an element and a group, group them, then ungroup the group inside the group, FontLab no longer crashes.
-
FontLab now correctly exports hints from sources with multiple masters into OpenType PS fonts when you export the fonts in Current Layer or Masters mode. Previously, on some occasions, FontLab exported unhinted fonts in these modes, and only exported the hinting in Instances mode (using the main master’s hints).
-
When you choose Tools > Autohint or Tools > Actions > Autohint, FontLab now correctly creates ghost hints even in quite thin (light) fonts.
-
When Edit > Match when Editing is on, and Preferences > Variations > Add hint is on, and you choose Tools > Autohint, FontLab now creates ghost hints in all masters. Previously, FontLab created normal hints in all masters but created ghost hints only in the current master.
-
When you perform the sequence of actions Element > Group, Edit > Undo, Element > Group, FontLab no longer crashes.
-
When you set the Font window sort to Index and drag-drop glyph cells to change the glyph order, FontLab correctly places the glyphs where you dropped them. Previously, it placed them later in the glyph order than expected.
-
When you open an OpenType TT (.ttf) font that contains an empty
kerntable with no subtables, FontLab no longer crashes. -
When you select several glyph cells in the Font window, choose an element in the Gallery panel and click Place, FontLab inserts a reference to that element into the selected glyph cells. Now you can correctly undo this operation.
-
When you make a contour selection with the Contour tool (A) and then switch to the Element tool (V), operations in the Edit menu now work on the element. Previously, some of these operations erroneously worked on the contour selection even if the Element tool was active.
-
When you hide Nodes in the Glyph window, FontLab no longer shows coordinates or angles and lengths. When you hide Handles, FontLab no longer shows handle lengths or angles.
-
When you apply Element > Expand Stroke to a glyph that is used as a component in some composite glyph, FontLab no longer moves the component to the origin point.
-
FontAudit no longer incorrectly reports a stem built from two or more elements as an uncommon stem.
-
When you export a particular font that contains stroked contours, FontLab no longer crashes.
-
When you open a font that has more than one master, the Layers and Masters panel instantly shows the colors that indicate the master matching status (green, yellow or red). Previously, the colors were not shown until you performed some operation.
-
When you click Font Info > Family Dimensions > Auto Descender, FontLab now puts the auto-calculated descender value in the Descender field, and not in the Ascender field.
-
When you click Font Info > Font Dimensions > Auto x-height, FontLab now puts the auto-calculated x-height value in the x height field, and not in the Caps height field.
-
When you Element > Ungroup an element group that contains element references, FontLab now shows the correct number of references shown the Elements panel and in the Element frame.
-
When you click in Font Info > Zones > Auto-detect zones, FontLab now correctly detects alignment zones.
-
When you Shift-click an anchor to add it to selection, FontLab no longer moves the previously selected anchor to the origin point.