Before You Export»
Before you export your font, make sure the most relevant aspects of the font are complete. Open all fonts that belong to your family in FontLab.
Font Info»
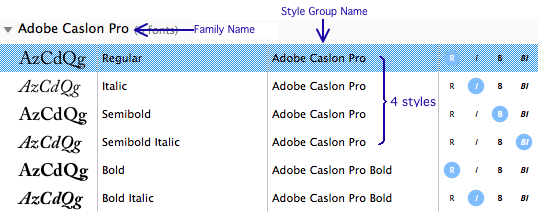
Open Window > Panels > Fonts and look at the family naming. All fonts in a single family should be grouped under one typographic family name (TFN). Each style group name (SGN) listed in the Fonts panel should contain no more than 4 members (styles):
Open File > Font Info and walk through all fonts of your family using the Next font and Previous font buttons. On the Names page, make sure that all text boxes and popup menus are filled in. Use the Build Names button for each font to generate Full Name, PostScript Name and Style Group Name automatically.
Check the Creator and Legal pages. All information should be filled in there (although for Type 1 fonts, actually only a subset of the entries will be included in the generated fonts).
On the Creator page, select your vendor ID from the Vendor popup menu. If you don’t have one, register one at Microsoft Typography. Click on the Now button to set the current date. Put a reasonable version number into the version field and click on the Auto button at the right. Increase your minor version number if you revised your font and click on the Auto button at the right. Other fields on the Creator page are optional.
On the Legal page, fill in the Copyright, Trademark and License fields. Change Embedding settings if needed.
On the Family Dimensions page, font UPM size can be 1000 for all formats, including TrueType-based. We do not recommend you to change the UPM size after you finished your design, hinting, font kerning. Make sure your Ascender, Descender, LineGap and other values are uniform for all fonts in your family. Use average values if your styles de facto have different ascenders or descenders. The Ascender value should be positive, the Descender value should be negative (preceded with a minus sign) in the fields. The sum of the absolute values of Ascender and Descender are usually equal or close to the font UPM size (e.g. 720+|-280|=1000), but this is not mandatory.
Values on the Font Dimensions page are individual for each font in the family. You may leave them custom or recalculate using Auto buttons.
You can usually leave the other Font Info settings that were not mentioned above at their factory settings.
Character Set»
Switch to the Encodings mode in Font Window and select some encodings to see whether all the glyphs you need in a desired encoding are included in the font. If you are making a text font, it should at least cover all glyphs from the “MacOS Roman” and the “MS Windows 1252 Western (ANSI)” encodings.
See Language Support and Glyphs for more details of selecting characters for your font.
Switch to the Codepages mode and check several codepages. If you are making a text font, it should at least cover all glyphs from the “MacOS Roman” and the “MS Windows 1252 Western (ANSI)” codepages.
Remember that the Encodings mode uses glyph names and the Codepages mode uses Unicode codepoints to reference glyphs. Your font should have both the glyph names and the Unicode codepoints conform to published recommendations.
If any glyphs present in the “yellow zone” in the Codepages mode are missing from the “yellow zone” of the corresponding Encoding, your glyph names may be incorrect. Choose Font > Generate Names to fix this problem. If the inverse occurs, i.e. glyphs present in the “yellow zone” in the Encoding mode are missing from the “yellow zone” of the corresponding Codepage, your Unicode codepoints may be incorrect. Choose Font > Generate Unicodes to fix this problem. You might wonder why FontLab does not do these steps automatically at the time of export, or earlier. In some cases, you may be making or editing a font where unusual or non-standard glyph names/encodings are required. Therefore when glyph names or encodings are set, FontLab preserves them rather than automatically “fixing” them.
Any glyph cell with red line in caption indicates that either the glyphname or the Unicode codepoint is incorrect. Fix them manually or automatically using the commands mentioned above.
It is recommended that all fonts in your family have the same character set.
Glyphs»
Open the first glyph of your font in a Glyph Window, enable View > Show > FontAudit and walk through all your glyphs. Review and fix potential problems reported by FontAudit.
Hints»
If you have manually hinted your glyphs, skip this.
Choose Tools > Autohinting to automatically create PS hints for your font.
Go to File > Font Info > Zones and click on Auto-detect zones  . Go to File > Font Info > Stems and click on Auto stems .
You can now review your hinting manually or just leave it as is – FontLab will take care of the rest as good as it can during the export. PS hints will be automatically converted to TT hinting instructions according to hinting settings in the Export Profiles.
Kerning and OpenType Layout Features»
Open the Glyph Window in the Kerning mode and review your kerning.
Open Window > Panels > Features and choose Create [kern] feature in the panel’s local menu  .
.
Click on the Compile button  . Check the Output panel for possible error messages and debug your feature definitions if necessary.