Using Guidelines»
- Using Guidelines
- Creating a guideline
- Changing the guideline type
- Selecting a guideline
- Moving a guideline
- Duplicating a guideline
- Removing a guideline
- Locking a guideline
- Guideline Width
- Guideline Markers
- Proportional Guideline Markers
- Guideline Tags
- Guidelines Context Menu
- Converting Guidelines into Alignment Zones or Hints
Guidelines are straight lines that are used to guide the drawing of specific elements of a glyph. Guidelines can be vertical, horizontal or slanted in orientation. They can be specific to a single element (an Element Guideline), specific to a single glyph (a Glyph/Local Guideline) or be applied to the entire font (a Font/Global Guideline).
While Element and Glyph Guidelines can be used to help in drawing that particular element or glyph, Font Guidelines can be used to mark important levels in the font or to set the base direction of an italic or oblique font.
If you have a non-zero italic angle specified in Font Info > Font Dimensions, you can slant any guide to that angle with the guide’s context menu entry Slant to italic angle
Creating a guideline»
Before you create guidelines, be sure that they are visible. Use the View > Glyph Guides and View > Font Guides commands to switch them on.
To add a new glyph or font guideline:
- Position the mouse cursor on the horizontal ruler for a horizontal guideline, or on the vertical ruler for a vertical guideline.
- Click on the ruler and while holding down the button, drag away from it to create the guideline. Release the button when the guideline is in the desired place.
If you release the button inside the glyph canvas (the lighter active area in the glyph window), a glyph guideline will be created. Otherwise, a font guideline will be created. You can reverse this behavior by pressing the Shift key.
To create a new guideline from nodes: when you have two nodes selected, choose Tools > Add Guide to add a glyph guide that goes through those nodes.
To add a new element guideline to the current element, use the Guides tool with the Alt key.
Changing the guideline type»
To change the type of guideline, Ctrl-click on the guideline and select Vector, Horizontal, Vertical, and/or Short.
- Vector adds a vector to the guideline. Moving vector’s start and end points allows to slant guidelines or measure distances;
- Horizontal makes the guideline horizontal;
- Vertical makes the guideline vertical;
- Short shortens the glyph guideline allowing to use it locally for a stem or some other glyph part.
To slant a guideline:
- First make it a vector by Ctrl-clicking on the guideline, and selecting Vector in the context popup menu.
- Click on the guideline to select it. You will now see the arrow on the guideline.
- Move one of the edges of this arrow or change the guideline angle.
Selecting a guideline»
To select a guideline, just click on it. Use Shift-click to select additional guidelines without losing your previous selections.
If one guideline is already selected, use Edit > Select All to select all guidelines of that type (font guidelines or glyph guidelines).
Moving a guideline»
To move a guideline:
- Move the mouse cursor onto the guideline that you want to move. Be sure that no other objects (such as nodes or hints) are near the cursor.
- Press the mouse button and drag the guideline to a new place.
While you are dragging the guideline, if the mouse cursor comes within the snap-to distance of a node, the guideline will stick to the node. When this happens, nodes will become visible temporarily.
Duplicating a guideline»
To duplicate an existing guideline, drag it with the Alt key pressed.
Removing a guideline»
To remove a guideline, click on the guideline to select it, and press Del or Backspace.
Locking a guideline»
You can lock any guideline that you want to move only occasionally or don’t want to move at all. To do so, select Lock in the context popup menu, or click on the Lock button in the Guideline panel or the Property bar.
Notice that while you are editing a guideline, its parameters are shown and can be changed in the Guideline panel or the Property bar:

You can name guidelines here, as well as change their type, color, position, angle and thickness.
Note
You can copy both outlines and guidelines. If an outline is linked to a guideline (see the Power Guides section), it will also be copied.
Guideline Width»
Guidelines can now have width or thickness. To define the width for a guideline, press Shift and drag the guideline. You will notice the dotted line defining the width. You can change the width by dragging this line without Shift:
Guideline Markers»
Guideline markers appear on a guideline where it crosses an outline. To see the markers, double-click on the guideline. If you now drag the guideline, along with the markers, it will measure and show the thickness of the glyph strokes where it intersects with them:
If you double-click on this guideline a second time, that will lock the guideline markers:
You can change position of markers manually in this mode. Positions of the locked markers are also visible and can be edited in the Guideline panel.
To switch back to a normal guideline without markers, double-click on it once again.
Proportional Guideline Markers»
By default, guideline markers on a vector guideline are proportional. That means if you change the length of a vector guideline, the guideline markers on it will move proportionally, and will acquire new proportional positions and thickness enclosed between them.
Example: The image below shows the vector guideline with locked markers. The starting point of the vector is linked to the left point of the horizontal stem, the end point of the vector (with arrow) is linked to the right point. The guideline markers show the thickness of the vertical stem:
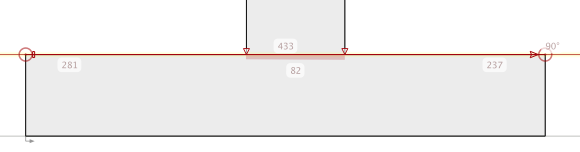
Now if you start to change the length of the stem by moving its left or right point the markers will move proportionally showing you the new proportional thickness and position of the vertical stem:
To not let the guideline markers change their positions, Ctrl-click on the guideline and turn off Proportional Marks in the context menu.
Guideline Tags»
Guideline tags are a way to make a font guideline only show up on specific glyphs. If you use a tag on a guideline, the guideline only appears in those glyphs which have the same tag assigned to them. For example, if you assign the lc tag (one of FontLab’s built-in tags) to a guideline, it will be visible only in lowercase glyphs.
To add a guideline tag, select a font guideline, click on the Tag button in the Property bar and enter your text for the tag:
Converting Guidelines into Alignment Zones or Hints»
You can convert guides into alignment zones or PostScript hints.
-
Create a guideline (font or glyph)
-
Hold Shift and define the width for the guideline to create the overshoot/thickness
-
Ctrl-click on the guideline and choose Zone to convert the guideline to alignment zone or Hint to make a hint.
Use View > Show > Zones and View > Show > Hints to make hints and alignment zones visible if they are not.