Working with Font Variations»
In FontLab, Variations panel is the primary place for controlling Variable fonts. In the Variations panel, you can see all your axes, as well a visual/spatial representation of the design space, including the position of masters. Here you can also create a virtual instance. You can use the Preview panel alongside to see how your glyphs look when you move the virtual instance you have created. If you’re working in a variable font, Layers and Masters panel shows a list of all your masters and the virtual instances. Finally, the Font Info dialog is where you can add, delete and manage the axes, masters and predefined instances of your variable fonts.
Axes»
In FontLab, you can add up to 65,536 axes (64K), as allowed by the OpenType specification. Axes can represent weight, width, optical size, slant and italic-ness (which all have registered axes tags in the specification), or other typographic properties like contrast, serif size, ascender or descender height, based on your design. If your variable font only uses the weight and width axes, you don’t need to explicitly add them to your font, but doing so gives you more control over defining axis properties.
Adding an axis»
To add an axis to a font:
-
Open the Font Info dialog File > Font Info.
-
Select Axes in the left sidebar.
-
Click on the + button. If you have no axes in the list (or are missing the
weightaxis), the standardweightaxis will appear. If you keep adding more axes, FontLab will add the following axes (if they are missing from the list) —width,optical size,slant,italic,contrast,serif,grade,x-height,scaleandtracking— in this order, before adding a completely empty axis. You can edit any of the standard axes added by the application, if you wished to create a different one.
Editing axis properties»
Each axis has the following properties:
- Name
- FontLab’s internal two-letter axis code
- Four-letter axis tag
- Minimum, default and maximum location coordinates (the default coordinate is the recommended value for that axis in a “regular” font and is used to determine the default i.e. “neutral” location within an OpenType variable font)
- Toggle to show/hide in apps
To edit axis properties, open the Font Info dialog File > Font Info, select Axes from the left sidebar, and edit the values for the appropriate axis.
Note that tags for custom axes, i.e. axes that are not registered in the OpenType specification, must begin with an uppercase letter and can only use uppercase letters or digits.
Removing an axis»
To remove an axis, select it in the list and click on the - button.
Masters»
If you want to interpolate along an axis, you need at least two font masters with different coordinates for that axis. FontLab Studio 5 allowed only two masters per axis (one for the minimal coordinate, one for the maximal coordinate) — and all instances were interpolated between these extreme coordinates. In FontLab VI, however, you can have any number of masters at different coordinates, for any given axis.
For example, you may choose to design three masters for your weight axis. The axis location of each of those masters would need a different coordinate for the wt axis. For example, your Thin master could have the location wt=200, your Medium master wt=500, and your Bold master wt=700. If you then define a Semilight instance to be derived at wt=300, it would be interpolated between the Thin and Medium masters. Design-wise, his instance would lie at ⅓ visual distance away from the Thin master (because (300–200)/(500–200)=⅓). Similarly, if you define a Semibold instance with wt=600, it would be interpolated between the Medium and Bold masters at a distance that is visually halfway between them (again, because (600–500)/(700–500)=½).
Apart from font masters, which are a complete font at a given axis location, you can also have glyph masters in a variable font. A glyph master is an additional master that contains the design for one or more particular glyphs, at an axis location where a font master does not exist. Glyph masters can be used to correct interpolation results for particular glyphs, but unlike font master, they do not contain font-wide information.
Adding a font master»
To add a new font master:
-
Open the Font Info dialog File > Font Info.
-
Click on the + button at the bottom left of the panel. A dropdown menu with the following options appears —
-
Select Empty Master if you want to create a master with no glyphs. Such a master will not be shown in the Layers and Masters panel unless you add at least one glyph to it.
- Select Duplicate Current Master to create a copy of the selected font master without glyphs (such a master will have the same limitations as above)
- Select Duplicate Current Master and Glyphs to create a duplicate of the selected font master and copy all the glyphs from it.
- A list of currently opened fonts and their font masters, from which you can select a master that will be copied to the new master with all its glyphs.
Along with these four ways to create a new master, the dropdown has two other options —
- Copy Font Metrics If this option is turned on, the new master will inherit font metrics from the default font master.
- Create Missing Glyphs, If this option is turned on, the new master will have the same glyphset as existing masters. Missing glyphs will be added if they are missing.
Editing font master properties»
Properties of font masters are divided into two places in the Font Info dialog: under Master properties and Masters within Font properties. Apart from name which is in the former, the remaining font master properties related to interpolations are within the latter.
- To edit the name of a font master, open the Font Info dialog File > Font Info, select the master from the list on the bottom-left of the dialog, and then select Names under Master Properties. Enter the new name in the field titled Master name, and then press Apply.
For editing all other font master properties, open the Font Info dialog File > Font Info and select Masters in the left sidebar. Here, select the master from the list on the right.
-
To edit the attributes (weight, width, slant) of a font master, use the dropdown menus that follow the title Attributes to select the appropriate value.
-
To edit the location of the font master on the axis, enter a new value in the Location field. Make sure that the numeric value is preceded by the two-letter axis code and the equal sign. You can also update the location by clicking on the dropdown menu named after the appropriate axis and selecting a value.
-
To select which master will be default, mark it with the blue radio button in the list. Choose the default master carefully — if you generate a variable font with TrueType outlines, and it is used in an old environment that does not understand variable fonts, the font will just show up with the outline of the default master.
-
Finally, you can click on the blue AAA icon associated with a master to exclude it from interpolation. When a master has been excluded from interpolation, you see a grey dot in the place of the icon.
Removing a font master»
To remove a font master, select it in the list on the bottom right of the Font Info dialog File > Font Info, and click on the - button below the list.
Instances»
An instance is a “snapshot” of the interpolation process at a chosen location within the design space. In FontLab, you can have two types of instances: predefined or virtual. A predefined instance is a location in the design space, defined by one coordinate per axis. It is not a real font, but a “plan” to create a real font. When you export a variable OpenType font, predefined instances are stored in the font as “named design space locations”. However, to the end-user, choosing a predefined instance of a variable font (in apps that support variable fonts, such as Adobe Illustrator CC 2018, Adobe Photoshop CC 2018, Apple Keynote or Apple Pages) feels very similar to choosing different styles in an extended font family. A virtual instance is not a real instance, instead you can use it to see how glyphs look at any particular position in the design space.
Adding recipes for predefined instances»
In addition to axes properties, you can define recipes for predefined instances in the Axes section of the Font Info dialog File > Font Info. Instance recipes can be defined in the Instances field under each axis. They need to be defined using a standard template. It can be in the form of a short definition:
”Style phrase”=DesignLocation
Or a long definition:
”Style phrase” UserLocation=DesignLocation
Style Phrase»
The Style phrase can have three forms —
1. A single word like “Light” — This form does not need quotation marks, and will be used to build the style name of the instance.
- Multiple Words like “Extra Black” — This form needs quotation marks, and will also be used to build the style name of the instance.
- Word in parantheses, like (Regular) or (Normal) — When the Style phrase is in parantheses, it will be omitted when building the style name of the instance. This makes sense when you use several axes, and you wish the instances with the “normal” width to have style names like “Light”, “Black” and not “Light Normal”, “Black Normal” — you’d define the Axis instance for the normal width using the Style phrase (Normal). But then, the fonts with the condensed width should have style names like “Light Condensed”, “Black Condensed” — so for the condensed width, you’d define the Axis instance using the Style phrase Condensed (or “Condensed” in quotes).
UserLocation»
In the FontLab VI, the UserLocation number only really works for the Weight axis: when you specify the UserLocation numbers using the OpenType convention where Thin is 100, Light is 300, Regular is 400, Bold is 700 etc., and in the Instances section you build instances from Axes, then the UserLocation will be used as the style attribute for Weight for each instance. Further, when you then export your instances as OpenType fonts, the style attributes will be written into the OS/2.usWeightClass field. If you don’t specify the UserLocation, FontLab will try to guess the Weight style attribute for the instances from the Style phrases of the axis instance. You can always modify the Weight style attribute (i.e. the value for the OpenType OS/2.usWeightClass field) in the top-right numeric field of the lower portion of the Instances section.
DesignLocation»
The DesignLocation is a number that corresponds to the location of the axis instance on the axis using the axis location “design coordinates”, that is, the coordinates that you, as the designer, use inside FontLab VI for defining the location of the masters, or when using the sliders in the Variations panel. The progression of the locations in design coordinates is always constant, and the scale can be anything you want — for example, you can set the Light master to have the design location 0 and the Black master to have the design location 1000, but you can also use numbers that correspond, for example, to the thickness of the vertical stems of the letter “n” in font units.
Adding a predefined instance»
To add a predefined instance from scratch:
-
Open the Font Info dialog File > Font Info, and select Instances in the left sidebar.
-
Click on the + at the bottom of the list of instances. A default instance will be added as a result.
To add predefined instances from masters:
-
Open the Font Info dialog File > Font Info, and select Instances in the left sidebar.
-
Click on From Masters at the bottom of the list of instances. As a result, the list of instances will be populated with font masters.
To add predefined instances from axes, you need to first define them in the Axes section of the Font Info dialog:
-
Open the Font Info dialog File > Font Info, and select Instances in the left sidebar.
-
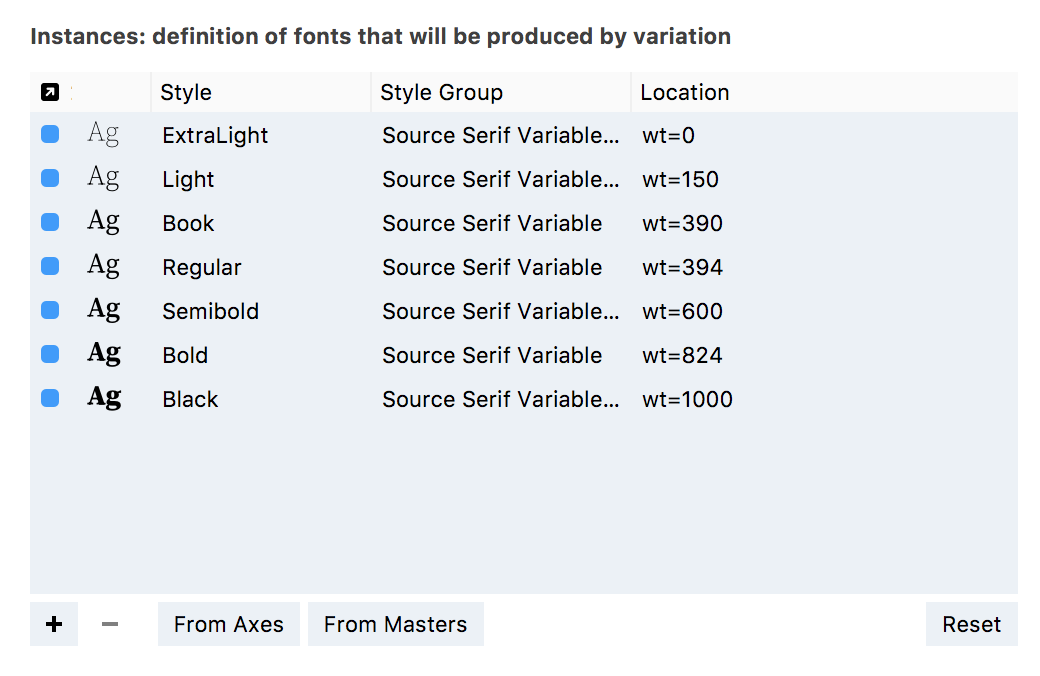
Press the From Axes button. All the instances you have defined will be created. For example, if your
weightaxis looks like this:

You will get the following predefined instances:
Editing predefined instance properties»
To edit the properties of a predefined instance:
-
Open the Font Info dialog File > Font Info, and select Instances in the left sidebar.
-
From the list, select the instance whose properties you would like to edit.
Removing a predefined instance»
To remove an instance, select it in the Instances section of the Font Info dialog File > Font Info, and click on the - button below the list.
Previewing Instances and Interpolation Results»
Open the Variations panel, switch to the Map mode and move the blue circle around the design space. This is an arbitrary instance and you can preview it in the Preview panel and the Glyph window.
This can also be one of the predefined instances that you can choose from the Instances bottom tab of the List mode of the Variations panel.
To preview some text in the current (predefined or interpolated) instance:
- Open the Preview panel and click on the top-right button to open the panel’s content sidebar.
- In the Master dropdown, choose Instance.
- In the Content dropdown, choose what text you’d like to preview. “Current” displays the selected glyphs if the Font window is active or the visible text in the Glyph window if it is active. “Custom” displays the text that you type into the panel.
- Activate the Text tool in the Glyph window, type any text and choose the instance in the Variations panel.
When you’re choosing a current instance, FontLab automatically refreshes the special #instance layer for all glyphs. This is a read-only virtual layer that contains the contours of the current instance. Glyphs with incompatible masters cannot be interpolated and do not show the #instance layer.
By default, the #instance layer is set to be Service (which means that it doesn’t contribute to the exported final font, to the filled preview or to the interpolation as a master) and Wireframe (which means that whenever FontLab renders glyphs, you see the outlines instead of fills). You can change these properties and experiment with various settings in the Layers and Masters panel.
Creating a Variable Font (example)»
To create a font with multiple font masters from a set of existing single-master fonts, open all the single-master fonts in FontLab and do one of the following:
-
Open the Fonts panel, select all the fonts (using Shift or Cmd) and use Font > Merge to Layers. FontLab will create a new font with multiple font masters. Close source fonts and continue working with your new variable font.
-
- Activate the font into which the font masters will be added (choose its Font window or double-click it in the Fonts panel). This will be the font that will provide names, classes, features and other font-wide (or family-wide) data. let it be the Regular style of the family.
- Choose File > Font Info to open the Font Info dialog.
- Click on the “Plus” button in the lower left corner.
- Choose the single-master font which will be added as the new font master to your Regular font master.
- Repeat the previous step until you’ve added all the fonts as font masters.
- Close the source single-master fonts except the one which is multiple-master now.
Use the Master switcher on top of the Font Info dialog to switch between masters. You can also add new blank font masters, or duplicate existing font masters, using the “Plus” button.
Once you have multiple font masters, assign a unique name to each one using the Master name field in the Font Info > Names section.
Then, switch to the Font Info > Masters section to choose the default font master (which will be exported as the neutral master into the variable OpenType font), and set the location of each font master on the design space.
To check how the interpolation is working, open the Variations panel.
Importing Fonts»
FontLab can open OpenType Variations fonts and GX Variations fonts, as long as they have TrueType outlines. (Support for Adobe’s new CFF2 format and OpenType variations fonts with PostScript outlines is planned for the future.)
FontLab VI does not directly open legacy Multiple Master fonts, the axis-based format that Adobe introduced around 1992 and phased out around 1999–2002. However, although FontLab VI can’t open Type 1 MM fonts directly, it can open the same data in a FontLab 5 VFB file. So as a workaround, you might open such a font in FontLab Studio 5, and save it again (as a FontLab VFB file). FontLab VI can open the MM VFB file and treat it as a variable font.