Free Transform operation»
To activate the Free Transform operation, use Tools > Free Transform (CmdT). Like Geometric transformations, Free Transform can work in two modes:
In Editing mode»
When the Contour tool (A) is active, double-click on the selected contours, or use Tools > Free Transform if nothing is selected. You will see a blue transformation rectangle surrounding the area that will be transformed:
![]()
When the surrounding rectangle is blue, it means the transformation will apply to both nodes and contours. If there are other elements sharing the same contours (i.e. element references), they will be transformed as well.
In Element mode»
When the Element tool (V) is active, select several elements or use Tools > Free Transform to transform the current element or component. You will see a green transformation rectangle surrounding selected element(s):
![]()
The green rectangle means the transformation applies only to this particular instance of the element/component. Other elements/components referencing to the same contours will stay unchanged. In this case the element properties are changed, and you can see this in the Elements panel.
Transformations»
Once the Free Transform operation is activated, the following will appear in the middle, dynamic part of the Property bar:
![]()
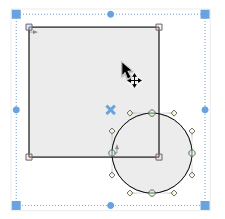
Moving a selection»
To move a selection using the mouse:
-
Position the mouse cursor somewhere inside the transformation rectangle, but not on the center handle.
-
Press the mouse button and drag the rectangle to its new place.
-
Release the button. The selection will be moved.
To move a selection using the Property bar, enter the value for the horizontal and vertical shift ![]() , and press
, and press ![]() if you would like to move the selection to the left/down, and press
if you would like to move the selection to the left/down, and press ![]() to move to the right/up. You can use the nine-point proxy
to move to the right/up. You can use the nine-point proxy ![]() to choose the origin point of the transformation. Click in the editing field or press Return to accept the completed transformation. Press Command-Z or the Esc key to reject it.
to choose the origin point of the transformation. Click in the editing field or press Return to accept the completed transformation. Press Command-Z or the Esc key to reject it.
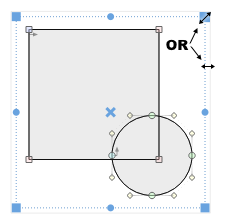
Scaling a selection»
To scale a selection using the mouse:
-
Position the mouse cursor on one of the corner handles (represented by squares), side handles (represented by circles), or on the transformation rectangle bounding box.
-
Press the mouse button, and drag the mouse. You will see that the transformation rectangle is scaled non-proportionally. Hold down the Shift key on the keyboard to scale proportionally. Hold down Alt to scale around the center handle. Hold down Ctrl to scale by 50%, 100%, 150% etc.
-
Release the button when you are done. The selection will be modified.
Previously, scaling was proportional without Shift and non-proportional with Shift. If you prefer that old behavior, turn on Preferences > Editing > Free Transform scaling: non-proportional with Shift, otherwise proportional.
To scale a selection using the Property bar, enter the value for the horizontal and vertical scaling and then press ![]() to scale up, or
to scale up, or ![]() to scale down. If the chain between the horizontal and vertical value looks like
to scale down. If the chain between the horizontal and vertical value looks like ![]() , the scaling will be non-proportional. Click on it to change it to
, the scaling will be non-proportional. Click on it to change it to ![]() to scale proportionally. You can use the nine-point proxy
to scale proportionally. You can use the nine-point proxy ![]() to choose the origin point of the transformation. Click in the editing field or press Return to accept the completed transformation or press the Esc key to reject it.
to choose the origin point of the transformation. Click in the editing field or press Return to accept the completed transformation or press the Esc key to reject it.
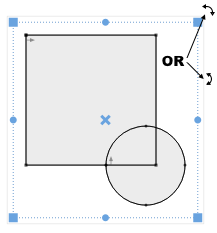
Rotating a selection»
To rotate a selection using the mouse:
-
Position the mouse cursor near one of the corner handles (represented by squares), side handles (represented by circles), or near the transformation rectangle bounds.
-
Press the mouse button and drag the mouse. The transformation rectangle will rotate around its center. Hold down the Shift key to constrain the rotation angle to 45-degree increments.
-
Release the button to accept the rotation.
To move the center of rotation, just drag the center handle (represented by a cross) to its new position.
To rotate a selection using the Property bar, enter the value of rotation and press ![]() to rotate left or counter clockwise, or
to rotate left or counter clockwise, or ![]() to rotate right or clockwise. You can use the nine-point proxy
to rotate right or clockwise. You can use the nine-point proxy ![]() to choose the origin point of the transformation. Click in the editing field or press Return to accept the completed transformation or press the Esc key to reject it.
to choose the origin point of the transformation. Click in the editing field or press Return to accept the completed transformation or press the Esc key to reject it.
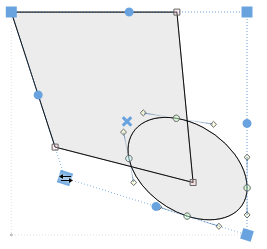
Slanting or skewing a selection»
To slant or skew a selection using the mouse:
- Position the mouse cursor on one of the side handles (represented by circles), or on the transformation rectangle bounds, just like you would for scaling.
- Press Cmd (or Ctrl on Windows) and drag the mouse. The transformation rectangle will be slanted. Hold down the Shift key to constrain the slant direction to horizontal or vertical. Hold down Alt to slant around the center handle. Drag horizontal bounds to slant horizontally, and vertical bounds to slant vertically.

- Release the button to accept the slanting.
To slant or skew a selection using the Property bar, enter the angle into the text field, and press ![]() to slant left or
to slant left or ![]() to slant right. You can use the nine-point proxy
to slant right. You can use the nine-point proxy ![]() to choose the origin point of the transformation. Click in the editing field or press Return to accept the completed transformation or press the Esc key to reject it.
to choose the origin point of the transformation. Click in the editing field or press Return to accept the completed transformation or press the Esc key to reject it.
Distorting a selection»
To distort a selection:
-
Position the mouse cursor on one of the corner handles (represented by squares).
-
Press Cmd (or Ctrl on Windows) and drag the mouse. The transformation rectangle will be distorted in the direction you move the mouse. Hold down the Shift key to constrain the direction to horizontal or vertical. Hold down Alt to distort around the center handle.
-
Release the button to accept the distortion.
Click in the editing field or press Return to accept the completed transformation or press the Esc key to reject it.
Flipping the selection»
To flip a selection horizontally, press ![]() .
.
To flip a selection vertically, press ![]() .
.
You can use the nine-point proxy ![]() to choose the origin point of the transformation. Click in the editing field or press Return to accept the completed transformation or press the Esc key to reject it.
to choose the origin point of the transformation. Click in the editing field or press Return to accept the completed transformation or press the Esc key to reject it.
Note that during Free Transform, Edit > Undo cancels the current transformation process (the same way it did in FontLab Studio 5), and does not undo the previous action.