Overlaying Fonts»
FontLab has a special function for creating layered fonts, that allows you to apply a different single color to each layer, to create multicolor (chromatic) fonts. This function can be used with one, two or more selected fonts.
First, open a pair of fonts having similar (or identical) glyph sets, but different glyph shapes. For example, regular and bold styles from one family, or fonts specifically designed to be layered (such as some wood type fonts, for example Adobe’s Pepperwood, Rosewood and Zebrawood).
Select the two fonts in the Fonts panel and then select the Font > Overlay Fonts menu command. The Overlay Fonts dialog box appears:
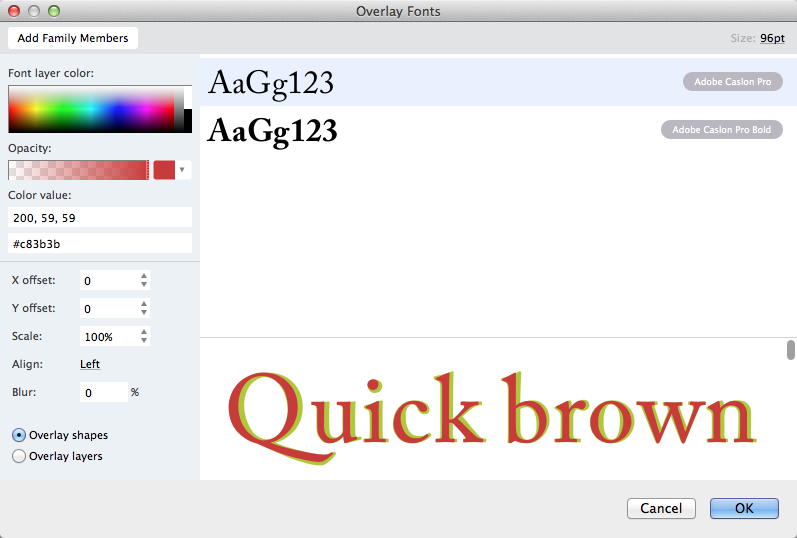
The Overlay Fonts dialog box consists of 3 main parts: the overlay preview (bottom), the list of source fonts used (top), and the current Layer properties (left).
The Add Family Members button will add to the list fonts which were opened and belong to the same font family.
The Duplicate Current Font button will add a copy of the selected font to the list of source fonts.
Overlay Preview»
All the changes you make are reflected in the overlay preview. This is how your new layered font will look after they layers are merged into one font.
Click on the font in the list to switch between layers. Changing the order of fonts in the list by drag-and-drop changes the layers order in the new font. For example, to put the layer on top of others, drag the font to the first position in the list.
You can change the preview string size using the  menu in the upper right corner.
Editing layer properties»
Use controls in the Layer properties section to change the current layer properties:
-
color: standard color palette includes the grayscale bar, black and white colors. Use it to apply a color to the glyphs of the current layer;
-
opacity: the current layer opacity selection bar

with additional popup palette with common colors; -
fields for numeric color values;
-
vertical and horizontal offset in font units to move the layer. Use negative values to move left and down;
-
scale factor to reduce or enlarge glyph images;
-
alignment to position layers left, centered or right;
-
blur: the effect to soften edges of glyph images on the current layer. This effect can be used to imitate glyphs’ shadows. Use values below 10% for better results. Blurring by 50% and more may take several minutes.
-
Overlay to elements will create the font with a single “Layers” layer. It will put 2 (or more) overlapping elements in each glyph;
-
Overlay to layers will create 2 (or more) layers.
Finishing»
When you are satisfied with the overlay preview click on OK to create new color font. FontLab will add the new font to the list in the Fonts panel where you can rename the font if needed. The font will inherit all glyph metrics, kerning and OpenType features (if there were any) from the most bottom font, i.e. the last font in the list. Do not forget to save your new font.
Note
Before exporting the font, select all glyphs and merge layers using the Merge Visible Layers button in the Layers and Masters panel.
Note
When exporting the font from the layered font, you will get several different kinds of color font files. At the moment, there are four major formats for color fonts, and much variety as to what is supported in which browser or app. It seems plausible that OpenType-SVG may become the dominant color font format, but that is far from certain, and support is still highly variable. Firefox and Edge browsers and Photoshop support OpenType-SVG color fonts. Apple’s apps (both desktop apps and Safari) support Apple’s TT-SBIX format. Microsoft’s Edge browser is unusual in supporting all four formats! Firefox does three out of four. Safari, Chrome and Internet Explorer each support only one — and a different one at that. It is a bit of a mess — details on color font formats and support.