Editing Kerning»
This section covers how to edit both pair kerning and class kerning. If you are unfamiliar with kerning, see Kerning and Using Kerning Classes.
Kerning Mode»
To adjust spacing between specific pairs or classes of glyphs, open a Glyph window in Kerning mode. Do this by clicking on the Kerning tool (K) or by selecting the Window > New Kerning Window (New Kerning Tab) menu item.
The Property bar of the Glyph window in the kerning mode looks like this:
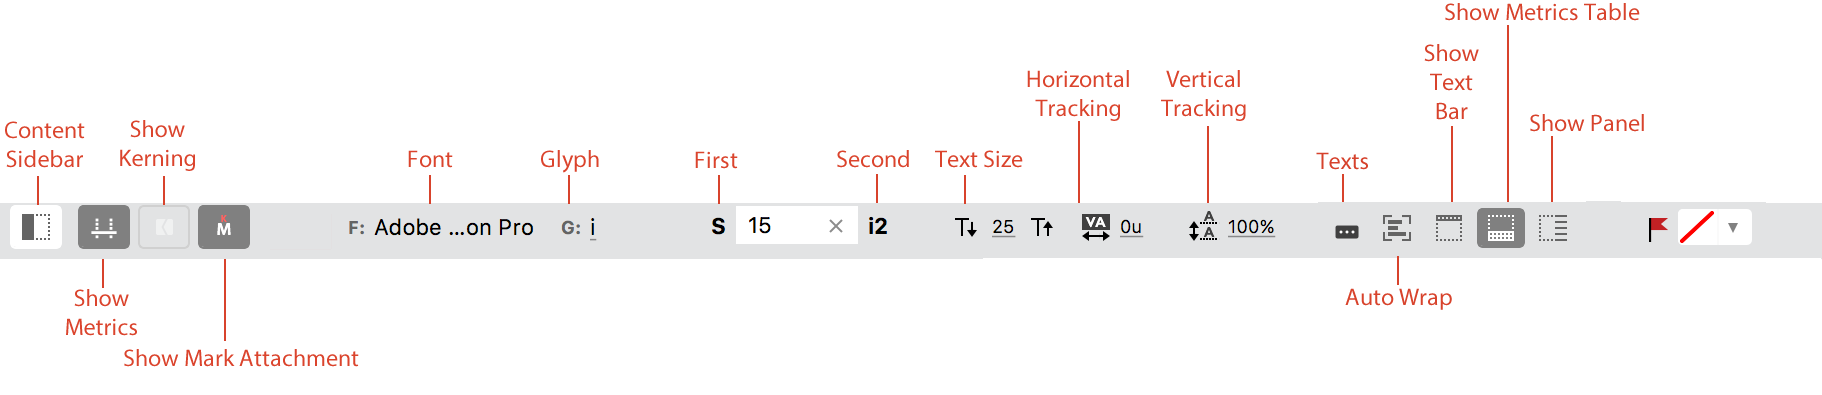
Use any of the methods described in Editing an Existing Glyph to add glyphs to the window. For example, while in the Kerning mode, press T. This will switch the window to the Text mode allowing you to type any glyph or text. Type glyphs which you are going to kern and press Esc to switch back to the Kerning mode.
You may also enter pairs using the Content sidebar by selecting the  button in the Property bar.
You can assign color backgrounds to Metrics and Kerning modes, independently of the general color background in use. This option is in Preferences > Spacing.
Adding Kerning Pairs»
To add a kerning pair, click on the second glyph in the pair and then drag it closer or farther to the previous glyph in the string. You also can drag the “thumb” below the pair:
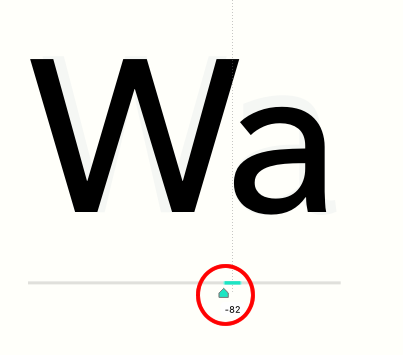
A green bar and “thumb” under the glyph pair indicate negative kerning. A yellow bar and “thumb” indicate positive kerning. A white “thumb” indicates that there is no kerning.
Tap on W to swap positions of the two currently selected glyphs. For example if the current pair is “TA”, tapping W will turn it into “AT”.
Modifying Kerning»
In FontLab VI, you can perform Regular Kerning, i.e. kern between two glyphs; or Class Kerning, i.e kern between a glyph and a class, or a class and a glyph, or between two classes (create classes for Class Kerning in the Classes panel). In a departure from FontLab Studio 5, there is no longer the concept of a “key glyph” of a class, which means that all glyphs in a class are equal members.
If any member of a class is kerned with another glyph (or class), the new kerning is applied not only to that glyph but to all members of the parent class, unless you specify otherwise. In other words, class-to-class kerning is now the default, as long as the glyphs are members of classes.
To edit a kerning combination, click on the second class (or glyph) in the pair and then drag it closer or farther to the first class (or glyph). You can also do this by using the cursor keys ← for moving the glyphs closer and → for moving them farther. The amount kerned while using the cursor keys can be controlled by keyboard shortcuts:
- ←/→: 1 unit
- ++Shft++-←/→: 10 units
- Cmd-←/→: 100 units (Mac only
Since class-to-class kerning is default, use the following methods to turn off one or both kerning classes so you can kern individual glyphs instead of their entire class:
To turn off the first class, so you kern only the first glyph with the second class, press and hold down the Ctrl key.
To turn off the second class, so you kern the first class with only the second glyph, press the Alt key.
To turn off both classes and kern individual glyphs against each other, press both the Ctrl and Alt keys.
You can see the current pair in the Property bar:

If you kern the class you see its name in the pair in bold and with an icon. Otherwise you see the glyph name in regular without an icon.
Use the “x”  button to delete the kerning pair.
Kerning Cloud»
If you have kerning classes defined all glyphs of a class are shown as a “cloud” in the Kerning mode. To switch the cloud on/off, use the Show > Kerning Classes command.
Deleting Kerning Pairs»
To delete a particular kerning pair (whether it involves classes or simple pairs), you can:
- click on the second glyph in the pair and type 0 (zero) in the kerning value field in the Property bar;
- click on the second glyph in the pair and then on the “x” button next to the kerning value field in the Property bar;
- click on the pair in the Kerning panel and then on the “minus” button at the bottom of the panel;
- open the Metrics table and type 0 (zero) in the kerning field.
To delete all kerning pairs, open the Kerning panel and select Remove All Pairs in the local “hamburger” menu.
Kerning Panel»
The Kerning panel can be activated by using Windows > Panels > Kerning or by clicking on the  button in the Property bar. The Kerning panel is patterned after the Kerning table in Fontlab Studio 5 and displays all the pairs which are available in the current font.
Double-clicking on a pair in this panel brings the pair to the Glyph window for edit. Pressing the Enter key or double-clicking on the kerning value allows you to edit it directly in the table.
If you select several lines in the list you can quickly adjust kerning for the selected pairs using the left and right ++Arrow++ keys. ++Shift+Arrow++ will change kerning values by 10 units, ++Cmd+Arrow++ will change by 100. This can be customized in Preferences. Pressing Enter will bring selected pairs into the Glyph window.
Pairs and Phrases»
The Pairs and Phrases panel allows you to browse the “to do” list of kerning pairs. Clicking on a string in this panel brings the string to the Glyph window for edit.
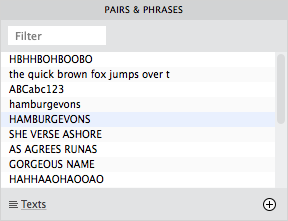
You can multi-select pairs by holding down Shift in the Pairs and Phrases panel list.
Please see the Pairs and Phrases panel page for more details.
Automatic Kerning Generation»
To automatically kern pairs, open the Pairs and Phrases panel. In the Pairs mode, select multiple pairs with Shift and click on the “diamond” button in the upper right corner. FontLab automatically generates kerning for selected pairs according to the settings on the Preferences > Curve Conversion page.
Note that the “diamond” button is NOT available in the Text mode.
Metrics Table»
The Metrics table is an optional feature for spacing and kerning. To open it click on the  button in the Property bar of the Glyph window.
You can edit kerning values in the table in both Kerning and Metrics modes; simply enter new kerning values in the appropriate fields.