View panel»
The View panel Window > Panels > View can be used to easily toggle the visibility, snapping behavior and lock status of various details of the Glyph Window. It is modeled after the advanced mode of the Editing Layers panel of FontLab Studio 5.
The panel is divided into three parts. The top part contains buttons that control details that help in drawing and editing contours.
 |
Preview Rounding | Turns on the Rounding Coordinates mode that turns off fractional precision for outline editing and transformations. |
 |
Power Nudge | Turns on the Power Nudge editing mode. This mode automatically identifies additional nodes and handles, which should be nudged along with your selected nodes, and moves them to produce the best possible result. |
 |
Edit Tunni Lines | Allows to edit curves using Tunni Lines. Tunni lines are imaginary lines connecting two neighboring control handles of a smooth contour, and useful for symmetrically editing a curve. |
 |
Suggest Nodes | Turns on Suggest Nodes mode. During editing or drawing of contours in this mode, FontLab shows dotted lines suggesting where to put nodes so they are aligned to existing nodes. |
 |
Suggest Bounds | Turns on Suggest Bounds mode, which adds a smart guide on the edge of the element and on the element center. |
 |
Suggest Tangents | Turns on Suggest Tangents mode, which suggests that some points that are configured like tangent points, maybe ought to be actual tangent points. |
 |
Suggest Stems | Turns on Suggest Stems mode, which adds a smart guide on a distance to the vertical/horizontal line that is equal to the thickness of a standard stem. |
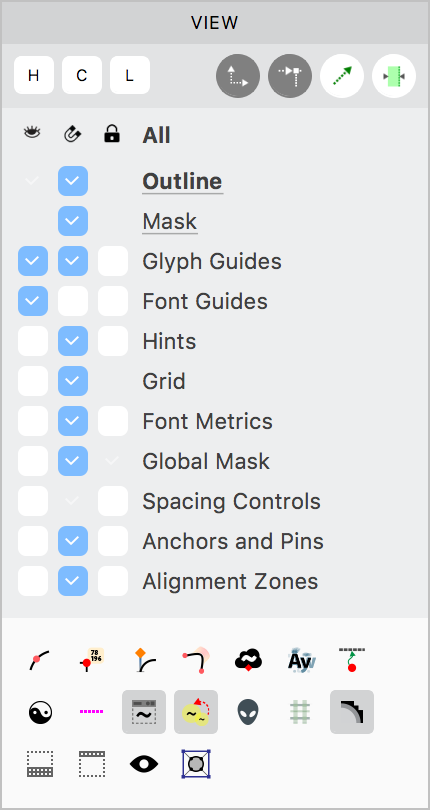
The second part of the panel allows you to do all the actions available in the View > Show, View > Snap and View > Lock menus along with letting you choose the outline or mask layer for editing.
To choose a outline or mask layer for editing, just click on its name in the panel. The chosen layer’s name will be displayed in bold.
This part of the panel is organized like a table:
-
The first column controls an item’s appearance in the Glyphs window. It corresponds to commands in View > Show menu. Of all the items in the list, only the Outlines cannot be hidden.
-
The second column controls the “snap to” feature, and corresponds to commands in the View > Snap menu. Of all the items in the menu, only Spacing Controls cannot be un-snapped, so its corresponding checkbox is not available.
-
The third column lets you lock items, and corresponds to the commands in View > Lock menu. Outline and the Mask cannot be locked. The Grid and the Global Mask are always locked so the corresponding checkboxes are not available.
-
The fourth column shows the list of items.
With the panel you can easily control all items at once using these clickable icons:
The third part of the panel controls the visibility of the following items:
 |
Nodes | Makes all nodes visible |
 |
Coordinates | Shows coordinates for selected nodes |
 |
Handles | Makes all handles visible |
 |
Curvature | Makes curvature or curve tension visible |
 |
Anchor cloud | Shows the “cloud” of anchored elements |
 |
Kerning classes | Makes the cloud of all glyphs belonging to the same kerning class visible in Kerning mode |
 |
Node links | Shows green arrows that link nodes to Power Guides |
 |
FontAudit | Shows FontAudit arrows that point to odd points and suspicious curves or technical errors |
 |
Measurement line | Shows the Measurement Line, which is an optional horizontal line you can use to force the calculation of sidebearings at a particular position, instead of from the farthest extremes of the glyph. |
 |
Element frame | Shows gray rectangles around an element with element name if assigned, and number of references |
 |
Element references | Shows red arrows that connect Element References. Note that Element References can only be seen when two or more element references are present in the Glyph window, otherwise selecting this option will have no visible effect. |
 |
Character placeholders | Shows the light gray template image showing what character should go in that glyph cell |
 |
Hints and Metrics shadows | Shows light gray “shadows” of hints and alignment zones |
 |
Smooth outline | Selecting this option shows the outlines rendered smooth, but this can result in slow performance |
 |
Metrics table | Opens the Metrics table where you can edit spacing and kerning |
|
Text bar | Opens the Text Bar, a horizontal text field where you can edit the “source” of the text that is shown in the Glyph window |
 |
True fill | True Fill is a toggle to switch the glyph fill to 100% opaque, while keeping it possible that other items like nodes, handles, curvature, etc. can also be made visible |
 |
Master relations | Shows lines connecting corresponding nodes of different masters |
| Cousins | Turns Cousins on/off |