Anchors and Pins»
Anchors»
Anchors are a special type of point, represented by default as a red rhombus with their name attached to it, that can be used to attach glyphs to each other at specified positions. The most common use of anchors is to attach or position diacritics to base characters. They can be added, removed, moved or renamed.
All the anchors you add in a font can be viewed and managed in the Anchors and Pins panel. Anchors work on glyphs, while Pins work similarly, but on Elements. When an anchor is selected, you can see its properties not only in the Anchors and Pins panel, but also in the Property bar of the Glyph Window.
Adding Anchors»
To add an anchor, use one of the following methods:
-
Choose the option Add Anchor from the Glyph menu;
-
Ctrl-click anywhere in the empty space of the editing field and select the Add Anchor command from the context popup menu;
-
Select the Guides tool (G key) and then Ctrl-click anywhere in the drawing area to create an anchor.
If you create anchors using the first two methods above, FontLab will automatically name the first four anchors you create as “top”, “bottom”, “left”, “right” and place them accordingly in the glyph advance width. Any anchors you create after this will be placed in the middle of the glyph advance width and be named a5, a6 and so on. On the other hand if you use the Guides tool, the default name of the anchor will depend on where you Ctrl-click in the glyph advance width. Based on location, the anchor will be called “top”, “bottom”, “left”, “right” and “centre,” with numbers appended to the name if you add more than one anchor in a particular location.
Copy-pasting Anchors»
To copy anchors from one glyph to other glyphs, follow these steps:
- Select the glyph having anchors in the Font window;
- Choose Edit > Copy Glyphs;
- Select glyph cells where you want anchors to be pasted;
- Select Edit > Paste Special…, choose Anchors in the Paste Special dialog box and click OK.
Renaming Anchors»
To rename an anchor, click on its name, type a new name and hit the Enter key to complete. Notice that on mouse hover, an underline appears below the anchor’s name. An anchor can also be renamed by selecting it in the Anchors and Pins panel and typing into the Name field.
Moving Anchors»
To move an anchor, select the Contour tool or Element tool and then drag the anchor to the location of your choice. Note that when the mouse cursor approaches an anchor, it becomes highlighted.
Removing Anchors»
To remove an anchor, click on it to select it and press Backspace or Del on your keyboard. You can also remove an anchor through the Anchors and Pins panel: select the anchor in the panel and click on the – button.
Activating/Deactivating Anchors»
Activated anchors are used in generating composite glyphs, auto glyphs and the mark/mkmk OpenType features, while deactivated anchors are not used for these purposes. To activate/deactivate an anchor, click on the rhombus icon to the left of its name in the Anchors and Pins panel. Activated anchors are shown with their icons filled, while deactivated ones are outline only. To activate/deactivate all anchors for the current glyph, go to the corresponding list and use the  buttons in the panel’s local toolbar.
Linking Anchors»
An anchor’s location can be linked to another anchor or guideline. Once an anchor is linked, it moves automatically if the linked anchor or guideline is moved. To link an anchor to a guideline:
- Create a vertical guideline and give it the name “center”.
- Now position the guideline in the centre of the glyph “I”.
- Choose Glyph > Add Anchor. The “top” anchor will appear.
- Click on the anchor’s x-coordinate and enter the name of the guideline, i.e. “center” and press Enter.
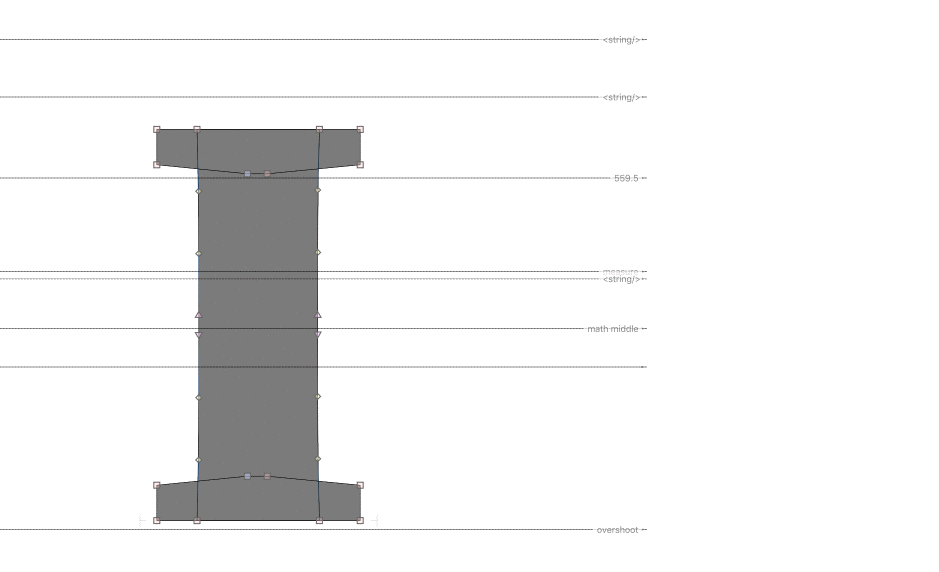
The anchor is now linked to the guideline. If you move the guideline, the linked anchor will move along with it. Using the same steps described above, you can also link the y-coordinate with a horizontal guideline.
To link an anchor to a second anchor, you can put the name of the second anchor in place of the first’s x-coordinate or y-coordinate.
Note that you can use basic mathematical expressions during linking. For example, if you enter (top+bot)/2 in the y-location field of an anchor, where “top” and “bot” are names of horizontal guidelines, the anchor will get positioned vertically exactly between “top” and “bot” guidelines.
Using Anchors to Build Composites»
The main purpose of anchors is to show FontLab how to generate composite glyphs and the mark/mkmk OpenType features.
You can define a composite glyph using Element > Add Element Reference at any time, but that operation creates “fixed” composites and you would need to perform it manually for every composite glyph you want to create. For composites that consist of a base glyph and one or more “accent” glyphs this operation may take a lot of time. In contrast, with anchors you can create “virtual” composites, which can be converted to the fixed state at any time with the Glyph > Generate Glyphs command.
To define a virtual composite, you need to define pairs of anchors in the base and the accent glyph. Each pair of anchor names must match by the “underscore rule”: for each base anchor, there must be a corresponding accent anchor with the same name except that it starts with an underscore. So if there is a base anchor named “top” in the base glyph, there must be an accent anchor named “_top” in the accent glyph. FontLab will now be able to match these two anchors and create a virtual composite by snapping them to each other.
In our example, we have called the anchors “top”, “_top”, “bottom” and “_bottom”, but other names can be used, provided that they match by the underscore rule (e.g. “ogonek” and “_ogonek”). Remember that in in each pair of anchor names, the base anchor always has the name without the underscore, while the name of the accent anchor always starts with the underscore.
To create a virtual composite:
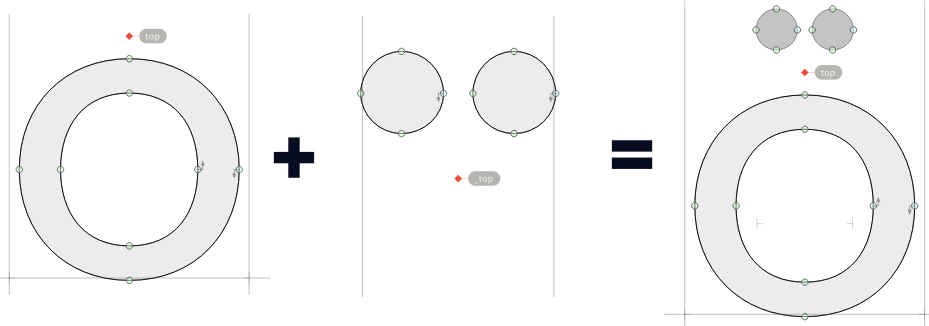
- First, open the base glyph, e.g. “o”:
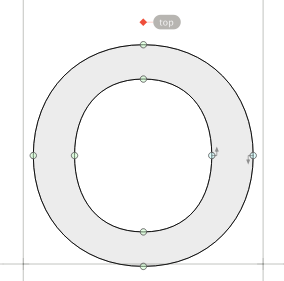
Insert the base anchors in this glyph. To add anchor points, use the Glyph > Add Anchor menu command or Add Anchor command from the Glyph window context menu, and set the names of the anchors accordingly. In our example, we create one base anchor “top”, to which the accent anchor “_top” will be linked, and one base anchor “bottom”, to which the accent anchor “_bottom” will be linked.
- Now add matching anchors in the accent glyphs. Open one of the accent glyphs. Add the accent anchor “_top” where it connects to the “top” base anchor:
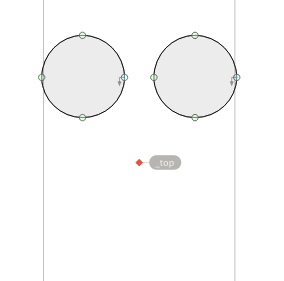
Add an accent anchor named “_bottom” at the point in the accent glyph where it will be linked to the “bottom” base anchor in the base glyph.
- Use the Glyph > Generate Glyphs command to convert to fixed state.
Make sure the relative position of the corresponding anchors is consistent because they need to snap to each other to create the composite. Also, it doesn’t always make sense to place all types of anchors to all glyphs – it really depends on the desired character set of your font.
Viewing the Anchor Cloud»
FontLab can display all the matching diacritical marks to the anchors in a base glyph, in the form of an anchor cloud. Use View > Anchor Cloud or the View panel to show/side the anchor cloud.

Pins»
Pins are a special type of point, represented by default as a blue circle with their name attached to it, that can be used to attach Elements to each other at specified positions. Pins work the same way for Element references that anchors work for glyphs. Like Anchors, Pins can be added, removed, moved or renamed.
All the pins you add in a font can be viewed and managed in the Anchors and Pins panel. When a pin is selected, you can see its properties not only in the Anchors and Pins panel, but also in the Property bar of the Glyph Window.
Adding Pins»
To add a pin, use one of the following methods:
-
Select an element and use the Element > New Pin menu;
-
Select the Guides tool (G key) and then Alt-click anywhere in the drawing area to create a pin.
A new pin will be created and placed in the middle of the element bounding box. By default, the first pin will be named “p1.”
Renaming Pins»
To rename a pin, click on its name, type a new name and hit the Enter key to complete. Notice that on mouse hover, an underline appears below the pin’s name. An anchor can also be renamed by selecting it in the Anchors and Pins panel and typing into the Name field.
Moving Pins»
To move a pin, select the Contour or Element tool and then drag the pin to the location of your choice. Note that when the mouse cursor approaches a pin, it becomes highlighted.
Removing Pins»
To remove a pin, click on it to select it and press Backspace or Del on your keyboard. You can also remove a pin through the Anchors and Pins panel: select the pin in the panel and click on the – button.
Activating/Deactivating Pins»
Activated Pins are used for positioning Element references in a glyph, while deactivated pins are not. In such a case the reference is placed at its default position. To activate/deactivate a pin, click on the circle icon to the left of its name in the Anchors and Pins panel. Activated pins are shown with their icons filled, while deactivated ones are outline only. To activate/deactivate all pins for the current glyph, go to the corresponding list and use the buttons in the panel’s local toolbar.
Linking Pins»
A pin’s location can be linked to another pin, or to a guideline. Once a pin is linked, it moves automatically if the linked pin or guideline is moved.
To link a pin to a guideline (example):
- Create a vertical guideline and give it the name “center”.
- Now position the guideline in the centre of the glyph “A”.
- Choose Element > Add Pin. The “p1” pin will appear.
- Click on the pin’s x-coordinate and enter the name of the guideline, i.e. “center” and press Enter.
The pin is now linked to the guideline. If you move the guideline, the linked pin will move along with it. Using the same steps described above, you can also link the y-coordinate with a horizontal guideline.
To link a second pin to a first pin, you can put the name of the first pin in place of the second’s x-coordinate or y-coordinate, or both.
Note that you can use basic mathematical expressions during linking. For example, if you enter (top+bot)/2 in the y-location field of an pin, where “top” and “bot” are names of horizontal guidelines, the pin will get positioned vertically exactly between “top” and “bot” guidelines.