Moving Points»
You can use the arrow keys or the Contour tool to move nodes; the latter can be used for basic moving, as well as some advanced operations.
Using the Contour Tool»
To move individual nodes with the Contour tool:
-
If nodes are hidden, switch nodes on with the View > Show > Nodes command, or click on the node to select it. If you miss, and accidentally select an incorrect node, use the Page Up and Page Down keys to move to the correct node.
-
Drag the node to its new place. It will stick to the other objects (if they are visible) and snap-to those objects, where that feature is activated (View > Snap menu). Hold down the Shift key to move it vertically or horizontally.
While you are dragging the node you may see red dotted lines with arrows at their ends. These are snapping suggestions which help you position objects better:
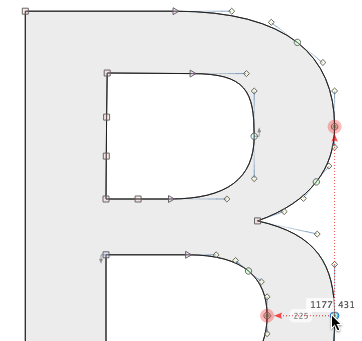
Press Ctrl at any time when dragging points to temporarily disable snapping and snapping suggestions.
Additional options for nodes connecting Postscript curves»
If you are moving a node that is connecting two PostScript (Bézier) curves you have the following additional options:
If the connection is smooth»
To constrain movement to a line between the node’s control points, while leaving the handles in place, press and hold the Alt key while moving the point. The node moves, but the handles do not:
To move the node such that the connection’s curvature is unchanged as much as possible, press and hold the Alt and Cmd keys while dragging the node. All four control points will be involved in the process:
To slide a node along a curve, press the Alt and Shift keys while dragging it. The node’s own handles and the two adjacent handles will be recalculated to maintain the current shape of the curve, as much as possible:
If the connection is sharp»
To move a node without moving its handles or control points, press and hold the Alt key when you drag it. The node will move, leaving its handles and control points at their original positions:
Moving control points»
To keep the direction of the control vector unchanged, hold down Shift while moving the moving the control point:
To temporarily change the connection type from sharp to smooth, so that the adjacent control vector will be collinear hold down Alt while dragging the control point.
Shift-double-click to align nodes and handles
If you have a node or handle that is nearly aligned (in either X or Y) with an adjacent node, this will shift it to become aligned.
Using the arrow keys»
To move a point using ++Arrow++ keys (cursor keys), select the point and use ++Arrow++ keys to move by 1 font unit, ++Shift+Arrows++ to move by 10 units, or ++Cmd+Arrows++ to move by 100 units.
Power Nudge»
Power Nudge mode is a special mode that affects the movement of nodes. Usually, when you move several selected nodes at the same time, only the selected nodes are moved, and the remaining (unselected) nodes stay in place. Sometimes, it is useful to move adjacent points proportionally. In these situations, the Power Nudge mode can help.
You can toggle Power Nudge on or off by choosing Contour > Power Nudge (Shift-C). For turning it on more temporarily, hold down the C key: the mode is on until you release the key. With this mode on, select some nodes and move them. FontLab will automatically identify both additional nodes and handles, which should be nudged along with your selected nodes, and move them the amount it thinks will produce a good result.
There are also keyboard shortcuts to move nodes/contours and apply a nudge at the same time:
- move by 1 unit & nudge
- Mac: CtrlAlt plus arrow key
- Windows: Right Alt plus arrow key
- moves by 10 units & nudge
- Mac: ShiftCtrlAlt plus arrow key
- Windows: ShiftCtrlAlt (or ShiftRight Alt) plus arrow key
- move by 100 units & nudge
- Mac: ++Ctrl-Cmd+Alt++ plus arrow key
- Windows: not available on Windows