Layers and Masters Panel»
The Layers and Masters panel Window > Panels > Layers & Masters helps you manage the layers and masters in your font. FontLab VI allows multiple layers in the glyph, which can contain elements with contours or bitmap images. In variable fonts, layers can also represent masters and the special virtual instance.
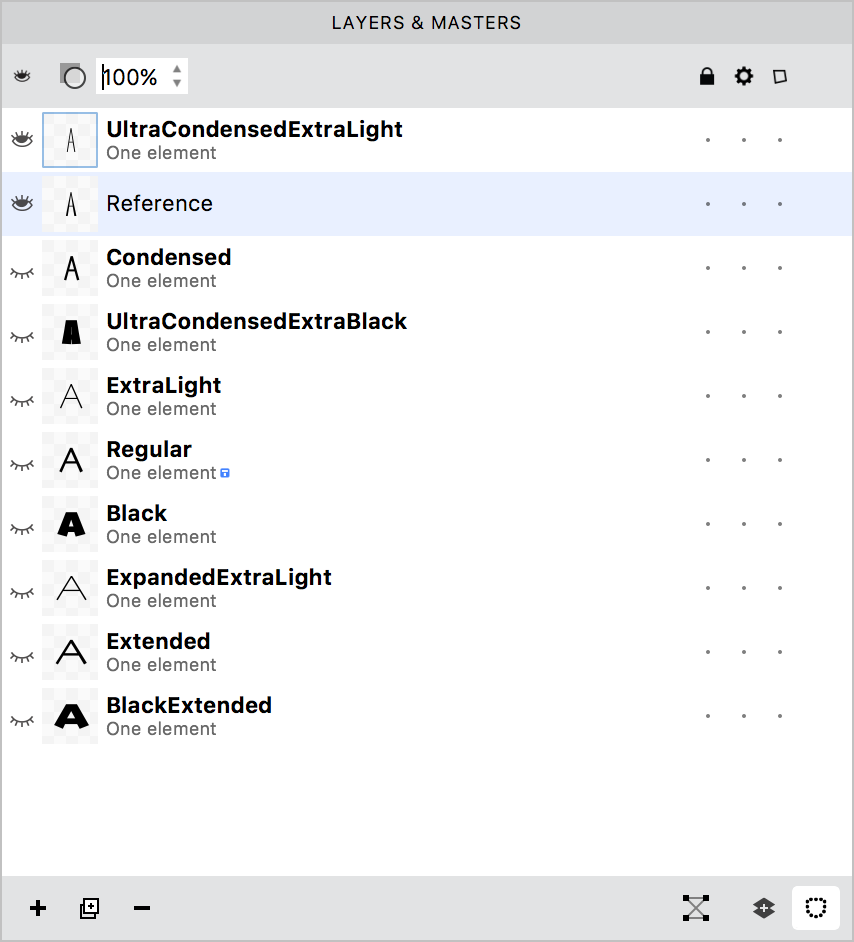
The panel consists of a local toolbar, a list of layers and masters, and a status bar.
Local toolbar»
The local toolbar has the following options:
| Show layer properties toggle to show/hide the properties section of the panel that gives you access to additional layer properties. | |
| Show toggle to show/hide the selected layer. Hold down Cmd while pressing the toggle to show/hide all the layers in the panel. | |
| Lock toggle to lock the selected layer. Hold down Cmd while pressing the toggle to lock all the layers in the panel. | |
| Service toggle to set the selected layer to a Service layer. Hold down Cmd while pressing the toggle to set all the layers in the panel as Service. | |
| Wireframe toggle to show the selected layer as wireframes. Hold down Cmd while pressing the toggle to show all layers in the panel as wireframes. |
List»
Each item in the list of layers and masters comprises the name of the layer or master, a preview, number of elements in the layer or master, and icons to show whether it is visible, locked, a service layer and if it is shown as a wireframe.
Any masters in the list have their names displayed in bold, while the #instance layer has its name shown in grey. Compatible masters have pale green backgrounds in the panel, while incompatible masters have a pale red background:
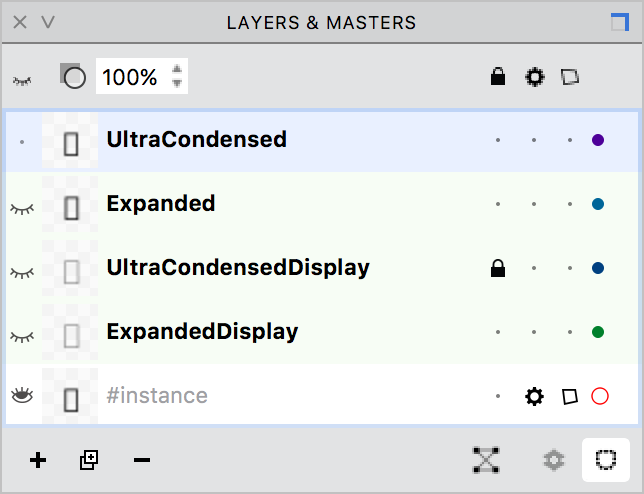
The yellow background means that masters are not fully compatible: the order of contours is different but the interpolation is still possible.
Properties section»

The properties section of the panel, which you can show and hide using the Show layer properties toggle ![]() , includes:
, includes:
- An editable text field for the layer’s name. You can also edit the layer’s name right in the layers list by double-clicking it.
- The Auto layer toggle
 with an editable text field for the glyph generation recipe. You can use this to turn the glyph into an Auto glyph in that layer (see Generate Glyphs for more info about auto glyphs).
 - The layer’s transparency slider that controls the layer’s visibility within the FontLab VI user interface. This does not affect the font export.
Status bar»
Additionally, the status bar offers the following options:
| Add layer button | |
| Duplicate layer button | |
| Remove layer button | |
| Match Masters tries to automatically match masters for the whole glyph. | |
| Merge visible layers button that merges all layers that are marked visible in the panel | |
| Show mask toggle hides and shows the mask layers |
Adding a new layer»
To add a new layer click on the Plus button in the status bar or the Glyph > Add Layer (CmdShiftN) command. This dialog will appear:

Here you can enter a Name for your layer and set its main properties: whether it will be service layer ![]() , be locked
, be locked ![]() and be displayed as wireframe
and be displayed as wireframe ![]() . You can also select if the new layer should appear at the end of the list by pressing the Put to Background button
. You can also select if the new layer should appear at the end of the list by pressing the Put to Background button  ; if this option is off, the new layer will be added to the top of the list.
In addition to the name and properties of the layer, the dialog gives you the following options:
-
To choose whether the new layer should be added to the current glyph only, selected glyphs or all glyphs.
-
Fill new with content of this font allows you to copy glyph elements from another opened font to the new layer of the current font, and choose whether you would like this copy to be left, right or center aligned. You can also choose the master of that font. If no other font is open at the time, the contents of the currently selected layer of the same font will be copied.
-
Check the Make it master layer if you would like FontLab VI to name the master in a way that it works as a master. This will be a font master if you add the contents of the opened font, or this a glyph master if you create the layer for just some of the glyphs in the font.
-
If Use instance layer if available is checked and the font is axis-based (i.e. a variable font), the #instance layer is used. The #instance layer is the virtual layer which keeps the results of interpolation.
-
Check the Rasterize layer to this PPM and enter the value you need to put the result of the glyphs outline rasterisation to the new layer.
Duplicating layers»
To duplicate a layer in the current glyph, select it in the panel and click on the Duplicate button ![]() in the status bar.
in the status bar.
To duplicate a layer in all glyphs in the font, follow the steps outlined in the section above, and in the option Fill new layer with content of this font, choose the current font.
Deleting layers»
To delete a layer, select it and click on the Minus button ![]() in the status bar, or select the Glyph > Remove Layer command. This dialog will appear:
in the status bar, or select the Glyph > Remove Layer command. This dialog will appear:
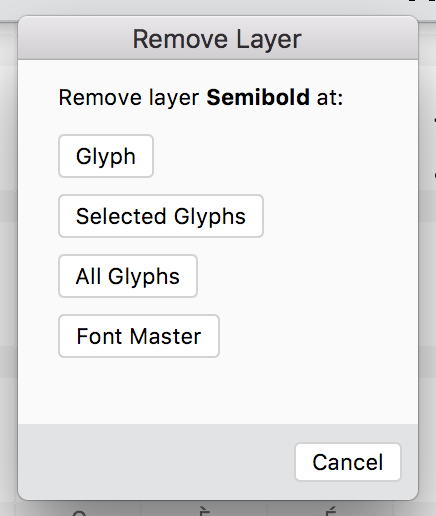
Here you can choose whether you would like the selected layer to deleted in the current glyph, the glyphs selected in the Font Window or Font Map panel, all glyphs, or in the font master.
Editing layer properties»
To hide/show a layer, select the layer and click on the Eye button ![]() in the local toolbar, or click on the Eye button on the left of the layer preview. To hide/show all layers, hold down Cmd and click on the Eye button in the local toolbar. Note that the current active layer is always shown regardless of its visibility settings.
in the local toolbar, or click on the Eye button on the left of the layer preview. To hide/show all layers, hold down Cmd and click on the Eye button in the local toolbar. Note that the current active layer is always shown regardless of its visibility settings.
To change layer opacity, use the Opacity slider or the Opacity field in the layer properties section of the panel.
To lock a layer, select it and click on the Lock button ![]() in the local toolbar, or click on the dot under the Lock icon for that layer. To unlock a layer, click on the lock icon in that layer’s row. To lock all layers, hold down Cmd and click on the Lock button in the local toolbar.
in the local toolbar, or click on the dot under the Lock icon for that layer. To unlock a layer, click on the lock icon in that layer’s row. To lock all layers, hold down Cmd and click on the Lock button in the local toolbar.
To make a layer a Service layer, select it and click on the Service button ![]() in the local toolbar, or or click on the dot under the Service icon for that layer. To remove the Service attribute from a layer, click on the Service icon in that layer’s row, or select it and click the icon in the local toolbar. To add the Service attribute all layers, hold down Cmd and click on the Service button in the local toolbar.
in the local toolbar, or or click on the dot under the Service icon for that layer. To remove the Service attribute from a layer, click on the Service icon in that layer’s row, or select it and click the icon in the local toolbar. To add the Service attribute all layers, hold down Cmd and click on the Service button in the local toolbar.
To show a layer as a wireframe, select it and click on the Wireframe button ![]() in the local toolbar, or or click on the dot under the Wireframe icon for that layer. To switch off the wireframer, click on the Wireframe icon in that layer’s row, or select it and click the icon in the local toolbar. To show all layers as wireframes, hold down Cmd and click on the Wireframe button in the local toolbar.
in the local toolbar, or or click on the dot under the Wireframe icon for that layer. To switch off the wireframer, click on the Wireframe icon in that layer’s row, or select it and click the icon in the local toolbar. To show all layers as wireframes, hold down Cmd and click on the Wireframe button in the local toolbar.
To make a layer an auto layer or a manual layer, use the ![]() toggle. To customize the glyph generation recipe for an auto layer, enter the recipe into the auto layer recipe text field. Note: when you turn on the Auto layer toggle and the glyph generation recipe is valid, the contents of the current layer will be replaced with autogenerated content (so your drawings, manually placed elements etc. will be removed).
toggle. To customize the glyph generation recipe for an auto layer, enter the recipe into the auto layer recipe text field. Note: when you turn on the Auto layer toggle and the glyph generation recipe is valid, the contents of the current layer will be replaced with autogenerated content (so your drawings, manually placed elements etc. will be removed).
Customizing background color per master»
In the Layers and Masters panel, you can assign a custom color to any master. Click on the color dot in the layer’s properties to open the standard Colors dialog box.
Using the Preferences > Variations > Preview master color setting, you can view the custom master color as a thin colored line on the top of the Glyph window, or as a “pale” background color of the entire Glyph window (with customizable transparency).
Now you can easily differentiate which master you’re currently working on, so you won’t make changes to the wrong master by mistake. This is particularly helpful if your master designs only differ slightly (for example, in the length of the ascenders), or if you’ve duplicated a finished master and are adjusting (condensing etc.) the new one.
Browsing layers and masters»
To switch between layers and masters, click on their names in the panel, or use the Glyph > Next Layer (++Alt+.++) and Previous Layer (++Alt+,++) menu commands. Note that these commands skip service layers.
To modify the order of layers and masters, drag and drop them in the panel. The order of masters in the panel is in sync with the order in the Font Info dialog.