Editing Glyph Metrics»
When you click on the Metrics tool you switch the Glyph Window to the Metrics mode. In this mode, you can edit glyph metrics: advance width and sidebearings. The Property bar of the Glyph Window in the Metrics mode looks like this:
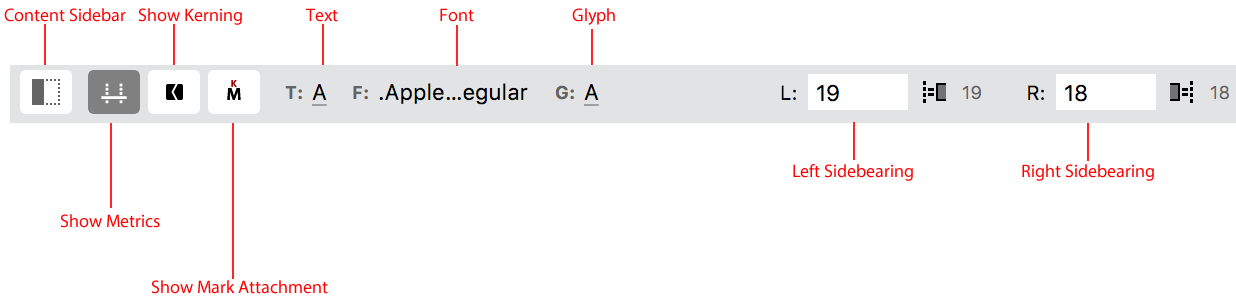
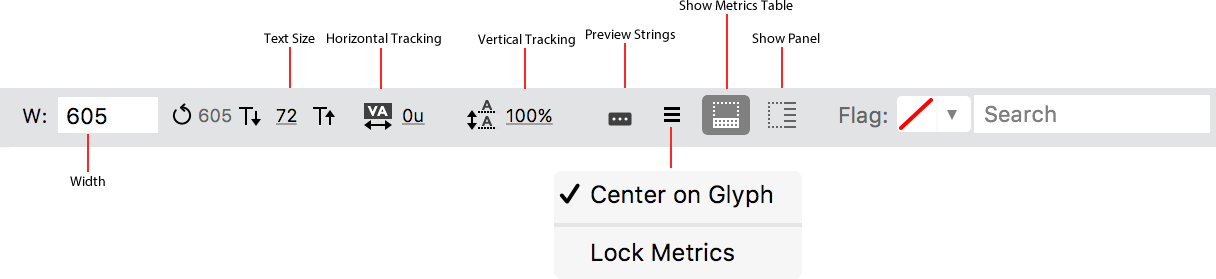
Click on the Show Panel button to open the Metrics panel. Click on the Show Metrics Table button to open the Metrics table.
Manual Metrics Editing»
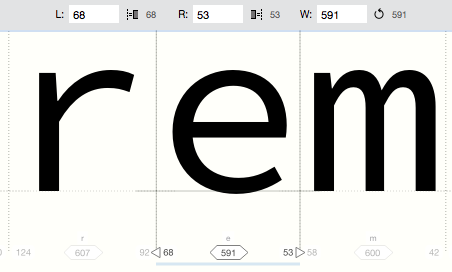
When in the Metrics mode, one glyph in the string is always active, others are inactive. The active glyph is highlighted and has more contrasting sidebearing lines:
If you do not see sidebearing lines, click on the Show Spacing Controls button in the Property bar.
To modify glyph metrics you can use several methods:
- Drag the sidebearing lines of active and inactive glyphs.
- Drag the active glyph within its advance width. This can be turned off in Preferences > Spacing.
- Edit metrics values directly.
To drag the sidebearings lines, just position the mouse cursor on the line, press the mouse button and drag the mouse. Release the mouse button when you are done. You can also use triangle handles.
To drag a glyph within its advance width, position the mouse cursor on the glyphs’ image; press the mouse button and drag the mouse to position the glyph inside its width. Press the Alt key while dragging the mouse to modify the glyph’s width.
Keyboard shortcuts»
Metrics editing»
To edit the glyph metrics, use the following keyboard shortcuts. Note that the adjustments of “1” and “10” are by default 1 and 10 font units, but can be customized in Preferences > Distances.
- ;: auto-calculate metrics for active glyph
- CtrlLeft/CtrlRight: decrease/increase Left Sidebearing (LSB) by “1” (with Shift by “10”)
- AltLeft/AltRight: decrease/increase Right Sidebearing (RSB) by “1” (with Shift by “10”)
- CtrlAltLeft/CtrlAltRight: move glyph within the current advance width by “1” (with Shift by “10”)
- -/+ or CtrlAltDown/CtrlAltUp: decrease/increase both LSB and RSB (with Shift by “10”)
- The Cmd modifier will decrease/increase the value by 100 units
- ShiftCmd will decrease/increase the value by a true 1 unit, regardless of the setting in Preferences > Distances.
NOTE: On macOS, the CtrlLeft and CtrlRight shortcuts are normally used for switching between Spaces, so to use these shortcuts in FontLab VI, you will need to disable them in macOS System Preferences > Keyboard > Shortcuts > Mission Control.
Entering Input»
Cmd-click on the left or right spacing controls puts the focus to the LSB (L) or RSB (R) field in the Property bar allowing you to change the value immediately.
- Edit the values (L, R, W) in the Property bar of the window.
- Edit the values directly in the editing area under the glyph image.
- Edit the values directly in the Glyph panel.
- Use the Metrics table or the Metrics panel.
The Metrics table is an optional feature for spacing and kerning. To open it click on the  button in the Property bar of the Glyph window. You can edit values in the table in both Kerning and Metrics modes; simply enter new width, left sidebearing (LSB) and right sidebearing (RSB) values in the appropriate fields.
Using direct numeric input»
- Negative or positive integer number. Such an expression is immediately converted into a direct result. Example:
-20,20. - Negative or positive fractional number. Such an expression is immediately converted into a direct result (and rounded). Example:
-20.3,21.753.
Using simple expressions»
- Two or more numbers concatenated with characters for the basic arithmetic operations (
+for addition,-for subtraction,*for multiplication,/for division), and optionally parantheses ((and)). Such an expression is kept as expression, and its result is calculated. Example:20*(3+7). - Glyph name or Unicode character. Such an expression links the metric field of the current glyph to the corresponding field of the glyph that the name or character refers to. Example:
NortwoorЖ. - Glyph name or Unicode character followed by
+(for addition) or (-) for subtraction, followed by a number. Such an expression links the metric field of the current glyph to the corresponding field of the glyph that the name or character refers to, plus or minus the numerical value that follows the mathematical sign. Note:*or/don’t work this way. Example:N+10ortwo+7orЖ-21.
Using extended expressions»
Extended expressions start with the equal sign (=) can be followed by numbers, glyph names or functions, concatenated with arithmetic operation signs (+, -, *, /) and parantheses (( and )).
The supported functions are the following:
lsb("G")refers to the LSB of the glyph which has the glyph nameGor which is the default glyph for the single Unicode characterG.rsb("G")refers to the RSB of the glyph which has the glyph nameGor which is the default glyph for the single Unicode characterG.width("G")refers to the Advance Width of the glyph which has the glyph nameGor which is the default glyph for the single Unicode characterG.l()refers to the LSB of the current glyph. It makes most sense if=l()is used in the RSB field.r()refers to the RSB of the current glyph. It makes most sense if=r()is used in the LSB field.w()refers to the Advance Width of the current glyph.g("G")refers to the horizontal position of a vertical guideline which has the nameGand is located within the current glyph.
All the functions can be combined in extended expressions, such as =l()*1.2 or =g("center")*2 or =(n+o)/2.
Linking metrics»
Linking metrics in Fontlab VI replaces the concept of Metrics Classes from Fontlab Studio 5. With this feature, you can link the metrics of one glyph with another, both manually and automatically.
Metrics links are updated automatically, but this can be controlled in Preferences > Spacing > Automatically update linked metrics. If you have a font with a very large character set that uses linked metrics, you may want to turn this option off as it could slow the application down. In case this option is turned off, use Font > Update Metrics to update linked metrics manually.
In the interaction between expressions and explicit numerical values in the three metrics fields (left sidebearing (LSB), right sidebearing (RSB), advance width), expressions take precedence over simple number values; and for conflicting expressions, the last expression you entered takes precedence.
- If you use just one expression in any of the three fields, the other fields will adjust. So if you enter i into the RSB field of “j” and change the RSB of “i”, the spacing of “j” will update correctly.
- If you use expressions in any two of the fields, the third field will adjust. So if you link the RSB and the width of “j” to i, the LSB of “j” will adjust.
- If you use expressions in all three fields (a bad idea, which will likely lead to future problems/inconsistencies), the last expression you enter will take precedence, and one of the others will be adjusted by adding a constant.
Manually linking metrics»
To manually link glyph metrics, select the glyph and enter the glyph you want to link to, i.e. key glyphname, in the width, left or right sidebearing field in the Metrics window property bar:
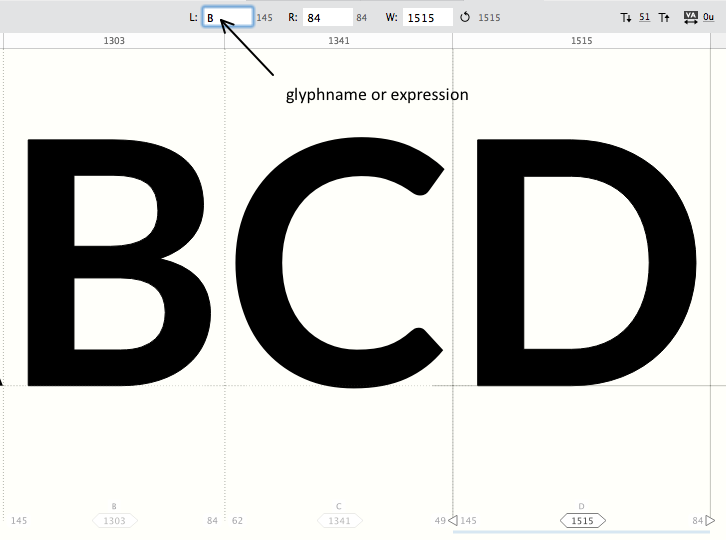
In the image above, after manual linking the glyph D is assigned the same LSB as the B. Now when you change the LSB for B, it will be changed for D as well.
Linking can also be done using expressions (see above).
Automatically linking metrics»
To automatically link glyph metrics, select Font > Link Glyph Metrics command. The Link Metrics dialog box appears:
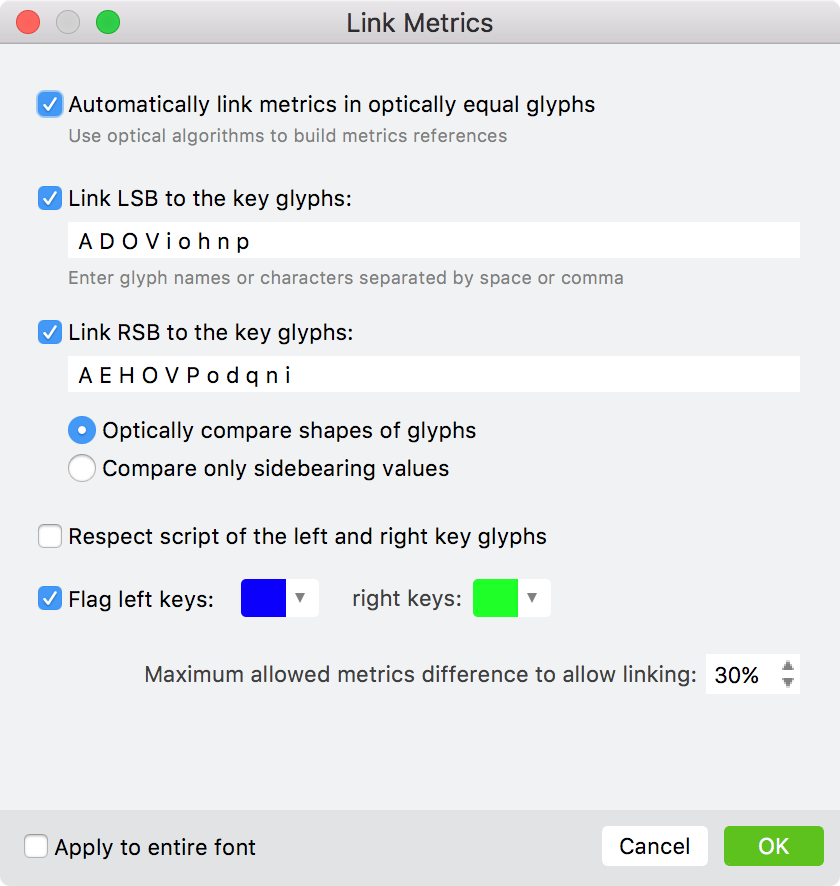
You can link the LSB and RSB of dependent glyphs to some key glyphs automatically, with customizable precision, using this dialog. It has the following options:
To allow FontLab to use optical algorithms to build metrics linking, select the Automatically link metrics in optically equal glyphs option.
Check the Link LSB to the key glyphs and Link RSB to the key glyphs options and enter key glyph names or characters separated by comma or space. FontLab will attempt to link metrics of these key glyphs to others in the font.
There are two ways in which FontLab can compare glyphs – Optically compare shapes of glyphs or Compare only sidebearing values – when linking glyoh metrics. Select an option based on your preference.
To prevent linking of glyph metrics across different scripts, select Respect script of the right and left key glyphs option. For example, it prevents linking between English (Latin) and Russian (Cyrillic) glyphs, even when the glyph outlines are identical.
To assign color flags to linked glyphs, check the Flag keys option(s) and use the dropdown to select the colour.
Finally, use the Maximum allowed metrics difference to allow linking field to enter the percentage value for the difference in metrics that is allowed for linking.
Viewing linked metrics»
When you view linked metrics, FontLab shows both the formula and the result. For example, the right sidebearing of the e could be shown as “o-5 (40)”, meaning that it is linked to be five less than the right sidebearing of the o (entered as “o-5”), which currently gives a result of 40.

Removing metrics links»
To remove linked metrics (that is, to apply calculated constants and get rid of links) use Font > Remove Metrics Links.
Linking metrics across masters»
In the Width, LSB or RSB fields of the Metrics table for a given master, you can now enter the name of another master. For example, in the Black master of the O glyph, you can enter Light in both the LSB and the RSB fields.
Then, if you change the sidebearings of the Light master in the O glyph, and run Font > Update Metrics (CmdAltM on macOS, CtrlAltM on Windows), the sidebearings of the Black master of the same glyph will be updated to the same value.
Note: If you enable Preferences > Spacing > Automatically update linked metrics, the linked metrics will be updated automatically as you edit them, but only within the current master. Automatic updating of linked metrics across masters would be too slow, so you need to run Font > Update Metrics to update across masters.
In addition to using the full master name in any of the metrics fields, you can use an abreviation. For example, if you want to link the width of the Black O to the ExtraLight O, you can write Ex. or ExtraL. (using the period). As long as the abbreviated master name is unique, it’ll work.
Also, rather than linking to just the specific value, you can use more extended expressions. For example, you can enter Light+20 in the RSB of the Black O, and then it’ll be equal to the RSB of the Light O plus 20 font units.
Binding sidebearings»
While working on the glyph metrics you may want to tether the left, right or both glyph sidebearings to the contours. This means that even if you edit the contours in the glyph, the selected sidebearing(s) will remain the same. Binding sidebearings to contours is very useful when you are interpolating or transforming contours using an automatic procedure, because you don’t have to worry about the sidebearings changing even as the contour is modified.
To bind the left, right or both sidebearings, click on the “bind sidebearing” buttons 
 in the Property bar or in the Glyph panel. Manual changing sideberings will still be possible but changing glyph outlines will change glyph advanced width but not the binded sidebearing.
To bind sidebearings of selected glyphs or even all glyphs in the font at once, use the Tools > Actions > Bind Sidebearings operation
Using spacing strings»
The Pairs and Phrases panel allows you to browse the list of sample strings. Clicking on a string in this panel brings the string to the Glyph window for editing.
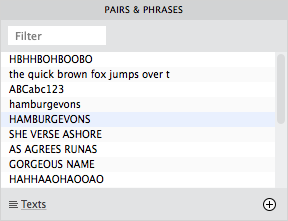
You can select multiple strings of text at the same time by holding down Shift in the Pairs and Phrases panel list.
Please see the Pairs and Phrases panel page for more details.
Viewing Metrics»
The Metrics panel can be activated by using Windows > Panels > Metrics or by clicking on the  button in the Property bar. The Metrics panel is patterned after the Metrics table in Fontlab Studio 5, and displays all the glyphs with their metrics. Double-clicking on a value in this panel allows you to edit it right in the table. Double-clicking on the glyph name brings the glyph to the Glyph window.
You can quickly sort lines in the table by clicking on a column’s title.
Updating Metrics automatically»
There are several automatic operations for changing metrics of selected or even all glyphs in the font at once. Open the Tools > Actions dialog box.
If you want the changes to be applied to the entire font, select the checkbox in the bottom-left. In addition, you can choose whether the actions should be applied to the Active Layer, all Visible Layers, or to All Masters by selecting the option of your choice in the top-left of the dialog.
Adjusting metrics»
To modify metrics by some given value or as a percentage of the original value, use the Tools > Actions >
Adjust metrics operation

To make a modification, first select the metrics you would like to change: left sidebearing, right sidebearing or width. Then, enter the value by which you would like to modify the metrics by either entering the value in the field or using the slider. By default, this value is in absolute units. Click on units to change this to percent. Enter a positive number to increase metrics or a negative value to decrease them. Normally, metrics are measured from the bounding box. If you would like to change that to use the measurement line, select the checkbox.
Setting advance width»
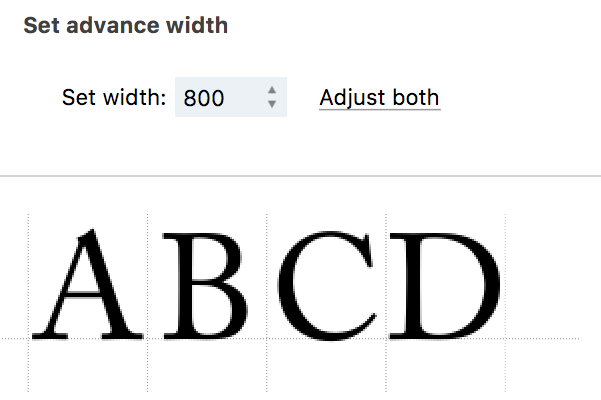
To set a fixed width for selected/all glyphs, use the the Tools > Actions > Set advance width (abbreviated to Set width, in the navigation) operation. A glyph may be aligned to the left or right margins or it may be centered in the advance width; you can choose this by clicking on the “Center Character” link. Using this action is the fastest way to make a monospaced font: open the Actions dialog, check “Apply to entire font”, set the desired width and click on the OK button.
Setting Sidebearings»
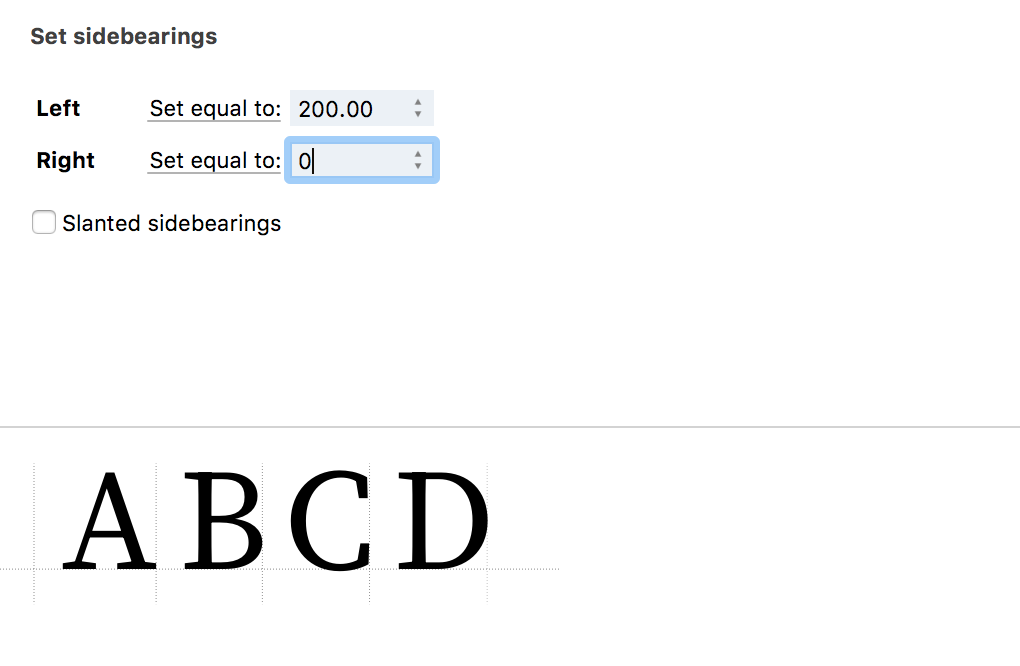
To set/modify the left and right sidebearings, use the Tools > Actions > Set Sidebearings operation. It offers five options for how each sidebearing can be set/modified:
- Set equal to: Enter the exact value you would like the sidebearing to be
- Auto + adjust: Let FontLab to automatically space glyphs and enter some amount to increase or decrease the results of autospacing
- Increase by: Enter the value by which you would like to increase the sidebearing
- Decrease by: Enter the value by which you would like to decrease the sidebearing
- Do nothing: Set this option to not modify the sidebearing
Note
Increasing or decreasing any of the sidebearings also increases or decreases the glyph advance width.
If you check the Slanted sidebearings checkbox, FontLab makes all calculations as if the sidebearings are slanted by the slant angle set in Font Info. This is very useful if you are designing an italic typeface. Note that if the slant angle is set to zero in Font Info, your preference in the checkbox doesn’t make any difference.
Tracking»
To proportionally increase or decrease the advance width by some value, use the Tools > Actions > Tracking operation. Unlike Set advance width above, changing the Tracking will proportionally modify the left and right sidebearings of the selected glyphs. This action can be very useful if you think your entire font needs more white space: just select the action and drag the slider to achieve the spacing you would like.