- Preferences
- General
- Windows and tabs configuration
- Font has at least one Font window
- Font Map and Fonts panels control fonts
- Activate panels depending on type of activated objects
- Close Glyph window sidebar after X minutes of inactivity
- Open Sketchboard on startup
- Autosave Sketchboard every x minutes
- User data folder
- Unicode-name mapping
- Check for updates at startup
- Developer/Experimental Preferences
- Open Fonts
- Detect tags for alignment zones
- Make friendly glyph names
- Change CID names to Unicode names when Unicode index in known
- Use components
- Convert components to element references
- Detect composites/Detect element references
- Automatically assign non-spacing property to accent components
- Decompile binary features
- Compile feature definitions
- Convert TrueType curves into PostScript curves
- Detect smart nodes: Servant / Genius
- Do not import these tables to Tables panel
- Save Fonts
- Font Window
- Editing
- Show scroll bars in the Glyph window
- Pinch gesture zooms in the Glyph window
- Highlight nodes on alignment zones
- Pen and Pencil tools can change contour
- Force snap to guides
- Marquee selection selects nodes but not handles
- Free Transform scaling: non-proportional with Shift, otherwise proportional
- Clicking on outline selects segment
- Pasting contour to another element preserves appearance
- Curve handles have fixed direction when curve point is dragged
- Show missing glyph placeholders
- Hide character placeholders if layer is not empty
- Show cross
- Holding Cmd activates Contour tool
- Always show anchor names
- Rapid tool remembers last state
- Live preview (may be slow)
- Spacing
- Glyph Window
- Cousins
- Paste & Duplicate
- Operations
- Distances
- Variations
- Grid
- Curve Conversion
- Autohinting
- Remove existing hints when autohinting a glyph
- Convert hints to links when autohinting
- Generate triple hints
- Direct links to the center of the glyphs where possible
- Automatically interpolate positions of the cusp points
- Try to automatically generate middle delta instructions
- Add link to the right sidebearing point
- Interpolate positions of the double links
- Single link attachment precision
- Digital Signature
- Default Texts
- Texts
- General
Preferences»
To customize your FontLab preferences, select the FontLab VI > Preferences menu command on Mac, or Edit > Preferences on Windows.
You can use the local toolbar of the Preferences dialog box allows you to search, open, save, and reset preferences. You can use the hamburger menu on the top left of the dialog to:
- Open Preferences by choosing an external preferences file from the file dialog.
- Save Preferences into an external file.
- Reset to Defaults
Note that Reset of Defaults only resets the options in the Preferences dialog. Menus, recent files, custom workspaces, loaded files for phrases and pairs, opened panels, view settings, recent settings in the Export Font, Open Font etc. dialogs, bookmarks in the Font window, custom brushes etc. remain intact. To reset all the preferences listed above, you need to delete the Preferences file manually.
!!! Attention:
When you save your Preferences, ALL your settings are saved in an external file, potentially including your password for your Digital Signature (DSIG) (if you saved that in your Preferences). Consider this when sharing your preferences files with other people.
You can customize the following options in Preferences:
General»
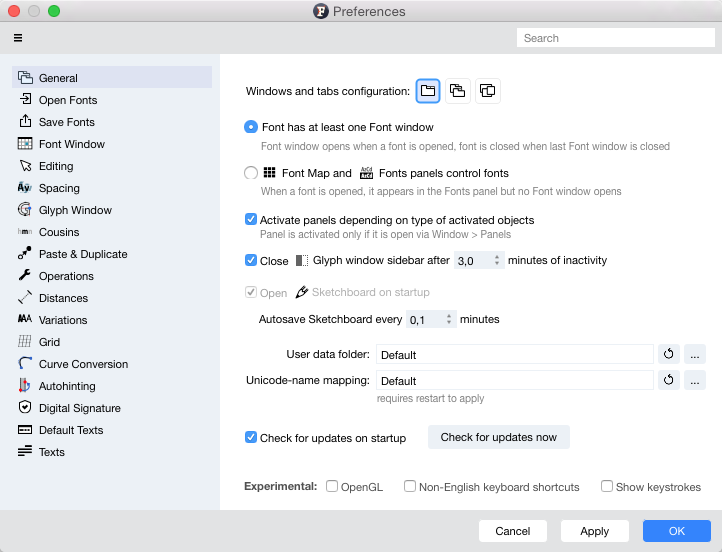
Windows and tabs configuration»
There are three types of configurations possible for windows and tabs in FontLab VI:
- If
 is selected, all fonts and glyphs open in tabs within the single main window. You can undock tabs to turn them into separate windows, and you can dock windows back;
 - If
 is selected, fonts open in their separate Font windows, while glyphs open as tabs;
 - If
 is selected, everything opens in separate windows (like in Fontlab Studio 5) but windows can be docked manually to form tabs.
Font has at least one Font window»
When this option is active, a new Font Window appears every time you open, import or create new font.
Closing the last Font window means closing the font.
Font Map and Fonts panels control fonts»
When this option is active and you open a font, a new Font Window doesn’t appear. Instead you can control opened fonts in the Fonts panel and see glyph cells in the Font Map panel. This way, only two panels replace multiple Font windows.
This mode doesn’t completely prohibit font windows, you still can open them. But closing the last font window for the font won’t close the font itself. It will remain open and seen in the Fonts panel.
Activate panels depending on type of activated objects»
If this option is active and you have multiple panels open in a tabbed panel group, selecting a particular object in the Glyph Window, say a node, will bring the corresponding panel, in this case the Node panel to the front.
Close Glyph window sidebar after X minutes of inactivity»
This option allows you to change the idle time after which the Glyph window sidebar is automatically closed. If you do not want it to close based on inactivity, just uncheck this option.
Open Sketchboard on startup»
If you have chosen the second or third Windows and tabs configuration option, you can choose to open or not open the Sketchboard automatically on startup.
In the first configuration, the Sketchboard always opens regardless of the setting.
Autosave Sketchboard every x minutes»
FontLab saves the contents of the Sketchboard window in ~/Library/Application Support/FontLab/FontLab VI/sketchboard.vfc on macOS or in ~\AppData\Local\Fontlab\Fontlab VI\sketchboard.vfc on Windows on exit. Here you can set the interval of saving the Sketcboard in minutes.
User data folder»
The default location for custom codepages and encodings is Macintosh HD/Users/Your_Name/Library/Application Support/FontLab/FontLab VI on macOS or C:\Users\Your_Name\AppData\Roaming\Fontlab\FontLab VI on Windows.
Here you can change the default location of the User data folder. Just keep the structure of the folders.
Unicode-name mapping»
Enter the path to the external custom standard.nam file that contains glyph name to Unicode mapping rules. The required structure for this file is described in Custom data files and locations.
The original default location of the file is FontLab VI.app/Contents/Resources on macOS or \Program Files\FontLab\FontLab VI\Resources\ on Windows.
If you make any modifications to the file or change its location, you must restart FontLab to see your changes being reflected.
Check for updates at startup»
FontLab VI checks for updates and notifies you when an update is available. Updates are downloaded and installed only when you choose to download and install them. To not allow FontLab checking for updates every time it starts, turn this option off. To manually check for the latest updates, click on the Check for updates now button or use the FontLab VI > Check for Updates menu.
Developer/Experimental Preferences»
These options are aimed to do tests and identify possible issues. OpenGL allows you to turn on OpenGL, a library for graphic computing. Non-English keyboard shortcuts is aimed to allow single key shortcuts (like A for Contour tool) work even with local keyboard layouts. Preview keystrokes shows every typed key on the screen, what can be used while doing a screen recording to report a problem.
Open Fonts»
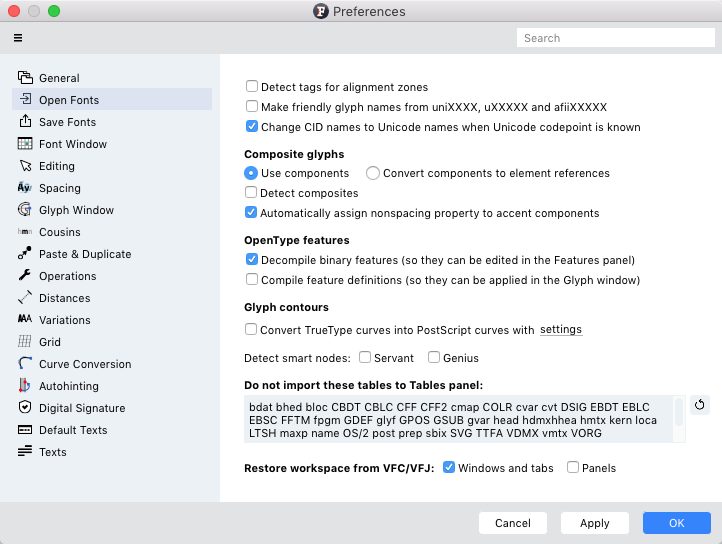
Options in this section are applied to fonts when they are opened and imported.
Detect tags for alignment zones»
When this option is active, FontLab VI will automatically assign tags to alignment zones when a font is imported. If there is a zone in the imported font that is obviously the “cap height”, it will get the proper tag and will then appear only in capitals.
Make friendly glyph names»
When this option is turned on, which is the FontLab VI default, glyphs with names like “uniXXXX”, “uXXXXX” and “afiiXXXXX” will be renamed to friendly names during import.
Change CID names to Unicode names when Unicode index in known»
When this option is active (default), FontLab names glyphs using its regular glyph naming heuristics when importing CID-keyed PostScript fonts. If you want glyphs named by CID number turn this option off.
Use components»
When this option is active (default), FontLab preserves composite glyphs on import. Composites are not decomposed. When this option is on, menu Font contains the command Detect Composites to analyse glyphs and automatically create composites.
Convert components to element references»
When this option is active, FontLab converts components in composite glyphs to elements on import. When this option is on, menu Font contains the command Detect Element References to automatically find identical elements and compose glyphs using element references.
Detect composites/Detect element references»
This option changes its naming depending on which of the above options was selected.
If both this option and Use components above are selected, FontLab will browse all glyphs in the font being opened or imported, and find glyphs using elements of other glyphs as components. These element references will be replaced by components. If this option is unchecked, you can still detect composites later by using the Font > Detect Composites menu command.
If both this option and Convert components to element references above are selected, FontLab will browse all glyphs in the font being opened or imported, and find identical Elements. One of the found identical element will become the base element, while the others will be replaced by locked references to the base element. If this option is unchecked, you can still detect element references later by using the Font > Detect Element References menu command.
Automatically assign non-spacing property to accent components»
When this option is active, accent components will get the special “non-spacing component” property.
Decompile binary features»
When this option is active, the application will decompile any OpenType features in the font being imported, and present them as text in the Features panel.
Compile feature definitions»
When this option is turned on, FontLab will try to compile features imported from vfb and ufo file formats. This builds binary GPOS and GSUB tables (in memory), which are used for applying OpenType features to text in the Glyph window.
Convert TrueType curves into PostScript curves»
In FontLab, you can work with PostScript Bezier curves or TrueType quadratic curves. If you open a TrueType / OpenType TT font and plan to generate the font in the same format, disable this option to keep the original outlines and avoid conversion errors. But if you plan to generate your font as a Type 1 or OpenType PS font, you can enable this option to convert the outlines on import. In any case, you can always convert the outlines in either direction at any time during editing. Curves are converted according to the settings set on the Curve Conversion page of the Preferences dialog.
Detect smart nodes: Servant / Genius»
When an existing font is being opened or imported, FontLab VI can detect smart nodes automatically. You can check whether you would like the application to detect Servant nodes, Genius nodes or both.
Do not import these tables to Tables panel»
By default, FontLab will not import the tables listed here and will not put their code to the Tables panel. You can add or remove table tags in this text box. But make sure to only import the tables you really need.
Save Fonts»
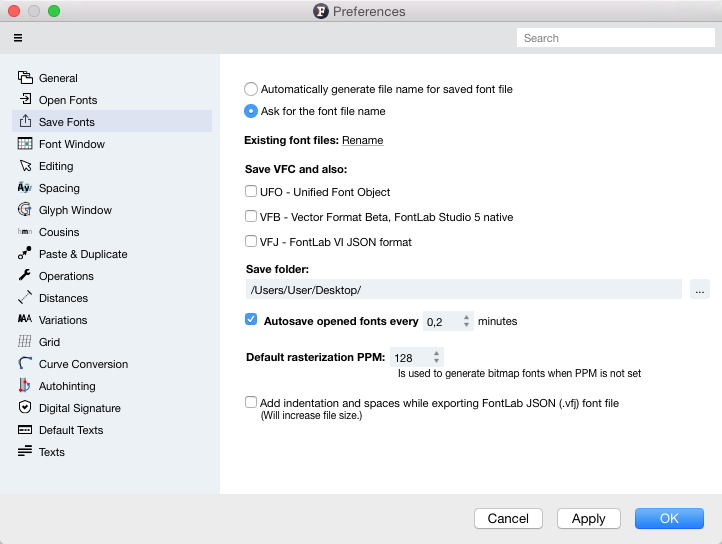
Silent save v. Save File dialog»
The first set of radio buttons offers two options that let you choose between a “silent save” and showing the Save File dialog. If you choose the first option, Automatically generate file name for saved font file, then the font will be “silently saved.” For example, if you have a font named “FontName-Regular.otf” open and then choose the File > Save Font menu command, FontLab VI will save the font file “FontName-Regular.vfc” in the folder entered in the Save Folder below. On the other hand, if Ask for the font file name is selected, the application will show you the Save File dialog where you can enter both the name and location for the file you are saving.
Save VFC and also»
You can select what font formats you want the files to be saved by default, apart from the proprietary binary format .VFC. The other formats available are UFO, VFB and VFJ. When working, press CmdS, to save your font in all selected formats.
Save folder»
You can enter the path to the location where new and imported fonts will be saved by default if the Automatically generate file name for saved font file option is selected in the radio buttons at the top of the panel.
Autosave opened fonts every x minutes»
Use this option to activate Autosave and enter the time interval (in minutes) at which you want to save the font.
Font will be saved into the Autosave folder within the FontLab VI user data folder (Macintosh HD/Users/Your_Name/Library/Application Support/FontLab/FontLab VI on macOS or C:\Users\Your_Name\AppData\Roaming\Fontlab\FontLab VI on Windows).
If Autosave was active and you have a system or program crash, you can open your last saved font from the Autosave folder.
Default rasterization PPM»
Default rasterization PPM defines the resolution for rasterization if it has not been explicitly set.
Add indentation and spaces while exporting FontLab JSON (.vfj) font file»
When this option is active, FontLab adds spaces to the exported .vfj font file to make it more human readable.
Font Window»
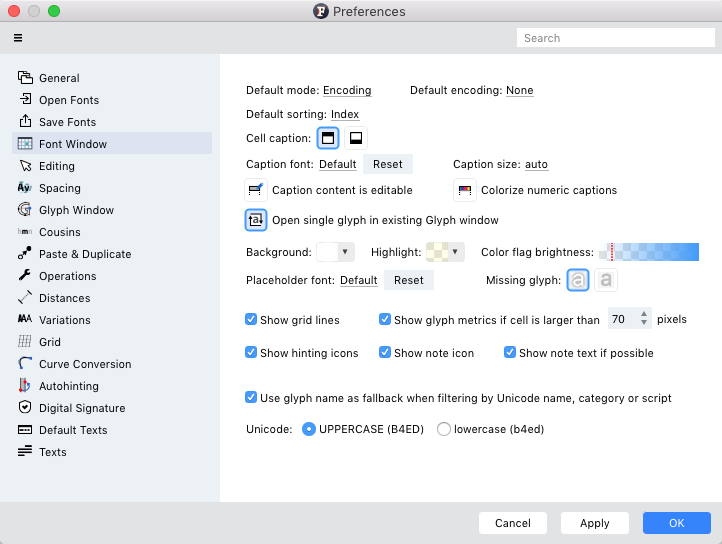
Default mode»
This is for users who do not always use Encodings, but want to work in the Unicode, Codepage, Category, Script or Index mode. Changing this setting allows new, imported or opened fonts to be shown in the preferred mode.
Default encoding»
Here you can choose between a variety of OpenType or Type 1 encodings to filter glyphs in the Font window/Font Map panel. The default encoding is used for all new and imported fonts.
Default sorting»
Select the default sorting order for cells in the Font Window.
Cell caption properties»
Cell caption position can be selected to be at the top or bottom of the the cell. The caption may be the name of the glyph, character code or some other glyph information. Similarly, you can select a different Caption font or reset it to the original, and set the Caption size to auto, small, medium or large. Caption content is editable is off by default. If you turn it on you can edit the caption directly in the cells of the Font window.
If the Colorize numeric captions is checked, cell captions with numeric information will be automatically colorized. Numeric captions are those showing glyph width, LSB, RSB, top or bottom of the glyph bounding box, number of elements, script or age. If this option is checked, cells in the List sidebar are also colorized:
Cell Background»
Use this option to select the background color for cells with glyphs. This is white by default, but you may need to change it if, for instance, you are working on a color font that has white glyphs.
Cell Highlight»
Cells belonging to the selected encoding, codepage or range have highlighted captions. Use the Highlight selector to change the color for highlighted captions.
Color Flag Brightness»
Color flags for cells are pale and desaturated by default. By modifying the transparency of the color flags using this slider, you can make them more or less bright.
Placeholder Font»
Use this option to select the font that will be used as template for empty glyph cells. Click on Reset to set the font back to the default font. You can also choose how you would like missing glyphs to be shown by selecting an option from Missing Glyph.
Other options that control how the Font Window looks are:
| Option | Description |
|---|---|
| Show grid lines | Draws thin grey borders between glyph cells |
| Show glyph metrics | If cells are large enough, the advance width is shown with a lighter background so left and right glyph sidebearings are visible |
| Show hinting icons | Draws small hinting marks in the lower left corner of glyph cell having hints |
| Show note icon | Draws the note icon if glyphs have Glyph Notes |
| Show note text if possible | If cells are large enough, the note text is shown |
Use glyph name as fallback when filtering by Unicode name, category or script»
When this option is selected, FontLab VI will generate Unicode indices XXXX from uniXXXX or uXXXX when filtering glyph cells in the Font window.
Unicode index format»
Select how Unicode numbers are shown: uppercase XXXX or lowercase xxxx. This doesn’t affect the exported fonts.
Editing»
You can customize how FontLab glyph editing looks and works by going to Preferences > Editing:
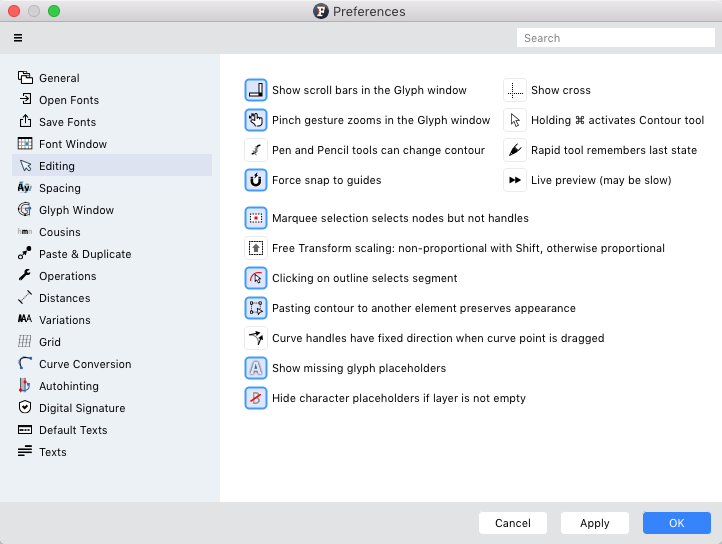
Show scroll bars in the Glyph window»
You can turn this option off if you don’t need scroll bars in the Glyph Window and scroll with the mouse wheel or pan by pressing Space instead.
Pinch gesture zooms in the Glyph window»
Enable this option if you would like to zoom in the Glyph Window using pinching gestures.
Note
On Windows, if this option is enabled, you need to use CtrlAlt-mouse wheel to change the current glyph in the Glyph window. If it is turned off, Ctrl-mouse wheel needs to be used instead.
Highlight nodes on alignment zones»
When alignment zones are not visible and the option is enabled, if you move a point into an alignment zone, the zone will become visible again and the node is highlighted. The highlighting is in a different style when the node is on the zone line rather than within the zone.
Pen and Pencil tools can change contour»
When turned on drawing with Pen and Pencil adds to existing contours
Force snap to guides»
When turned off, a node snaps to a guide only at idle, when you stop your mouse move, so you can move nodes smoothly. But when it is on, the node will snap when the mouse moves, so it feels “harder”.
Marquee selection selects nodes but not handles»
You can turn this option on if you would like handles inside the marquee selection rectangle to be selected. Note that even when this option is turned off, handles between selected nodes are selected.
Free Transform scaling: non-proportional with Shift, otherwise proportional»
Previously, scaling was proportional without Shift and non-proportional with Shift. If you prefer that old behavior, turn on this option.
Clicking on outline selects segment»
Turn this option on if you would like to be able to select a segment by clicking on the outline. When this option is off, you can still select a segment by Shift-clicking on it.
Pasting contour to another element preserves appearance»
When turned on, copying and pasting contours from/to transformed elements is WYSIWYG: original contours are copied transformed to keep their look in the source element and so are pasted to the destination element.
Curve handles have fixed direction when curve point is dragged»
When you drag any point on a curve segment (not the node) and this option is off, the direction of the handles changes, so you can freely change the shape of the curve segment but you will also change the shape of neighboring curve segments if they connect via a smooth node. If this option is on, the direction of the handles stays fixed, so the change of the current curve segment will be limited, and neighboring segments stay intact.
Show missing glyph placeholders»
If enabled, placeholders of missing glyphs are shown in the Text mode.
Hide character placeholders if layer is not empty»
If enabled, placeholders are not shown in the Edit mode if the current layer is not empty.
Show cross»
If enabled, a crosshair cursor is shown whenever the user moves any nodes.
Holding Cmd activates Contour tool»
When turned on and some other tool is selected holding down the Cmd key activates the Contour tool temporarily. This option is not available on Windows.
Always show anchor names»
When turned on, anchor/pin names are always visible. Otherwise names become visible when the cursor approaches the anchor/pin.
Rapid tool remembers last state»
When turned on, the Rapid tool remembers the type of added node (straight or smooth) and continues add nodes of this type until Ctrl-click
Live preview (may be slow)»
When turned on and you edit the contour, you can see the “live” preview of the glyph in other windows or in the Preview panel while you drag the mouse. If turned off, the preview is updated at idle or when you release the mouse.
Spacing»
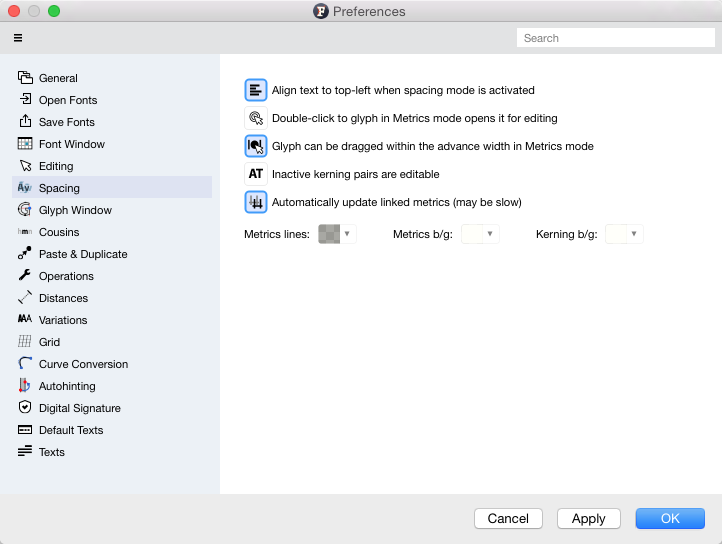
| Option | Description | ||
|---|---|---|---|
| Align text to top-left when spacing mode is activated | When you switch to the Metrics, Kerning or Text mode the text block showing glyphs is aligned to the top and left of the window. You cannot pan the contents until you zoom-in close enough | ||
| Double-clicking to glyph in Metrics mode opens it for editing | When turned on, this option emulates the FLS 5 behavior | ||
| Glyph can be dragged within the advance width in Metrics mode | Turn this option off to not allow dragging glyphs when editing metrics. Only sidebearing lines can be dragged in this case | ||
| Inactive kerning pairs are editable | When turned on, all glyphs (except the first one) in a line can be dragged to change kerning. It is off by default so only the current and the following glyph can be dragged | ||
| Automatically update linked metrics (may be very slow) | When turned on, the linked metrics should be updated on the fly. Otherwise you must use the Font > Update metrics menu command | ||
| Metrics lines color | Select custom color for vertical lines representing left and right sidebearings. | ||
| Metrics b/g color | This control allows you to customize the background color for Metrics tool | ||
| Kerning b/g color | This control allows you to customize the background color for Kerning tool | ||
| <!—- | Auto kerning | Auto kerning tolerance options are used whenever you run the automatic kerning creation in the Pairs and Phrases panel. | -→ |
Glyph Window»
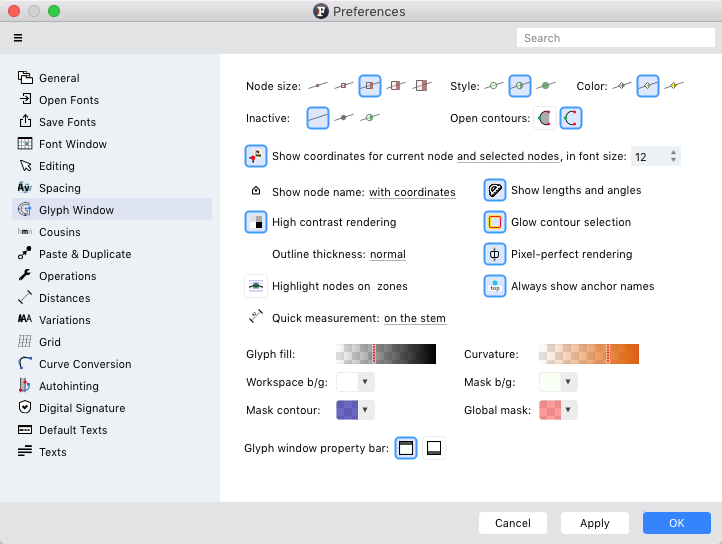
Node showing options include 5 sizes, 3 styles and 3 grades of color:

Select any combination of these 3 options you like.
When the middle Node Style option is selected (default), any node whose handles are aligned perfectly vertically or horizontally (or corner node whose adjacent line is almost vertical/horizontal) will be a darker solid color. Any node that does not meet such a test will be lighter and outlined. This helps identify points that are not quite where you intended, or are not quite proper extrema.
Inactive nodes may be invisible, black or colorful. If black or colorful inactive nodes are visible even when View > Show > Nodes is off.
Open contours can be rendered filled or not depending on what you prefer.
Other options are as follows:
| Option | Description |
|---|---|
| Show coordinates for current node and selected/all nodes | This option defines which nodes are shown with their coordinates when View > Show > Coordinates is on. If the latter is off only the node under the cursor shows coordinates |
| Font size for the current node coordinates | The size of text for coordinates of the current node |
| Show node name always/with coordinates/never | Nodes may have names and you can choose to show them always or when coordinates are visible. You may also choose to never show node names in the design space. They will still show in the Nodes panel |
| Show lengths and angles | When turned on, the Glyph window shows the length of handles and line segments if they are perfectly horizontal or vertical, or, otherwise, their angle. |
| High contrast rendering | When turned on, the items like metrics lines, guides, grid, etc. have more contrast |
| Glow contour selection | When turned on, the selected contour gets additional glowing effect (which is invisible on non-Retina screens) |
| Outline thickness | Choose how thick glyph outlines should look in the Glyph window (three settings) |
| Pixel-perfect rendering | When turned on, the rendering of outlines, nodes, guides, sidebearings, font metrics and the crosshair will be rounded to full screen pixels, so all lines drawn in the Glyph window will be sharper, especially on non-Retina screens. |
| Quick measurement on the stem/never/on the contour edge/everywhere | When the cursor is over the stem the stem thickness is shows by default. Choosing never switches this off, choosing on the contour edge shows thickness when the cursor is over the contour. Choosing everywhere measures not only stem thickness but also the distance between stems or stems and sidebearings |
| Glyph fill transparency | This control defines how filled outlines are rendered when you edit them. The color of fill is the property of an Element. To turn transparency off, use the View > True Fill trigger |
| Curvature transparency | This control allows you to customize the transparency for curvature |
| Workspace color | This control allows you to customize the background color for the Glyph window in the Text and Editing modes |
| Mask background color | This control allows you to customize the background color for the Mask layer |
| Mask color | This is the color for outlines in the Mask layer |
| Global mask color | This is the color for outlines in the Global Mask. |
| Glyph window property bar | Select the place for the Property bar: at the top (default) or at the bottom of the Glyph window. |
Cousins»
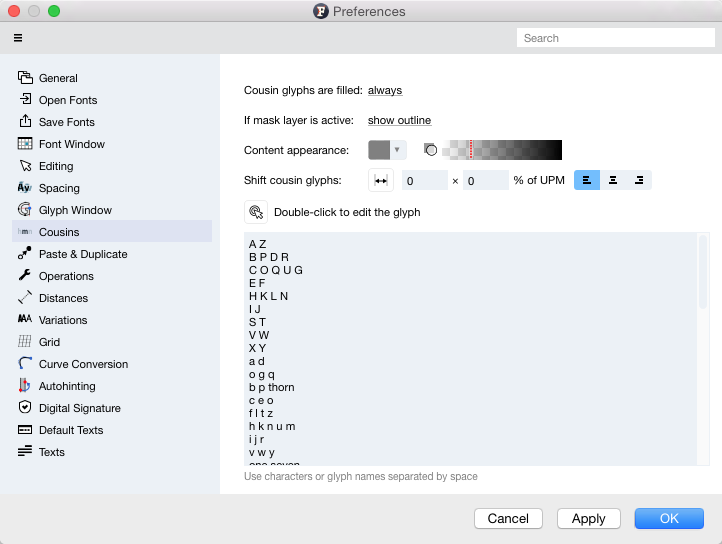
In this section, you can decide whether Cousins should be rendered filled (with adjustable transparency), or as outlines. You can also decide how the Cousins should be placed in relation to the current glyph: aligned to the LSB, RSB or the center, and optionally shifted by a X/Y unit distance. With Use metrics, the Cousins will be placed to the left or right of your current glyph, shifted by their advance width (this works best if you only have one glyph in your Glyph window).
The glyph list defines which glyphs are “cousins”. Use space-separated Unicode characters or glyph names, one cousin group per line. Enable Double-click to edit the glyph if you want to be able to quickly switch between the Cousins that you’re editing.
Paste & Duplicate»
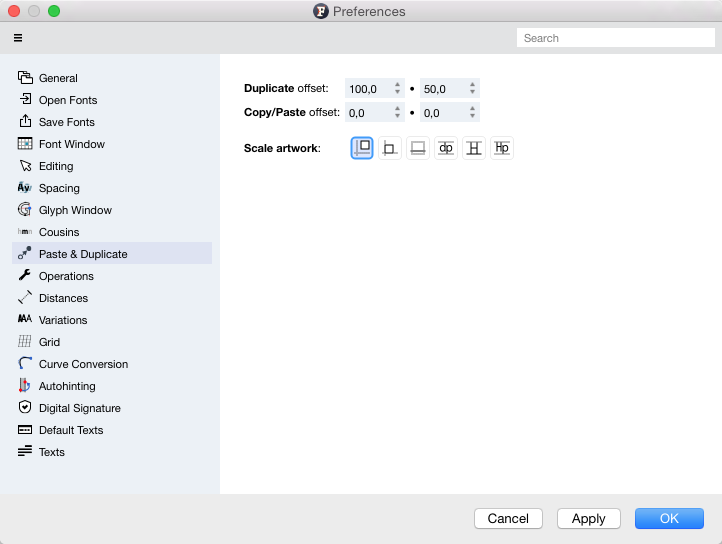
| Option | Description |
|---|---|
| Duplicate offset (100:50) | This setting controls the distance by which outlines are duplicated |
| Copy/Paste offset (0:0) | This setting controls the distance by which copied outlines are pasted |
Scale Artwork»
There are six options available under Scale Artwork:
| Icon | Option | Description |
|---|---|---|
 |
Do not scale or align | The copied artwork will be pasted without scaling and won’t be positioned at specified location in the glyph space |
 |
Align Only | The artwork will be pasted without scaling, but will be vertically positioned on the baseline |
 |
Scale to UPM, Align to Descender | The artwork will be pasted scaled to the font UPM size and will be positioned on the Descender |
 |
Scale to Ascender - Descender | The copied artwork will be pasted scaled to Ascender + Descender size and will be positioned on the Descender |
 |
Scale to Caps Height - Baseline | The artwork will be pasted scaled to the Caps Height size and will be positioned on the baseline |
 |
Scale to Caps Height - Descender | The artwork will be pasted scaled to the Caps Height + Descender size and will be positioned on the Descender |
Operations»
Operations are a number of different commands from Font, ===Glyph== and Element menus:
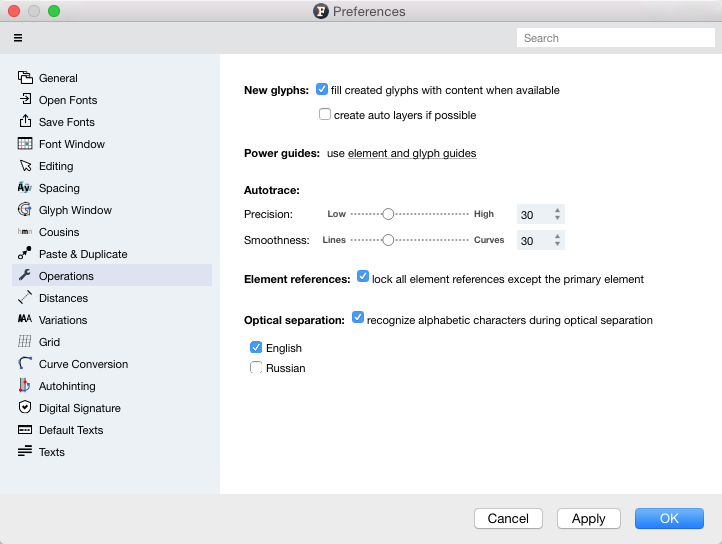
New glyphs»
When the fill created glyphs with content when available option is turned on (default), then when you double-click on an empty glyph cell in the Font window or when you use the Font > Add Glyphs command, FontLab will create the glyph, and then it tries to generate the glyph as a composite or auto glyph in all font masters: the glyph layers are created and element references are added to the them.
FontLab generates the contents of each glyph layer using glyph generation recipes from the alias.dat file that is also used by the Generate Glyphs operation. Turn this option off if you do not want to automatically generate the glyph contents.
In addition, when the create auto layers if possible option is turned on, FontLab will generate the glyphs as auto glyphs, so their contents will automatically update when you add or modify primary glyphs later. Turn this on if you plan to keep consistent glyph metrics between base letters and letters with diacritical marks, and if you plan to use anchors for mark positioning.
When the option is turned off, FontLab will generate the glyphs as composite glyphs, so their contents will be manually editable but only the contents of the element references will be updated, not the positioning of elements, guides or anchors. Turn this off if you don’t plan to use anchors for mark positioning or need manual control over the positioning of elements or over glyph metrics in composite glyphs.
Power guides»
When you call the Glyph > Add Power Guides command, FontLab automatically creates element guidelines and links them to nodes. You can draw those element guidelines in advance or add glyph or font guidelines and select here which of them will be used as power guides. This option just gives you more control.
Autotrace»
Precision and smoothness are the options to tune up the autotracing algorithm which is called from the Element > Image > Autotrace and Element > Image > Separate and Trace operations. See the Autotracing section for details.
Element references»
When FontLab automatically creates element references (Font > Detect Element References) it locks all references except the one which is called primary element. You may choose to switch this option off to keep all references unlocked.
Optical separation»
The OCR system used in FontLab can recognize characters of two languages: English and Russian. This is used in Element > Image > Separate and Trace when you need to transform a bitmap image to the number of outline glyphs. You can switch one or both languages on; or turn OCR off if needed. More languages can be added later without a special notice.
Distances»
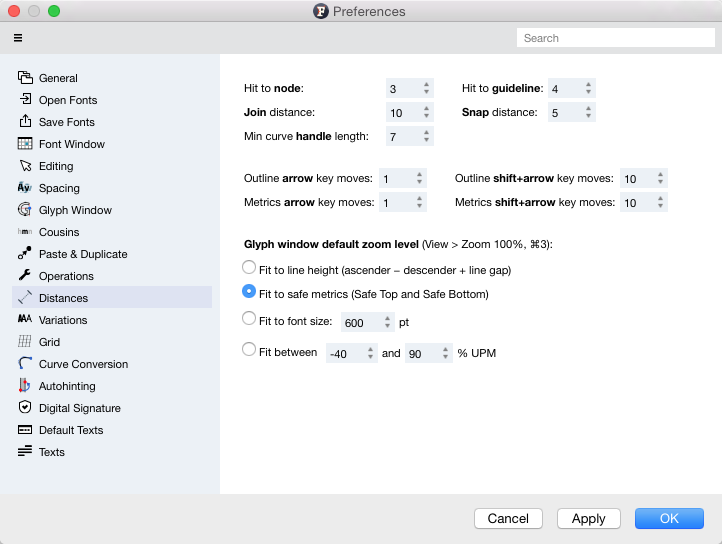
Some useful distances can be tweaked here to slightly change the behavior of editing tools. We have put the default values in brackets:
| Option | Description |
|---|---|
| Hit to node (3) | When you need to select a node, you need to click it with the mouse. You don’t need to click the node precisely, but you must be within the “hit to node” distance defined here |
| Hit to guideline (4) | When you need to select a guideline, you need to click it with the mouse. You don’t need to click the guideline precisely, but you must be within the “hit to guideline” distance defined here |
| Join distance (10) | This setting defines the distance within which two nodes will join when you move one to another |
| Snap distance (5) | If any of the objects in the GW has the “snap-to” property turned on, moving a node will cause it to snap to that particular objects if the distance between the node and the object is not larger than the distance (in pixels) specified here. Tip: Enabling “snap to grid” and increasing the snap-to distance may be helpful when designing pixel fonts |
| Min curve handle length (7) | This setting defines the minimum length (in screen pixels) of the handle (BCP) to display it. So handles which are shorter will hide to reduce clutter in glyph display. To make them display whenever possible, set the value to 1 |
| Outline arrow key moves (1) | This setting defines the distance (in font units) by which objects are moved when ++Arrow++ keys are used |
| Metrics arrow key moves (1) | This setting defines the distance (in font units) by which sidebearings are moved or kerning value is changed when ++Arrow++ keys are used |
| Outline shift+arrow key moves (10) | This setting defines the distance by which objects are moved when ++Shift+Arrow++ keys are used |
| Metrics shift+arrow key moves (10) | This setting defines the distance by which sidebearings are moved or kerning value is changed when ++Shift+Arrow++ keys are used |
Glyph window default zoom level»
Every time you open a new Glyph window it opens at the default zoom level. The default zoom level for Editing mode is the one you set with the View > Zoom 100% (Cmd3) menu command. What is meant by 100% can be defined here in the preferences. Choose among four different options and check how this fits your needs.
Variations»
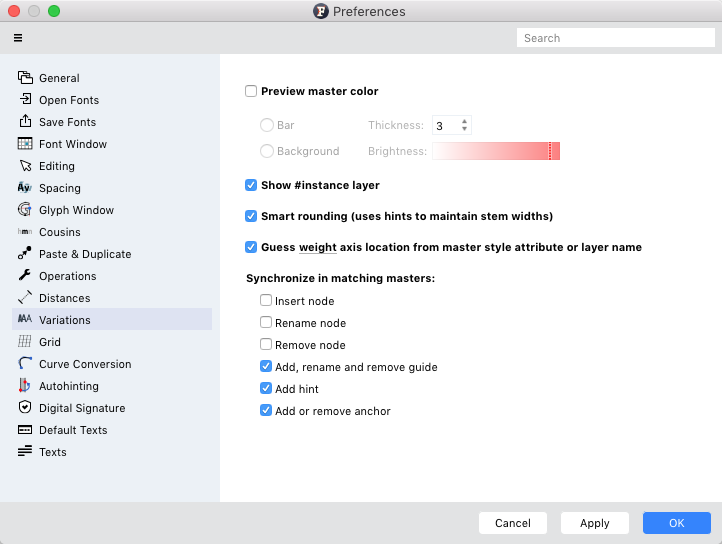
Preview master color»
Turning this option on draws the color Bar with the defined Thickness at the top of the Glyph window or fills the Glyph window Backckground with the defined Brightness when you edit in the corresponding font master. The color of the bar or background is the layer color defined in the Layers and Masters panel.
Show #instance layer»
Turn this option off to hide the #instance layer containing interpolation results.
Smart rounding »
Guess weight/width/weight&width axis location from master style attribute or layer name»
When turned on (default), in fonts with multiple masters, FontLab VI uses the Font Info > Names > Weight and Font Info > Names > Width style attribute values to automatically build the weight (wght) and width (wdth) axes, and to infer the location of the master on those axes — even if these axes are not defined in Font Info > Axes. FontLab also makes glyph layers work as font masters if the glyph layers use names such as Regular, Bold or similar (using one of the registered weight or width keywords) — even if these font masters are not defined in Font Info.
To disable this “guessing”, turn the checkbox off. If the Output panel reports errors like KeyError: : 'wght' when you export an OpenType Variations font, turn the checkbox off. Then, masters and layers will be variable along the weight and/or width axes only if the axes are defined in Font Info > Axes and if the corresponding masters are defined and set to variable using the blue AAA toggle in Font Info > Masters.
Synchronize in matching masters»
These settings allow you to perform an editing action on the current master and have the same action “replayed” on all other masters that match the current master. As a result, your editing actions affect all compatible masters at once. Note that if any master doesn’t match the current master, it will not be affected.
Insert node keeps masters compatible when you add a node to a contour on one of the masters. The new interpolated node is added on the corresponding contour in other masters automatically. But if you add a new contour masters will lose their compatibility.
Rename node renames nodes across masters.
Remove node keeps masters compatible when you delete a node on one of the masters. The corresponding node is deleted in other masters automatically. If you delete a contour, the corresponding contour is removed on other masters as well.
Add, rename and remove guide adds a guide on all matching masters whenever you add a guide in the current master. If you rename a guide in one master, the guides with the same old name on other matching masters will get the same new name. If you remove a font guide in one master, the font guides with the same name on other matching masters will be removed.
Add hint allows you to add a hint on all matching masters.
Add or remove anchor allows you to add an anchor on all matching masters in the same position, and removes anchors from all matching masters that have the same name as the anchor you’re removing from the current master.
Grid»
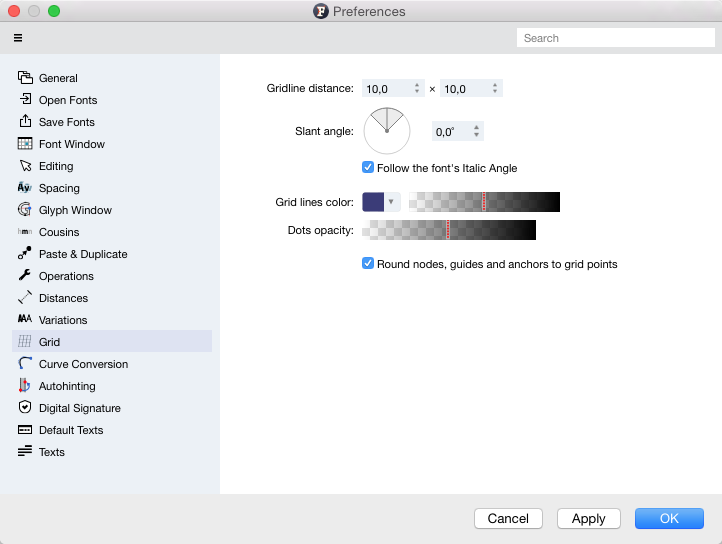
Gridline distance defines the distance between vertical and horizontal gridlines.
Slant angle allows slanted vertical gridlines. The angle can be within the -45˚+45˚ range. This option is overridden by the next one.
Follow the font’s italic angle checkbox will cause an oblique font to display a slanted grid and sidebearings and the upright font to display a vertical grid regardless of the slant angle in the previous option.
Gridlines color allows you to change the color and opacity of gridlines.
Dots opacity changes the opacity of gridlines intersections.
Turning Round nodes, guides and anchors to grid points OFF allows you to override the setting Show > Snap > Grid for nodes, anchors and guidelines. With this setting on, snapping to the grid becomes “strong” so that nodes, guides and anchors (but not handles) will snap to it immediately.
Curve Conversion»
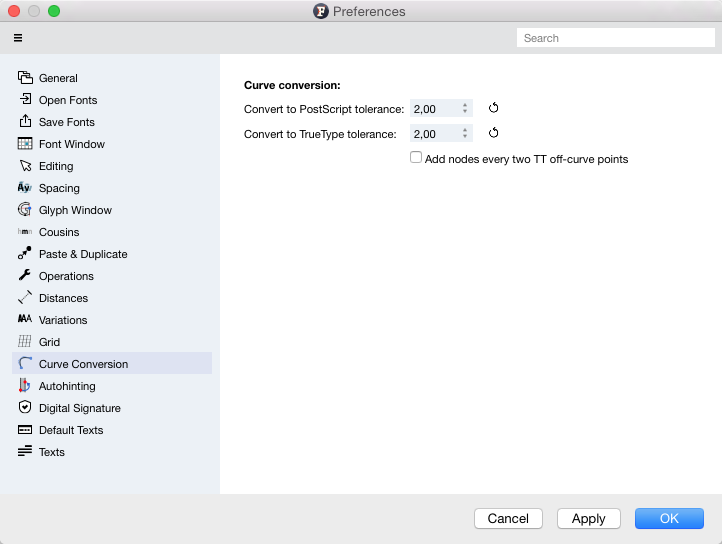
The Curve conversion tolerance options are used whenever you convert TrueType to PostScript or vice versa. Use the tolerance controls to define how close to the original should the result be. The less the value the more precise the conversion is. But note that FontLab may add points to make conversion more precise.
When Add nodes every two TT off-curve points is active, FontLab may add unnecessary nodes between off-curve points. If this option is off, unnecessary nodes won’t be added.
Autohinting»
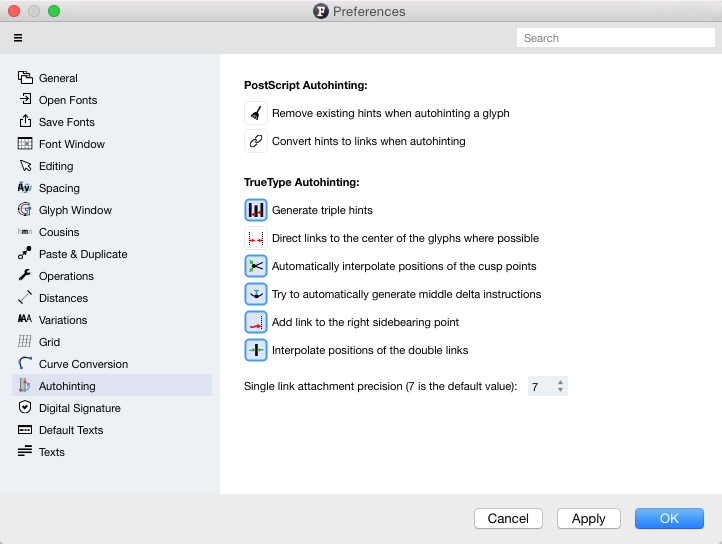
The PostScript Autohinting options are as follows:
Remove existing hints when autohinting a glyph»
If Remove existing hints when autohinting a glyph is on, and you run Tools > Autohint or press F7, FontLab will remove the existing glyph hints before calculating new hints.
Convert hints to links when autohinting»
If Convert hints to links when autohinting is on, and you run Tools > Autohint or press F7, the hints will be subsequently converted to links (same as Tools > Hints to Links). Links are “dynamic hints” — when you move nodes, the links will follow your design changes. This is particularly useful when you use View > Show > Hints or View > Metrics and Hinting Shadows as a visual design aid.
The TrueType Autohinting options are as follows:
Generate triple hints»
If this option is active FontLab will try to generate TrueType instructions that simulate PostScript triple hints for characters like ‘m’ where the distance between stems must be kept the same at all PPMs.
Direct links to the center of the glyphs where possible»
FontLab can try to hint starting from the left sidebearing and going to the right or starting from both sidebearings and going to the center of the glyph. Use this option to customize the hinting direction.
Automatically interpolate positions of the cusp points»
A Cusp is a point where the contour sharply changes direction. If this option is on, FontLab will generate an Interpolate command that will link the cusp point to one of the links.
Try to automatically generate middle delta instructions»
Our research shows that it is useful to include small middle delta commands at the end of links that connect round parts of the glyph.
Add link to the right sidebearing point»
FontLab can generate a single, distance-rounded link that will go from the rightmost hinted point to the right sidebearing point. This feature guarantees at least one pixel distance between glyphs on all PPMs.
Interpolate positions of the double links»
In glyphs like ‘B’, which have overlapping stems, FontLab may hint them independently or hint the first stem and then interpolate the position of the second stem using the interpolation command with the final point aligned to the grid. Whether this is appropriate for your font has to be decided on a case-by-case basis.
Single link attachment precision»
If an outline is not very precise you can enter a value in this field so FontLab will have a threshold to decide when several points are located along a line. For precise fonts set this value to 1 or 0. 7 is the default value.
Generally speaking, autohinting is a trial and error process. You can get very good autohinting results if you select the correct options for your font and define correct stem and alignment zone behaviour at the critical PPMs.
Digital Signature»
This option controls settings for digital signatures that can be included in the OpenType (TT or PS) fonts that you generate. For more information about digital signatures, please refer to Microsoft Typography’s detailed explanation of the subject.
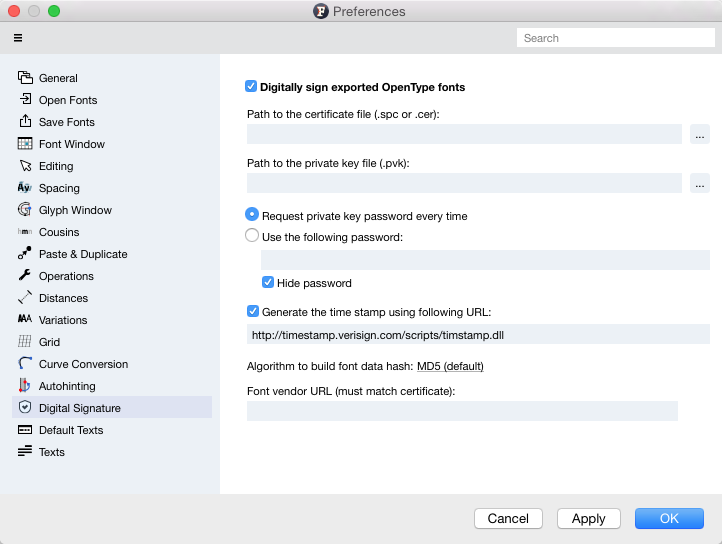
Digitally sign exported OpenType fonts»
When this option is enabled, a DSIG table will be generated that includes a digital signature. Note that you need to own a valid Authenticode code signing digital certification to be able to digitally sign fonts. When disabled, a “dummy” empty DSIG table is generated and all the following options are disabled as well.
File paths»
You should point FontLab to the certificate file (.spc or .cer) and private key file (.pvk) that you will receive from your certification authority. It is a good idea to store the private key file in a safe location, e.g. on a USB key, although you can use any location. The option to add these file paths becomes available only when Digitally sign exported OpenType fonts is enabled.
Request private key password every time»
If selected, FontLab will ask you for the password for your private key every time you generate a font.
Use the following password»
If selected, FontLab will remember the password for your private key in the preferences file.
!!! Attention:
When you save your Preferences to an external file, all your settings are saved, including the password for your Digital Signature. Be careful when sharing your preferences files with other people.
Generate the time stamp using the following URL»
Paste the link to the service that is making time stamps here. If empty, a time stamp will not be generated.
Algorithm to build font data hash»
From this dropdown menu, you can choose the algorithm, MD5 or SHA1, that will be used to build the font data hash. MD5 is selected in this menu as default.
Font vendor URL»
In this field, you need to enter the URL of the font vendor. This URL must match the one in your certificate file.
Default Texts»
When testing your hinted fonts, test a range of sizes. View sample text at what you consider to be “normal” viewing size, and test at 3–4 sizes above and below. Keep in mind that you may run your machine at much higher or lower resolution than others. Someone with a 1024 x 768 17 inch monitor will likely choose a smaller size than someone using the same resolution on a 12 inch laptop.
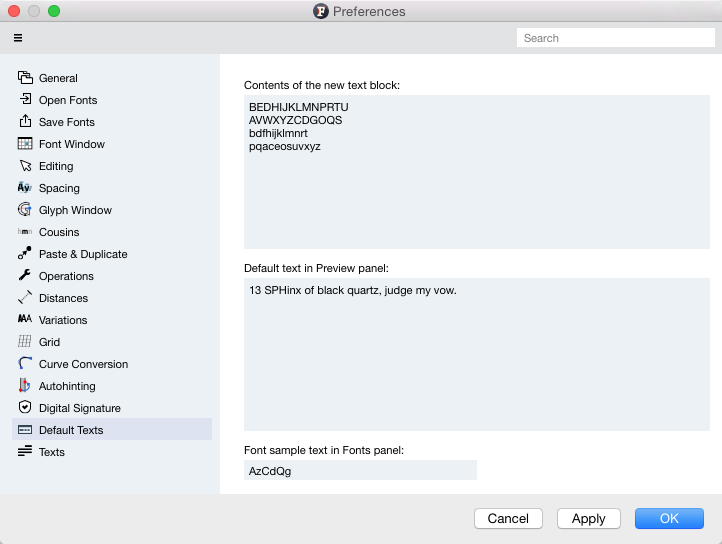
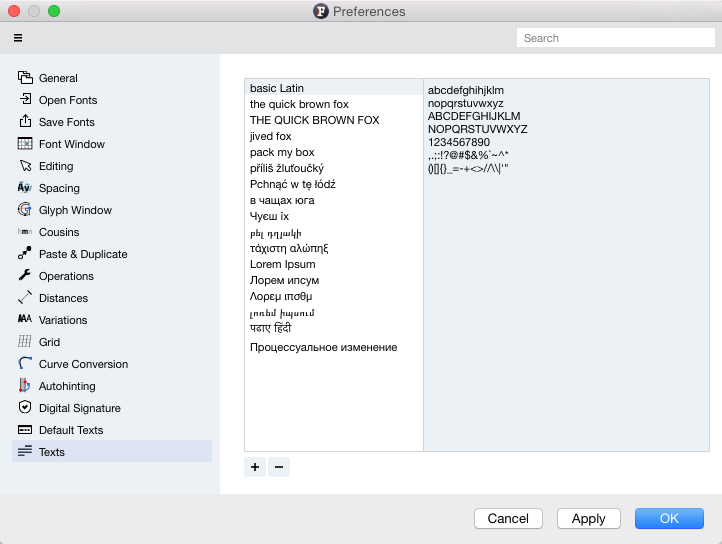
Texts»
Here is where you set the type of sample texts you wish to use, such as Lorem Ipsum…
You actually have titles at the left and texts at the right. Double-click on a title to edit it. Use + to add more samples or - to remove the sample which you do not need.
These sample texts appear in the Text drop down menu in the Property bar of the Glyph window.