Making uppercase accented characters using custom recipes»
If your typeface has accented characters, chances are you have two forms of accents – one for lowercase letters and another for uppercase ones. Uppercase accents tend to be squatter than their lowercase counterparts so that they can fit better over tall uppercase characters, while keeping the vertical metrics manageable. Using custom recipes, you can automate the process of creating uppercase accented characters, and save yourself a lot of precious time.

Before you learn more about using recipes, you need to create uppercase accents first. So, let’s create the acutecomb.case, which we will use in later steps. Go to Font > Generate Glyphs, and select the Custom tab. In the input field, enter acutecomb.case. Now unselect all the options in the left sidebar, and press =Ok=. FontLab will create this new glyph with the same anchor and contours as the acutecomb, and you can now edit the shape to make it more suitable for uppercase characters.
Recipes»
Recipes are strings with an = sign in their middle. On one side of the = is the resultant glyph name, and on the other, the ingredients for that glyph with an instruction about how to combine them. They are used in the Generate Glyphs dialog and in the Layers and Masters panel, and you will see how in this tutorial. Recipes in FontLab VI can follow one of two syntax – the legacy syntax that is backwards-compatible with FontLab Studio 5 and is used in the alias.dat file; or the extended one based on Glyph Construction syntax.
Writing recipes in the legacy syntax»
In the legacy syntax, glyph generation code looks like this:
<legacyGlyphRecipe>=<resultGlyphName>
Each <legacyGlyphRecipe> consists of one or more component glyph names separated by attachment operators (without spaces). There are two attachment operators:
Underscore _»
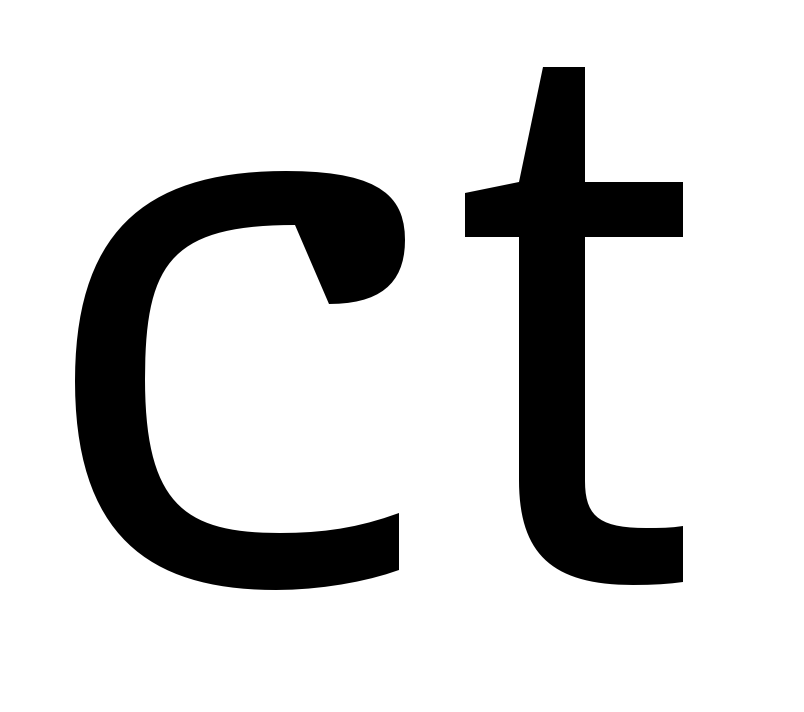
Underscore acts as a spacing attachment. It appends the second component in the recipe to the right of the first component, and also adds the advance width of the second component to the existing advance width of the glyph. _ is useful when you are creating ligatures. For instance, if you write the following recipe:
c_t=ct
The components c and t will arrange themselves like this:
Plus +»
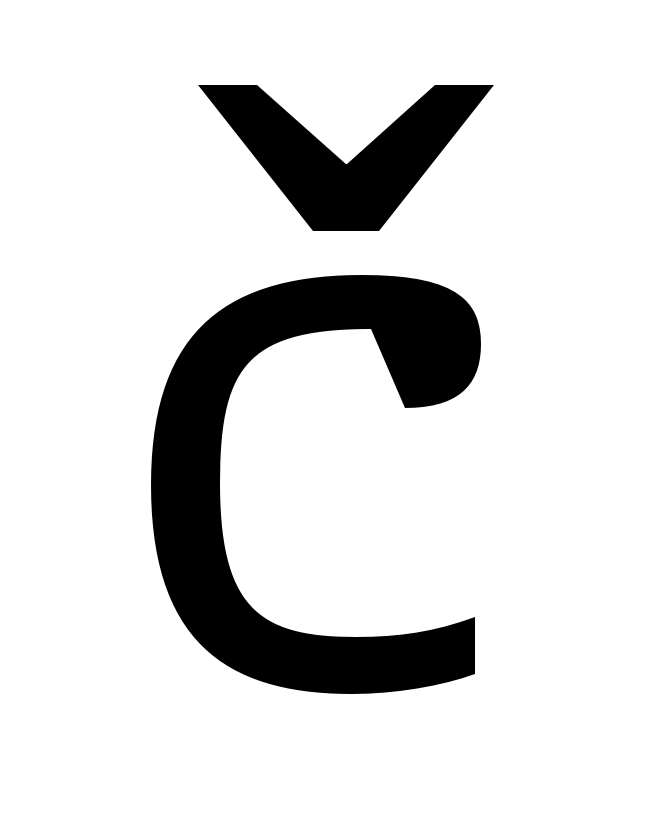
Plus acts as a non-spacing attachment. It appends the second component in the recipe as a mark so it attaches to the first component, but does not modify the advance width. So, + is useful in creating accented characters. For instance, if you write the following recipe:
c+caron=ccaron
The components c and caron will arrange themselves like this:
Writing recipes in the extended syntax»
In the extended syntax, glyph generation code looks like this:
<resultGlyphName> = <extendedGlyphRecipe>
You’ll notice that the order of the <extendedGlyphRecipe> also consists of one or more component glyph names separated by attachment operators. There are two attachment operators:
Ampersand &»
Ampersand acts as a spacing attachment (like underscore _ in the legacy syntax), useful for building ligatures.
Plus +»
Plus, like in the legacy syntax, acts as a non-spacing attachment, which is useful in creating accented characters.
If you would like to learn more about glyph recipe syntax – including how to position components and modify glyph metrics using recipes, head to our manual for a deep dive into the subject.
Using custom recipes»
In the Layers & Masters panel»
The Layers & Masters panel is the place to go to if you would like to create a single uppercase accented characters. In this tutorial, let’s create the Aacute. Open the Aacute in the Glyph Window, and then go to Window > Panels > Layers & Masters. In the panel, click on the Auto Layer button. Once you do that, FontLab will try to build the glyph based on predefined recipes in the alias.dat file. You will also see this predefined recipe in the Auto Layer field. This is the result you will see:
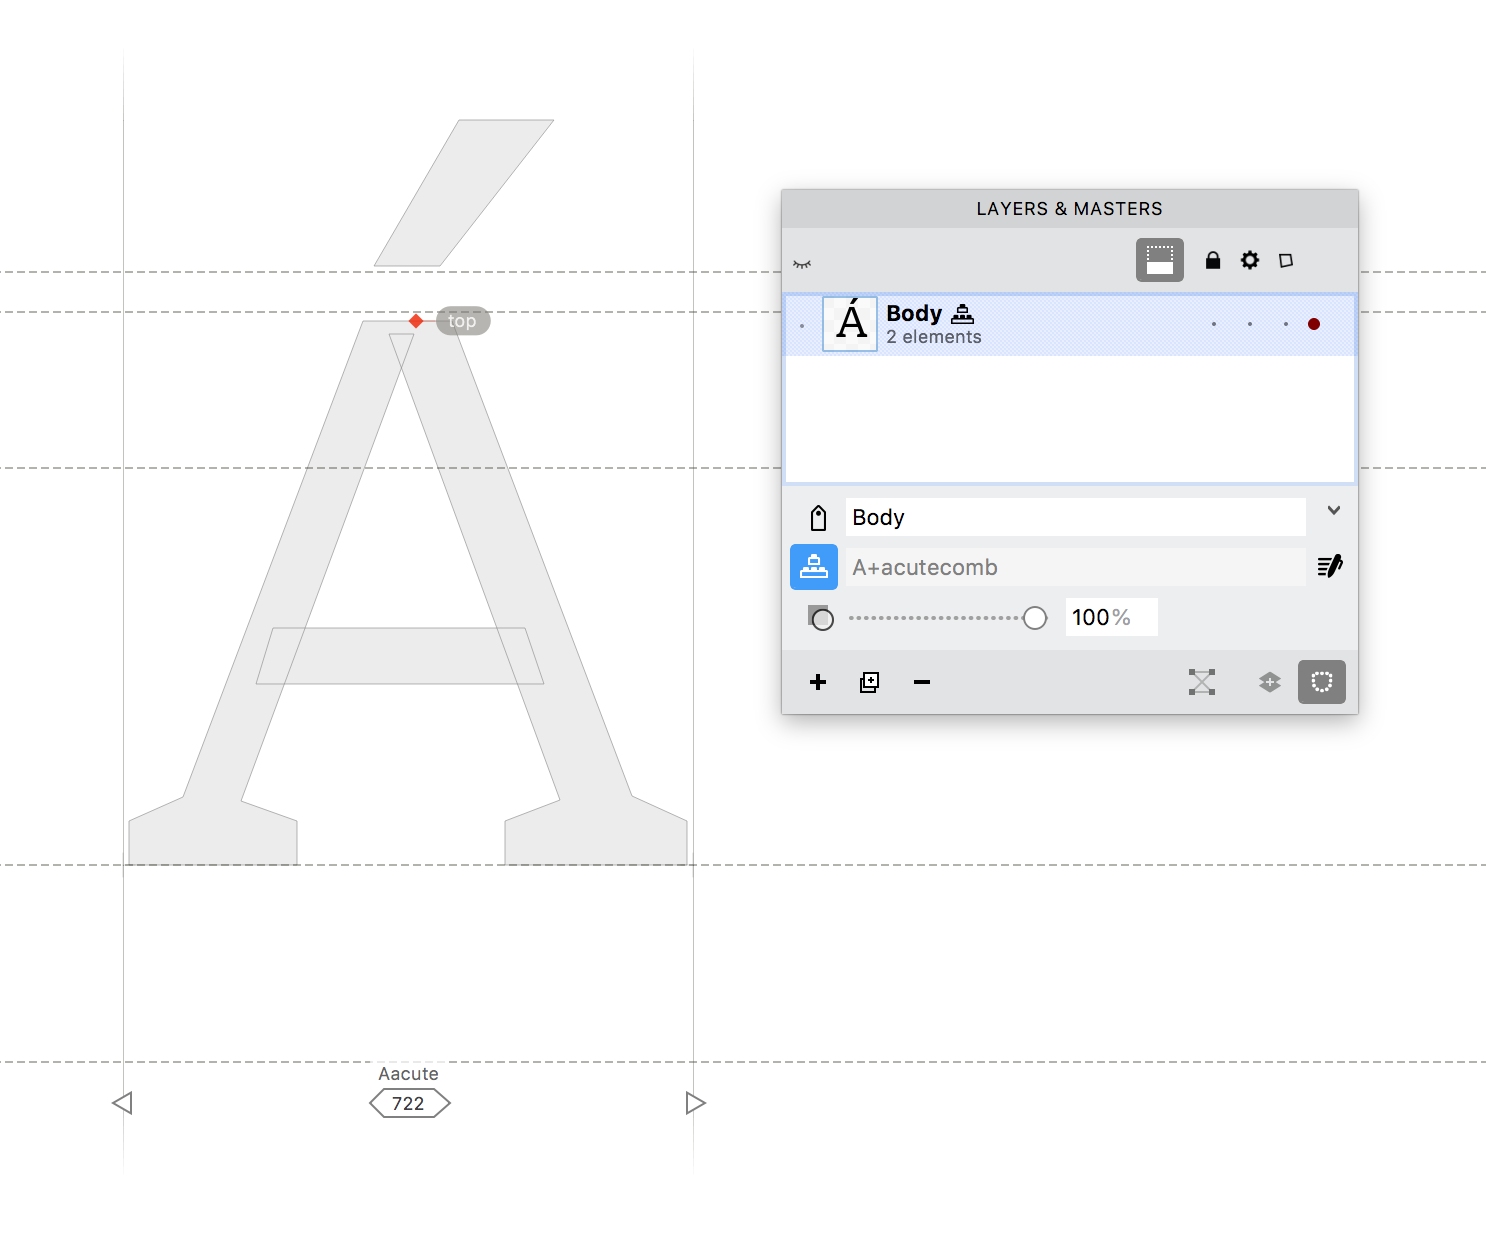
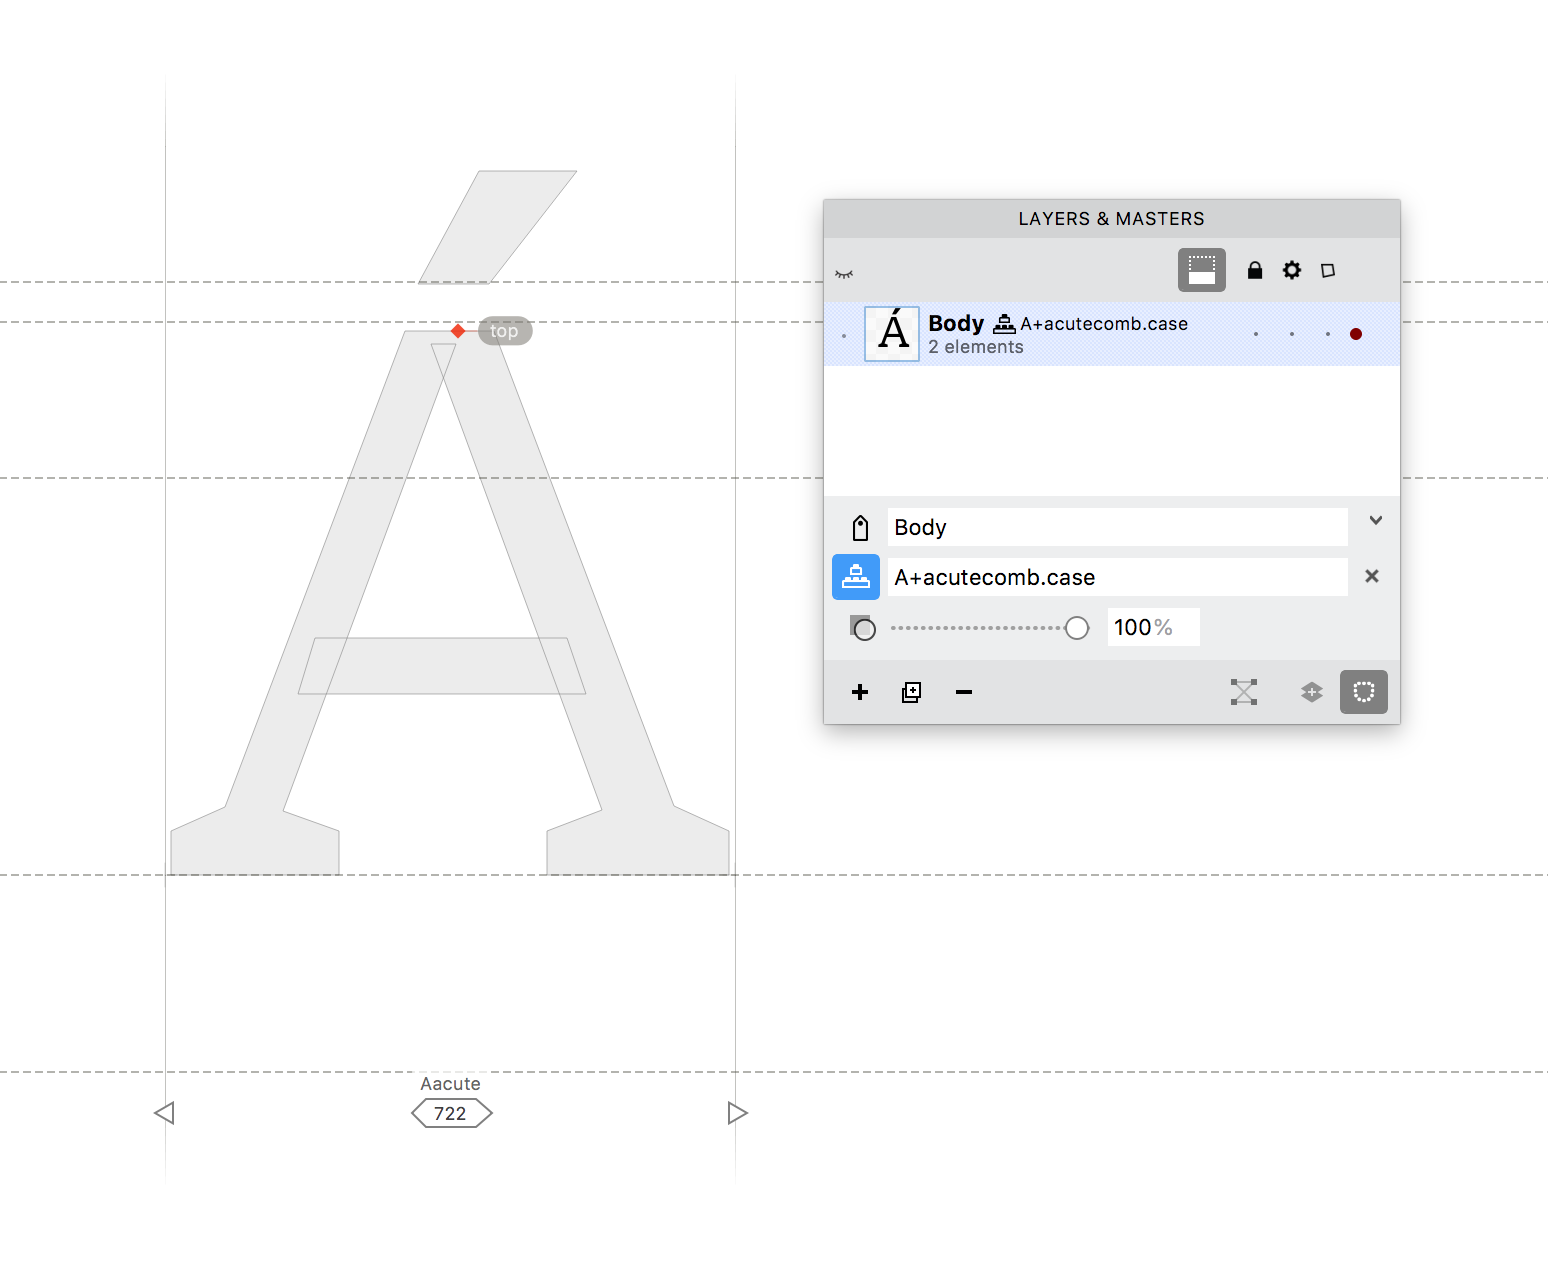
Now to use the uppercase version of the acutecomb in the Aacute, force a custom recipe. Click on the Edit Recipe button, and then enter the custom recipe in the input field. You can use either syntax in this field, but if you start with =, FontLab will interpret the recipe using the extended syntax. We will use the legacy syntax. Enter A+acutecomb.case in the field, and now FontLab will use the uppercase accent to build this glyph.
In the Generate Glyphs dialog»
The Generate Glyph dialog comes handy if you have to build several glyphs using a single operation. The dialog can be used to create ligatures, accented glyphs or alternates, and by using custom recipes you can tailor the glyphs you are creating and how they are built. We will build all the uppercase glyphs with the acute using the Generate Glyphs.
Go to Font > Generate Glyphs to open the Generate Glyphs dialog. In the left sidebar, check Create Auto Layers if you want to build Auto Glyphs, or leave that option unchecked to build Composite Glyphs. Here you can also choose if you would like the new glyph to be built using Element References or Components, by using the Link as References option.
Now select the Custom tab. Here in the input field, you can enter a custom recipe. Based on your preference, use the Use legacy (FLS5) code option to decide what syntax you would like to use. Select the option, since we will be using the legacy syntax. You can enter a new recipe in each line. A preview of your custom-built glyphs is shown below.
To create our uppercase characters, enter the following recipes in the Custom tab:
A+acutecomb.case=Aacute
C+acutecomb.case=Cacute
E+acutecomb.case=Eacute
I+acutecomb.case=Iacute
N+acutecomb.case=Nacute
O+acutecomb.case=Oacute
T+acutecomb.case=Tacute
S+acutecomb.case=Sacute
U+acutecomb.case=Uacute
Y+acutecomb.case=Yacute
Z+acutecomb.case=Zacute
In the dialog you’ll see:
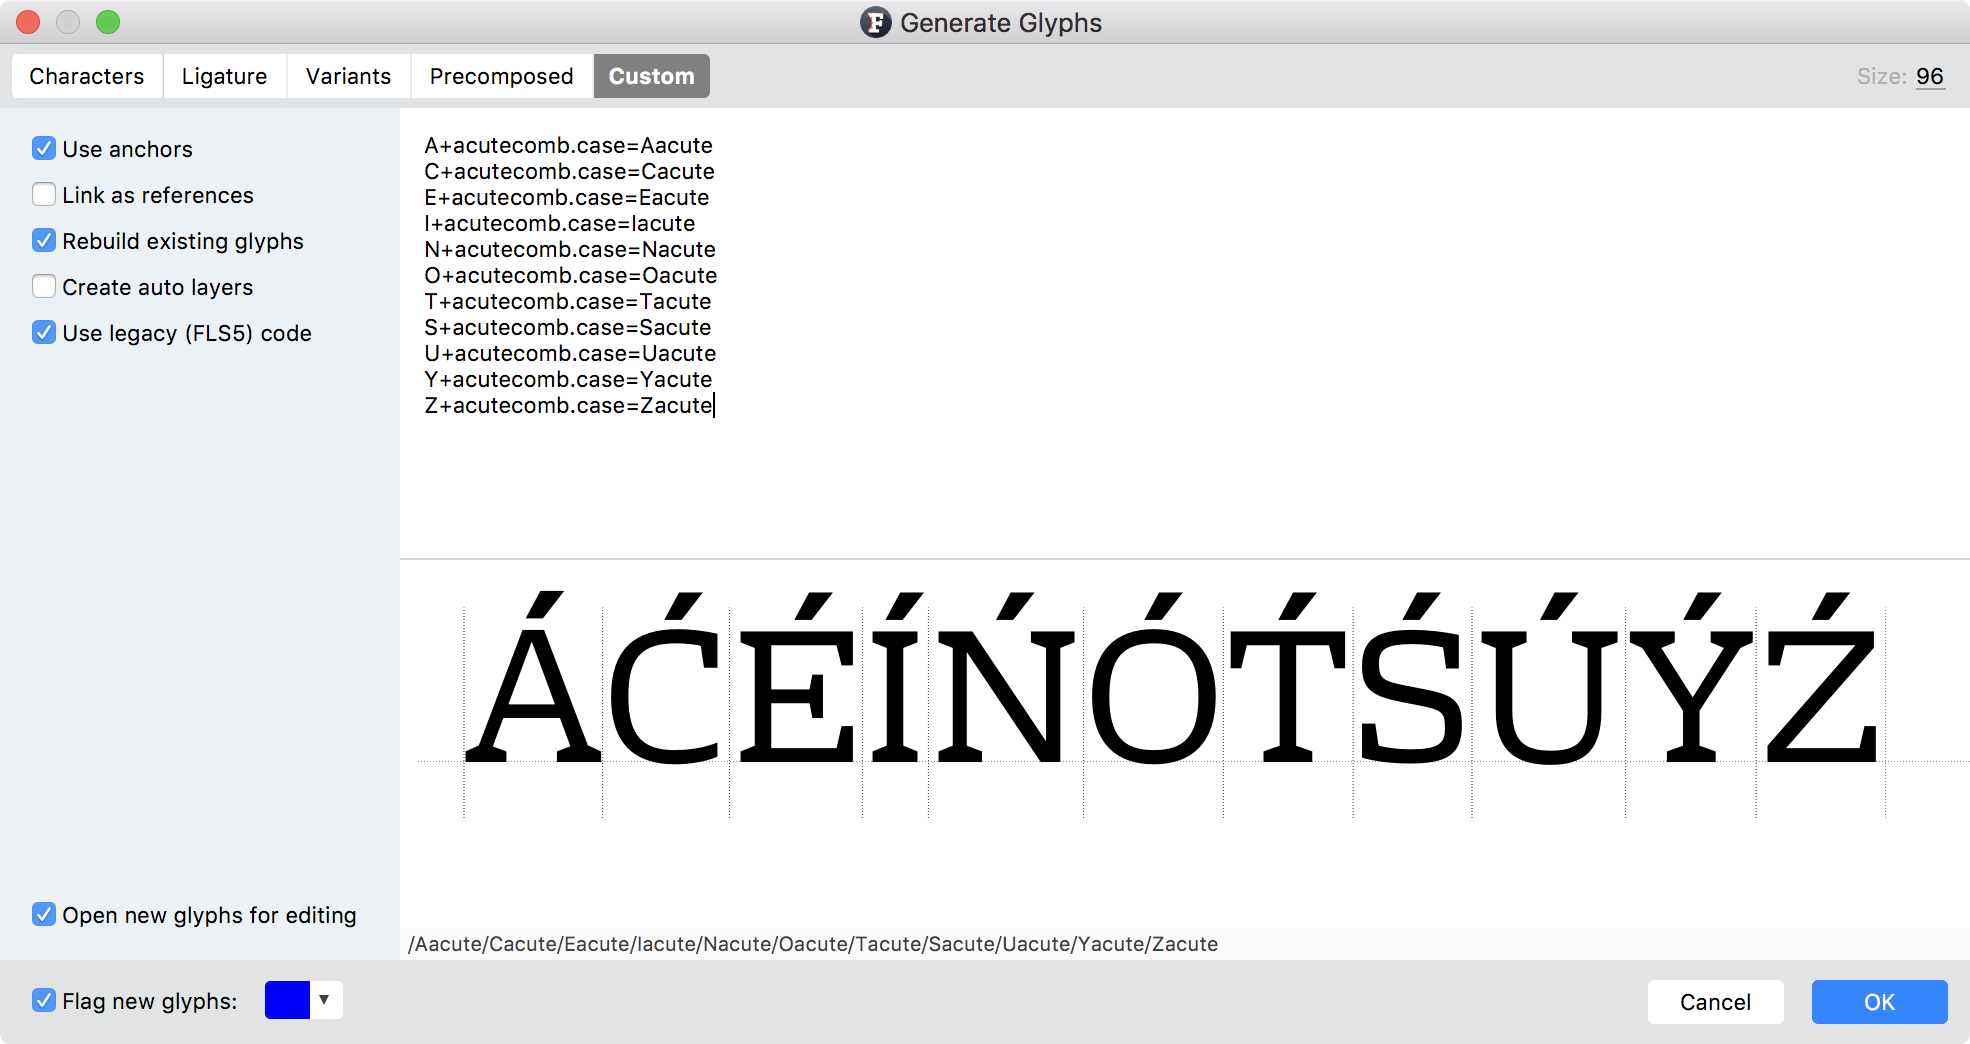
If you are happy with what you see in the preview, press Ok.
To learn about all the powerful functions of the Generate Glyphs dialog, read the about it in the FontLab VI manual in the Generate Glyphs and Glyph Recipe Syntax articles.