Manually Kern Exceptions

Benefits Check and set your exceptions quickly and accurately.
It’s a good idea to do auto before manual exceptions.
Why?
Because auto finds the exceptions. Finding exceptions is hard.
As you will see…finding exceptions is like taking a trip over the river Styx, into the caverns of classes. Hundreds of thousands of possible pairs lurk in there.
…Also, if you use a Mac, making a left side exception is hard!
Viewing Kerning Exceptions
If you’ve never made kerning exceptions, it can get confusing.
So here’s a file where I made some bogus kerning exceptions.
Download VFJ
❶ Open the file. ❷ Open the Kerning panel. ❸ Push the triangles on the sides of the kerning pairs.
You will see something like this.▼
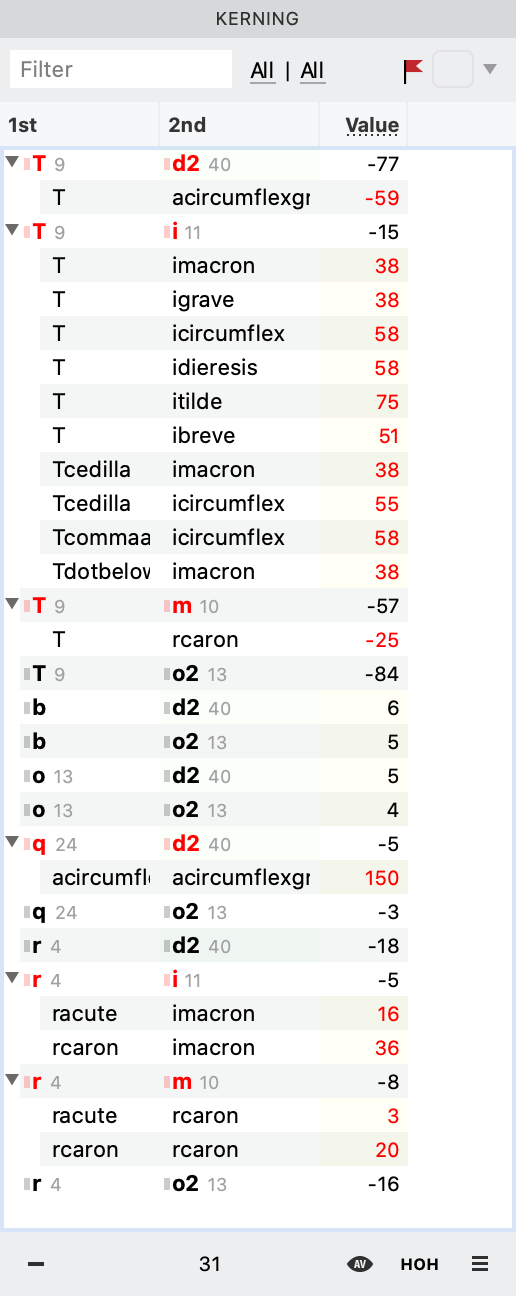
But what does it all mean?!
Here’s an explanation. This might not make total sense, but look at it now.

In the rest of this tutorial this will get explained.
Then you’ll see this chart again at the end.
Avoid Confusion by Understanding Kerning Types
When we talk about kerning, it usually seems like there are two types. Kerning and Kerning Exceptions.
This is true in a way.
But in actuality, there are four types!
Class:Class Kerning
Let’s check out the first type.
These ones feel all nice and comfy in their blue and green homes.
When you are starting kerning on your font, all your kerns should be this type.▼

Every letter should be in a class!
At the bottom of this image, there’s the row from the kerning panel.
Notice that the T and r classes appear bold.
Tip
Even if you don’t think a class is necessary, it is good to put everything into a class. It is easy to remove a class later, but very hard to add one.
Glyph:Glyph Kerning
Here’s the opposite type of kerning.
In this one, every glyph is a vagabond. Wandering the streets alone. (Ok, well with his other lonely pair.)
These glyphs have no cozy blue or green home.
This is glyph to glyph kerning.
In early stages, these are bad.
Actually the example I have below is a bad pair. F and x should be in classes!
Glyph:glyph kerning overrides every other type. So it can be useful toward the end of the kerning process.

Notice that on the kerning panel F and x are not bold. Glyphs by themselves don’t get to be bold.
Also they have no number next to them!
Also, notice the key controls for these Ctrl Alt.
You make them by holding down Ctrl and Alt, while dragging with the mouse…or using the ←→ keyboard arrows.
While glyph to glyph kerning is not good in the early stages, glyph to glyph exceptions are OK in your exported file.
FontLab arranges your kerning to save file space and avoid table overflows.
Class:Glyph Kerning
The “option exception” is the most commonly used, since accented letters can come after capitals. (And not the other way around.)
Use the Alt button while moving to make these. In this example, all 9 T’s in the “T class” will kern with only the itilde.

Class:Glyph Kerning
This last exception is also common.
Hold down Ctrl to make this exception.
This is difficult to manually push on the Mac, because if you use the mouse, your context menu will pop up!
In this example, only the Tbar will kern with all 13 members of the o class.

Correctly Read Exceptions
Anti-Warning Warning!
When I first was learning kerning, I though that the red in the panel meant bad!! It doesn’t. Red lets you know that you have a kerning exception. #youdidntbreakit
Let’s see how all these exceptions look in the kerning panel.
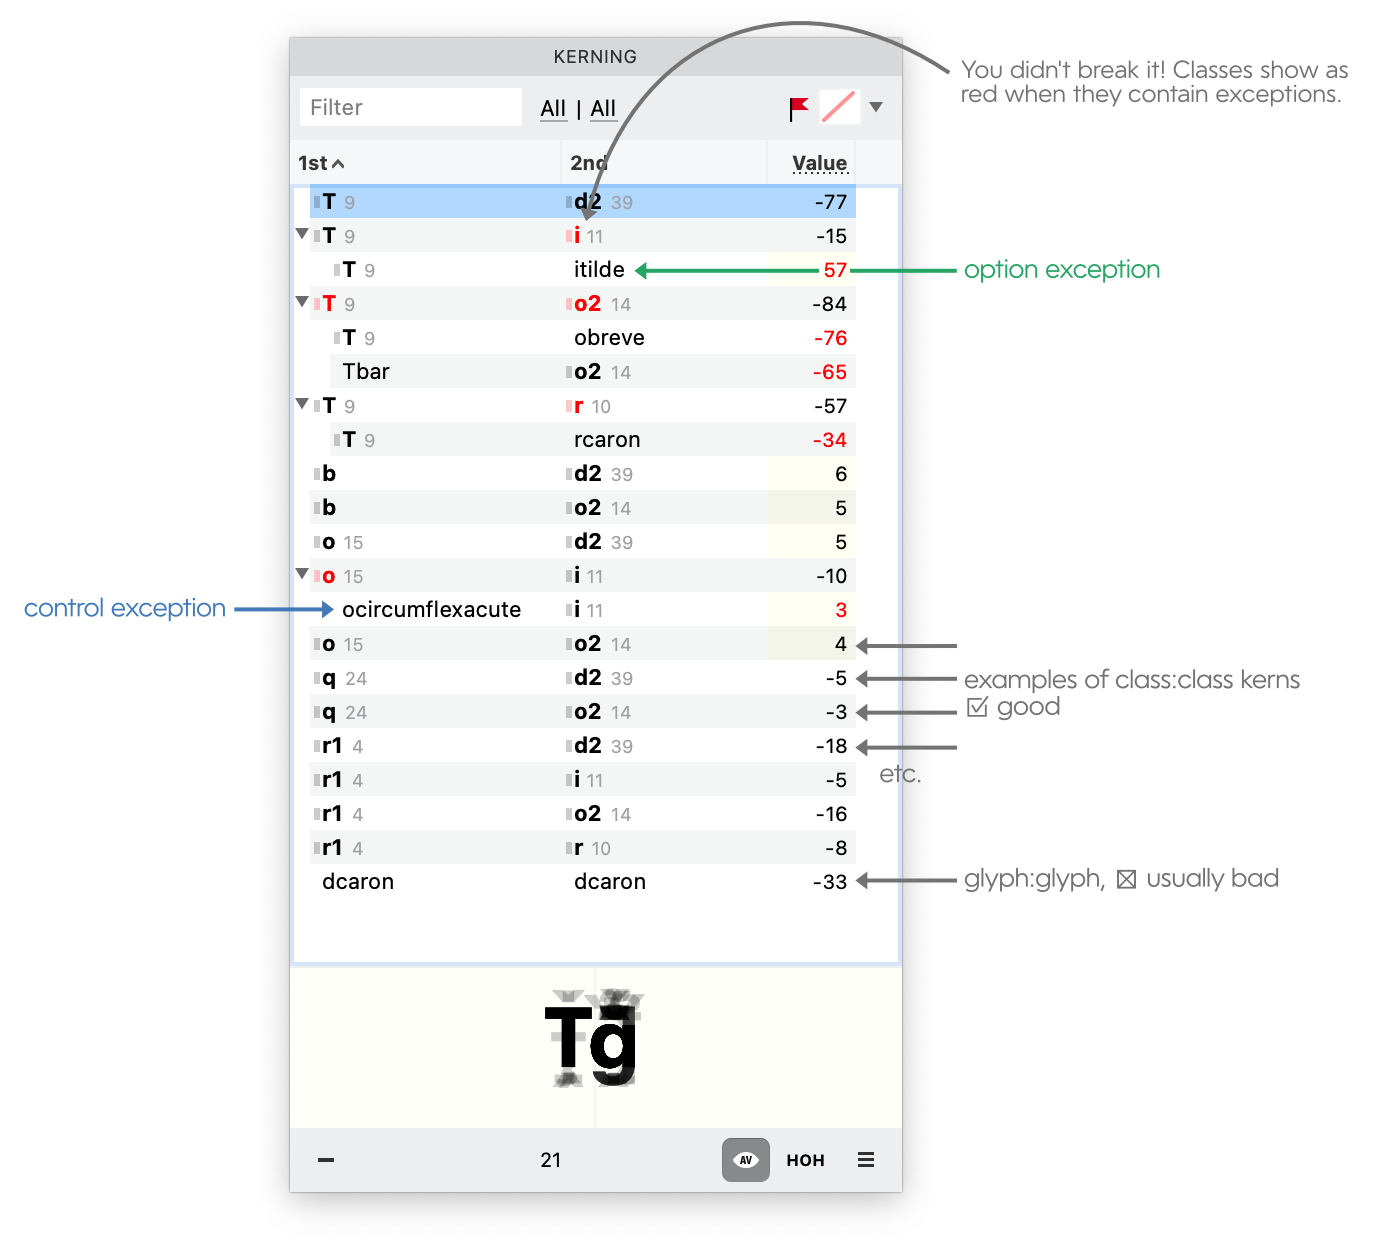
And here’s a refresher on what all the symbols mean.▼

This is a lot of stuff to remember!!
And it can take a while to get used to it.
But this is not necessary to memorize.
You can use this next technique instead.
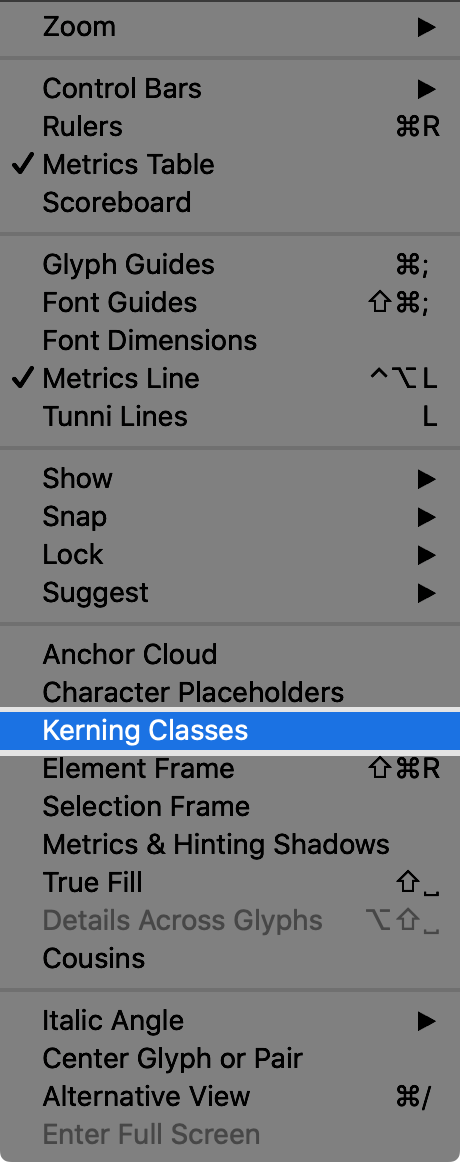
Show Kerning Classes
There’s a great option to turn on when you are making exceptions.
Go to menu: View > Kerning Classes
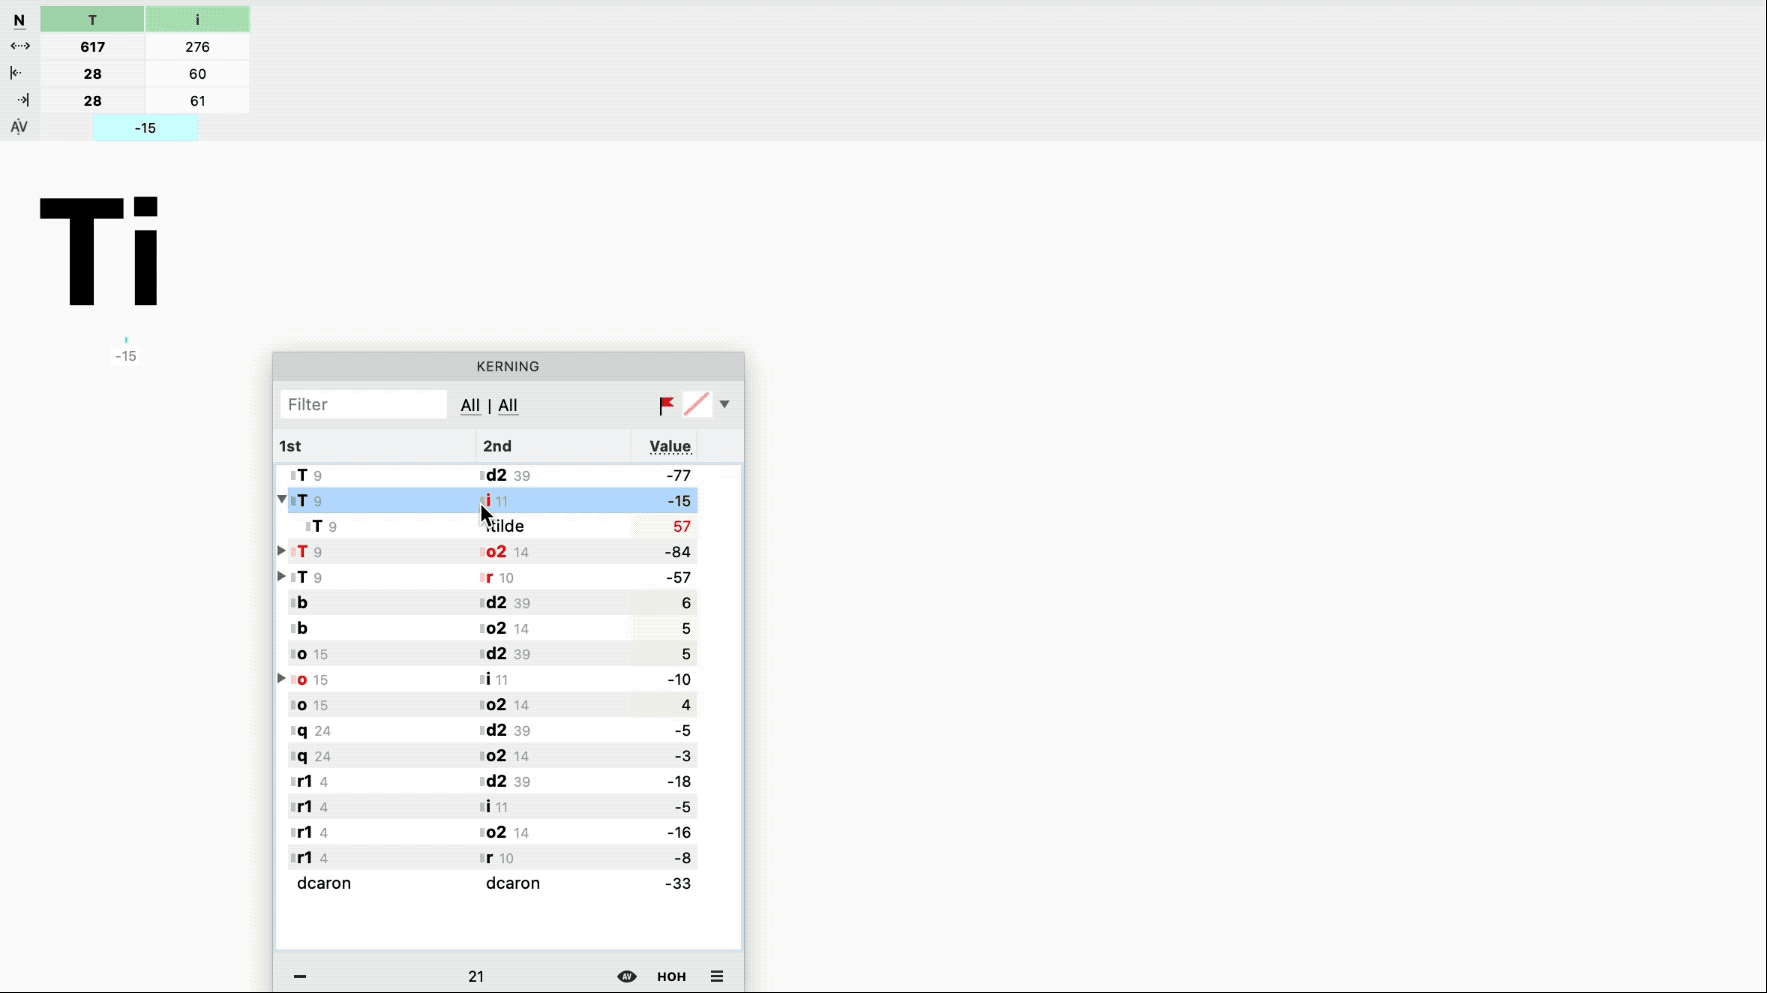
Type this into your kerning window: Tī
You should see this.▼
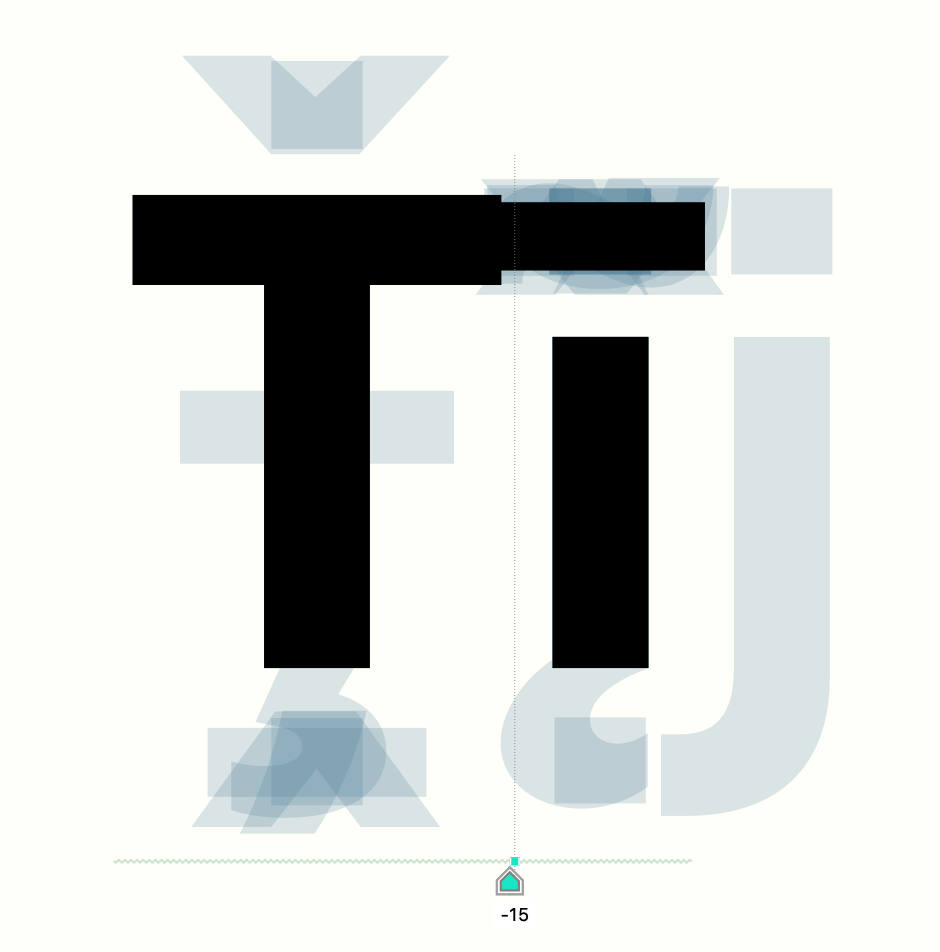
Try holding down Ctrl and see what happens. Try holding down Alt.
It shows you where you are making the exception!
Then just drag with your mouse, or use your keyboard as normal.
How to Load Up Exception List
An exception list would be something like ƯA ƯB ƯC ƯD ƯE ƯG ƯH ƯI ƯK ƯL ƯM ƯN ƯO ƯƠ ƯP ƯQ ƯR ƯS ƯT ƯU ƯƯ ƯV ƯX ƯY for Vietnamese.
To load, go to the Pairs & Phrases Panel. Push the one with three dots. Find the file on your hard drive. Load it up.

If you want to see how to make good kerning and metrics lists, see this tutorial.
What If I Don’t Have an Exceptions List?
If you don’t have a list, that is OK. Push the rectangle in front of the class in the Kerning panel. All the pairs will show.
Now you can modify each pair. Remember to hold down the Alt key in this case.
Modifying Exceptions
To modify exceptions, input a new value into the Kerning panel.
Or just pull them apart.

As long as it shows as an exception on top, it will only change that pair. In this case a class:glyph.
Exceptional!
PS
Control Exceptions on Mac
On Mac, Ctrl brings up the context menu. That’s why I recommend doing auto kerning exceptions first.
To do left exceptions on Mac, click and hold, immediately push down Ctrl, then drag, unclick, then let go of Ctrl.
It’s all in the wrist. :)