New in FontLab 8: Draft & draw
Sketch freely on the unlimited Sketchboard canvas, or dive right into drafting separate glyphs and icons. Effortlessly copy-paste or import SVG, PDF and bitmaps, and use them natively, or convert into editable vectors with customizable autotracing.
Explore expressive, adjustable calligraphy with live Power Stroke and pressure-sensitive Power Brush. Masterfully draw with our uniquely efficient Rapid and traditional Pen tools, with versatile Pencil, and with precise geometric tools. All this in pixel-perfect integer coordinates or ultra-high fractional precision.
New in FontLab 8: Draw calligraphic letterforms with new Power Stroke or improved Power Brush. Modulate thickness visually with Thickness tool. Draw fluently with Pen and Rapid toolbox sub-tools. Draw polygons and stars with Rectangle tool.
Drafting with Stroke and Brush
New stroke with modulation
New The all-new stroke engine adds flexibility to how you specify “outline strokes” for existing contours, and allows you to create skeleton-based drawings.
-
New You can specify which portion of the stroke appears inside and which portion appears outside the contour (or: on the left and right side of the contour).
-
New You can specify different kinds of caps (decoration of start and end nodes).
-
New You can change the global thickness of the stroke, and specify a vertical compression of the thickness (useful for optical compensation of vertical vs. horizontal thickness).
-
New You can adjust the local thickness on either side of each node of the skeleton contour.
-
You can assign a flat color or New a gradient as the fill color and/or as the stroke color.
Stroke vs. Brush
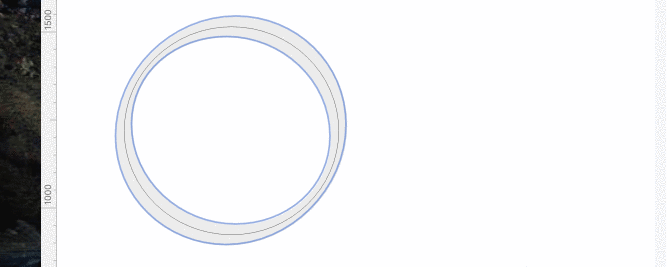
Stroke and Brush are two techniques that you can use to create skeleton-based designs. There are some differences. The general difference is that Stroke produces an offset contour from the skeleton, and Brush works by tracing an ellipse along the skeleton.
Stroke allows different thickness on either side, but does not allow diagonal contrast (global thickness modulation along a diagonal axis, like made by a broad-nib pen). Stroke builds variable contours, i.e. the number of nodes on either side of the stroke corresponds to the number of nodes on the skeleton. Compared to the Brush, Stroke has more cap possibilities.
Brush only allows thickness to be distributed uniformly on both sides, but does allow diagonal contrast. Brush has limited selection of caps, and it does not create variable contours (the nodes it generates differ depending on the actual curve). Compared to the Stroke, Brush produces more faithfully calligraphic strokes.
Simple stroke and Power Stroke
New The new Element > Make Power Stroke filter creates virtual contours from the stroke on the fly.
Simple stroke

If a contour has a normal stroke, FontLab treats them as a property of the current contour that is applied as a “decoration” to the contour, just like as if you’d apply stroke to some drawing in Adobe Illustrator or another vector-drawing app. FontLab does not consider the stroke as a contour on its own, does not “see” nodes on the stroke. FontLab only suggests the nodes on the skeleton for snapping. If you perform Tools > Autohint, FontLab does not build hints on open skeletons that have a stroke.
If you have a closed contour that has a black fill and has a stroke, the contour is always filled.
For the purpose of calculating the sidebearings, FontLab ignores the stroke thickness if the setting Preferences > Spacing > Ignore Stroke thickness is turned on, and takes it into account if the setting is turned off.
Power Stroke filter

New If you apply Element > Make Power Stroke to an existing contour that has stroke, FontLab creates an additional filter element, and starts treating the stroke as two contours on their own, starts “seeing” the nodes on the stroke. If you have a closed contour that has a fill and stroke in the same color (such as black), the inner stroke edge creates a counter, so it’s easy to draw an “O”.
With Power Stroke, FontLab suggests nodes both on the skeleton and on the Power Stroke-generated contours. Additional filters such as Skin or Glue don’t work on the virtual contour created by the Power Stroke. If you perform Tools > Autohint, FontLab builds hints for the Power Stroke-generated contours, but does not link the hints to any nodes.
Regardless of the setting Preferences > Spacing > Ignore Stroke thickness, FontLab always considers the Power Stroke-generated contours when calculating the sidebearings.
Stroke panel
New In the Stroke panel, you can set the stroke properties (the stroke thickness, caps, color):
- for the current element in the Glyph window (immediately)
- New for the selected elements in the Glyph window (if you click Apply)
- for all elements in the selected glyph cells in the Font window (if you click Apply).
This works with a simple stroke and with a Power Stroke.
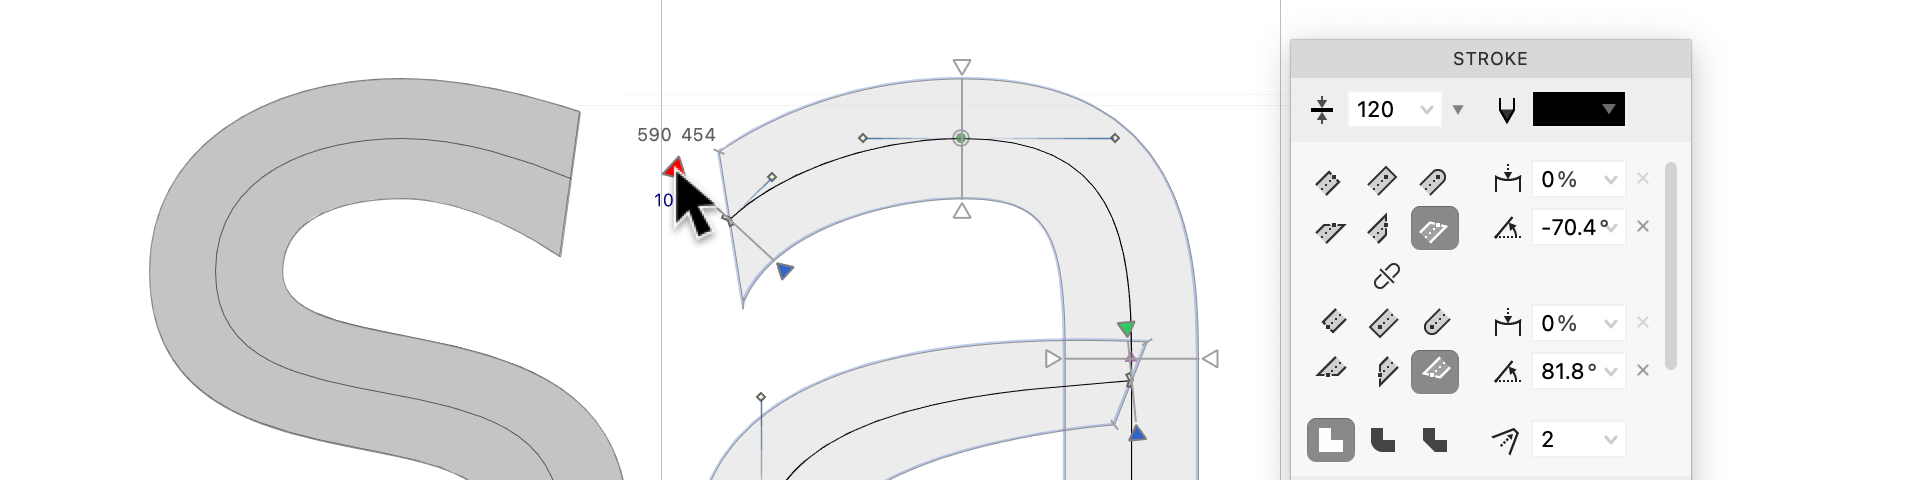
Stroke thickness and color

In the top bar of the panel, you can:
- New Set the global stroke thickness: type a number or use the down-arrow inside the text box to open a slider, or use the down-arrow outside the text box to open a dropdown with predefined values.
- New Set the stroke color.
New If the panel is wide enough, you can also set the fill color, and swap the fill and stroke colors.
Stroke cap properties

New In the middle area of the panel, you can set the cap properties. On the right, you can expand and collapse the stroke cap properties section. If you collapse the section, or if you expand the section and turn on the Link caps toggle, all changes apply to both the start and the end caps. If you turn off Link caps in the expanded section, you can set the properties for the start and the end caps separately.
Within the stroke cap properties section, you can choose one of six cap types:
- Flat cap, with customizable convexity and outset distance
- Square cap, with customizable convexity and inset distance
- Round cap, with customizable tension
- Horizontal cap, with customizable convexity
- Vertical cap, with customizable convexity
- Fixed angle cap, with customizable convexity and angle
On the right of the cap type selector, you can customize the cap shape, customize the outset distance for the Flat cap and the inset distance for the Square cap, and set the angle for Fixed angle cap.
Flat stroke caps

If you choose a Flat cap, in the Cap shape field you can change the cap: -100% is round concave, 0% is flat, 100% is round convex. With the Cap shift field:
- At 0%, the sides of the cap are at the node.
- Positive values extend the cap beyond the node, 100% extends it by the node’s stroke thickness.
- New Negative values retract a convex cap towards the skeleton, –100% retracts it so that the tip of the cap is at the node. For non-convex flat caps, negative values have no effect.
Round stroke caps

If you choose a Round cap, in the Cap tension field you can change the curve tension of the cap: 0% is triangular, 55% is round, 100% is nearly square. New With Cap shift field:
- At 0%, the sides of the cap are at the node.
- New Negative values retract the round cap towards the skeleton, –100% retracts it so that the tip of the cap is at the node.
Square stroke caps

If you choose a Square cap, the Cap shape field behaves the same as with a Flat cap. But the Cap shift works in a way that’s opposite to the Flat cap:
- At 100%, the sides of the cap are at the node.
- At 0%, the sides of the cap are extended by the node’s stroke thickness.
Stroke join properties
New Then you can set the join properties that define the shape of the stroke on a skeleton corner. You can choose a:
- Miter join (sharp join), with customizable miter limit
- Bevel join
- Round join
Stroke location
New Further down, you can choose at which side of the skeleton the stroke is drawn:

- Centered stroke: stroke is drawn equally on both sides.
- Inner stroke: stroke is drawn inside (or on the left side of) the skeleton.
- Outer stroke: stroke is drawn outside (or on the right side of) the skeleton.
- Custom stroke location: the percentage of the stroke that is drawn inside; the rest is drawn outside, so 0% is outer stroke and 100% is inner stroke.
Additional stroke properties
New Finally, if you apply stroke to elements that have overlapping paths, you can decide:

- Keep skeleton overlaps: FontLab draws the stroke on each contour completely
- Remove skeleton overlaps: FontLab does not draw the stroke on contour parts that form an overlap inside the “filled” area; for example, if you apply a contour onto two intersecting circles, FontLab does not draw the contour on the intersecting paths
You can also specify the vertical compression (contrast) of the stroke. Set this to 85-95% to compensate for the visual illusion of horizontal strokes appearing thicker than vertical strokes if they have the same nominal thickness.
Stroke operations
New At the bottom of the Stroke panel, you can click:
- Copy fill and stroke properties: copies the fill and stroke properties of an element, and pastes them to another element
- Expand stroke: replaces the skeleton contour with the final contours produced by the stroke
- Remove stroke: removes the stroke from the element, keeps the skeleton contour
- New Apply if multiple elements are selected in the Glyph window: applies the stroke properties defined in the panel to all selected elements
- Apply if the Font window is active: applies the stroke properties defined in the panel to the current layer of all selected glyph cells
Working with stroke
Local stroke properties for the node in the Node panel

New In the Node panel, you can set stroke properties for a node, which overrides the global stroke properties of the element. You can set a custom thickness and a custom stroke location.
Use the Thickness tool (8 key) to change these values visually.
Merge stroke into the body contour
If you add a stroke to closed contour (like a traditional monochrome glyph), the stroke dynamically expands the original (“body”) contour in two directions: outside and inside the filled (“black”/opaque) area. But FontLab keeps the body contour filled. Therefore, the inside part of the stroke is invisible, and the outside part of the stroke visually adds weight to the body contour.

Here’s a great way to experiment with adding weight without changing the underlying drawing:
- Use the Thickness tool on some nodes to visually add weight in some parts of the body contour in a non-destructive way.
- New If you’re happy with the results, use Element > Merge Stroke. FontLab 8.2 will add the outside stroke part to the original filled contour, and will disregard the inside part of the stroke.
Note
If you’ve applied a different stroke color and use Merge Stroke, the resulting contour will use that color as the fill. Don’t use a white stroke color to “remove weight” from the body contour, it will not work. Don’t use Merge Stroke if your contours have filters like Smart Corners, Power Stroke, or Delta. Merging the stroke will only work on the body contour, and will disregard the filter results.
Distance suggestions for Stroke
New If you’re making a sanserif with some stroke modulation, Stroke and Power Stroke play very well with View > Suggest > Distance.

If you’ve drawn a skeleton, use the Stroke panel to assign a global stroke to your elements with the thickness that define the thickest vertical strokes (let’s say, 100 units). You should probably reduce the stroke contrast in the panel to e.g. 90%. This will produce optical compensation, so the horizontal strokes will have the same optical thickness.
Optionally, you can add Element > Make Power Stroke. If Power Stroke is assigned as a filter, FontLab 8.2 starts treating the stroke as two virtual contours on their own, unfills the inside of closed contours, and considers the Power Stroke-generated virtual contours when calculating the sidebearings even if Preferences > Spacing > Ignore Stroke thickness is turned on.
Now, Turn on View > Suggest > Distance, and in Font Info > Other Values > Suggest distance, set the desired distance at which the snapping suggestions should appear:
- If you use simple strokes (no Power Stroke filter), enter absolute values for your thinnest horizontal and vertical strokes, because distance suggestions will appear from the skeleton. For example, if your global stroke is
100and the stroke contrast is90%, you can set Suggest distance X to90, and Y to81(which is90%of90). - If you have Power Stroke assigned, enter relative values, because distance suggestions will appear from the virtual contours produced by the stroke. For example set Suggest distance X to
-10(because100-10=90), and set Y to-9(because90-9=81).
Now comes the magic! Use the Thickness tool to reduce the thickness of the strokes on some nodes. As you move the thickness control points (without Cmd or Ctrl), the suggested distances will appear as a snappable outline, so you can consistently make your strokes thinner in the right places! Hold Cmd or Ctrl to suppress the snapping.
This technique also works great if you’re using the Thickness tool to “add weight” to a traditional monochrome glyph, as described above.
New The snapping suggestion that appears for Suggest > Distance now has miter (sharp) corners rather than rounded corners.
Stroke thickness and stem suggestions
If one set of distance suggestion values is not enough for you, you can instead turn on View > Suggest > Stems, and set up multiple horizontal and vertical stems in Font Info > Stems. New If you drag a thickness control point without Cmd or Ctrl, FontLab 8.2 will suggest the stem thicknesses as snapping positions. This works well for changing thickness on extrema nodes, because stem suggestions are always horizontal or vertical, while distance suggestions work along segments.

If you assign tags to the stems in Font Info > Stems, stem thicknesses will be suggested only in glyphs that have the same tags. You can assign a tag like uc to a stem in Font Info, and this stem will only be suggested in uppercase letters, because FontLab automatically assigns the uc virtual tag to all uppercase letters. Same works lc (for lowercase letters), sc (for small caps), fig (for figures / numerals), latn or cyrl (for scripts) etc. But you can also assign your own tags to any glyph, and the same tags to stems.
Brush and Power Brush
Brush tool (B key)
New Click the Brush icon in the toolbar, or tap or hold B and right-click the canvas: the context menu opens where you can choose the Brush sub-tool or option. To toggle between the sub-tools, you can also click the icons in the toolbox or repeatedly tap the B key.
To resize and rotate the brush tip, Ctrl-drag on the canvas or New right-drag.
Simple Brush sub-tool

Simple Brush: FontLab draws simple contours using the brush settings specified in the Brush panel or the tool’s property bar. You cannot change the brush thickness or angle of the contours after you’ve drawn them with the simple brush. The contours are immediately editable with the Contour tool.
Power Brush sub-tool

Power Brush: FontLab draws a new element and in it draws a skeleton (as if you used the Pencil tool), and applies the Power Brush filter using the current brush settings. After you’ve drawn with Power Brush, you can edit the skeleton contour with the Contour tool, and you can use the Brush panel or the Brush tool property bar to change the global brush thickness or angle.

You can also use the Thickness tool to change the local brush thickness at any skeleton node. To get the final contours, use Element > Expand Filters.
Erasing Brush sub-tool

Erasing Brush: If you draw over any closed contours, FontLab cuts out (erases) the portions of the existing contours that you’ve drawn over. It also removes any existing overlaps. This is similar to using the Erasing rectangle sub-tool of the Rectangle tool, but for more freeform strokes.
Erasing brush is particularly useful for freehand “shaving off” (“sculpting”) portions of a drawing, especially if you use a tablet.
Soft Brush option
New If the Soft Brush toolbox or context menu option is turned on, the Brush tool will have some inertia as you draw with it. Soft Brush ignores small jiggles of your hand so the resulting curves are smoother. It also helps you make corners more pronounced, and produces fewer unintended line segments.
Brush panel
New If your element does not have a Power Brush applied, you can apply it to the element with the first button on top of the Brush panel, or with Element > Make Power Brush.
New If the element has a Power Brush, you can:
- remove it with the first button on the Brush panel, or with Element > Remove Filter
- expand it (convert into plain contours) with the second button on the Brush panel, or with Element > Expand Filters
Brush stroke modulation with the Brush panel
As in previous versions, you can specify the stroke modulation of the Brush or Power Brush in five locations that are uniformly distributed along the contour. For that, use the Stroke modulation and terminals visual widget in the middle of the Brush panel.
If you have a pressure-sensitive tablet (for example a Wacom tablet, or iPad Pro with Apple Pencil and the Duet Display app), you can turn on the Pressure-sensitive toggle in the Brush panel. Then, when you draw with the tablet, the Brush strokes will modulate accordingly to the pressure you put on the tablet.
Brush stroke modulation with the Thickness tool
New If the thickness specified in the Stroke modulation and terminals visual widget of the Brush panel is uniform (set to 100% in all locations), then you can use the new Thickness tool to change the Power Brush thickness on any node of the skeleton.
New If you Alt-drag a thickness control point, you can rotate the element brush.
To add more modulation locations, use the Knife tool to add nodes to the skeleton. If you wish to edit the skeleton and you’ve only added new nodes to have new modulation locations, make the new nodes X-Servant and Y-Servant. This way, they adjust their position if you move the more important nodes.
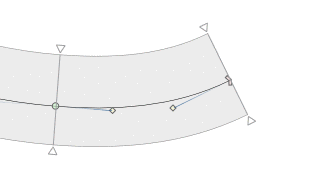
Thickness tool (8 key): visual stroke & brush modulation
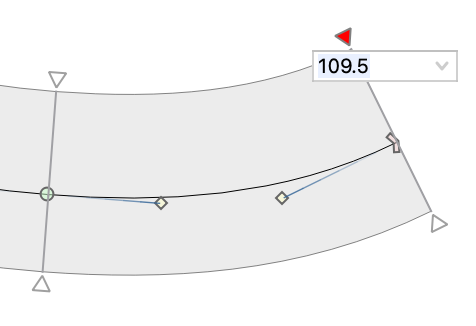
New The Thickness tool is a brand-new tool that you can use to modulate (locally adjust) the thickness of stroke (including Power Stroke) and of Power Brush.
You can change the element thickness, which is the global (default) thickness on all skeleton nodes in all contours within the element. All control points for the element thickness are white.
You can also change the node thickness, which is the local thickness that applies only to a selected skeleton node, and takes precedence over the element thickness. A control point for the node thickness is blue on the right side of the skeleton and green on the left side of the skeleton.
Shift-drag a thickness control point to change the element thickness. With Power Brush, it changes the element thickness on both sides. With Stroke, it changes the element thickness on one side, so it changes the Stroke location of the element.
Alt-drag a thickness control point to change the node thickness symmetrically on both sides of the node (with Stroke).
New Alt-drag a thickness control point to rotate the brush (with Power Brush). Brush rotation is uniform per-element.
Drag a thickness control point to change the node thickness on one side of the node with Stroke, or on both sides with Power Brush.
New ShiftAlt-drag a thickness control point of a stroke (not Power Brush) to change the stroke location on the node without changing the thickness. This way, you can change how much of the stroke on a node is drawn on the left or right side of the skeleton contour.
ShiftAlt-click a thickness control point to copy the current thickness at that side of the node to the element thickness, keeping custom node thicknesses intact.
Click a thickness control point and tap BkSp to remove the node thickness and apply the element thickness on that side of the node.
New If Preferences > Glyph Window > Coordinates editable is turned on, and the Thickness tool is active, you can click the thickness value in the canvas and enter a numerical value.
New If you add Font Info > Parameters prefixed with stroke. (like stroke.n, stroke.o), you can enter the suffix into the numeric value field (like n or o). FontLab immediately converts the name into the corresponding numeric value. This is not a dynamic expression, but a shorthand to enter the value: if you change the Font Info parameter afterwards, the stroke will not change its thickness. Use New Match parameters in the Font Info page to synchronize the parameters, or the New Filter box to only see stroke.-prefixed parameters.
If you select multiple thickness control points with marquee and enter a numeric value or a stroke parameter name, FontLab applies that thickness to all selected control points.
If you change the element thickness using the numeric text box in the Thickness tool property bar or the Stroke panel, the node thicknesses scale accordingly. If you change the element thickness using Shift-dragging, the node thicknesses stay intact.
Change thickness precisely or with snapping with Thickness lever
New In FontLab 8.2, With the Thickness tool, you can now use the Lever technique to make precise adjustments without zooming in, or you can make quicker adjustments and utilize snapping.
Power Brush: If you have an element active that has a Power Brush filter, click the Thickness tool on the toolbar or tap the 8 key to adjust the global (per element) or local (per node) thickness, and the global angle, of the Power Brush.
Drag a thickness control point to change the local brush thickness on both sides of the node. New The thickness control follows the mouse pointer directly, and the pointer snaps to all snapping items that are turned on in View > Snap and View > Suggest. To modify the behavior as you drag a thickness control point, hold:

- Shift: changes brush thickness of the entire element
- Alt: changes rotation of the brush on the entire element
- ShiftAlt: changes rotation of the brush in 15° increments
- New Ctrl or Cmd in addition to the above modifiers: no snapping, the thickness control point moves precisely according to the Preferences > Distances > Contour lever moves point by setting. Default value of contour lever is
6, constant dragging speed is1, the highest precision at short drags is10.

Stroke or Power Stroke: If you have an element active that does not have a Power Brush filter, click the Thickness tool on the toolbar or tap the 8 key to adjust the global (per element) or local (per node) thickness, and the global angle of the stroke. If the element has the Power Stroke filter, the change will affect the Power Stroke.
Drag a thickness control point to change the local stroke thickness on one sides of the node. New The thickness control follows the mouse pointer directly, and the pointer snaps to all snapping items that are turned on in View > Snap and View > Suggest. To modify the behavior as you drag a thickness control point, hold:
- Alt: changes the thickness on both sides of the node
- ShiftAlt: moves the stroke location on the node, keeping thickness the same: increases thickness on one side, decreases by the same amount on the other side
- Shift: changes stroke thickness of the entire element on one side
- New Ctrl or Cmd in addition to the above modifiers: no snapping, the thickness control point moves precisely according to the Contour lever moves point by preference.
Thickness tool context menu
New Click the Thickness icon in the toolbar, or tap or hold 8 and right-click the canvas: the context menu opens where you can choose one of several operations relevant to strokes and brushes:
- Make Power Brush: Apply the Power Brush filter to the element contours, and instantly edit the thickness of the calligraphic brush per node, or (with Shift) per element.
- Make Power Stroke: Apply the Power Stroke filter to the element contours, and instantly edit the thickness of the stroke per node, or (with Shift) per element. Power Stroke behaves like the regular stroke, but FontLab considers the contours dynamically created by the stroke part of the glyph’s “body” — the same way as it considers normal contours. So you can perform further operations on them, autohint, they take part in metrics calculation etc.
- Merge Stroke: Add the outside stroke part to the original filled contour, and disregards the inside part of the stroke.
- Expand Stroke: Create new contours for the outside and inside stroke part.
- Remove Stroke: Set all stroke properties of the current element to none.
- Open Stroke Panel: Access additional properties for stroke and the Power Stroke filter. Change the element thickness, caps, miters, stroke offset, contrast and color.
- Open Brush Panel: Access additional properties for the Power Brush filter. Change the brush element thickness, shape, modulation.
- Open Color Panel: Access color properties for the element stroke and fill.
Drawing contours
Pencil tool (N key)
New The Pencil tool (N key) uses a new, slimmer cursor, and it has a new Smart Pencil sub-tool that allows you to draw straight lines, ellipses and rectangles in a simplified way.
New Click the Pencil icon in the toolbar, or tap or hold N and right-click the canvas: the context menu opens where you can choose the Pencil sub-tool and options. To toggle between the sub-tools, you can also click the icons in the toolbox or repeatedly tap the N key. Double-click the Pencil toolbar icon to open the toolbox.
- New Click the Smart Pencil button (the first icon in the toolbox) or repeatedly tap the N key, to toggle between the simple Pencil and the Smart Pencil sub-tools.
- New Click the Existing contour is editable button to change the way Pencil works on existing contours. This is the same toggle as in the Pen toolbox and in Preferences > Editing > Pen and Pencil can modify contour.
Simple Pencil sub-tool
The Simple Pencil sub-tool is active if you choose it from the Pencil context menu, or if the Smart Pencil toolbox is turned off.
With simple pencil, if you make a drawing move with Pencil (hold button, move, release button) away from existing contours, Pencil creates a separate contour.
- If you don’t hold any modifier keys, Pencil creates a freehand contour that follows your drawing move.
- Hold Alt as you draw to create a straight line. Also hold Shift to make the line horizontal or vertical.
- Hold Ctrl to prevent joining with start/end nodes or modification of existing contours.
Smart Pencil sub-tool
New The Smart Pencil sub-tool produces paths that are simpler. The Smart Pencil sub-tool is active if you choose it from the Pencil context menu, or if the Smart Pencil toolbox is turned on.
Smart Pencil performs simplification of the curves that you draw, so it produces smoother curves with fewer nodes, longer curve segments, and nodes at extremes.
Smart Pencil can recognize basic geometric shapes as you draw, so you can draw straight lines, ellipses and rectangles in a simplified way. The basic shape recognition of the Smart Pencil works only within one drawing move, and only if you make the drawing move away from existing contours, or if you hold Ctrl as you make your drawing move.
If you make a drawing move and it:
- resembles a straight line, Smart Pencil creates a straight line (same as when you hold Alt),
- resembles a rectangle, Smart Pencil creates a rectangle. This is a way to draw rectangles that may also be rotated.
- resembles an ellipse, Smart Pencil creates an ellipse. This is a quick way to create ellipses that may be rotated.
Otherwise, Smart Pencil behaves like the simple Pencil if you start or finish the drawing move near existing nodes or contours without Ctrl, or if you make multiple drawing moves (you hold the button, move, release, hold again, move, release).
If you turn on both Smart Pencil and Soft Pencil, the curves will be even smoother, but Smart Pencil may produce line segments if make drawing moves that are close to straight lines.
Existing Contour is Editable option
If the Existing contour is editable toggle in the toolbox or context menu is turned off:
- If you start a drawing move near a start/end node of an existing contour (inside the blue circle), Pencil creates a new contour (does not join the new contour with the existing one). Alt and Shift work like above.
- If you finish the drawing move near a start/end node of an existing contour, Pencil joins the end node of your current drawing move with that start/end node. Alt and Shift work like above.
If the Existing contour is editable toggle is turned on:
- If you start a drawing move near a start/end node of an existing contour, Pencil joins the new contour with the existing one. Alt and Shift work like above.
- If you finish the drawing move near a start/end node of an existing contour, Pencil behaves the same as with the toggle turned off: it joins the end node of your current drawing move with that start/end node. Alt and Shift work like above.
- If you start a drawing move on the outline of an existing contour (with a blue X-cross visible), Pencil will modify the existing contour: when you finish the drawing move, it will replace a part of the existing contour with the drawing you have just made. Alt and Shift work like above, so you can easily replace an existing part of the outline with a straight line.
- If you hold Ctrl, Pencil prevents any joining with start/end nodes or modification of existing contours.
Soft Pencil option
New The Pencil tool now has a Soft Pencil toggle in the toolbox. If you turn it on, the Pencil tool will have some inertia as you draw with it.
When you draw with Soft Pencil, FontLab ignores small jiggles of your hand so the resulting curves are smoother. Soft Pencil also helps you make corners more pronounced, and produces fewer unintended line segments.
Rapid tool (5 key)
With the Rapid tool (5 key), you can quickly draw contours that use consistent curve tension or manually trace bitmap images. To activate the Rapid tool, click its toolbar icon or tap 5. Start drawing, then press Esc or switch to another tool to finalize the drawing. Once you’ve finalized a Rapid drawing, you can edit it with the Contour tool, but not with the Rapid tool.
New Rapid tool now has a toolbox. Double-click the Rapid toolbar icon to open the toolbox. Click the icons in the toolbox or repeatedly tap the 5 key, to toggle between the Rapid sub-tools (Corner, Curve, Tangent, Tension), or to turn all sub-tools off.
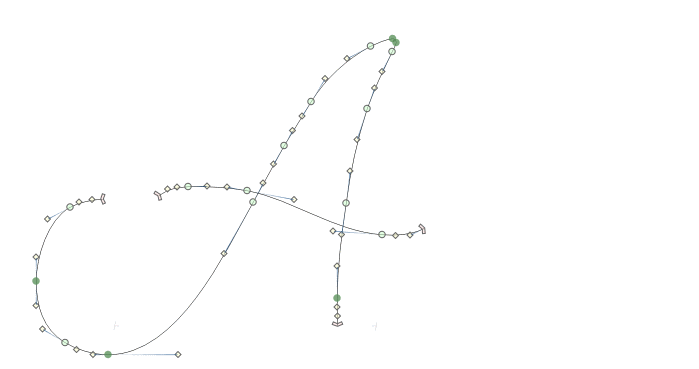
Drawing sharp and smooth nodes
If all Rapid sub-tools are turned off, you can use Rapid to add sharp or smooth nodes in two ways.
If the Preferences > Editing > Rapid tool remembers last state setting is turned off (default):
- Click to add a sharp node, and to make the next segment a line.
- Double-click or Ctrl-click to add a smooth node, and to make the previous and the next segment a curve.
- Hold Shift to align the next node to the previous one horizontally or vertically.
If the setting is turned on, each click adds a sharp node, and makes the next segment a line, until you double-click or Ctrl-click. Rapid then adds a smooth node, and all subsequent clicks add a smooth node, until you double-click or Ctrl-click again. Rapid then adds a sharp node, and all subsequent clicks add a smooth node.
New If you turn on the Rapid > Corner sub-tool, you can click to add a sharp node, and double-click to add a smooth node. New If you turn the Rapid > Curve sub-tool, you can click to add a smooth node, and double-click to add a sharp node. In both cases, keyboard modifiers except Shift have no function.
Drawing tangent nodes

If all Rapid sub-tools are turned off, you can hold CmdAlt CtrlAlt and click to add a tangent node. If the previous node was a smooth node, a tangent node makes the previous segment a curve segment and the next segment a line segment. If the previous node was sharp, a tangent node makes the previous segment line, and the next segment curve.
New If you turn on the Rapid > Tangent sub-tool, you can click to add a tangent node.
Closing Rapid contours
Click the first node of the newly-drawn contour to close it.
Curve segments
With the Rapid tool, FontLab creates one Rapid tension point per curve segment. The Rapid tension point is a simplified way to control the position of both PS handles of a curve segment.
If a smooth node is at an extreme position (horizontal or vertical boundary), FontLab forces the curve segment handles around the node to be horizontal/vertical. Otherwise, the position of the handles is determined by the Rapid tension point.
By default, Rapid creates curve segments with the tension specified in Font Info > Font Dimensions > Curve tension. To change the segment’s tension, move the Rapid tension point. To set the default tension, double-click or Ctrl-click the Rapid tension point.
Adding Rapid tension points

If all Rapid sub-tools are turned off, Alt-click to add a custom Rapid tension point. If you add Rapid multiple tension points one by one, FontLab adds the intermediate nodes.
New If you turn on the Rapid > Tension sub-tool, you can click to add a Rapid tension point.
Adjusting nodes and tension points with Rapid tool
While the Rapid tool is active, you can adjust nodes of the current Rapid drawing:
- drag to move the node, hold Shift to keep the movement horizontal or vertical
- double-click to convert between sharp and smooth nodes
- right-click or Ctrl-click to remove the node
- click the outline to insert a node
You can also adjust the Rapid tension points of the current drawing:
- drag to move the tension point to a custom location (becomes filled)
- double-click the tension point to move it to the standard location for the given tension (becomes unfilled)
- right-click or Ctrl-click an tension point between two sharp nodes to convert the segment to line and the adjacent nodes to tangent nodes
Pen tool (P key)
If you’ve worked with a Bézier pen tool in any font editor or a vector drawing app, you’ll find the FontLab Pen tool familiar. You can use it to draw new contours and adjust existing ones. To activate Pen tool, click its toolbar icon or tap P. Start drawing, then press Esc or switch to another tool to finalize drawing the new contour.

New Pen tool now has a toolbox. Double-click the Pen toolbar icon to open the toolbox.
Click the icons in the toolbox or repeatedly tap the P key, to toggle between the Pen sub-tools (Add corner, Add curve, Add tangent, Edit handles), or to turn all sub-tools off.
New toolbox also has a Preview next segment toggle, which modifies how the basic Pen tool works. If the toggle is turned on, Pen previews what the next segment will look like if your next action will be a click.
Default drawing with Pen
New If you turn off the first four sub-tools in the Pen toolbox, you can use the basic Pen tool. New The way the basic Pen works depends on the Preview next segment toolbox toggle.
Click the canvas to start drawing a new contour. Move the mouse to the position of the next node.
If you’ve started drawing a new contour:
- Click the canvas to create a sharp node. If the previous node was sharp and it did not have an outgoing handle, Pen adds a line segment. If the previous node was smooth or had an outgoing handle, Pen adds a curve segment. If the Preview next segment toggle is turned off, the new node has a zero handle (retracted handle). New If the toggle is turned on, the incoming handle of the new node is similar in length and angle to the outgoing handle of the previous node.
- Hold and start dragging to create a smooth node and a curve segment. Drag to move the handle and the previous handle symmetrically. Release the mouse button to place the handle, and the previous handle. Hold <sup>M</sup>Cmd as you drag to move the handle, and to keep the length of the previous handle.
- Hold Alt as you drag to make a sharp node, to move the handle, and to keep the length and position of the previous handle.
- Hold Shift as you drag to constrain the line or handle to 45°.
- Click the starting node of the contour to close it, or hold and drag to close the contour and place the handles.
- Alt-click an existing contour to start drawing a new contour there.
- Tap Esc to stop drawing the contour without closing it.
Editing existing contours
Before you start drawing a new contour with the Pen tool, you can use the tool to edit an existing contour. The last icon in the Pen toolbox toggles the Existing contour is editable setting. This is the same as Preferences > Editing > Pen and Pencil can modify contour. If this setting is turned off, you can use the Pen tool make some simple modifications to existing contours:
- Click a segment to add a sharp node.
- Click the first or last node of an open contour to continue it.
- Click a smooth node to retract the handles
- Click a sharp node to remove it.
- Alt-drag a node to make it sharp and to adjust one handle.
- Hold Shift to constrain handle direction to 45°.
But if Existing contour is editable is turned on, you can modify existing contours in more ways: click a segment and drag to add a smooth node and break the contour, then click a segment and drag to close the segment and remove the smaller part of the contour. This way, you can “sculpt” existing contours by adding or removing filled areas to it.
Simplified drawing with Pen
With the first three sub-tools in the Pen toolbox, you can draw contours quickly in a simplified way. Hold Shift to constrain the handle or line direction to 45°.
If you turn on the Pen > Add corner sub-tool:
- Click the canvas to draw a line segment and a sharp node.
- Alt-click the canvas to draw a curve segment and a smooth node.
If you turn on the Pen > Add curve sub-tool:
- Click-and-drag to draw the first segment as a curve, or click to draw it as a line.
- Click to draw a curve segment and a smooth node.
- Alt-click to draw a line segment and a sharp node.
If you turn on the Pen > Add tangent sub-tool:
- Click to draw a smooth node, and to make a line segment if the previous segment was a curve, or vice versa.
- Alt-click to draw a line segment and a sharp node.
Editing handles of existing segments
If you turn on the Pen > Edit handles sub-tool:
- Click and drag a node to make it a smooth node and set both opposite handles.
- Alt-click and drag a node to set one of its handles.
- Click a smooth node to retract the handles, or to remove the node if there are no handles to retract.
If you draw with the Pen tool, and press CmdZ CtrlZ to undo, FontLab removes the last-drawn segment along with the handle. Previously, FontLab left the handle. #5818
Ellipse tool (O key)

New The Ellipse tool (O key) now has a toolbox and a context menu. If the toolbox is not visible, double-click the Ellipse toolbar icon.
Click the icons in the toolbox or in the property bar, use the context menu, or repeatedly tap the O key, to toggle between the Geometric ellipse and Oval with curve tension sub-tools. The toolbar icon shows which sub-tool is active.

Drag from the corner or Alt-drag from the center to draw an ellipse or oval, hold Shift to draw a circle or circular oval, hold Cmd Ctrl to draw a counter (the contour is in the opposite direction). Click to open a dialog box to create an ellipse with a numeric size.
If the Geometric ellipse is turned on, FontLab draws an ellipse or circle.
If the Oval with curve tension is turned on, use the numeric text box to specify the curve tension of the oval (by default, Font Info > Font Dimensions > Curve tension is used). FontLab then draws an oval with the specified tension. An ellipse or circle has the tension of 55%.
Rectangle tool (I key)

The Rectangle tool (I key) now has a toolbox and a context menu, and you can use it to draw rectangles, New regular polygons and New stars, as well as erase (cut out) rectangular areas. If the toolbox is not visible, double-click the Rectangle toolbar icon.
Click the icons in the toolbox or the property bar, or use the context menu, or repeatedly tap the I key, to toggle between the four sub-tools: Rectangle, Polygon, Star and Erasing rectangle. The toolbar icon shows which sub-tool is active.

New If the Polygon or Star sub-tool is active, use the numeric text box in the toolbox or property bar to set the number of corners of the regular polygon or the star. Click and drag to start drawing from the center, hold Shift to constrain the rotation to 90 degrees.

If the Erasing rectangle is turned on, and you draw over any closed contours, FontLab cuts out (erases) the portions of the existing contours that you’ve drawn over with the rectangle. It also removes any existing overlaps. This is similar to using the Erasing brush sub-tool of the Brush tool.

If the Rectangle or Erasing rectangle sub-tool is active, hold Shift to draw a square, hold Alt to draw from the center rather than corner.

Hold Cmd Ctrl while drawing to draw a counter (the contour is in the opposite direction). Depending on the sub-tool selected, click to open a dialog box to create a shape with a numeric size, and to set the number of corners for a star or polygon.
Better Sketchboard
Sketchboard is FontLab’s unlimited canvas (like a Glyph window without a parent font), where you can:
- import images, separate them into single glyph images, autotrace them and place them into a font
- sketch or draw artwork
- create text frames that show different texts in different fonts and sizes
Choose Window > Open Sketchboard to open the Sketchboard. If you turn on Preferences > General > Sketchboard > Open on startup, FontLab will open it automatically when it starts.
New In FontLab 8.2, Sketchboard shows lengths and non-H/V angles of handles and line segments if you turn on Show lengths and non-H/V angles in the View panel, or you turn on Preferences > Glyph window > Measure > Lengths & angles.
FontLab automatically saves the content of the Sketchboard (customize the autosave frequency in Preferences > General > Sketchboard). FontLab restores the content of the Sketchboard if you close and reopen FontLab.
New Choose File > Export > Sketchboard… to save the content of the Sketchboard as a .vfj or .vfc file in a custom location, or to export it as a .svg or .pdf file. FontLab uses .vfj and .vfc to store the Sketchboard contents, but it’s not identical to a font .vfj/.vfc.
New Choose File > Import > Sketchboard and choose a saved .vfj or .vfc Sketchboard file.