
New in FontLab 8: Consistency & precision
Work on upright or slanted grids using flexible guidelines, measurement tools and smart snapping. See lengths, angles, curve tension, stem thickness and whitespace distance as you draw. Dynamically snap to zones, guides, hints, nodes, angles, stem distances, continuation lines, perpendicular lines and centerlines. Losslessly scale, rotate and slant with fractional precision.
New in FontLab 8: Study the numeric values of your stem widths, segment lengths, curve tensions and corner angles with Auto-meter, or hold G to temporarily view these in Guides tool along with quick measurement and master relations. View relative node offsets. Snap to continuation lines, perpendicular lines and centerlines. See coordinates for key nodes only. Edit visual TrueType Hinting like never before.
New In FontLab 8.3, you can navigate the Glyph window in high zoom easily with visible unit grid, you can decide if dynamic snapping suggestions should activate immediately, delayed, or relaxed. Font guides respect the italic angle.
Measuring and snapping
Coordinates
Showing coordinates for key nodes

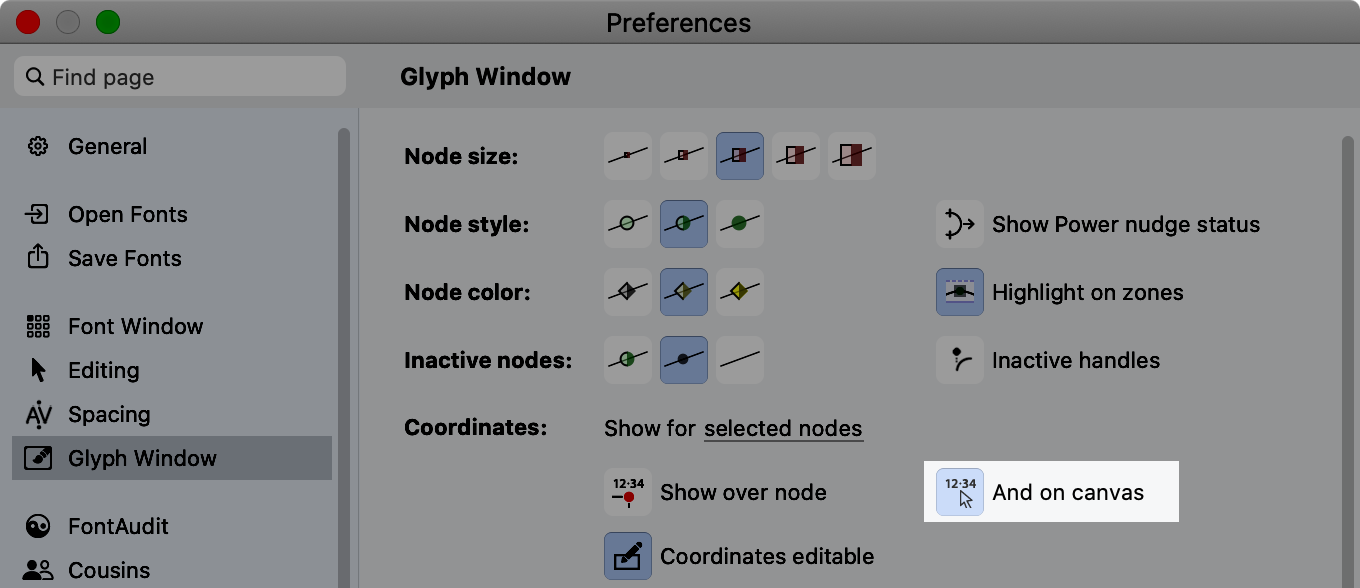
If View > Show > Coordinates is turned on, the Glyph window shows point coordinates depending on the settings in Preferences > Glyph Window > Coordinates. Previously, you could choose if FontLab shows coordinates for all nodes or for selected nodes.
New Now, you can choose key nodes. FontLab then automatically determines the nodes for which it shows coordinates. For curved extrema, it only shows the x or y coordinate, and it does not show coordinates for nodes inside longer paths. This gives you meaningful numeric information without visual clutter, especially if you have a design with roughened or irregular edges.
Tip
If the Show over node setting in Preferences > Glyph window > Coordinates or the Coordinates over node toggle in the View panel middle section is turned on, you can hover over any node and then see the full coordinates.
#6079
Showing pointer coordinates on canvas
You can now more easily see the current coordinates of the pointer on the canvas in font units when you move your pointer (cursor) with the mouse or trackpad:
- New with the Contour, Knife, Rotate, Scale or Slant tool, if the Coordinates on canvas toggle in the View panel middle section or the And on canvas toggle in Preferences > Glyph window > Coordinates is turned on,
- New always, if the Guide tool is active.
Choosing when to see coordinates
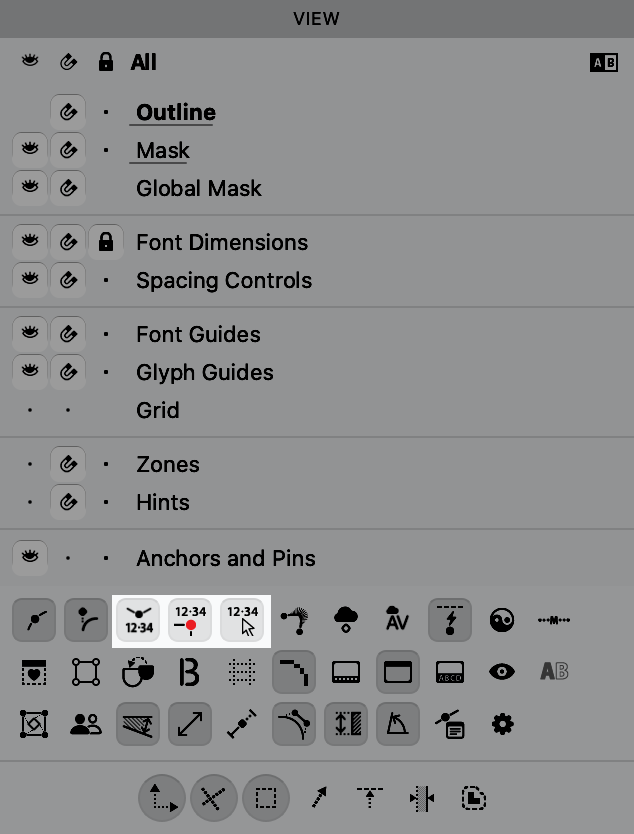
New You can now use the new buttons in the middle section of the View panel to more easily control when you wish to see coordinates in the Glyph window:
- Coordinates: turn on to see coordinates for selected nodes and handles, all nodes and handles, or key nodes, depending on the setting in Preferences > Glyph window > Coordinates > Show for. This is the same as View > Show > Coordinates.
- New Coordinates over node: turn on to see coordinates for nodes and handles that are under your pointer (cursor). This is the same as Preferences > Glyph window > Coordinates > Show over node.
- New Coordinates on canvas: turn on to see coordinates of your pointer in font units when you move the pointer around the Glyph window. This is the same as Preferences > Glyph window > Coordinates > And on canvas.
New The button for toggling the Coordinates display has a new, clearer design.
Scoreboard
To show the coordinates in a large area on the Glyph window, turn on View > Scoreboard. This opens a floating area which you can drag to position and resize. New The Scoreboard has an improved design.
Snapping suggestions
FontLab makes it easy to snap to continuation lines or line segments and handles, to lines perpendicular to markers and key locations on a horizontal, vertical or diagonal guide, and to centerlines of stems, counters, hints, and thick guides.
View > Suggest > Handles
New FontLab has a new type of snapping suggestions: angles of handles. If View > Suggest > Handles is turned on, FontLab shows snapping suggestions for handles of a curve segment:
- thin red line: makes the the handle horizontal or vertical if the angle of a handle is close to it (you’ll get the same snapping suggestion if Suggest > Nodes is turned on)
- violet line that connects both nodes of the curve segment: makes the angle between the handle and that line the same as the angle between that line and the opposite handle of the segment
- cyan lines with a square: makes the angle between both handles of a curve segment 90° (right angle)
View > Suggest > Lines
New FontLab has a new type of snapping suggestions: lines. If View > Suggest > Lines is turned on, FontLab shows snapping suggestions for continuation lines, perpendicular lines and centerlines near your mouse pointer, when you:
- drag a node, handle, selection snapping point or anchor with the Contour tool,
- draw with the Rapid, Pen, Ellipse or Rectangle tool,
- move the pointer with the Guides tool.
New Continuation lines: One or more lines that are the continuation of line segments or of control vectors of handles. This works for lines at any angle.
New Perpendicular lines: lines that are perpendicular to the start, middle and end of a snappable diagonal (vector) guide, or to the manual markers on a snappable horizontal, vertical or diagonal guide. This works for:
- glyph or element guides if View > Snap > Glyph Guides is turned on,
- font guides if View > Snap > Glyph Guides is turned on.
To create a diagonal (vector) guide:
- Glyph or font guide: create the guide (drag or Shift-drag from the ruler), click the tiny dot near the end of the guide or right-click and choose Vector. Then drag the guide or its start point (circle) to move the guide, drag its end point (arrow) to change the angle.
- Element guide: with the Guides tool, Alt-drag between the start and end point.
Note
Element guides are stored inside the element, so they move with the element and are inherited into components and element references. Glyph guides are tied to the coordinate space of the glyph layer.
To add a manual marker, Alt-click the guide. To add multiple markers, click the guide and enter their positions as a space-separated list in the Markers field of the Guide panel.
If the guide has manual markers, perpendicular line suggestions appear on those markers. If a diagonal (vector) guide has no manual markers, the suggestions appear on the start point, the end point and in the middle.
New Centerlines: lines in the middle of a stem, counter, hint, or a thick guide. If View > Suggest > Lines is turned on, snappable centerlines appear near the middle of:
- a contour that has vertical or horizontal parallel segments so it forms a stem
- a counter (whitespace, unfilled area) between two vertical or horizontal stems
- a horizontal or vertical hint
- a thick horizontal, vertical or diagonal (vector) glyph or element thick guide if View > Snap > Glyph Guides is turned on
- a thick font guide if View > Snap > Font Guides is turned on
To add thickness (width) to a guide, Shift-drag it.
Example: if you have two nodes and want to center a 3rd node horizontally between them:
- select both nodes and choose Tools > Hints > Add Vertical Hint (CtrlY CtrlAltShiftY)
- or drag a vertical glyph guide out of the vertical ruler onto the 1st node, then Shift-drag the guide to extend its width onto the 2nd node
Now move the 3rd node near the middle of the hint / thick guide, and FontLab will suggest its centerline for snapping.
View > Suggest > Distance with open contours
If you turn on View > Suggest > Distance, FontLab will show snapping suggestions at a specified distance from existing contours. In Font Info > Other Values > Suggest distance, you can specify the snapping suggestion distance for X and Y per master.

Distance suggestions are great for placing guides or anchors, for drawing parallel contours, and for positioning elements or contours at fixed distances from each other in a kind of grid.
New The distance suggestions now also appear around open contours.
Instant or relaxed snapping
New With Preferences > Distances > Suggest activates, you can decide whether the snapping suggestions should be instant or relaxed:
- Immediately: the suggestions appear immediately as you move your pointer
- On mouse idle: the suggestions appear once you’ve slowed down or stopped moving the pointer
- With some delay: the suggestions appear once you’ve slowed down or stopped moving the pointer for a slightly longer while (previously, this was the default behavior)
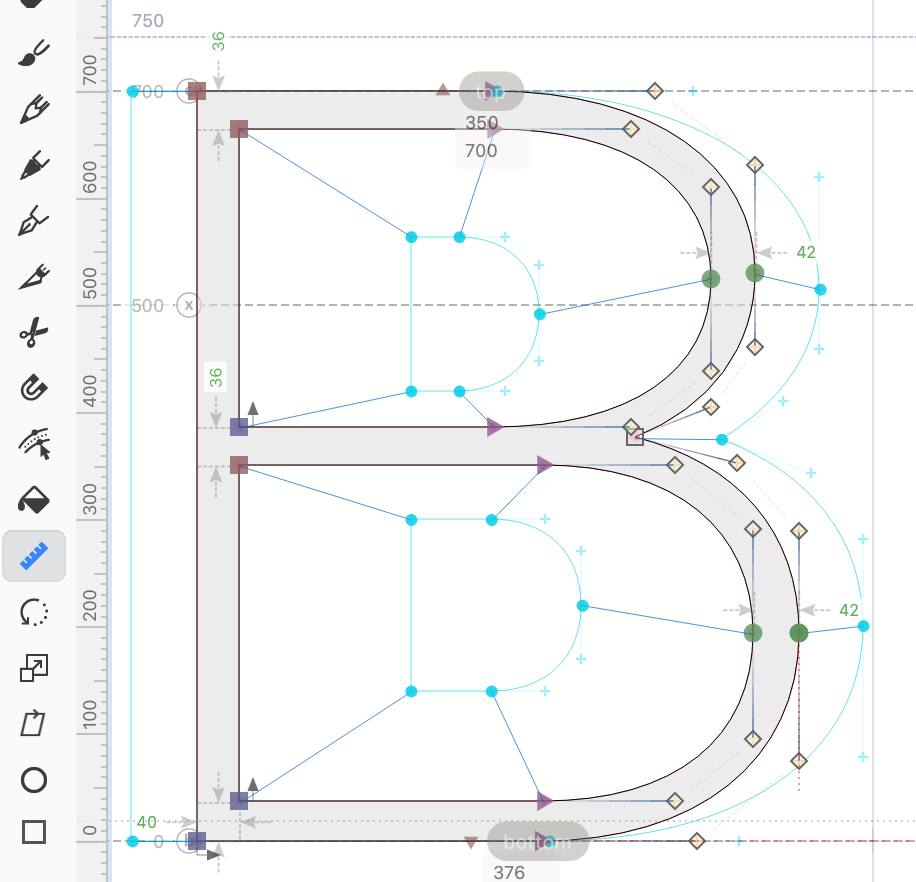
Auto-meter for stems, counters, and corner angles
New FontLab’s new built-in Auto-meter can automatically measure important stem widths: horizontal and vertical distances within the filled area between opposing segments that have nodes at extremes. The Auto-meter automatically determines at which locations it measures the important stem widths. These are typically the horizontal and vertical stems.
New In addition, Auto-meter can measure the height and width of counters (enclosed whitespace), or in other words, the horizontal and vertical distances between stems.
Auto-meter can also measure angles of corners inside and outside the filled area.
Use Auto-meter to view stem widths
New The Glyph window shows the Auto-meter values for stem widths:
- if the Stem widths toggle in the View panel is turned on,
- or if Preferences > Glyph window > Auto-meter > Stem widths is turned on,
- or if the Guides tool is active.
If the zoom level is close, the Glyph window shows the Auto-meter stem widths inside the stem. If the zoom level is far, the Auto-meter stem widths are shown outside the stem.
Use Auto-meter to manually adjust stems
New If Preferences > Glyph Window > Coordinates editable is turned on, you can click the numerical value of the Auto-meter stem width to change the thickness of the stem. Type a new number, use ↑/↓ arrow keys or click the v button and use the slider. FontLab applies the change when you press Enter or click away.
If you use Auto-meter to adjust the stem, FontLab intelligently changes the contours:
-
If you’ve changed a X-direction stem (between two vertical contours), FontLab moves the closest nodes to the left and right as needed, and makes small adjustments to the surrounding contours,
-
If you’ve changed an Y-direction stem (between two horizontal contours), FontLab moves one of the nodes towards the center of the glyph, and makes small adjustments to the surrounding contours.
Use Auto-meter to automatically adjust stems
New If Preferences > Glyph Window > Coordinates editable is turned on, and if Preferences > FontAudit > Irregular stem tolerance is higher than 0, you can use the Auto-meter to perform automatic adjustment of stems. Auto-meter shows:
-
common stem widths in green: the stem width is identical to one of the common stems defined in Font Info > Stems
-
uncommon stem widths within the tolerance in red: the stem width is close to one of the common stems but is off by the value of Irregular stem tolerance
-
other stem widths in gray: the stem width is not close to any of the common stems
New If you click the red star next to the uncommon stem width, FontLab adjusts the stem width to the closest common stem. If you click the numerical value, you can manually adjust the stem (see above).
Tip
FontLab detects stems in a master within the range specified in Font Info > Other Values > Autohint minimum / maximum, which by default is between 20 and 250 font units. Adjust these values to check for thinner or thicker stems.
Use Auto-meter to view height or width of counters
New The Glyph window shows the Auto-meter values for counters (whitespace enclosed by contours):
- if the Auto-meter for counters toggle in the View panel is turned on,
- or if Preferences > Glyph window > Auto-meter > Counters is turned on,
- or if the Guides tool is active.
Auto-meter for counters shows the height if the counter is enclosed vertically (like in a c or o), and the width if the counter is enclosed horizontally (like in a u, n or o). Technically speaking, Auto-meter for counters shows distances between hints, which are being generated on the fly. Therefore, Auto meter may show some additional distances e.g. in the middle of a bold s.
Use Auto-meter to view corner angles
New If the zoom level of the window is close enough, the Glyph window shows the angles between the line segments or curve handles adjacent to a sharp node:
- if the Corner angles toggles in the View panel is turned on,
- or if Preferences > Glyph window > Auto-meter > Corner angles is turned on,
- or if the Guides tool is active
Quick measurement
If Quick measurement is turned on, the Glyph window shows various automatic measurements as you move your pointer around the current glyph. You can turn Quick measurement on or off with View > Show > Quick measurement or with the Quick measurement toggle at the bottom of the View panel. The basic Quick measurement shows the distance between two opposite segments:
- Hold Shift to measure horizontally or vertically
- Hold ShiftAlt to measure horizontally
- Hold ShiftCtrl to measure vertically
You can configure Quick measurement in Preferences > Glyph window > Quick measurement.
New If a stem is very thin, FontLab now renders the quick measurement values outside the stroke, so the value is not covered with the mouse pointer. #6146
Precision of Quick measurement
Even if you use rounded (integer) coordinates, Quick measurement can show the precise distance between two curves.
New With the new Preferences > Glyph window > Quick measurement > Precision selector, you can decide if Quick measurement shows distances rounded to integers, or with one or two decimal places.
Basic Quick measurement between guides
New Basic Quick measurement now works for several kinds of guides: font dimension lines (like Ascender), font guides and glyph guides (horizontal and vertical):
- Hover over one of these guides to see the distance between that guide and the closest segments.
- Hold Shift or Alt and hover over one of these guides to see the distance between that guide and the closest guides.
Note
Quick measurement for guides works only for the start edge of a horizontal or vertical font or glyph guide. It does not work for the end edge if you have a “thick” guide that has width.
Show node offset option for Quick measurement
New In Preferences > Glyph window > Quick measurement, if you turn on Show node offset and set the dropdown to everywhere, you can hover over a segment or node in the Glyph window, and:
- If you hover over a segment, the Glyph window highlights the segment and shows the horizontal (X) and vertical (Y) offset (relative distance) between both nodes of the segment.
- If you hover over a node, the Glyph window highlights its both adjacent segments and shows the offset between the node and the opposite nodes of both segments.
Quick measurement between elements and components
New If Preferences > Glyph window > Quick measurement is set to everywhere and if Edit > Edit Across Elements is turned on, FontLab shows quick measurement values between elements and components.
Quick measurement for guides and anchors
You can now easily see the relative position of a guide to the contour or the distance of an anchor to the sidebearings and closest font dimensions. New Turn on Preferences > Glyph Window > Quick measurement > Measure distance to guides and anchors, then in your Glyph window turn on View > Measure > Quick Measurement, and then:
- New If you hover over an anchor or drag it, the Glyph window shows the vertical distance of the anchor to the nearest font dimension (ascender, caps height, x-height, baseline or descender), and the horizontal distance of the anchor to the left and right sidebearing. The values will appear blue if they’re equal (that is, if the anchor is perfectly centered).
- New If you hover over a vertical guide or drag it, the window shows the horizontal distance of the guide to the “key” (extrema) nodes on the closest contour segments. As with basic Quick measurement, the distance is measured at your pointer position.
- New If you hover over a horizontal guide or drag it, the window shows the vertical distance of the guide to the “key” nodes on the closest contour segments.
Measuring details in Glyph window
In FontLab 7, if you hovered over a node or handle or selected multiple segments, the Glyph window could show the lengths of line segments and of handle vectors, and their angles if they were not horizontal or vertical.
New In FontLab 8, you can view the measuring details when the Guides tool is active, but you can also view them in other editing modes of the Glyph window if you turn on the relevant options in Preferences > Glyph window > Measure.
Showing the length of line segments and handle vectors
If you hover over nodes or handles or if you select them, the Glyph window shows the length of handles and of line segments in font units:
- if the Lengths & angles toggle in the View panel is turned on,
- or if Preferences > Glyph window > Lengths & angles is turned on,
- or if the Guides tool is active.
New Lengths & angles is now turned off by default.
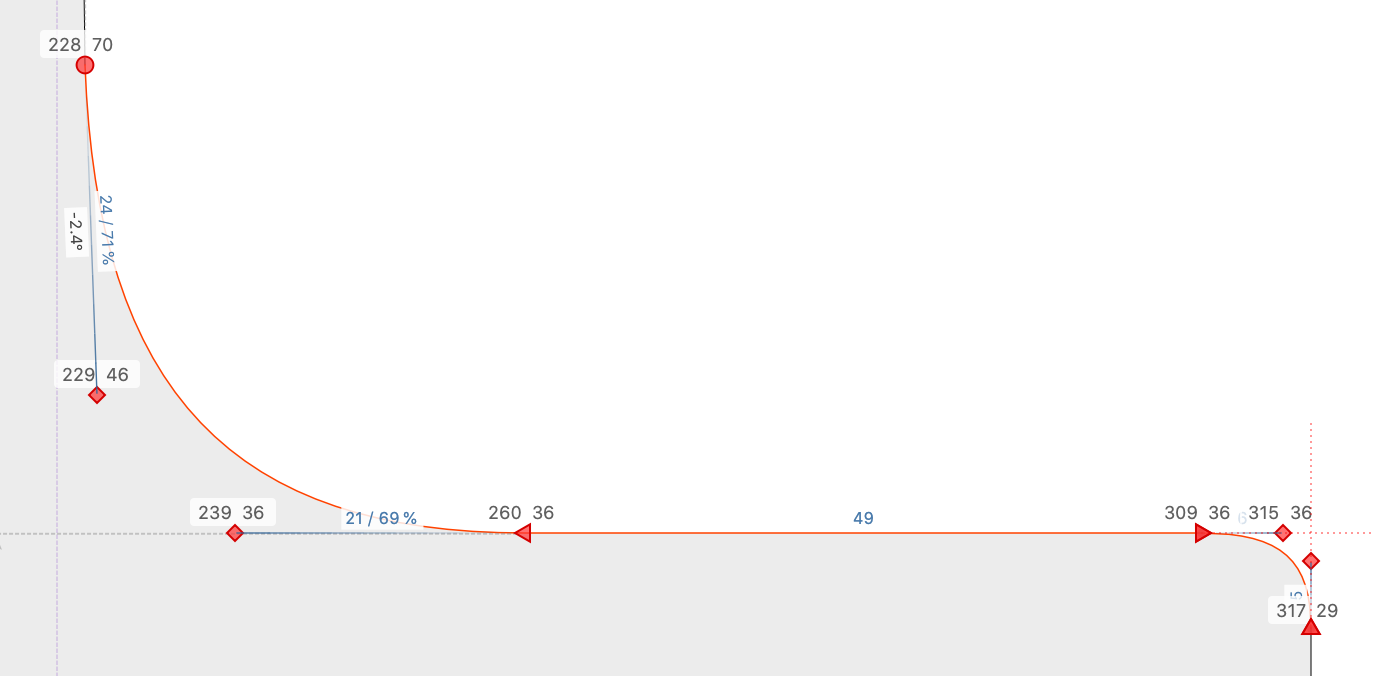
Showing the tension of curve segments
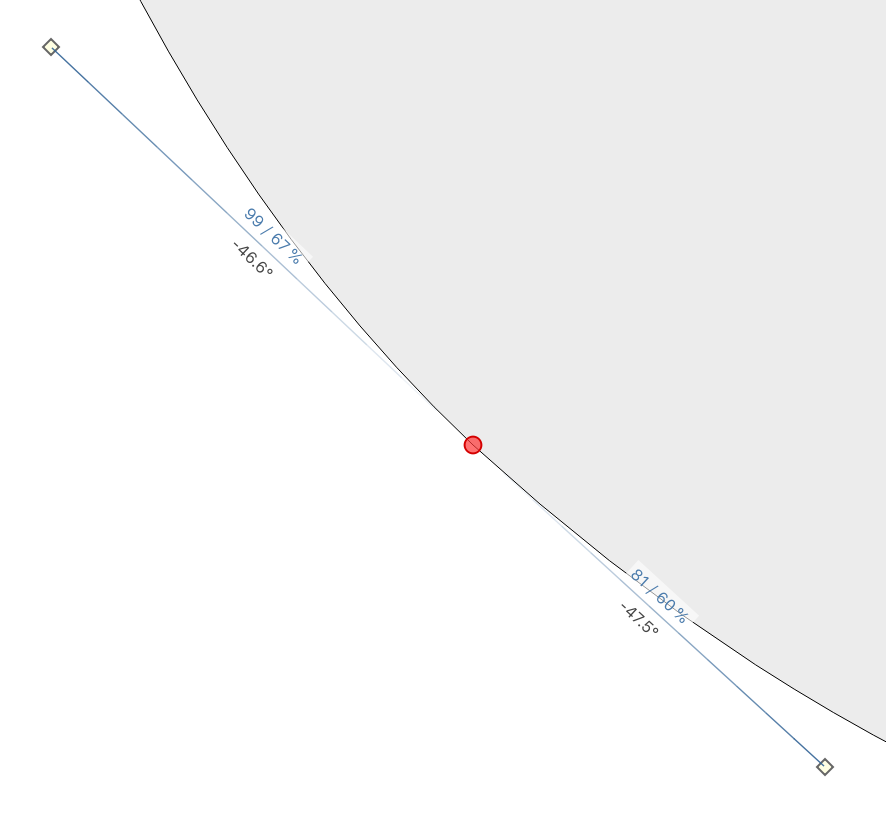
New The Glyph window shows the curve segment tension as a percentage of the handle length towards the point where the handles intersect:
- if the Lengths & angles and Curve tension toggles in the View panel are both turned on,
- or if Preferences > Glyph window > Lengths & angles and and show tension are both turned on,
- or if the Guides tool is active.
This is the same percentage as is shown when you edit a Tunni line.
Guides tool
In many designs, numeric precision matters. With FontLab 8, press the G key to see all the numerical details, then release it, and the details fade away. You can also tap G to view the numeric info permanently. Meet the all-new Guides tool, your new center for measuring! #6147
In the Guides tool, if you start dragging (to measure) or Alt-dragging (to add an element guide):
-
New The extra details disappear so you can focus on your explicit measuring. If you hold Ctrl, snapping suggestions also disappear.
-
New FontLab no longer deselects an existing contour selection.
#6971
New Guides tool pointer
New The Guides tool now uses a new pointer (cursor) that allows more precise clicking. #6261
Length of line segments and handle vectors
New If the Guides tool is active, and you hover over a node or handle, or if you select multiple segments, the Glyph window shows the length of line segments and of handle vectors in font units.
Showing curve segment tension
New If the Guides tool is active, and you hover over a node or handle, or if you select multiple segments, the Glyph window shows the curve segment tension as a percentage of the handle length towards the point where the handles intersect. This is the same percentage as is shown when you edit a Tunni line.
Auto-meter for stem widths
New If the Guides tool is active, the Glyph window shows the stem widths measured by Auto-meter.
Auto-meter for corner angles
New If the Guides tool is active, and the zoom level of the window is close enough, the Glyph window shows the angles of corner nodes measured by Auto-meter.
Guides in Guides tool
New If the Guides tool is active, the Glyph window shows font guides, glyph guides and font dimensions even if they are turned off in View menu.
Context menu operations
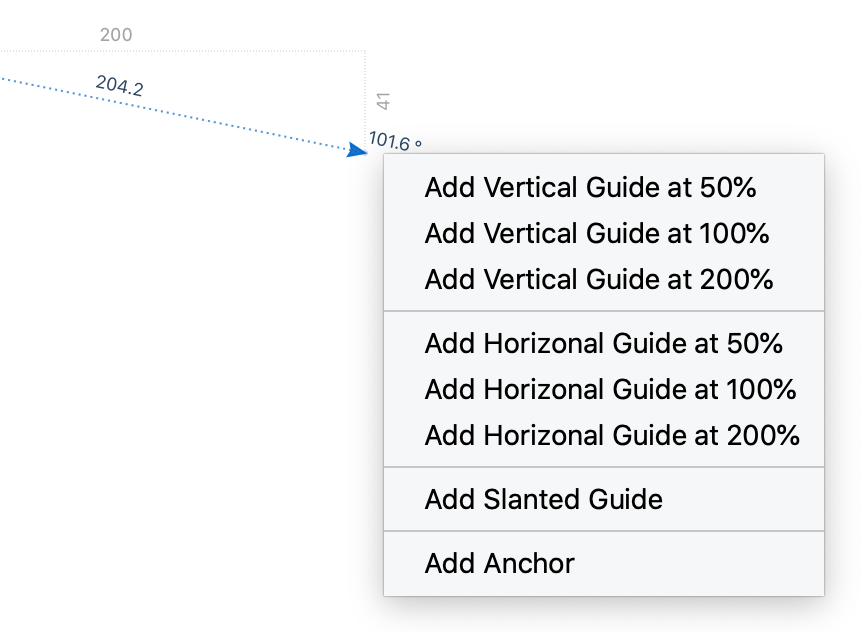
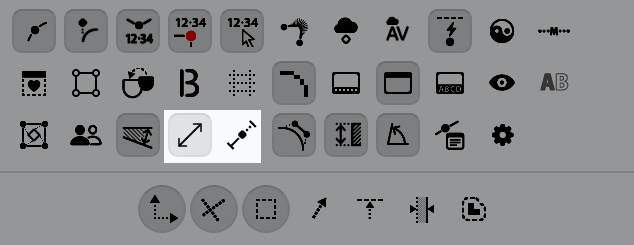
New If the Guides tool is active, and you right-click or Ctrl-click, and then drag and release, FontLab now shows a context menu, where you can choose to add Anchor, slanted guide or some common guides. #5861
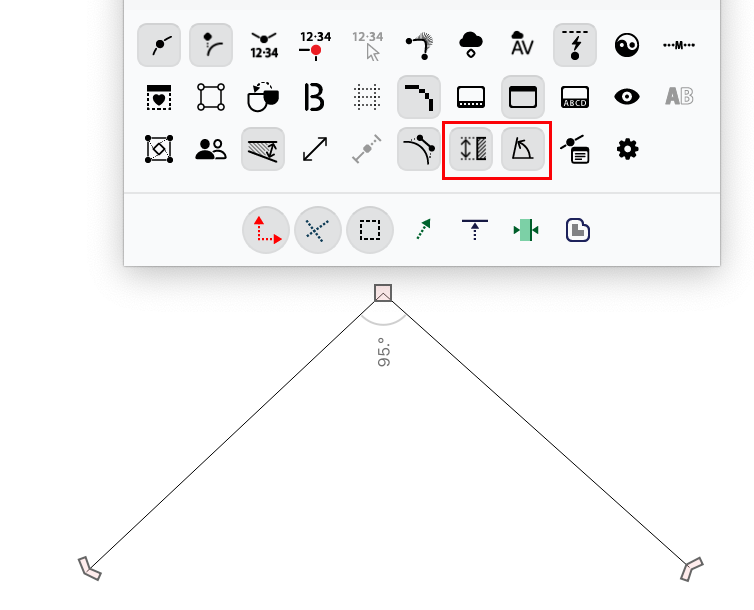
Free-form measuring of angles
New To measure the angle between two vectors (lines), drag with the Guides tool along the first vector, then without releasing the mouse button hold Alt, and then drag to define the second vector. FontLab shows angle in degrees.
Visible masters and Master Relations
New If the Guides tool is active, and you have multiple masters visible in the Layers & Masters panel, Glyph window now shows the nodes and handles in the visible inactive masters, regardless of the setting Preferences > Glyph Window > Inactive nodes.
In addition, if you turn on View > Show > Master Relations, the Glyph window in the Guides mode shows the nodes and handles in the visible inactive masters, and the master relation lines in a more visible way.
Measurements panel
The Measurements panel is a table in which you can record numeric values for design features of each master of your font, for example the vertical dimensions, contrast, overshoots or stem thicknesses. These values don’t need to correspond to technical measurements in the Font Info dialog. Quite often, the technical measurements need to comply with some software requirements, while the values in the Measurements panel do not. FontLab does not export these values into the final font formats.
FontLab can automatically calculate many values in the Measurements panel: click any cell in the panel, press CmdA or CtrlA, and click the Recalculate button.
New The Measurements panel now has new icons that illustrate the design features.
Hints, zones, guides
Zones in Font Info

Zones are special horizontal “thick font guides” that have an origin and a width. Once you export a hinted OpenType PS or TT font, and you use the font in an app that supports hinting, then in small font sizes, the app’s font engine vertically aligns all nodes that are located within a zone. This is used to align the tops and bottoms of flat glyphs (like E) and glyphs that have overshoots (like O or A), especially in small font sizes on low-resolution displays. Each font master has its own set of zones.
Each zone shows up for all glyphs, but if you assign tags to a zone, it shows up only in the glyphs that have a given manual or virtual tag (like desc for descending glyphs or sc for small caps).
New In Font Info > Zones, if you click the Auto-detect zones button in the bottom-right, FontLab now assigns tags to the auto-generated zones, and generates a top zone for small caps. The detection of the descender zone has been improved.
New When you open an OpenType font, FontLab now assigns tags to alignment zones, so only relevant zones appear in various glyph groups. For example, the uppercase top zone only shows up in uppercase glyphs. Turn off Preferences > Map zones to specific glyphs using tags and open the font to see all zones in all glyphs, or change the zone tags in Font Info > Zones.
Guides, Hints and zones in Glyph window
In FontLab:
- A guide can either be horizontal or vertical (“H/V”), or it can be diagonal (“vector”).
- Both types of guides can be either “long” or “short”.
- A guide can optionally have measurement markers. If you double-click a guide, automatic measurement markers appear. If you double-click a guide with automatic measurement markers, the measurement markers will become manual, and you can position them yourself.
Glyph and element guides
A “long” guide in FontLab is a guide that has an origin coordinate and a direction. Any element or glyph guide can be a long guide. FontLab displays them across the entire current glyph, and visually extends them a bit beyond.
You can also have a a “short” element or glyph guide. A short guide that is drawn only between two coordinates, and does not extend to the bounding box and beyond. To control the length of a short guide, use the explicit start and end point (if the guide is a vector), and use the positions of the outmost manual measurement markers (if the guide is H/V).
- New If you click a guide, you can now make it a short guide in the property bar. Previously you could do it in the context menu or Guide panel.
- If you create an element guide (Alt-drag with the Guides tool), the guide is short by default. New You can now make any element guide long.
A glyph guide with automatic measurement markers always measures the distances inside the glyph and to the current glyph sidebearings.
Font guides, zones, font dimensions
A font guide is always “long”. New With the Preferences > Grid, Guide and Hints > Show in current glyph only setting, you can control how FontLab displays font guides, and also font dimension lines and alignment zones.

If the setting is off, FontLab shows font guides in a “super-long” way: across the entire Glyph window, from edge to edge. If the font guide has automatic measurement markers, they measure distances inside the glyph, and they measure distance between glyphs. New For the first and last glyph in line, they measure distance to the sidebearings (respecting slanted sidebearings).
If the setting is on, in a all Glyph window modes except Metrics and Kerning, FontLab shows font guides across the entire current glyph, and visually extends them a bit beyond, just like long glyph guides. New If the font guide has automatic measurement markers, in non-Metrics modes, they only measure distances inside the glyph.
Color opacity of font, glyph and element guides, of font dimensions, hints and zones

New In Preferences > Grid, Guides and Hints, you can now change the opacity at which the Glyph window shows alignment zones (if View > Show > Zones is turned on) and hints (if View > Show > Hints is turned on). If the opacity is set to less than 50%, the hints and zones and the Glyph window do not show their numerical values.
New By default, the various types of guides have reduced opacity so they’re not too distracting:
- Font dimensions: 30%
- Alignment zone: 20%
- Font guide: 50%
- Hint: 50%
- Glyph guide: 50%
- Element guide: 80%
To make them fully visible, go to Preferences > Grid, Guides and Hints and move their opacity sliders fully to the right.
Zones in Glyph window
New If View > Show > Zones is turned on, the Glyph window now shows zones with a uniform fill, less color intensity and without a visible outer edge. In addition, you can control their opacity in preferences.
Locked guides
New If you lock a guide and then right-click or Ctrl-click the locked guide, FontLab now shows a guide-specific context menu. Previously, FontLab showed a generic context menu.
View distance of dragged guides
New As you drag a horizontal or vertical guide, the Glyph window will show the distance by which you’ve dragged it if you turn on View > Measure > Quick Measurement, or if you turn on Auto-meter for stem widths or Auto-meter for counters in the View panel or in Preferences > Glyph Window. This also works if you’re duplicating a guide with Alt-drag.
Ghost hints
To align the edges of horizontal stems in small pixel sizes across different glyphs to a common line (for example the bottoms of uppercase letters to the baseline), specify a zone in Font Info > Zones. The origin (position) of the zone needs to be on the common line, the other edge (defined by the zone’s width) should cover the overshoots for glyphs such as “O”. Then, in each glyph that should be aligned, create a horizontal stem hint so that one edge (but not both) of the hint is inside the zone.
If the glyph does not have a horizontal stem (such as a sanserif “I”), you can add a horizontal “ghost hint”. The origin (position) of the ghost hint needs to be on the common line.
Ghost hints in Glyph window
If View > Show > Hints is turned on, FontLab shows horizontal hints in the Glyph window in pale green color. Like with other “thick guides”, FontLab shows the position of the hint on the left side of the hint “bar”, and the width on the right side.
New If a hint is a ghost hint, FontLab fills its area with a 45°-rotated grid, and shows the position of the ghost hint on the left, immediately followed by an upwards or downwards arrow that points towards the zone to which the hint is aligning. The explicit numeric width on the right is no longer shown.

New If the ghost hint is above the zone, it’s a bottom ghost hint: FontLab shows a “↓” in the canvas and in the property bar Width field, and will export the hint into Type 1 or OTF with the width -21.

New If the ghost hint is below the zone, it’s a top ghost hint: FontLab shows a “↑” in the canvas and in the property bar Width field, and will export the hint into Type 1 or OTF with the width -20.
Adding ghost hints
To create a ghost hint, select one node and choose Tools > Add Horizontal Hint or with the Magnet tool Shift-click a node. FontLab automatically determines if it’s a bottom or a top ghost hint.
New You can also convert any regular horizontal hint into a ghost hint: enter + into the hint’s Width field in the property bar to make it a bottom ghost hint, or enter - to make it a top ghost hint.
Converting thick guides to hints
New If you use the guide context menu to convert a guide that has a negative width value to a hint, FontLab now creates the hint with negative direction. #5797
Hints linked to nodes
If a hint is linked to one or two nodes, and you move the node, the hint moves or changes its width. If a hint is not linked, it does not change when you move nodes.
FontLab links hints to nodes if you:
- Use Tools > Hints > Autohint and Preferences > Autohinting > Link hints to nodes when autohinting is turned on.
- Select two nodes and use Tools > Hints > Add Hint (horizontal or vertical).
- Shift-drag with Magnet tool from a node to the canvas or another node.
- Add a ghost hint: select a node and use Tools > Hints > Add Horizontal Hint or Shift-click a node with Magnet tool.
Use Tools > Hint > Link Hints to Nodes to link hints to nodes if the hints are not linked.
New Use Tools > Hint > Unlink Hints to unlink hints from nodes.
Add stems quickly
New Font Info > Stems now has two new buttons: Add horizontal stem and Add vertical stem. Use them to quickly add multiple stems.
Better autohinting settings
If you autohint a font master, FontLab will only build hints that have a value larger than the minimum and smaller than the maximum stem width specified for each master in Font Info > Other Values > PostScript hinting > Autohint (H for horizontal stems, so the Y direction, and V for vertical stems, so the X direction).
New These settings now use UPM font units. Previously, they used in ‰ of the font size.
Number of stems and zones
New the Font Info sections list now shows how many Stems and Zones are defined in the current font master.
Expressions for zones
In FontLab, Zones are a special per-master structure. FontLab dynamically constructs the “thick guides”, which visualize zones in the Glyph window, and updates them. Expressions don’t work with Zones. Previously, you could assign an expression to a zone in the Glyph window, but these expressions did not save into VFC/VFJ, and could be “lost” after you change something in the Font Info dialog. New Now, the Expression field in the Guides panel and in the Glyph window property bar is disabled for Zones.
TrueType Hinting
Import TTH Stems and TTH Zones from Font Info
In the TrueType Hinting mode, you can now easily convert the stems and zones defined in Font Info (which are used for PostScript hinting) into stems and zones used in TrueType Hinting. This was possible in FontLab Studio 5 but not in FontLab VI or 7.
New Use the property bar to open the TTH Stems dropdown. Click the new Import TT Stems from Font Info button to import the stems defined in Font Info > Stems into the TTH Stems dropdown, for all masters. Alt-click the button to only import the stems for the current master.
New Use the property bar to open the TTH Zones dropdown. Click the new Import TT Zones from Font Info button to import the alignment zones defined in Font Info > Zones into the TTH Zones dropdown, for all masters. Alt-click the button to only import the zones for the current master.
TrueType Hinting preview in Glyph window
New If you turn on the TrueType Hinting mode (tool), and you press Space or `, the Glyph window: #6149
-
shows the rasterized pixels of the current glyph at full opacity, in monochrome or ClearType mode depending on the property bar setting
-
hides all surrounding glyphs, all visual TTH commands and all guides and spacing controls
-
shows the pixel grid, the pixel centers and hinted outline if they are turned on in the property bar
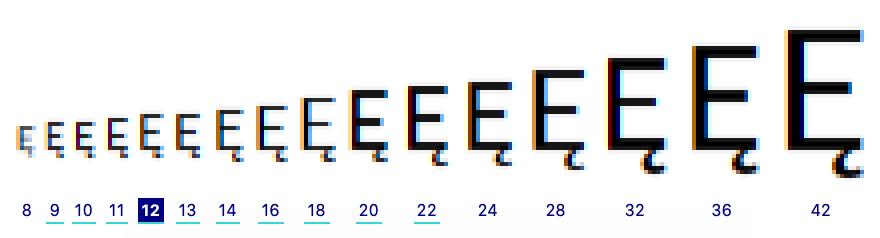
Preview rasterized glyphs in the TrueType Hinting panel
New If you have any tool active, you can now right-click the heading of the toolbar or any panel, or choose Window > Panels or open Window > Panels List, and then open the TrueType Hinting panel. Previously, to open the panel, you had to activate the TrueType Hinting tool.
The TrueType Hinting panel is a useful alternative to the Preview panel that shows your glyphs exactly as they are rasterized by the Microsoft Windows® ClearType® font engine. This way, you can design and preview the low-resolution rendering in real time. Also, you can see how Microsoft Windows® will render your font, even if you’re working on a Mac.
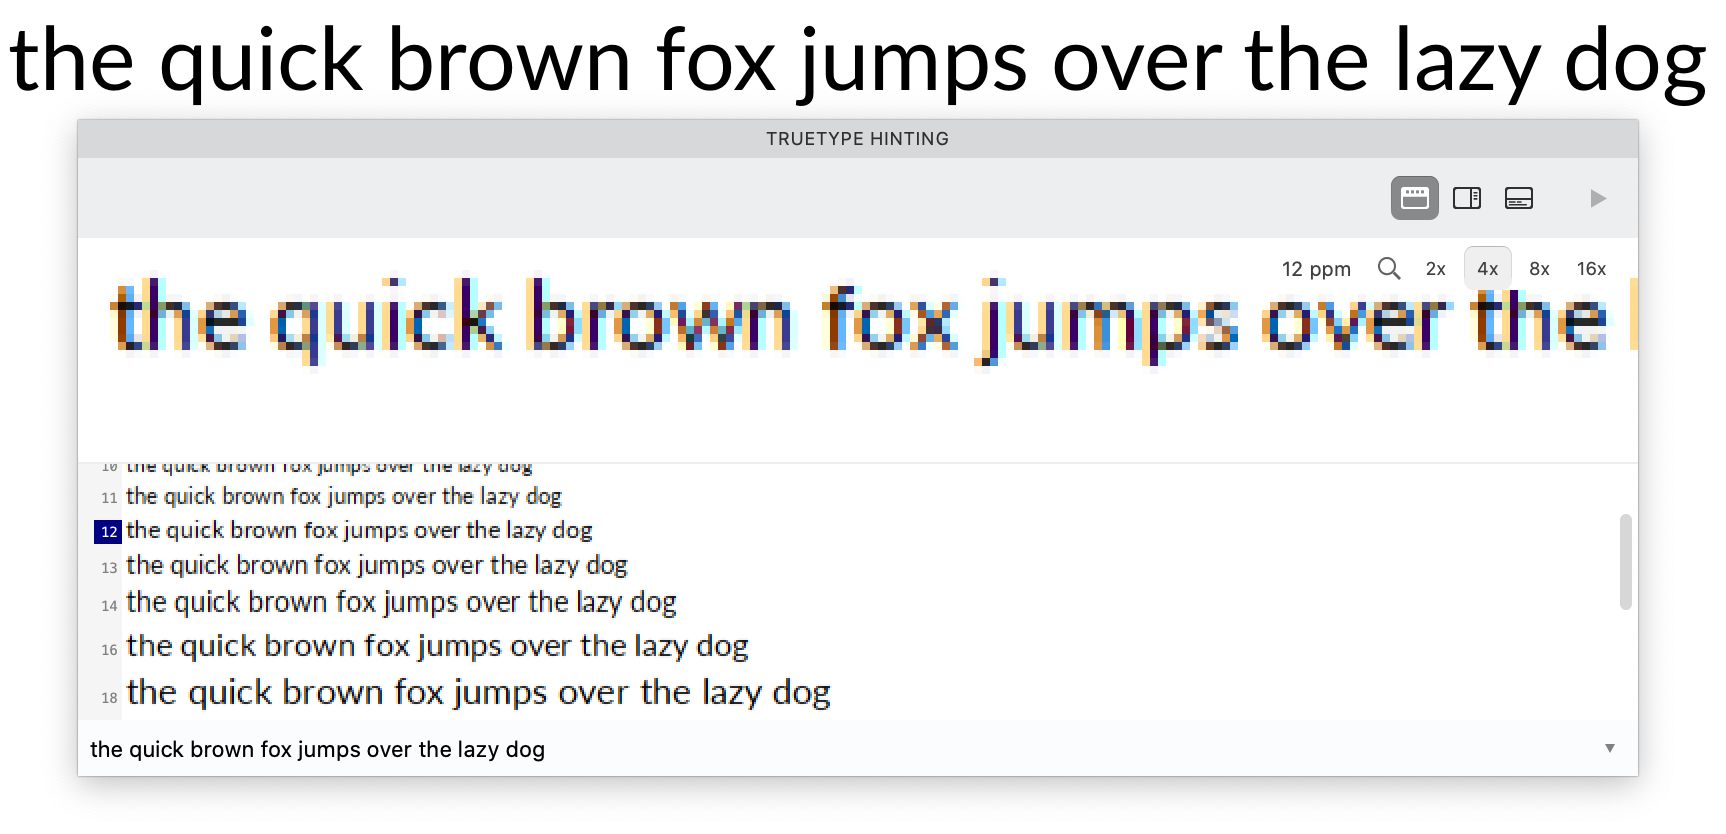
Zoomable preview in the TrueType Hinting panel
New If you turn on the leftmost toggle in the right section of the TrueType Hinting panel control bar, FontLab shows a Zoom sub-panel that shows the hinted preview of the current text in the current ppem size. In the top-right part of the sub-panel, you can set the zoom (magnification) level of that hinted preview: 2x, 4x, 8x or 16x. #6017
Delta hints in the TTH Glyph window waterfall
New If the TTH tool is active, the waterfall preview in the Glyph window highlights the PPM sizes containing middle delta hints in cyan, final delta hints in magenta. #5858
PPM size selector in the TTH Tool property bar
New You can use several methods to change the current PPM size in the TrueType Hinting mode:
- the </> keys if Glyph window or a panel has focus,
- if the PPM numeric field of the property bar has focus, the ↓/↑ keys, or the slider,
- the PPM down/PPM up buttons in the property bar.
TTH Stems dropdown in TTH Tool property bar
New In TrueType Hinting mode, if you click the TTH Stems button in the property bar, the TTH Stems dropdown now highlights the current master. #5821
Removing TTH commands
New If you click the visual representation of a TTH command (align, link or interpolate) in the TrueType Hinting mode, you can now tap the Del or BkSp key to remove the TTH command. Previously, you could only use the Delete button in the floating Options panel that appears if you click the visual representation of a command. #5819
Remove X or Y hints only with Tools > Actions > Hinting > Remove TT hints
New You can now easily remove just the x-direction or just the y-direction visual TTH commands multiple glyphs or layers. Use Tools > Actions > Hinting > Remove TT hints and turn on the new checkboxes that indicate the direction of the commands to remove. #5800
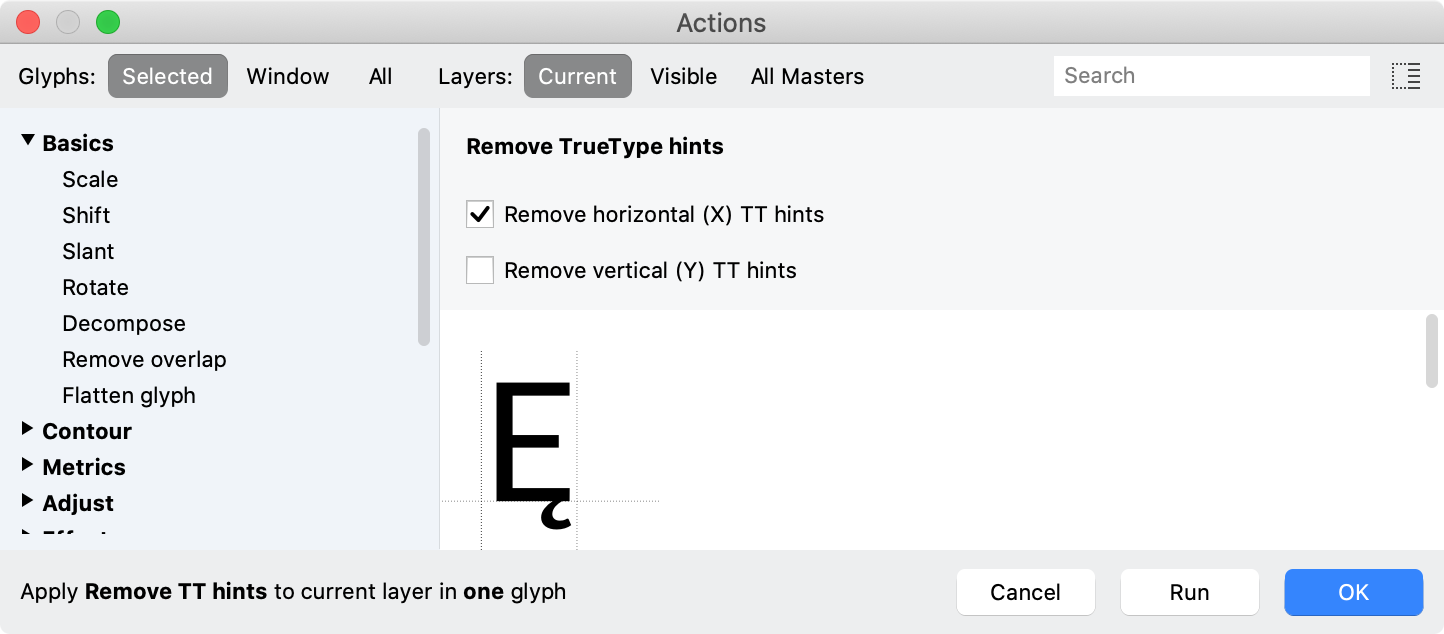
Typically, after autohinting, you may want to remove the horizontal (X) hints.
Other improvements
New In the TT Hinting panel, the line height of the text waterfall preview is increased to correctly show taller glyphs. #5817
New If you make the Glyph window narrower, the property bar of the TrueType Hinting tool no longer hides interface items prematurely. #5726