New in FontLab 8: Metrics & kerning
Adjust metrics and kerning in a text-like editor, by planned phrases and pair lists. Apply tracking, modify widths, sidebearings and kerning globally or for selected glyphs. Automatically or manually build kerning classes and link metrics between glyphs using complex expressions. Auto-calc metrics and kerning, and audit kerning exceptions to find combinations that produce visual conflicts.
New in FontLab 8: Use your mouse to adjust metrics and kerning with high-precision Lever dragging. Hide or reduce the visibility of spacing controls for distraction-free spacing and kerning. Auto-space and auto-kern with one click or tap.
New FontLab 8.3 respects the italic angle when you center a glyph, components or anchors within the advance width. The Metrics and Kerning panels have better sorting.
Metrics
Manual editing of metrics
Center glyph in advance width
If the Metrics tool is active:
- tap { to align the current glyph layer to the left sidebearing, in other words to set the LSB to 0 and keep the advance width
- tap } to align to the right sidebearing (set RSB to 0 and keep width)
- New tap | to center the current glyph layer (make both sidebearings equal and keep width)
Metrics lever: precision dragging of metrics

New The Preferences > Spacing page now has a new setting Metrics and kerning editing changes value by 1/n of dragging distance, where n can be up to 100. A reasonable value is between 4 and 10. #6613
In the Metrics mode of the Glyph window, if you drag a sidebearing line or a glyph and n is larger than 1, the change in the metrics is more precise (smaller) than the distance of the dragging on screen. Hold Shift when you drag, and the change in the metrics will be the same as the distance of the dragging.
Tip
Shift-drag far to make larger changes. Then release the button and drag again by a small distance to make a precise adjustment.
Spacing Controls
Rendering of Spacing Controls
New If you turn on View > Metrics & Kerning > Spacing Controls and hover over the sidebearings in the editing modes and the Metrics mode, the Glyph window shows a cross at the intersection of the baseline and the sidebearings. This cross is now smaller.
New Also, if you change Preferences > Spacing > Metrics lines to a color with a lighter transparency, FontLab draws the cross more transparent.
To show or hide the kerning line in Kerning mode of the Glyph window, or the sidebearing lines in other modes except Text, you can use:
- View > Metrics & Kerning > Spacing Controls
- the Spacing Controls toggle New which is now in the toolbar, and not in the property bar
Tip
If you want to edit metrics and kerning with your mouse, use Preferences > Spacing > Metrics lines to set the transparency to around 4%, and the spacing controls (sidebearings and the cross) will be barely visible. Also, in the Glyph window sidebar, set a higher linespacing to increase the distance between the baseline and the spacing controls.
Draggable Spacing Controls
To change the spacing of the current glyph with your pointer:
- drag the sidebearing lines with the Metrics tool
- alternatively, if View > Metrics & Kerning > Spacing Controls is turned on and View > Lock > Glyph Metrics is turned off, drag the sidebearings with the Contour and Element tools
New If another tool is active, the spacing controls are not draggable.
Metrics line
In FontLab, you can set numerical sidebearing values in two ways: using the bounding box or using the Metrics line (previously called Measurement line).
-
Bounding box mode: If View > Metrics Line is turned off, the sidebearing text boxes in the Glyph panel, in the Metrics table and in the Glyph window property bar show sidebearings at the bounding box, calculated using all elements except the elements that are set to Nonspacing.
-
Metrics line mode: If you turn on View > Metrics Line, the background of the text boxes becomes violet, and the sidebearing values are calculated at the intersection of the Metrics line and the glyph content (excluding Nonspacing elements). Drag the dotted violet guide in the Glyph window to set the Metrics line position for the current master.
The Glyph panel and the Metrics mode property bar of the Glyph window show both the bounding box and the Metrics line sidebearing values in small text.
In metrics expressions, FontLab always uses bounding box sidebearing values, but ignores Nonspacing elements.
Sidebearing values on the Metrics line
New If View > Metrics and Kerning > Spacing Controls is turned on, and if Preferences > Grid, Guides and Hints > Font guide opacity is higher than 50%, the Metrics line now explicitly shows the sidebearings (thick bars and numeric values) on the glyph canvas.
To hide them, move the Preferences > Grid, Guides and Hints > Font guide selector to the left half of the slider. You can also use the slider to generally make the inactive Metrics line (and the font guides) more or less visually subtle.
Metrics line and Spacing controls
If you have View > Metrics & Kerning > Spacing Controls turned on, the Glyph window canvas shows the numeric sidebearing values at the bottom of the current glyph in Metrics mode, and also in other Glyph window modes if Preferences > Spacing > Spacing controls show sidebearing values in editing modes is turned on.
In Bounding box mode, the sidebearing values are shown in black. New In Metrics line mode, the values are shown in violet.
Use Metrics line with Set sidebearings action

With Tools > Actions > Metrics > Set sidebearings, you can modify the sidebearings of multiple glyphs and layers: you can set a fixed value, adjust an existing value, or auto-space.
New If you choose Set equal to and turn on Use the metrics line, FontLab will apply the new sidebearing value at the intersection of the glyph content and the metrics line, regardless of whether the Metrics line is visible in the Glyph window or not.
Metrics links
Font > Metrics submenu
New The new Font > Metrics now has the Link Glyph Metrics and Remove Metrics Links commands.
Tools > Actions > Metrics > Remove metrics links
New With the new Tools > Actions > Metrics > Remove metrics links action, you can remove all metrics links (expressions) from the specified glyphs and layers, so the sidebearings and widths become simple numerical values. #5578
Auto-spacing
In the Glyph window, if you tap the ; key (except in Kerning mode), FontLab will automatically calculate the sidebearings for the current glyph. New With Font > Metrics > Auto Space, you can also do it for a Font window selection.
New In Preferences > Spacing > Autospace method, you can now choose the method which FontLab will use to automatically calculate the metrics:
- optical: FontLab analyzes the glyph shape and intelligently sets the sidebearings. This is mostly useful for the initial step of autospacing, which you may need to later refine.
- tight: FontLab sets both sidebearings to 0.
- custom: FontLab sets both sidebearings to the specified % of the UPM size.
The tight and custom methods always set the same fixed value. This is mostly useful if you are drawing, and tap ; to predictably set the initial sidebearings to a sensible value.
Whichever method you choose, FontLab always ignores elements and components that are set to Nonspacing in the glyph when it sets the sidebearings.
Metrics & Hinting Shadows
New If you turn on View > Metrics & Hinting Shadows in an italic design, FontLab takes the italic angle and caret offset into account when it renders the “shadows” for metrics, zones and hints. #6456
Title Case text conversion
If you have multiple glyphs in your Glyph window, you can use Text > Change Case or the buttons at the top of the Glyph window sidebar to change the case of the text between UPPER CASE, lower case, and New now also Title Case.
This is very useful when checking spacing and kerning between uppercase and lowercase glyphs.
Kerning
Manual kerning
Kerning lever: precision dragging of kerning
New The Preferences > Spacing page now has a new setting Metrics and kerning editing changes value by 1/n of dragging distance, where n can be up to 100. #6613
In the Kerning mode of the Glyph window, if you drag a glyph and n is larger than 1, the change in the kerning is more precise (smaller) than the distance of the dragging on screen. Hold Shift when you drag, and the change in the kerning will be the same as the distance of the dragging.
Shift-drag far to make larger changes. Then release the button and drag again by a small distance to make a precise adjustment.
Tip
If you turn on Preferences > Spacing > Inactive kerning pairs are editable and you turn off View > Show > Spacing Controls, you can rapidly make small kerning changes to all pairs that are part of the current Glyph window text.
Hide pointer as you drag in Kerning mode
If you turn on Preferences > Spacing > Hide cursor while editing kerning, and you drag a kerning pair in the Kerning mode of the Glyph window, FontLab temporarily hides the pointer during the dragging, so it does not obscure your view.
Font > Kerning submenu
New The Font > Kerning submenu is rearranged for better readability.
New FontLab K2 autokerning algorithm
New Click the Auto-kern button in the Pairs & Phrases panel to autokern the selected pairs using the new FontLab K2 autokerning algorithm, or tap ; in the Kerning mode to use K2 to autokern the current pair.
New Alt-click the Auto-kern button in the panel or tap Shift; to autokern using the old FontLab K1 algorithm.
New terminology and icons for kerning classes
New For kerning classes, FontLab now uses the terms Left class and Right class instead of 1st class and 2nd class.
A left class is used on the left side of the kerning pair, so it groups glyphs that share a similar design structure on their right side.
A right class is used on the right side of the kerning pair, so it groups glyphs that have their left side similar design-wise.
This change is necessary to properly support kerning in right-to-left (RTL) scripts like Arabic and Hebrew.
![]()
New The icons for left and right kerning classes are updated. They visualize two glyphs with a kerning pair between them:
- The icon for left kerning class has a small glyph drawing on the left side, and the right edge of that drawing has an irregular form.
- The icon for right kerning class has a drawing on the right, and its left edge has an irregular form.
Arrangement of kerning class assignment boxes
FontLab has a few places where you can edit the kerning class assignment for a glyph: in the Glyph panel, and in the Font window status bar. New By default, the UI arranges the kerning class assignment boxes by the design side similarity of the glyphs, analogically to sidebearings, but you can change this arrangement.
If Preferences > Spacing > Edit kerning classes by position in pair is turned off (default), FontLab follows the “design side similarity” logic: the class which groups glyphs with a similar left side (which was previously called “2nd class” and is now called “right class”) is shown on the left. The class called “left” which groups glyphs with a similar right side is shown on the right. This logically follows the glyph-centric display of the kerning class boxes. This arrangement should be familiar to users of font editors like Glyphs.
If Preferences > Spacing > Edit kerning classes by position in pair is turned on, FontLab follows the “position in pair” logic: the “right class” which is used on the right side of a pair is shown on the right. This arrangement should be familiar to users of FontLab 8.0 and earlier.
Our users have asked us to implement both approaches, so we have — but in the famous “ultimately customizable” FontLab fashion, you have the choice! The table below summarizes the settings:
| New name | Old name for LTR | Position in pair | Similar side | Shown if pref off | Shown if pref on |
|---|---|---|---|---|---|
| Left | 1st | left | right | right | left |
| Right | 2nd | right | left | left | right |
Kerning classes arrangement in Glyph panel
New In the Glyph panel, right and left kerning class are shown in one row.

New By default, the Glyph panel uses the “design side similarity” logic, so the kerning class called “right” is shown on the left side. Turn on Preferences > Spacing > Edit kerning classes by position in pair to switch to the “position in pair” logic.
Kerning classes arrangement in the Font window

If View > Control Bars > Status Bar is turned on in the Font window, the bottom of the window shows info about the current glyph. New This status bar has a new layout, and by default uses the “design side similarity” logic for the kerning class assignment fields: editing field for the right kerning class is shown to the left of the right sidebearing, and the field for the left kerning class is shown to the right of the right sidebearing field.
The new default layout is decidedly glyph-centric. The class kerning fields are located at the side that corresponds to the side of the glyph which is similar to other glyphs in the same kerning class.
New Turn on Preferences > Spacing > Edit kerning classes by position in pair to switch to the “position in pair” logic.
Better editing of kerning classes
New You can now easily edit the assignment of glyphs to kerning classes in the Glyph panel and in the Font window status bar.

- New If the glyph is part of a kerning class, click the left or right kerning class icon in the panel or in the status bar to show the kerning class in the Classes panel.
- New To specify a kerning class for the current glyph in the current master, type a class name into the kerning class text field in the panel or in the status bar, and press Enter or click away the field. If the kerning class does not exist, FontLab will create a new left or right kerning class. If the glyph was assigned to another class, FontLab will remove it from that class and will assign it to the class you specified.
- New Click the … button in the panel, or click the class field in the status bar and then click the … button that appears, to open the Set Kerning Class dialog. In this dialog, you can add the glyph to a new or existing left or right kerning class.
- New The Set Kerning Class dialog now has a scrollable glyph map of glyphs that belong to a class, and you can change the cell size there.
If you create a new left kerning class, you cannot create a new right kerning class that has the same name, and vice-versa. Therefore, we recommend that you use a consistent naming scheme for your left and right kerning classes, for example L_A for the left class that groups A and glyphs that are similar on the right side, and R_A for the right class.
The kerning class fields in the Font window status bar only show kerning class assignments for the current glyph. The fields in the Glyph panel can show kerning class assignments for multiple glyphs that are selected in the Font window, and you can assign all selected glyphs to the same class in one go.
You can still use the Classes panel to edit kerning classes. There, you can also create left-and-right classes, which is not possible in the Glyph panel or in the Font window status bar.
Manually create class kerning exceptions
Note
This text follows the FEA feature syntax convention to use the
@prefix to denote a class. However, in the FontLab user interface, the@prefix is only shown in the Features panel.
If you have a kerning pair that has a class on either side (or both), you can create a class kerning exception for that pair.
Let’s say you have an @A kerning class that contains the glyph A and all accented derivatives of A, and you have an @Y kerning class that contains the glyph Y and all its derivatives. Type AY in the Glyph window, switch to Kerning tool and click the Y glyph.

Since both glyphs belong to a kerning class, the AY pair that you see in the window represents the potential class-to-class kerning pair: @A @Y. In other words, the A glyph in the text represents the @A class, and the Y glyph represents the @Y class.
- Hold Ctrl and use the ↑/↓ arrow keys to switch the representative glyph for the left class.
- Hold Alt and use the ↑/↓ arrow keys to switch the representative glyph for the right class.
- Without Ctrl and Alt pressed, use the ←/→ arrow keys or drag the kerning control to change the class-to-class pair (
@A @Y). It doesn’t matter which representative glyph is in the text.
To create exceptions, use the Ctrl modifier for the left side of the kerning pair, and Alt for the right side, like so:
- Hold Ctrl and use the arrow keys or drag the kerning control create a glyph-to-class exception (
A @Y). New If you hold Ctrl and click, FontLab no longer shows the context menu if the Kerning tool is active. Right-click to open the context menu. - Hold Alt and use the ←/→ arrow keys or drag the kerning control create a class-to-glyph exception (
@A Y). - Hold CtrlAlt and use the ←/→ arrow keys, or drag the kerning control create a glyph-to-glyph exception (
A Y).
FontLab adds a new exception pair the moment you change the pair value while you’re holding Ctrl or Alt. If you do this, the new pair gets ”decoupled” from the class-based pair. Once you’ve added the exception pair, you can release Ctrl and Alt: drag or use ←/→ to change the value of the now-created exception pair.
Selective audit of kerning exceptions
Class-based kerning pairs may cause visual clashes in some combinations such as “Tî”. With Audit Exceptions, you can automatically find and fix these collisions.
- In Preferences > Spacing > Minimal distance for Audit kerning exceptions set the threshold value in % of UPM (so 1% is 10 units in a 1000 UPM font). A negative value means that the glyphs may overlap by a certain amount.
- Choose Font > Kerning > Audit Exceptions or New Alt-click the Kerning panel local menu (☰) and choose Audit Exceptions in All Pairs.
- New Alternatively, select some class-based kerning pairs in the Kerning, click ☰ in the Kerning panel and choose Audit Exceptions in Selection.
For all glyph combinations in all or the selected class pairs of the current master, FontLab will check if the smallest horizontal distance between the contours of both glyphs of the combination is less than the threshold. If FontLab finds any such combinations, it opens the Audit Kerning Exceptions dialog.
In the dialog, you can choose Review to open these combinations in a new Kerning window, so you can create some exceptions manually.
If you choose Add exceptions in the dialog, FontLab creates the new kerning exceptions and sets each kerning value so that the smallest horizontal distance between the contours of both glyphs is equal to the threshold.
Example: Let’s say you set the threshold to 10 units (1% of the UPM), and the @L_T @R_i class kerning pair has the value -30. If Audit Exceptions finds that the kerned glyphs T and icircumflex (Tî) overlap by 14 units (so their distance is -14), then Add exceptions will create a T icircumflex exception pair with the value -6.
Remove kerning pairs by specified criteria
In the Remove Kerning Pairs dialog, you can remove some kerning pairs from the current font master according to criteria you specify. To open the dialog:
- Choose Font > Kerning > Remove Pairs… to apply the criteria to all pairs in the current master. If you
- New Select some kerning pairs in the Kerning panel, and choose Remove Pairs… from the panel local menu to apply the criteria to the selected pairs, or turn on Apply to all pairs to apply the criteria to all pairs in the current master.
New To remove kerning exceptions that differ insignificantly from the class pair, open the dialog and use the new option Remove exceptions that differ from class pair by n units or less.
Kern to distance
New You can now add kerning pairs that ensure that the distance between two glyphs are equal to a defined number of units.
Select pairs or phrases in the Pairs & Phrases panel, Cmd/Ctrl-click the Auto button in the panel, and in the Kern to Distance dialog, specify the distance. FontLab will add or change the kerning value so that the smallest horizontal distance between the contours of both glyphs of the pair is equal to the specified distance. A negative value means that the glyphs may overlap by the specified amount.
Copy kerning class assignment between glyphs

If you copy one or more glyphs in Font window, select other glyphs, then choose Paste Special…, turn on New Kerning classes and click OK, then for any source glyph that is part of any left and right kerning classes, the target glyph will also be placed in the same kerning classes.
If the source glyph is not in any kerning class, the duplicated glyph will not be placed in any kerning class.
Copy kerning classes between masters
New In the Classes panel local menu, you can now choose Copy Kerning Classes to Masters to copy all kerning classes of the current master to all other masters.
You can also click the new Copy to Masters button below the classes list to copy the selected kerning classes of the current master to all masters.
Better kerning matching across masters
If you have multiple masters, each master has its own set of kerning classes. If you use Font > Kerning > Match Kerning, FontLab makes the kerning multiple-master-compatible:
- Converts all class kerning into flat kerning.
- Synchronizes kerning classes: copies kerning classes from the main master (blue dot in Font Info > Masters).
- Equalizes the number of kerning pairs: adds 0-value kerning pairs in masters which don’t have a pair but another master has a given pair.
- Converts the flat kerning into class kerning using the synchronized classes.
New If you use Font > Kerning > Match Kerning for the first time, FontLab shows an explanatory dialog. If you use it again, FontLab no longer shows the dialog.
Right-to-left and bidirectional kerning in OpenType
OpenType fonts store kerning in GPOS table lookups. Each lookup for horizontal kerning has a flag that specifies the writing direction of the kerning pairs: left-to-right (LTR) or right-to-left (RTL).
Scripts that use the same writing direction may store kerning in the same lookup or in separate lookups. For example kerning for LTR scripts like Latin, Cyrillic and Greek may be stored in just one lookup. But kerning for RTL scripts like Arabic and Hebrew may not be stored in that same lookup, and needs a separate lookup that has the lookupflag RightToLeft enabled.
Kerning for scripts that use the same writing direction may be split into multiple lookups, each having the appropriate flag, but kerning for scripts that use different directions must not be mixed within one lookup.
So an OpenType font that has kerning for Latin, Cyrillic and Hebrew glyphs will need at least two kerning lookups: one for Latin and Cyrillic, and one for Hebrew.
Bidirectionality in Unicode
In Unicode, only some characters are associated with just one writing direction: Latin letters are always LTR, and Hebrew letters are always RTL, but digits or punctuation signs may be used in either direction.
The Unicode Standard categorizes characters used in horizontal writing into four directionality types:
| Type | Example |
|---|---|
| Strong | LTR or RTL: letters, characters that are used in one script only |
| Weak | LTR or RTL: numbers, some math signs, currency signs, nonspacing marks, some punctuation |
| Neutral | spaces, some separators, most symbols and punctuation |
| Formatting | small set of explicit directionality control codes |
Read more about Unicode directionality:
- Unicode Bidirectional Algorithm
- Unicode Character Database
- Unicode Script Property
- Bidirectionality in Microsoft apps
Visual vs. logical order of kerning pairs
Type design apps and font development tools have two competing paradigms for storing kerning pairs:
- Logical order is derived from the order in which the Unicode characters are written in the text.
- Visual order is the order in which the glyphs appear on the screen.
In early days of digital type design, not much thought was given to bidirectional kerning, and the “logical order” was implicitly the same as visual order.
Today:
- Logical order is still the same as visual order for the left-to-right scripts.
- For strong right-to-left characters, the visual order is the opposite of the logical order.
- For weak and neutral character types, the visual order is ambiguous.
Some source font formats store kerning in logical order, some store it in visual order. Apps and tools that convert between OpenType fonts and source formats need to take this into account, but some don’t.
This is a non-extensive summary of how formats store kerning:
| Format | Storage |
|---|---|
| OpenType | Separate storages by direction |
.vfj, .vfc |
Single visual storage |
.ufo 4 |
(Planned) single visual storage |
.ufo 3 |
Single logical storage, which is ambiguous for neutrals |
.ufo 2 |
Single visual storage |
.glyphs 3 |
Separate storages by direction |
.glyphs 2 |
Single logical storage, which is ambiguous for neutrals |
.vfb |
Single logical storage, which is ambiguous for neutrals |
The OpenType format has separate kerning storages by direction. In theory, it’s possible to define the AV pair with one value for LTR, and another value for RTL. In practice, the RTL AV pair would never be used, because both A and V are glyphs that represent strong LTR script, so only the LTR storage (lookup) would be used by a typesetting app.
The .vfb, .glyphs 2 and .ufo 3 formats use one storage in logical order. It’s easy to convert the kerning into OpenType kerning for strong glyphs. Pairs with weak and neutral glyphs are ambiguous: it’s not completely clear which order should be assumed in the single storage.
New If you open files in .vfb, .glyphs 2 or .ufo 3 format, FontLab applies certain heuristics (guesswork) to detect pairs that should be RTL, and converts them from logical to visual order.
New If you export files into .vfb, .glyphs 2 or .ufo 3 format, FontLab converts the RTL pairs from visual to logical order.
The .glyphs 3 format uses separate storages by direction. This makes it easy to convert the kerning into OpenType kerning for all glyphs, but requires designers to pay attention to the directionality of the glyphs when they define the kerning pairs, and makes it necessary to define the weak and neutral glyph pairs twice: once for LTR and once for RTL. It’s easy to make a mistake and define the visually same pair twice, but with different values.
New If you open files in .glyphs 3 format, FontLab converts the RTL pairs (stored in the kerningRTL key) from logical to visual order. If the same visual pair is defined in both LTR and RTL .glyphs storage, FontLab favors the LTR pairs.
New If you export files into .glyphs 3 format, FontLab converts applies heuristics to determine which pairs are RTL, converts them from visual to logical order and stores them in the RTL .glyphs 3 storage.
In late 2022, the topic was widely discussed among font technology professionals. The majority agreed that visual order is more predictable and easier to handle, especially for glyphs representing characters with weak and neutral directionality type.
FontLab follows this agreement, and stores all kerning in one storage, in visual order. The planned .ufo 4 format will also store kerning in visual order, like the .ufo 2 format did.
Right-to-left text in Glyph window
If you enter Arabic or Hebrew text into the Glyph window siebar or Text Bar, then by default, Glyph window will show the text in left-to-right order.
New If you turn on Text > Right to Left, FontLab will perform a live on-the-fly reversal of the Glyph window text, so the input text will be shown in the right-to-left order. This is independent of the script of the text: if you enter the text TYPO and turn on Right to Left, the Glyph window will show OPYT, and if you turn Right to Left off, the window will show TYPO.
If you turn on feature processing and enter text in a script like Arabic, the text will be shown right-to-left regardless of the Text > Right to Left setting.
Right-to-left kerning support
New FontLab 8.2 adds support for kerning in RTL scripts like Arabic and Hebrew.
The Glyph window and the Kerning panel display the pairs in visual order. The left side of a pair always shows the glyph or class that will be visually on the left side in typeset text, and the right side of the pair shows the visually right glyph or class.
If you enter Arabic or Hebrew text into the Glyph window, the glyphs will be rendered in the left-to-right direction by default. To display the text in right-to-left order:
- Turn on Text > Right to Left. This will reverse the sequence of the glyphs in the Glyph window, for any writing system.
- Alternatively, turn on Apply OpenType features and Unicode script processing in the Glyph window sidebar or in the Text mode property bar. This activates full Unicode and OpenType text processing for the Glyph window text. When this setting is turned on, FontLab renders scripts like Latin in left-to-right direction, and scripts like Hebrew in the right-to-left direction.
If you have a font that has kerning for scripts that run in different horizontal directions, and you export it into OpenType, FontLab will produce two kerning lookups: one for left-to-right and one for right-to-left. If you export the font into other formats like .glyphs or UFO, FontLab will export the right-to-left kerning in the most suitable form for the format.
Optical bounds
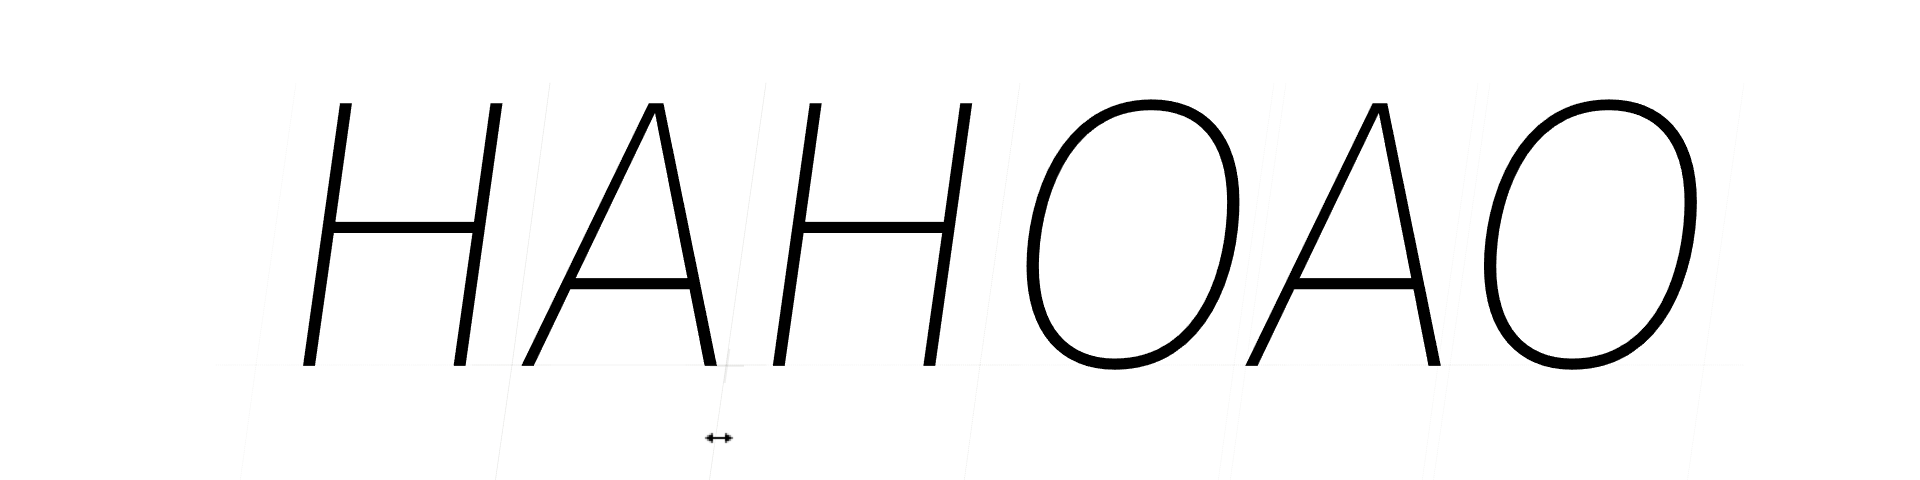
Sidebearings of a glyph are margins that are optimized so that as many glyph combinations as possible can be set without kerning. For example, the letter ”H” typically has relatively large (and often equal) sidebearings, so if you set two ”H”s next to each other, there is a clear gap between them. But if you set a large heading that starts with an ”H”, followed by a paragraph of small text that also starts with an ”H”, the left sidebearing of the heading will effectively be much smaller than the left sidebearing of the paragraph, so the heading appears indented.
To set the line edges in a more visually pleasing way, glyphs in a font can optionally have two additional margins, called optical bounds. These margins are intended to be used if a glyph is the first or last in a line. The optical bounds are usually much tighter than sidebearings. In OpenType, optical bounds are realized through the lfbd (left bounds) and rtbd (right bounds) features, which subtract a define distance from the sidebearing.

New In FontLab, you can now use Font Info > Other Values > Optical offset to define the left and right offset globally, for all glyphs in a master. The offset is the amoung of font units that are subtracted from each glyph’s left and right sidebearing. In many cases, the sidebearings of the letter ”H” measured without the serifs are a decent global value for sidebearings.
To override the left global optical offset in a glyph, place a vertical glyph guide named ol in the glyph at the position where the left optical bound should be. To override the right global offset, place an or glyph guide.
If the font includes these guides or the Optical offset values in Font Info are non-0, FontLab will generate the OpenType features lfbd and rtbd on export. If you open an OpenType font that includes these features, FontLab will import the values. If you open an AAT font that includes the opbd table, FontLab will also import these values, but FontLab won’t export an opbd table.

To preview the optical bounds in FontLab, open the Preview panel, choose Text waterfall in the sidebar, and align the preview text to the left or right.
Note
Most text layout apps don’t use the
lfbdandrtbdfeatures even if they’re defined in a font. But at the same time, very few fonts actually have these features, so it’s a bit of a chicken-and-egg problem. If more fonts have these features, app developers may be inclinded to add support for optical bounds.