New in FontLab 8: Glyphs & fonts
Go from standard to pro with one-click glyph set expansion and automatic OpenType features. Analyze each lookup visually, add custom OpenType tables. Find differences between font versions in Font Map. Fine-tune for the screen with powerful visual hinting. Find, filter and rename glyphs.
New in FontLab 8: Quickly create new glyphs with common suffixes. Clean up classes when removing glyphs. Copy-paste classes between fonts or masters. Exclude glyphs from export into final formats.
New FontLab 8.3 improves auto-calculation of Safe top/bottom values, and simplifies copying of zones.
Glyphs
Navigating glyphs
Scrolling to browse glyphs and layers in Glyph window
New You can now use the mouse wheel to switch between glyphs and layers in the Glyph window.
On macOS: if the option Preferences > Font Window > Browse glyphs with Cmd+scroll is turned on, Cmd-wheel changes the current glyph in the Glyph window, and Ctrl-wheel changes the current master in the Glyph window.
On Windows: if the option Preferences > Font Window > Browse glyphs with Cmd+scroll is turned on, and Preferences > Distances > Zoom with pinch gesture is turned off, Ctrl-wheel changes the current glyph in the Glyph window, and CtrlAlt-wheel changes the current master in the Glyph window. If Preferences > Distances > Zoom with pinch gesture is turned on, Ctrl+-wheel works as a pinch gesture.
Quick Find Glyph
New You can use Quick Find Glyph even if a panel has focus: press the / key, type a glyph name portion, and choose the glyph. Then press Enter to go to that glyph (in the Glyph window, this replaces the current glyph). Or in Glyph window, press AltEnter to insert the glyph after the current glyph.
New If you press / in the Font window, you search for a glyph and pick a result, but the resulting glyph is hidden because Hide unfiltered glyphs is turned on, FontLab now shows a dialog where you can show the unfiltered glyphs so you can see the result.
Global keys
New If a panel has focus, you can now still use certain keyboard shortcuts. Previously, these shortcuts only worked if the focus was in the Glyph window:
- /: quick find glyph
- ,/.: previous/next glyph in font
- Alt,/Alt.: previous/next master
- </>: previous/next element, or previous/next PPM size in TrueType Hinting tool
Font > New Glyph
New If you use Font > New Glyph to create a new glyph, you can quickly choose a common glyph name suffix or prefix (prefixes are used for skin shapes).
New There is now also a button Create Blank that does not fill the new glyph with any content. If you click Create, FontLab fills the glyph with content depending on the settings in Preferences > Operations > New glyphs.
Deleting glyphs

If you select glyphs in the Font window and tap BkSp or choose Edit > Delete, FontLab opens the Delete Glyphs dialog. New This dialog has a new Classes > Clean Up checkbox. If the checkbox is turned on, FontLab cleans up the classes in Classes panel that contain the deleted glyphs: removes the glyphs from the classes, and removes the classes if they become empty.
Duplicating glyphs
With Glyph > Duplicate Glyph…, you can copy one or more existing glyphs and add duplicate versions of these glyphs as independent glyphs, as components or as element references. You can specify a glyph name suffix for the new glyphs.

New If you choose Glyph > Duplicate Glyph, or if one or more glyphs are selected in the Font window and you choose Edit > Duplicate, you can now decide how FontLab creates the new glyphs: #6030
-
independent: FontLab creates new glyphs, and in each of them places an independent copy of the content of the corresponding selected glyph
-
components: FontLab creates new glyphs, and in each of them places a component that refers to the corresponding selected glyph
-
element references: FontLab creates new glyphs, and in each of them places element references that point to each element of the corresponding selected glyph
New If one or more glyphs are selected in the Font window and you choose Edit > Duplicate, you can input a new glyph name suffix or choose one of the predefined suffixes.
If the Replace existing suffix option is turned off, FontLab creates new glyphs and for each of them, appends the specified suffix to the name of the corresponding selected glyph. If the specified suffix is empty, FontLab appends a numeric suffix starting with .001 . This was the previous standard behavior.
If the Replace existing suffix option is turned on, FontLab creates new glyphs and for each of them, removes any portion after the initial . from the name of the corresponding selected glyph, and then appends the specified suffix. If the specified suffix is empty, FontLab removes the existing suffix, creating a glyph name that ends with . . If such glyph already exists, FontLab appends a numeric suffix.
New If you’re duplicating only one glyph, you can use the New glyph name field to specify the complete glyph name of the new glyph (not just the original name + suffix). For example, you can duplicate the A glyph and name the new glyph Alpha.
New If you turn on Copy kerning classes in the dialog, then for any source glyph that is part of any left and right kerning classes, the duplicated glyph will also be placed in the same kerning classes. If the source glyph is not in any kerning class, the duplicated glyph will not be placed in any kerning class.
Non-exporting glyphs
No export in Glyph panel and the noexport export to declare glyphs non-exporting

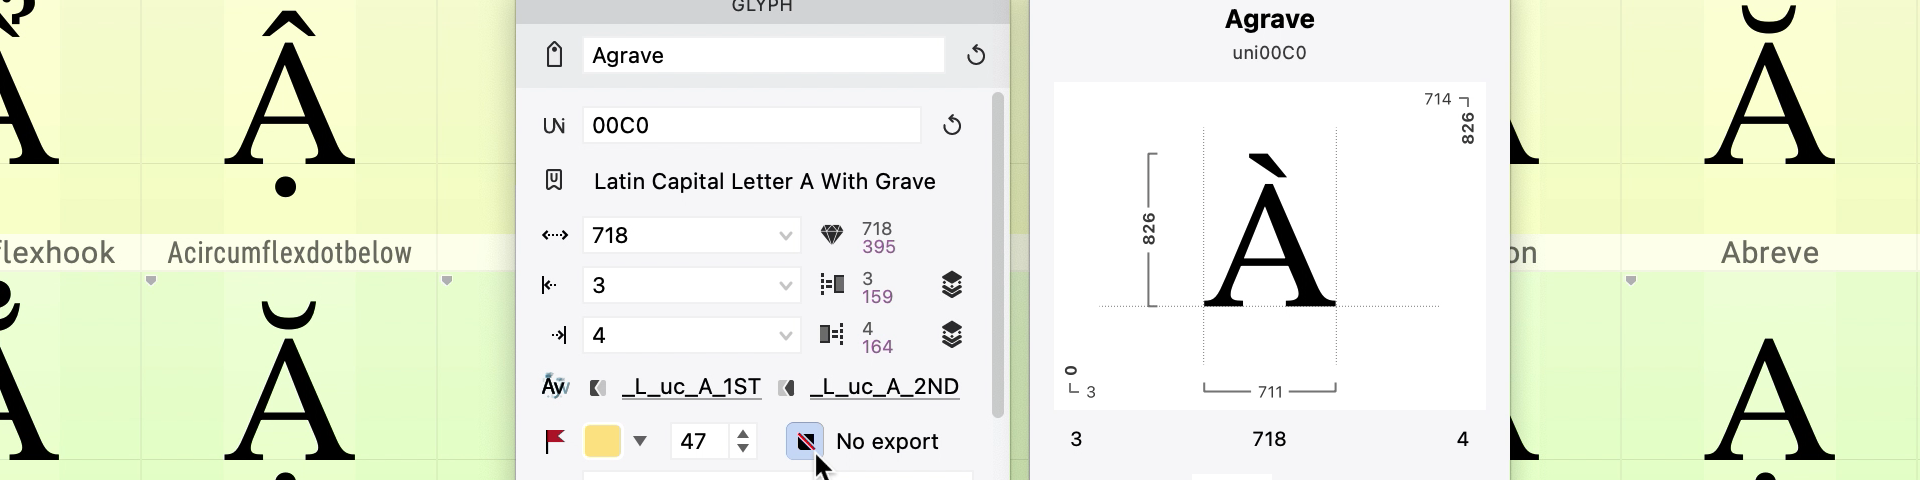
New You can now declare glyphs to be non-exporting. When you export the font into a final font format like OpenType, FontLab does not include the non-exporting glyphs in the final font.
To declare the glyph that is current in your Glyph window as non-exporting, open the Glyph panel and turn on the No export checkbox.
To declare one or more glyphs as non-exporting, select their glyph cells in the Font window and turn on the No export checkbox in the Glyph panel.
FontLab identifies the non-exporting glyphs using the noexport tag. You can also use the Classes panel to assign the noexport tag to glyphs.
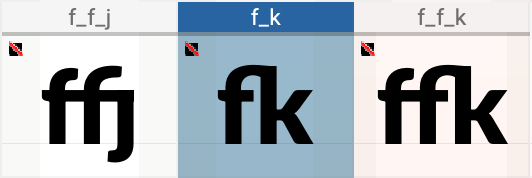
In Font window, the cell for each non-exporting glyph has a small crossed-out square in the bottom-left corner.
To see all non-exporting glyphs in the Font window, choose the Tags section in the sidebar and choose noexport, or type noexport into the Font window search box and choose Tags: Match “noexport”. Turn on Hide unfiltered glyphs in the property bar to only see the non-exporting glyphs.
New If you have features or classes that use non-exporting glyphs and you export the font, FontLab now subsets or removes the features and classes, and the Output panel prints warnings: WARNING: Class '@ccc' contains no glyph and will be removed! or WARNING: OT feature ['aaaa', 'bbbb'...] was not exported due to glyph(s) [gggg hhhh...].
Color flags
Glyph color flags
New The Glyph menu now includes the Flag submenu which was previously only available in the Font window context menu.
The entries of the Flag submenu are now also available in the Tools > Commands & Shortcuts dialog, so you can assign custom keyboard shortcuts to them, and you can quickly flag glyphs by pressing ShiftCmdP and typing Red or Green . #6092

New If the Glyph panel is collapsed, the background of the area around the glyph name icon now shows the color flag applied to the glyph.
Font color flags

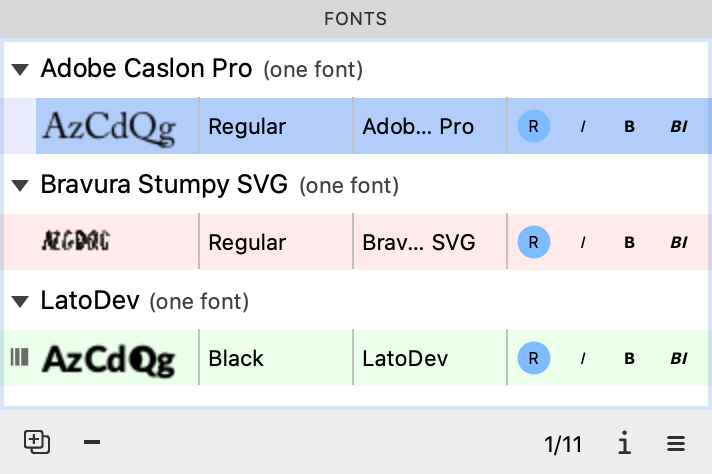
New You can now assign a unique color flag to your font in File > Font Info > Names page (this works per font, not per master).
If you assign a color flag to a font, the font’s entry in the Fonts panel is colorized with that color flag. This helps if you work with different versions of the same font.
Kerning pair color flags
New If you assign a color flag to a kerning pair in the Kerning panel, the panel now renders the flags with the color intensity specified in Preferences > Font Window > Background > Color Flag. #6011
Color flags intensity
The Font window cells, the Font window glyphs list, the Glyph window Glyphs Bar, the Kerning panel, the Glyph panel indicator in collapsed mode and the Fonts panel now all follow the color flag intensity that you can set with the slider in Preferences > Font Window > Background.
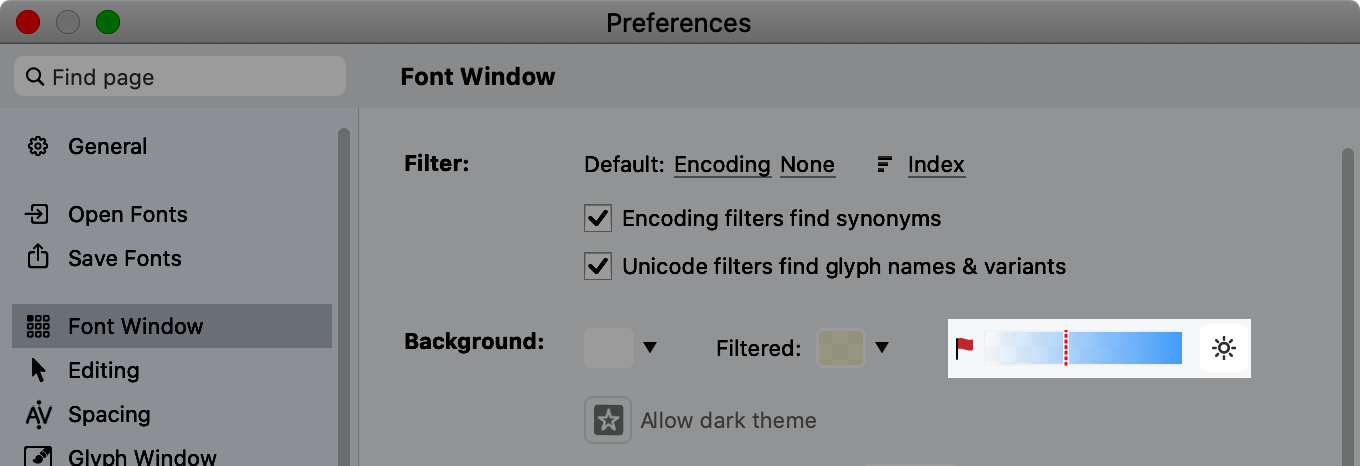
New If you turn on the Extra bright colors toggle next to the slider, Font window cells, the Glyphs Bar and the Fonts panel will show color flags with even more intensity.
The Metrics Table in Glyph window always shows the glyph color flag at a slightly dimmed intensity.
Color flag selectors
The selectors for the glyph color flag in the Font window property bar, Glyph window property bar and the Glyph panel, for the kerning pair color flag in the Kerning panel, and for the font color flag in Font Info > Names show the flags using lighter colors if you use the light user interface theme, and using darker colors in the dark theme.
Glyph names
Renaming glyphs

When you rename glyphs in FontLab:
- You can also choose to update other structures: classes, feature definitions, kerning pairs, auto layer recipes and metrics expressions to reflect the glyph name change.
- You can also rename alternates (glyphs with suffixes) if you’re renaming a glyph without a suffix.
- If you’re changing the name of a glyph to a name that is already used by another glyph, you can choose to replace the existing glyph, and to change the name of the existing glyph to a unique name.
To rename a single glyph:

- Open the Glyph panel, which will show info about the current glyph in Glyph window or in Font window. New Click the Rename glyph icon in the panel to set the renaming options. Then enter the new name into the name field and press Enter. Note: in older versions, changing the name in the Glyph panel did not update classes etc.
- Choose Glyph > Rename Glyph, or click the name Unicode icon in the Glyph panel, or New click the Rename glyph icon in the panel and choose Rename… to open the Rename Glyph dialog. Set the options as needed.
To rename all glyphs in the font, use any of the Font > Rename Glyphs commands. These commands always update classes, feature definitions, kerning pairs, auto layer recipes and metrics expressions.
Note
If you turn on Preferences > Font Window > Caption > Editable, and change name in the Font window cell, FontLab only renames the glyph, but does not update classes etc.
Copy glyph name in Glyph window property bar
New The Glyph window property bar has a new Copy glyph name button next to the glyph name. Click it to copy the current glyph name to the Clipboard.
Long glyph names
New If you open a font that includes glyph names that are longer than 63 characters, you can now compile the features. The technical length limit of 63 characters applies to final OpenType fonts, not to development names.
However, if you open a font and you have Preferences > Open Fonts > Glyph names turned on, FontLab uses the uXXXX convention to build names shorter than 63 characters for long ligatures such as Indic conjuncts. You can then use Font > Rename Glyphs to build longer names that are fully compatible with the Friendly or Alternative convention. #6044 #5480
Synonyms in Preview panel
New In Preview panel, if you turn on Show glyph names and enter the text using / -prefixed glyph names, FontLab now always uses the built-in synonyms to show the matching glyphs, so you can type /middot and FontLab renders the periodcentered glyph if the font contains no middot . Previously, FontLab used synonyms only if Apply features was turned on in the Preview panel. #6032
Glyph panel
New You can click-and-hold Unicode name label in Glyph panel to see the Unicode character info popup.
Classes
Kerning classes are now called “left” and “right” instead of “1st” and “2nd”.
Classes panel
Copy-paste of classes between fonts or masters
If you select one or more classes in the Classes panel, you can copy them to the clipboard with Edit > Copy Classes if the Classes panel is active. You can then switch to another font or master, activate the Classes panel again and use Edit > Paste Classes.
New If the target font has classes with the same names as those you are pasting, FontLab now shows a dialog box where you can choose: #4652
- New: paste the copied classes as new classes, append
1(or another number) to the class name, keep the existing classes intact. - Replace: replace the content of the existing classes with the content of the same-named classes you are pasting.
- Append: append the content (glyph names) of the classes you are pasting to the same-named existing classes.
Find glyph search box
New In the Classes panel, you can now enter Unicode characters and glyph name synonyms into the Find glyph search box to see which classes a glyph belongs to.
Improved design
New The Classes panel has minor design improvements and has a new – button that you can use to remove a glyph from a class.
Cleaning up classes when deleting glyphs
If you select glyphs in Font Window and choose Edit > Delete, the Delete Glyphs dialog box has a Classes: Clean Up checkbox even if the selected glyphs contain component sources. New If this is turned on, FontLab will now clean up the classes in all masters, not just in the current master.
Stickers

-
New To add a sticker in the current glyph layer, you can use a command from the Add Sticker submenu, which is now moved from the Element menu to the end of the Glyph menu. You can also activate the Guide tool and use the property bar.
-
New To remove all stickers from the current glyph layer, use the new Remove Stickers command at the end of the Glyph menu.
-
New The default text size of the the Text sticker is now smaller.
-
New If you use Window > Zoom > Fit Content on Screen, FontLab now ignores the stickers.
OpenType features and Unicode
Unicode 14
New FontLab 8 now supports the new scripts and Unicode blocks introduced in Unicode 14 if you:
- filter the Font window with the Unicode and Script filters
- add glyphs with the Font > Add Glyphs dialog
- use the Features panel to automatically build the
languagesystemstatements
Automatic features
If you have a glyph named f_i and the glyphs f and i, and in the Features panel menu you choose Add Auto Features, FontLab creates the liga feature and adds the substitution from f i to f_i. This also works for a small number of other common ligatures.
If you have a glyph such as Q_y and the glyphs Q and y, Add Auto Features creates the dlig feature and adds the substitution there. FontLab puts substitutions for arbitrary ligature names into the dlig feature.
New You can now use the glyph name suffixes .liga, .dlig and .rlig to override the automatic behavior. Name your glyph Q_y.liga, and FontLab puts the ligature substitution into the liga feature. Similarly, name your glyph f_i.dlig to put the substitution into the dlig feature.
Compiling features
Update features to match reduced glyph set
If you’ve removed some glyphs or imported a “master” FEA file from a larger font, and you click Compile, FontLab shows the Missing Glyphs Used in Features dialog. There, you can choose one of three things:
- Ignore: FontLab silently ignores the features, lookups and rules that refer to the missing glyphs, so you can successfully compile and test the features in the Glyph window or Preview panel
- Add Glyphs: FontLab adds the missing glyphs to match the glyph set defined by the features
- New Update Features: FontLab completely replaces your feature definitions in the Features panel with new “subsetted” feature definitions that match the reduced glyph set.

If you compile your features and choose Update Features, FontLab compiles the features ignoring the missing glyphs, and then decompiles them. This creates new lookup and class names, and replaces your hand-crafted structure of your features. The features will work the same, but their definitions will be expressed differently.
Warning about unused lookups
If your feature definitions code has named lookups that are not used by any features and you compile the features, FontLab issues a warning such as [W] Stand-alone lookup with Lookup Index 1 (locl_SRB) was not referenced from within any feature, and will never be used. New That warning now includes the name of the lookup (here: locl_SRB ), so it’s easy to find the problematic lookup definition. #5768
Features panel
Navigate with keyboard in Features panel

If you’re in the Features panel:
- New Press Cmd[ Ctrl[ to go to the previous feature definition, or the Prefix section.
- New Press Cmd[ Ctrl[ to go to the next feature definition.
- New Press CmdF CtrlF to jump to the panel search box.
- New Type a string (part of a glyph name, class or keyword) and press Enter to find the first occurrence of the string.
- New Press CmdG CtrlG to find the next occurrence.
Font window
Font window cells
New By default, the glyph cells in the Font window have captions at the bottom of the cell, and no longer show the grid lines. Use Preferences > Font window to restore the old defaults.
Font window property bar
Unicode-based Font window filters
New The Unicode-based Font window property bar filters (Unicode range, Codepage, Category, Script) now work slightly differently: if you choose All there, FontLab includes all glyphs that have a Unicode codepoint in the filter, and exclude all unencoded glyphs.
To only see glyphs that have codepoints, turn on Hide unfiltered glyphs and choose All with any of the Unicode-based filters.
Find box in the Font window property bar filters
New The dropdown for the Font window property bar filters now has a Find box. Type a text there and the dropdown will only show the matching encodings, Unicode ranges, codepages, Unicode categories or scripts.
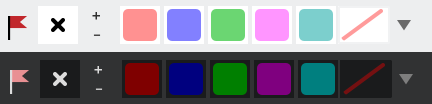
Property bar visibility
- To hide the Font window property bar, use View > Control Bars > Property Bar or New the × mini-button on the right edge of Font window property bar.
- To show the Font window property bar, use View > Control Bars > Property Bar or New the Show property bar mini-button at the right of the status bar.
Font window sidebar
Expanding or collapse Font window sidebar sections
New You can now expand and collapse all sections of the Font window sidebar: Basics, Categories, Scripts, Search History and Bookmarks. FontLab now remembers the state of each section in preferences.
New The History section of the sidebar is now closed (collapsed) by default.
Properties > Manual Composite
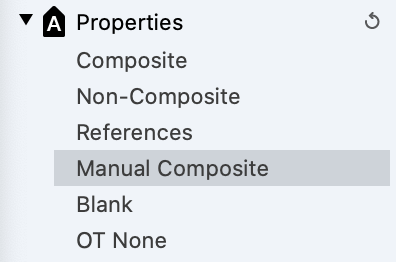
New The Properties section of the Font window sidebar now shows a new entry, Manual Composite, that lists all glyphs that contain only components but are not auto layers. These glyphs also get the manualcomposite virtual tag that you can view in the Virtual Tags section of the Classes panel.
Note
The Composite section lists glyphs that are either in the Auto Layers section or in the Manual Composite section.
Tag-based Font window filters are now case-sensitive
If you assign tags such as tag_a and tag_A to different glyphs, these tags appear in the Font window sidebar Tags section.
New If you click one of the tags in the sidebar, or if you search for a tag in the Font window search box and choose Tags match in the dropdown, the resulting Font window filter is now case-sensitive, as expected. Previously, tag-based filters ignored the case of the tag and returned too many results. #6082
Font window contextual menu
Select > Related Glyphs in the contextual menu

New If you right-click or Ctrl-click a Font window cell, and choose Select > Related Glyphs from the contextual menu, FontLab selects all glyph cells that are related to the current glyph: composites, component sources and alternates. These are the same glyphs as FontLab shows when you choose Edit > List Related Glyphs.
Once you’ve chosen Select > Related Glyphs, you can easily flag the glyphs with the same color flag (and then sort the Font window by Flag), or you can choose Window > New Glyph Tab to open these glyphs for editing.
Select > Same Caption in the contextual menu

New If you choose Select > Same Caption from the Font window contextual menu, FontLab selects all glyph cells that have the same caption as the current glyph.
To choose what info the Font window cells show, use the first dropdown in the property bar. The caption can show a unique property like the name, Unicode codepoint, character or index. But the caption can also show a property shared among many glyphs, like the advance width, the left or right sidebearing value, the top or bottom extent of the bounding box, the 1st or 2nd kerning class, the number of elements (and components), the OT glyph definition class (Unspecified, Simple, Ligature, Mark or Component), the Unicode script of the glyph, the tags. The caption can also show the age, which is the time of the last modification of the glyph.
For example, to select all glyphs that contain 3 elements, select one glyph with 3 elements, select Elements # in the Cell caption dropdown, then right-click or Ctrl-click the selected cell and choose Select > Same Caption. #5408
Select > Same Suffix in the contextual menu

New If you choose Select > Same Suffix from the Font window contextual menu, FontLab selects all glyph cells in which the glyph name has the same suffix (portion after the first .) as the current glyph. If the current glyph has no suffix, FontLab selects all glyph cells in which the glyph name has no suffix.
For example, to select all .sc glyphs, click any glyph that has that suffix (like A.sc, and then from the Font window context menu choose Select > Same Suffix).
Font window status bar
The Font window status bar shows essential info about the current glyph. You can:
- edit the glyph tags
- the metrics and the kerning classes of the current layer
- the auto layer status and recipe for all masters
It also shows how many glyphs are selected, filtered (if a Font window filter is active), and how many glyphs the font contains.
You can also use the status bar to change the proportions and size of the Font window glyph cells.
New If the Auto layer toggle in the status bar is turned off, the recipe field is not visible.
New If you hold the mouse button on the Unicode codepoint field in the status bar, FontLab shows an info box about the Unicode character.
Status bar visibility
- To hide the Font window status bar, use New View > Control Bars > Status Bar or the × mini-button on the right edge of Font window status bar.
- To show the Font window status bar, use View > Control Bars > Status Bar or New the Show property bar mini-button at the right of the property bar.
Font window filters
If the Hide unfiltered glyphs toggle in the Font window property bar is turned on and you have a Font window filter active, the Font window only shows the glyph cells that are matched by the filter.
New If you choose Edit > Find Glyphs or press /, you search for a glyph and pick a result, and the resulting glyph is hidden, FontLab now shows a dialog where you can show the unfiltered glyphs so you can see the result.
New The Font window property bar Codepages filter now supports double-byte codepages. If you select a double-byte codepage, an additional selector appears next to the codepage name. Use it to switch between the planes of the double-byte codepage.
Case conversion of the Font window selection
New If you select some glyphs in Font window, and those glyphs include letters, you can choose Text > Change Case and choose UPPER CASE or lower case, and FontLab will select the uppercase or lowercase counterparts of the selected letters.
Fonts and Font Map panels
In FontLab, you can open several fonts and easily compare their Unicode codepoints, advance width, left or right sidebearings, kerning class assignment, glyph index, number of elements, or the OT Glyph Definition class:
- Select multiple fonts in the Fonts panel.
- Open the Font Map panel, then open its list view.
- In the Font Map panel property bar, choose the property that you want to compare in the cell caption dropdown.
The list view now shows the values for each font in its own column. New If you assign a font color flag in Font Info > Names > Color flag, the columns that represent each font will use that color. The rendering of these columns in dark mode is overall better.
Font Info and fonts
The Font Info dialog
The Font Info dialog holds important font-wide metadata about your font project. You can access a subset of the font info parameters in the Font Info panel.
To open the Font Info dialog:
- choose File > Font Info
- or press AltCmdF CtrlAltF
- or click the i icon in the Font window property bar or in the Font Info panel
Searching the Font Info dialog
New The Find page search box in the Font Info dialog is now on the top left. To access it, click it or New press CmdF CtrlF.
New If you type a phrase into search box, the left-side pages list will show only the matching pages. FontLab searches inside the UI captions and inside the Font Info content, such as zone names, stem names, and various numerical values.
Important font note in Font Info > Note
Font Info > Note is a place where you can enter internal notes and remarks. Each master has its own font master note. The font master notes are stored in the VFC, VFJ, UFO and .glyphs formats, and are intended for your own purposes. You can use it to track your own progress or to pass messages between team members.
The font note is the note associated with the main font master (in the Font Info dialog, shown in bold in the sidebar, and with the blue circle in the Masters page).
New If you add the line !!! --- (three exclamation marks, space, three hyphens) in the font note (the note of the main font master), FontLab now treats any text below that special line as an important font note.
Whenever you open a VFC, VFJ, DesignSpace+UFO, UFO or .glyphs file that contains such a font note, FontLab opens a dialog Important Font Note that shows the portion of the font note below the special !!! --- line. FontLab interprets the content as Markdown so you can add formatting, links etc. This is useful if you are sharing the VFC/VFJ with other users, and you want to make sure they read an important message.
Example
If a VFJ file contains a main master note that has this text:
- Version 1.1: Updated kerning
- Version 1.0: Initial public release

!!! ---

This font is part of the [GetGo Fonts for FontLab](https://fontlabcom.github.io/getgo-fonts/) collection. You may create **your own fonts** based on this font.
and you open the VFJ file, FontLab will show an Important Font Note dialog box with the text:
This font is part of the GetGo Fonts for FontLab collection. You may create your own fonts based on this font.
The Font Info > Parameters page

New The File > Font Info > Parameters page has a filter box. Type a string to only see parameters in which the name matches the string. For example, type stroke. to only see the parameters that are used as common values for the node stroke thickness.
New The Font Info > Parameters page also has a new Match parameters button that synchronizes parameters on all masters. Click it, and all masters will have the same number of parameters. FontLab keeps the values for parameters that have already existed, and uses a common value for those that were missing.
New You can now drag-drop the Font Info > Parameters entries to reorder them.
The Font Info > Overview page
New When you resize the columns in Font Info > Overview, FontLab remembers the column widths when you open Font Info again.
Applying Font Info changes
To apply the changes and to close the Font Info dialog, click the OK button or New you can press CmdEnter CtrlEnter.
Improved Font Info > Other Values and File > Export Profiles
New We’ve improved the tabular user interface of the main area of the Font Info > Other Values page, and of the File > Export Profiles dialog:
- If you click a row that has a checkbox, FontLab doesn’t immediately toggle it, so you can read the description at the bottom. To toggle the checkbox, click the actual checkbox.
- If you hover over the property name, the tooltip that appears with a description of the property is now more readable.
- If you click a row that has a dropdown list, the list now shows a check mark next to the entry which is selected.
- Values in numerical fields that have more than 3 digits now show a thousand separator.
Fonts panel
Fonts with identical names
New If you open multiple versions of a font that has identical font names, FontLab no longer automatically appends numbers ( 2 etc.) to the Style name of the fonts in the Fonts panel.
However, if you double-click the Style name or the Styling Group name of one of these fonts in the Fonts panel, and press Enter, FontLab still rebuilds the font names and resolves duplicate naming. This is intentional.
For precise control of the naming, please use File > Font Info. #4933