
New in FontLab 8: Families & variation
Easily create large font families and variable OpenType fonts, interpolate and extrapolate fonts, create intermediate weights and styles, and add conditional glyph substitutions. Work on multiple masters at once, and perform automatic masters matching for point-compatible outlines. Dynamically preview interpolation with sliders, variations map and play/pause buttons — right in FontLab, without extra tools or plugins.
New in FontLab 8: Quickly make variable fonts from static fonts. Define custom per-glyph variation axes. Re-use live interpolated instances to build glyphs with smart variable components. Set start points and reverse contours in all masters. Make contours compatible with improved Matchmaker. Group layers visually.
New When you edit one master, FontLab 8.3 can synchronize the changes to other masters, now including movement. Color-coding for master matching is more visible, and mark attachment preview is truly variable. In multi-axis fonts, adding intermediate masters and variable components is easier.
Variation
Make variable fonts from static fonts
If you open several static fonts (OpenType, VFB, UFO etc.), then you select them in the Fonts panel (use Shift), and then choose Fonts > Merge Fonts to Masters, FontLab creates a new font that has all the source fonts as masters.
New If the static fonts differ in weight or width, FontLab now correctly builds the variation axes in Font Info and assigns reasonable design coordinates for each master. New If the source fonts contain Mask layers, FontLab also adds them into the new font. #6485
Add variation quickly
With Font > Add Variation, you can quickly add another master as the duplicate of the current master, and add a variation axis.

New If you first create and save some action sets in Tools > Actions, and then choose Font > Add Variation, you now turn on Run action set and choose any of the saved action sets. If you click OK, FontLab will run the action set on the new master.
Match when Editing
Apply Glyph menu operations to all masters
If Edit > Match when Editing is turned off and you enter the Glyph menu, the menu will have three commands:
- Auto Layer: click to toggle the auto layer status (automatic building of composites) of the current layer
- Decompose Layer: click to convert all components in the current layer into simple contours
- Flatten Layer: click to convert all components and filters in the current layer into simple contours
If you hold Alt and enter the Glyph menu, these commands will have the suffix Glyph, not Layer, and will affect all masters.
New If you turn on Edit > Match when Editing and enter the Glyph menu, the menu will have Auto Glyph, Decompose Glyph, Flatten Glyph by default, and these commands will affect all masters.
If you hold Alt and enter the Glyph menu, these commands will have the Layer suffix and will affect the current layer only.
Apply Contour menu operations to all matching masters
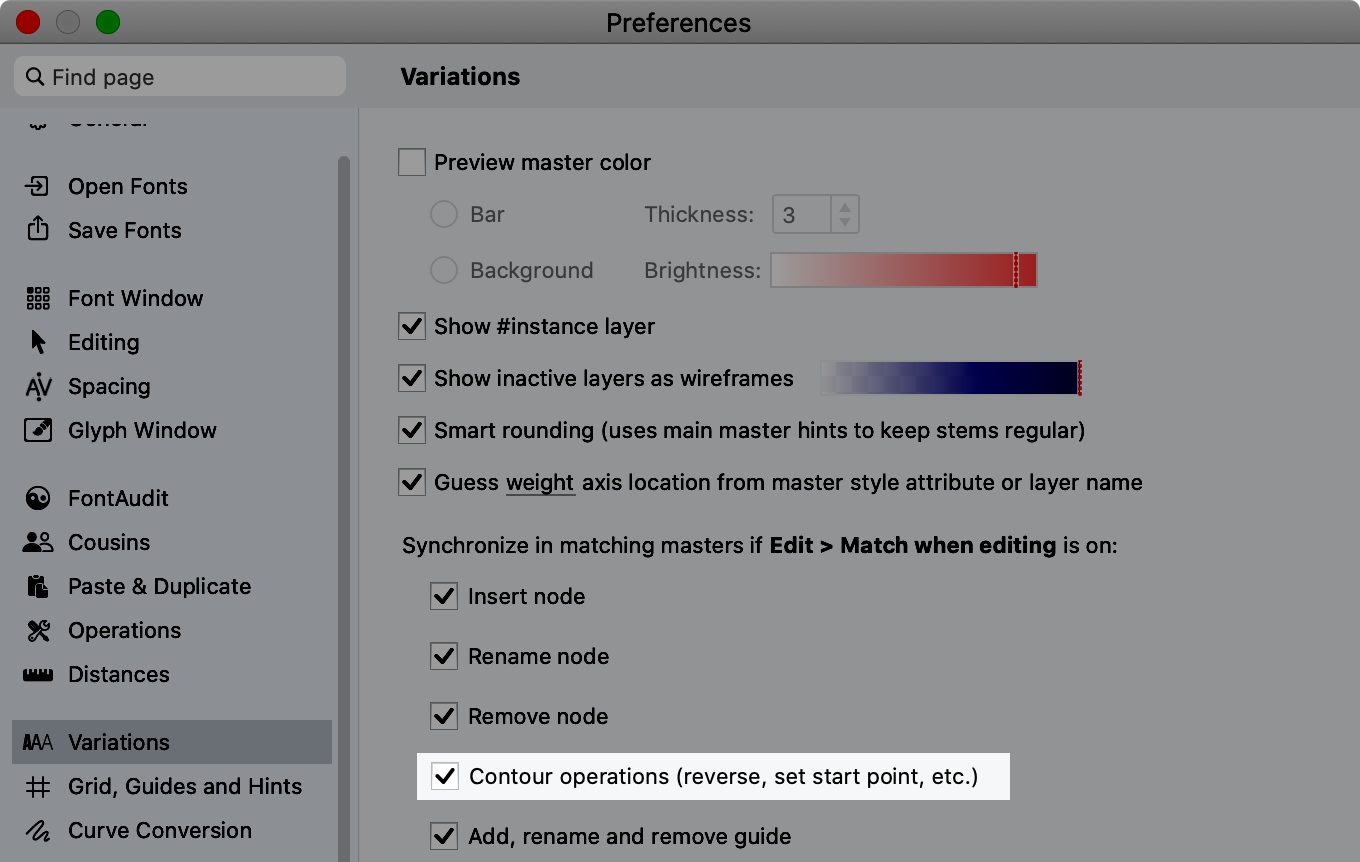
If you turn on Edit > Match when Editing and perform edits in the Glyph window, FontLab repeats those edits accordingly on all matching masters to keep variation compatibility. New Now, if Preferences > Variations > Match when editing > Contour operations is turned on, FontLab repeats these editing operations:
-
Contour > Set Start Point (but not Set Start Point from the context menu)
-
Contour > Reverse Contour and Reverse Contour from the context menu
-
Contour > Add Smart Corner and Smart Corner from the context menu
Match Masters and Matchmaker tool
The Matchmaker tool (7 key) is a tool that you can use to inspect the contour order, change the contour direction and relocate the start point. If you have multiple masters, you can also use Matchmaker to make the contours compatible for interpolation.
Depending on the settings in the Layers & Masters panel, Matchmaker shows all or some masters of the current glyph:
- If no master is set to visible in the panel, Matchmaker shows all masters in the order assigned in Font Info > Masters, but it shows the current master first.
- If any masters are set to visible in the panel, Matchmaker shows the visible masters and the current master, which it shows first.
Matchmaker draws master relation lines that connect the corresponding nodes between all visible masters. Drag the blue dot to change the stacking view (the arrangement of the masters) in Matchmaker.
Show intermediates turned on
If you turn on Show intermediates in the property bar:
-
Matchmaker colorizes the outlines of each master in the Glyph window with the color that you’ve assigned to the master in the Layers & Masters panel. Alt-click the Layer preview color button on top of the Layers & Masters panel to assign a unique color to each master.
-
Matchmaker shows a series of intermediate interpolation steps between each master. You can change the number of interpolation steps and their opacity in the property bar. Even if your font has multiple axes, Matchmaker shows interpolation steps between each two masters in the Font Info > Masters order, so these steps are not the same as your font instances.
-
If you select a contour or its portion with the Contour tool, or if you double-click a contour in the Elements panel, Matchmaker draws the master relation lines for the selected nodes thicker.
Show intermediates turned off
If you turn off Show intermediates in the property bar:
-
Matchmaker uses a unique color to draw the outlines of each contour across all visible masters. This way, you can easily see if the order of the contours in each master match.
-
If you select a contour or its portion with the Contour tool, or if you double-click a contour in the Elements panel, Matchmaker draws thick outlines for that contour and faded outlines for the other contours.
Manually matching masters with Matchmaker
If the matching status in the property bar is yellow or red, you can use Matchmaker to manually match a section (continuous series of one or more segments) across masters:
- Select start of section (blue): drag around start nodes of section in all masters, and release. Shift-drag: add nodes to the start of section.
- Select end of section (orange): drag around end nodes of section in all masters, and release. Shift-drag: add nodes to the end of section.
- Enter: make sections compatible.
Repeat until status is green.
Match Masters in Matchmaker tool
If you activate the Matchmaker tool, you can now use two different ways to match the masters: #5628
As in previous versions, click the Match masters button in the property bar to perform “weak matching”: FontLab uses the auto-match settings defined in Font Info > Axes, so if Sort contours and start nodes and/or Check masters geometry are off, FontLab does not perform these operations when matching the masters.
New Shift-click the Match masters button in the property bar to perform “strong matching”: FontLab behaves as if both auto-matching settings were turned on. So, if a simple click on the Match masters does not produce a matching result, try Shift-clicking.
Contour order in Matchmaker tool
New If you activate the Matchmaker tool, it now draws the first node (start point) of each contour larger and shows the number of the contour in the middle of the node. The contour numbers start at 0. You can see the same contour order and numbers in the Elements panel.
Start points in Matchmaker tool

If you activate the Matchmaker tool:
New If you Shift-click any node in a master, Matchmaker makes the node the start point of the contour. #5629
New If you click the Relocate startpoints button in the property bar, Matchmaker automatically sets the start point in each contour in the current master: it places the start point as close to the bottom-left of the glyph. #5626
New If you Shift-click the Relocate startpoints button, Matchmaker automatically sets the start point in each contour in all visible masters.
Contour direction in Matchmaker tool
When the Matchmaker tool is active:
New If you Alt-click any node in a master, Matchmaker reverses the contour to which the node belongs.
New If you click the Set PS contour direction button in the property bar, Matchmaker performs the automatic correction of the contour direction in the current master. #5627
New If you Shift-click the Set PS contour direction button, Matchmaker corrects the contour direction in all visible masters.
Improved Match Masters
New If you have a font with more than two masters, and the masters are not compatible for interpolation, FontLab can now perform matching of the masters in more cases if you use Glyph > Match Masters, or if you click the Match masters button in the Matchmaker tool property bar.
Variations panel

Sliders in the Variations panel show thin vertical bars: the “from” and “to” range indicators. If you click a Play button next to a variation slider in the panel’s List view, FontLab animates the variation within that range.
New It is now much easier to drag these range indicators to change the range.
New The collapsed Variations panel now contains the auto-matching buttons. #6719
Variation improvements in Font Info
Use Font Info > Axes > Detect Axes to build variation axes info based on the names of the layers
New Click Font Info > Axes > Detect Axes and FontLab detects the variation axes used in your font based on the names of the layers.
FontLab browses all glyph masters, and tries to decode the axis location from the master name. The master name can contain one of the known keywords for weight (like “Black”), width (like “Wide”) or slope (like “Italic”). The master name may also provide the axis location using the serif=10 notation. This is mostly useful if you’ve added glyph or font masters, and now you wish to add an axis.
Font Info > Add master

If you use Font Info > Add master (+ in the bottom-left corner), and you choose one of the options there, FontLab shows the Add master dialog.
New FontLab now auto-completes the master names from a list of known master names.
New If you use a known master name, FontLab also adds an axis in Font Info > Axes if needed, and also sets reasonable values for the master’s Weight, Width and Slope class in Font Info > Names. This functionality was previously only available in Font > Add Variations.
Copy dimensions to other masters
New In the Font Info dialog, the Family Dimensions and Font Dimensions pages now have Copy to masters buttons next to all dimensions, like Ascender, Line gap, Caps height, Caret offset etc.
Change a dimension in one master, and click Copy to masters next to it, and all masters get the same value.
Specify location of font-less masters
Font-less masters are glyph layers that participate in variation, typically as intermediate masters located between font masters. A font-less master only exists in a glyph. It does not have its own list of kerning classes or pairs, and it does not have any Font Info > Master properties like font dimensions, font guides or zones. Previously, the axes location of a font-less master was encoded in the layer’s name (: followed by a comma-separated list of axis codes and their numeric values, like :wt=650,wd=100).
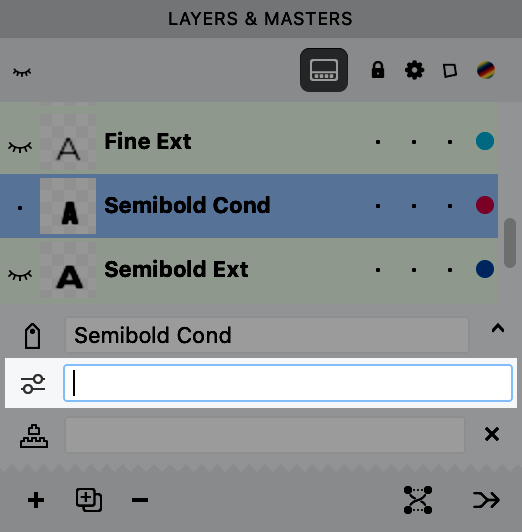
New Now each layer has its own location field which is separate from the name. The field is located in the layer properties section of the Layers & Masters panel. Click the Show layer properties button on top of the panel to open the section.
By default, the location field is empty. You can enter the comma-separated location into the text field, without the : prefix, like wt=650,wd=100. Once you confirm the change, FontLab asks you if you want to relocate the corresponding layer in Current Glyph, Selected Glyphs or All Glyphs.
You can also click the Select location button to open the visual location selector. There, add axes one by one and specify the location on that axis with the slider. Click + to add a custom axis, or click +⃞ to add all font axes. You don’t need to specify a location for every axis. At the bottom, choose in which glyphs you want to relocate the corresponding layer.
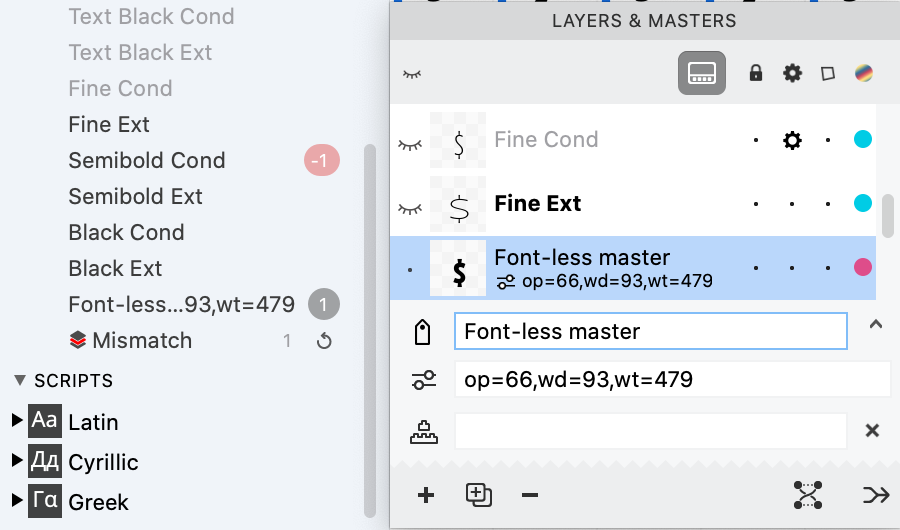
You may also give the layer an optional human-readable name, which now independent of the location. Enter the name in the Name field above the Location field, or double-click the layer entry in the list.
The Layers & Masters section of the Font window sidebar shows font-less master layers in the old format: the optional name followed by :, followed by the location, like ShortThin:length=30,thickness=40.
Set variation location when you add a new layer
FontLab has several ways to create a new layer in one or more glyphs, and to optionally also add a font master, which will hold separate Font Info data and kerning.
With the following techniques, you can add a new font master, and optionally fill its glyph layers with the content of another font master:
-
Font > Add Variation is the fastest way to duplicate the current font master (including all its font master data, and its glyph layers). Here, you can also quickly run a predefined action set.
-
The + button in the bottom-left of the Font Info dialog gives you a few more choices. Here, you can add a new font master, and you can specify how to create the layers in the new glyphs. You can create a new font master with default font master data, and copy the glyph layers from the current master, or create glyph layers with no content, or not create any glyph layers. Or you can copy an existing font master (even from another font), including all its font master data, and its glyph layers.
With these techniques, you can create new glyph layers, and optionally a font master, which will contain interpolated content that will reflect the current dynamic instance (the #instance layer):
-
With the Add glyph master (+) button in the Variations panel, you can add glyph layers (but no font master) to the selected glyphs. The layers will contain the current dynamic instance selected in the panel. This is useful to create intermediate glyph masters in only a few glyphs.
-
With Font > Generate Instance or with the Add current instance as font master button in the Variations panel, you can add a font master that will reflect the current dynamic instance selected in the panel, including interpolated kerning, interpolated Font Info data, and the interpolated variation location.

Finally, the most advanced way to create new glyph layers and font masters is to use Glyph > Layer > Add…, or the Add layer button in the Layers & Masters panel. This offers all choices available in the methods described above. It opens the Add Layer dialog, where you can:
- specify the name of the new layer (and optionally font master)
- set the lock, service and wireframe properties of the new layer
- New can specify the location of the new layer in the variation space
- choose to add the new layer in the current glyph, selected glyphs, or all glyphs and optionally to also add a font master
- decide what should happen if the same-named layer already exists in a glyph
- optionally fill the new layer with the content of another master from the same or different font, or with the currently selected dynamic instance
- if you use element references, and you’re adding the new layer to some glyphs but that layer already exists in other glyphs, you can change the references to point to elements that already exist in the layer
- create a bitmap layer that will contain rasterized content at a specified PPM
New If you use the New Layer dialog to add new layer, and you choose to fill new layer with contents of another layer of an open font, FontLab now also copies the associated mask layer if present. You can remove the mask if you do not need it. #6436
New action: Adjust by variation
New If your font has multiple masters, use the new Adjust > Adjust by variation action to replace a master with an interpolated instance that has a different axis location.
You can use absolute axis coordinates (replaces the master with the contours from another location), you can also specify relative axis coordinates (then, you can run the action on multiple masters). Use this for example if you:
- wish to “move” a central / neutral master (e.g. make it bolder or lighter), especially if your neutral master is purely interpolated
- extrapolate the min or max master (to allow extrapolation, you first need to adjust the min and max values in Font Info > Axes > Axis Graph > Design coordinates)
- convert a non-rectangular design space into a rectangular one (needed if you’re producing a variable font)
Note
If you replace a master with an interpolated instance, the design of the other instances changes accordingly.
Component sources that have font-less masters
New If you have a base or mark glyph that has intermediate font-less masters, and you build a composite glyph that points to such a glyph, the composite glyph now uses the intermediate masters when you produce variations.
For example you can have glyph e that has font masters Light and Bold, and has an intermediate glyph master (an unnamed layer with the location wt=650 or layer named SemiBold with the location wt=650).
In the composite glyph (like eacute), it’s now sufficient to have the font masters you want (like Light and Bold). You no longer need to build the intermediate master in the composite glyph. Previously, composite glyphs in FontLab ignored intermediate masters in component sources.
Smart variable components
Choose dynamic instance for a smart, variable component
If your font has variation axes defined in Font Info and multiple masters, you can use any dynamic instance of any variable glyph as a smart, variable component in any layer of another glyph.
New If you have a component that points to a variable glyph, click it and click the Select component instance button in the property bar. A dropdown appears where you can use the sliders to choose a dynamic instance for the component. Click the Reset button to set the component to use the current layer.
To use the same dynamic instance for multiple components, open the Elements panel, turn on Show element properties and then click Expand properties on the right of the element name. At the bottom of the panel, you’ll see a Base layer name field.
There, you can enter a layer name (like Black) or a #-prefixed variation location such as #wd=112,wt=550. Copy the contents of the field, click another component and paste.
Tip
Use variable components to build live small caps or superscript / subscript glyphs.
Define custom glyph axes for smart variable component sources
New The source glyph of a smart, variable component can also use custom glyph axes that are not defined in Font Info. You can encode arbitrary axis names in the layer’s location. For example, you can create an unnamed layer with the location le=30,th=40, and another layer with the location le=300,th=40 etc.
FontLab interprets le and th as glyph-specific axis codes. If you use this glyph as a component and select the instance in the Elements panel, you can use these codes in addition to the font-wide axis codes to specify the variation location of a component. These glyph-specific axis codes also show up as sliders when you visually choose the dynamic instance for the variable component.
In your layer location, you can also use longer names of axes (like length=30,thickness=40) as long as the first two letters don’t conflict with each other or with font axes codes defined in Font Info > Axes.
Tip
Create glyph portions like serifs, shoulders, stems or marks as a separate glyphs, create additional masters and custom axes, for example for width or height, and then add these glyphs as variable components to your regular glyphs.
Font-wide metrics in the #instance layer
New If you choose the #instance layer in the Layers & Masters panel or the Glyph window property bar, the Glyph window now shows interpolated positions for zones, font dimensions and font guides.
Conditional glyph substitution with features other than rvrn
In variable font projects, you may want to use different glyphs in different regions of the design space. For example, you may want to use a fundamentally different glyph design for the dollar sign in the lighter weights, and a different glyph for bolder weights.
You can achieve this with conditional glyph substitution. For this, you need at least a default glyph and a conditional glyph. The default glyph (for example dollar) will be used the part of the design space which includes the default instance. The conditional glyph (for example dollar.bold) will be used in some other part of the design space.
Both glyphs that participate in conditional glyph substitution must be present in your font, and you can use them in other OpenType features. If you want kerning, you need to assign them to kerning classes, and kern them as you wish. You can only specify conditional glyph substitutions where one glyph is replaced by another glyph. To use ligature substitutions, you need to manually write the conditions into the GSUB table using the TTX notation in the Tables panel.

You need to assign conditional tags to each conditional glyph. Select the conditional glyphs in Font window, then:
- Open the Classes panel, switch to Tags, add a tilde tag that describes the condition (see below) and drag-drop the selected glyphs from the Font window.
- Alternatively, open the Glyph panel, and in the Glyph tags field, type the title tag prefixed by
+to assign the tag to the selected conditional glyphs.
A conditional tag is a concatenation of three parts: defaultglyphname, prioritymarker and conditionset. For example, the tag for the conditional glyph dollar.bold could be dollar~wt>820&wd<110 or ~wt>820.
defaultglyphname is the name of the default glyph (for example dollar). If it’s absent, the conditional glyph’s name without the suffix will be used. So if you assign the tag ~wt>820&wd<110 to the glyph dollar.bold, FontLab will replace the glyph dollar with the glyph dollar.bold if the Weight axis value is 820 or more and the Width axis value is 110 or less.
prioritymarker can be:
~if the substitution should be done before all other substitutions (we sometimes call such conditional tags “tilde tags”)- New
^if the substitution should be done after other substitutions (see below).
conditionset is one or more condition expression, concatenated with &, so: condition&condition..., for example wt>820&wd<110.
Each condition can have the form either ax>min or ax<max or min<ax<max or max>ax>min, where:
axis the axis code (likewtfor Weight),minandmaxare axis locations expressed in design coordinates, same as master and instance locations.>and<actually inclusive, so they are equivalent to the mathematical ≥ and ≤ operators.
To specify a conditionset for multiple axes, so that the conditional substitution happens only in a region enclosed by multiple axes (logical “and”), concatenate (glue) multiple condition expressions (one per axis) with &. One axis code can only appear once in a tilde tag, so use the 200<wt<700 form rather than wt>200&wt<700.
To specify a conditional substitution that happens if one conditionset is met or if another other conditionset is met, add multiple space-separated conditional tags, one per conditionset.
For example, to replace e with e.ss04 if the weight axis is 820 or more and the width axis is 110 or less, or if the weight axis is 750 and the width axis has any value, enter +~wt>820&wd<110 +~wt>750 in the Glyph tags field of the Glyph panel for the e.ss04 glyph.
If the prioritymarker is ~ (“tilde tag”):
- If you export static fonts (instances), FontLab performs the conditional substitution by remapping Unicode codepoints in the affected instances, but does not rename the glyphs.
- If you export DesignSpace + UFO, FontLab converts the conditional tag into the
ruleselement. - If you export a Variable TT or Variable PS font, FontLab converts the conditional tag into the
rvrnfeature. OpenType engines apply this feature before all other substitutions, so the default glyph of a~conditional tag must have a Unicode codepoint.
New If the prioritymarker is ^ (“caret tag”):
- If you export instances, FontLab does not perform any conditional substitution
TO TEST. - If you export DesignSpace + UFO, FontLab converts the conditional tag into the
ruleselement with theprocessing="last"attribute. - If you export a Variable font, FontLab converts the conditional tag into the
rcltfeature.
You can specify a different feature to be used for ^ conditional tags. For example, if you’d prefer the ^ conditional substitutions to work in the calt, add "com.github.fonttools.varLib.featureVarsFeatureTag": "calt" to Font Info > Font Lib.
Some OpenType engines apply the rclt feature after other substitutions, so default glyph for a ^ conditional tag could be any glyph, for example a glyph that is the result of another substitution.
However, some OpenType engines only apply conditional substitutions associated with the rvrn feature. The ~ conditional substitutions work in more environments, and work with static instance fonts.
Layers
Better Layers & Masters panel
If a layer like Bold has an associated Mask layer named mask.Bold, the Layers & Masters panel in FontLab 7 showed the associated Mask layer as visually indented if the Show Mask layers in panel button at the bottom of the panel was turned off. FontLab 8 improves the presentation of Mask layers and other associated layers, and extends the visual grouping to other other layers.

New If a layer is not set to visible, the visibility column in the Layers & Masters panel shows a blank space instead of a closed eye, to minimize visual noise.
New If you turn on the Block reordering and removal of layers toggle, you will not be able to change the order of the layers in the panel, or remove them.
New The icons in the panel are slightly larger.
Mask layer
If a glyph has a design layer named, for example, Regular, it may also have an associated Mask layer named mask.Regular. FontLab creates Mask layers if you use Mask operations from the Tools menu. Designers use Mask layers to hold visual reference artwork for the glyphs they’re working on.
New In the Layers & Masters panel, a Mask layer is shown as a “child layer”: it is shown below its “parent layer”, indented, and now it shows a mask icon followed by the name of the associated design layer. The mask. prefix is no longer shown. If you double-click to edit the layer’s name, you can still edit the full name including the mask. prefix.
New The Show mask layers button at the bottom of the Layers & Master panel is now only visible if the glyph layer has any Mask layers.
Associated layers
New The Layers & Masters panel now supports visual grouping of arbitrary layers.
If a glyph has a layer named, for example, Regular, and it has another layer named Regular.draft (so it’s the same base name plus a . followed by a suffix), the Layers & Masters panel forms a visual group of “associated” layers: it shows the Regular.draft as a child layer, indented underneath its parent Regular layer, and only shows the draft part of the name, prefixed with an arrow icon.
This visual grouping of layers is just a presentational mechanism, and only works one level deep. The layers don’t form any technical parent-child structure. The Regular.draft layer is still completely independent of its associated Regular parent layer. If you rename the Regular layer to something else, FontLab does not automatically rename associated layers like Regular.1 or mask.Regular. Those layers will become visually ungrouped (disassociated), will no longer appear nested, and their prefix/suffix will be shown.
Components in Mask layer
New If you add a component to the Mask layer, FontLab now adds a component that points to the parent layer.
For example, if you create a glyph P and draw some contours in its Regular layer, and then in the glyph R, you choose Tools > Edit Mask or click Mask in the View panel, FontLab enters the mask.Regular layer of R.
If you now choose Glyph > Add Component, type P, turn off Apply to all masters and click OK, FontLab will insert a component into the R Regular layer mask that points to the Regular layer of P.
Now you can turn off Tools > Edit Mask or click Outline in the View panel, and you can edit your R while seeing the P in the Mask. If you update the P, the mask in the R will also update.
Inactive layers as wireframes

New In Preferences > Variations > Show inactive layers as wireframes, you can change the opacity of the wireframes for inactive but visible masters. #4961