New in FontLab 8: Build & assemble
Rapidly build glyphs from components or from always-editable element references. Automate complex glyphs with Auto layers. Join design parts and add flair with Skin and Glue. Convert drawing parts into components with one click. Use Fill to sculpt the whitespace off filled areas.
New in FontLab 8: Convert selections to components or elements. Add decoration and attach shapes to nodes or segments with updated Glue filter, or with .glyphs-compatible Skin filter in segment, dash, corner and cap modes. Use clipping groups to mask out areas. Use text shapes to re-use scaled words or phrases from your font in existing glyphs.
New FontLab 8.3 respects the italic angle when you align elements and components. The Skin Filter can be optionally shifted.
Elements and components
With element references, you can draw one or more contours once, and then re-use them in other glyphs. An element reference doesn’t have a “source glyph” — any occurrence of an element reference is the source.
-
If the Element tool is active, and you use Free Transform, the transformation tools or the Transform panel, you can apply live transformation to each occurrence individually: scale, rotate, slant and flip.
-
If the Contour tool is active, and you transform the content of an element or a selection within it, the transformation is applied to all occurrences of the element.
Components are similar, but the content of a component lives in one designated source glyph layer, and other glyphs point to it. Since a component points to a glyph layer, FontLab takes the entire geometry of the source layer into account: the placement of the individual elements and contours within the advance width and in relation to the baseline.
FontLab can also “import” other aspects of a glyph layer from the source, like hints and anchors.
In FontLab, a component within one glyph layer can point to the same layer of another glyph, and different layer, or a defined variation instance of a glyph.
Anchors
Tools > Actions > Guides & Anchors
New With the new Remove anchors expressions action, you can remove expressions (dynamic positioning) for all anchors in the specified glyphs and layers #5579
New In the Remove anchors action, you can use the top-right buttons to select or deselect all anchors found in the specified glyphs and layers
Anchors panel now has an Add button
New If you have a glyph in the Glyph window, you can now use the Add button in the Anchors & Pins panel to add predefined anchors one by one.
Move anchors vertically along italic angle
New If Contour > Coordinates > Follow Italic Angle is turned on, and you move an anchor with the ↑/↓ arrow keys (optionally with Shift), the anchor movement now follows the italic angle. Previously, this worked with nodes but not anchors. #6084
Aligning anchors
Select multiple anchors, but not nodes or handles, and use one of the Contour > Align Points commands to align them.
Components, Auto layers, mark attachment
Build Glyphs and Add Glyphs from Catalog in the Font menu
New The menu command Font > Generate Glyphs is now called Build Glyphs. Use this menu command to build composite glyphs manual or predefined recipes.
New The menu command Font > Add Glyphs is now called Add Glyphs from Catalog. Use this menu command to add default glyphs for Unicode characters.
If you use Add Glyphs from Catalog and if the settings are turned on in Preferences > Operations > New glyphs:
- If add components is turned on, FontLab adds neessary components if they exist in your font at the moment you add the new glyph.
- If create auto layers is also turned on, FontLab will add the components, and will automatically rebuild the glyph when you add the necessary components later.
Contour > Convert > To New Component…
New Contour > Convert > To New Component… moves the selection to a new glyph, and replaces the selection with a component pointing to that glyph. You must give a name to the new glyph, and you can choose to tag the new component source glyph as non-exporting.
Contour > Convert > Detect Component
New If you select some contours in the Glyph window and choose Contour > Convert > Detect Component, FontLab searches the current layer in all glyphs to find a glyph that only contains these contours. If it finds such a glyph, it replaces these contours in all glyphs with a component pointing to that glyph.
If you’re creating a component from a contour selection for the first time, use Contour > Convert > To New Component…. Then, open the newly-created component, select all contours and use Contour > Convert > Detect Component. To convert plain contours to available components in the current layer of all glyphs, choose Font > Detect Composites.
Do not inherit mark anchors from components to base or ligature glyphs on export
New In FontLab, the name of a mark anchor starts with a _. Mark anchors typically exist in mark glyphs (glyphs that represent diacritical marks), but they may also exist in other glyphs. The source glyphs of a component used in a composite glyph has mark anchors, and FontLab generates the mark attachment features (mark and mkmk) during export, FontLab only inherits the mark anchors into the composite glyph if the component source glyph is considered a Mark. FontLab no longer inherits these anchors from a component source that is considered a Simple (base) or a Ligature glyph.
Assign the OT Glyph Definition Class Simple or Ligature to a glyph in the Glyph panel, otherwise FontLab guesses the definition class of a glyph on export. #6080
Do not inherit any anchors from components when building an auto layer
New If you append #?noanchors to a recipe, FontLab does not inherit any anchors from the component sources into the auto layer when you export the font.
However, if you decompose the glyph manually, FontLab still inherits the anchors.
For example, if you build the aacute glyph with the recipe =a+acutecomb@top, then the aacute glyph will inherit anchors like bottom from a. But if you use the recipe =a+acutecomb@top #?noanchors, the aacute glyph will not have any anchors.
In the recipe syntax, anything that follows # is interpreted in a special way:
- a special “task keyword” that immediately follows
#?performs a particular task; currently, the only supported task keyword is#?noanchors - text that immediately follows
#!is inserted as a glyph note; this should last in the recipe - other text that follows
#is treated as an internal comment and ignored
Paste glyph as component with Edit > Paste Special
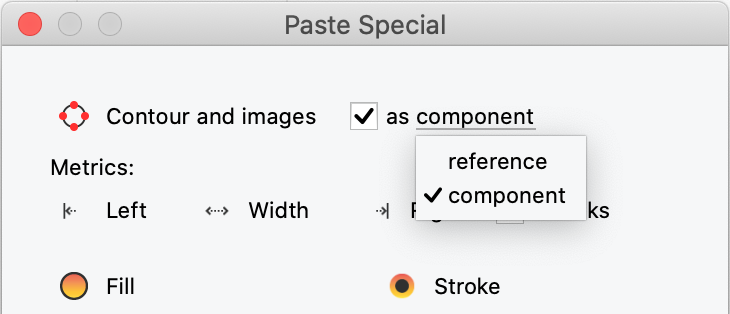
If you copy one or more glyphs in Font window, select some Font window cells and choose Edit > Paste Special, you could choose to paste Contour and images as an element reference. New Now, you can also choose to paste the content as a component. #5990
Anchored components and auto layers with #exit/#entry anchors
New Attached components are now called Anchored components.
New You can now use anchors named #exit and #entry to automatically position components in a ligature glyph.
If you use a recipe that includes the & simple / extended operator to generate a ligature-type glyph from components, FontLab will place the 2nd component so that the anchor named #entry of its source glyph is on the anchor named #exit of the 1st component source glyph:
- New if the layer is an auto layer,
- or if you build the layer with Build Glyphs, and you then turn on the Anchored property of the 2nd component.
Copy auto layer recipes

New If you show the Layer properties in the Layers & Masters panel, the Auto layer section at the bottom now has a Copy recipe to masters button.
Click it to copy the current layer’s auto layer recipe to all other masters.
Skin Filter
New You can use FontLab’s new Skin Filter to construct glyphs in a new, flexible way. Apply Skin Filter to one or more nodes in a contour (the body nodes), choose a skin source glyph, and FontLab will apply the content of the current layer of the skin source glyph (the skin content) to the segments adjacent to the body nodes (the body segments) in a special way.

FontLab uses the name of the skin source glyph to determine how to apply the skin content to the body segments. The glyph name must start with a special prefix that begins with _ followed by a suffix of your choice.
- Segment skin (
_segmentprefix) stretches and bends the skin content along the body segment. - Dash skin (
_dashprefix) repeats the skin content along the body segment. - Corner skin (
_cornerprefix) attaches the skin content to a body node, joins body node’s adjacent segments with the first and last segments of the skin content’s open contour, and optionally rotates the skin content. - Cap skin (
_capprefix) attaches the skin content to the body segment, and joins both nodes of the body segment with the first and last nodes of the skin content’s open contour, or with two special anchors.
To use Skin Filter:
- Create the skin source glyph. Depending on the intended type of the skin, give it the appropriate name add appropriate content (contours and anchors).
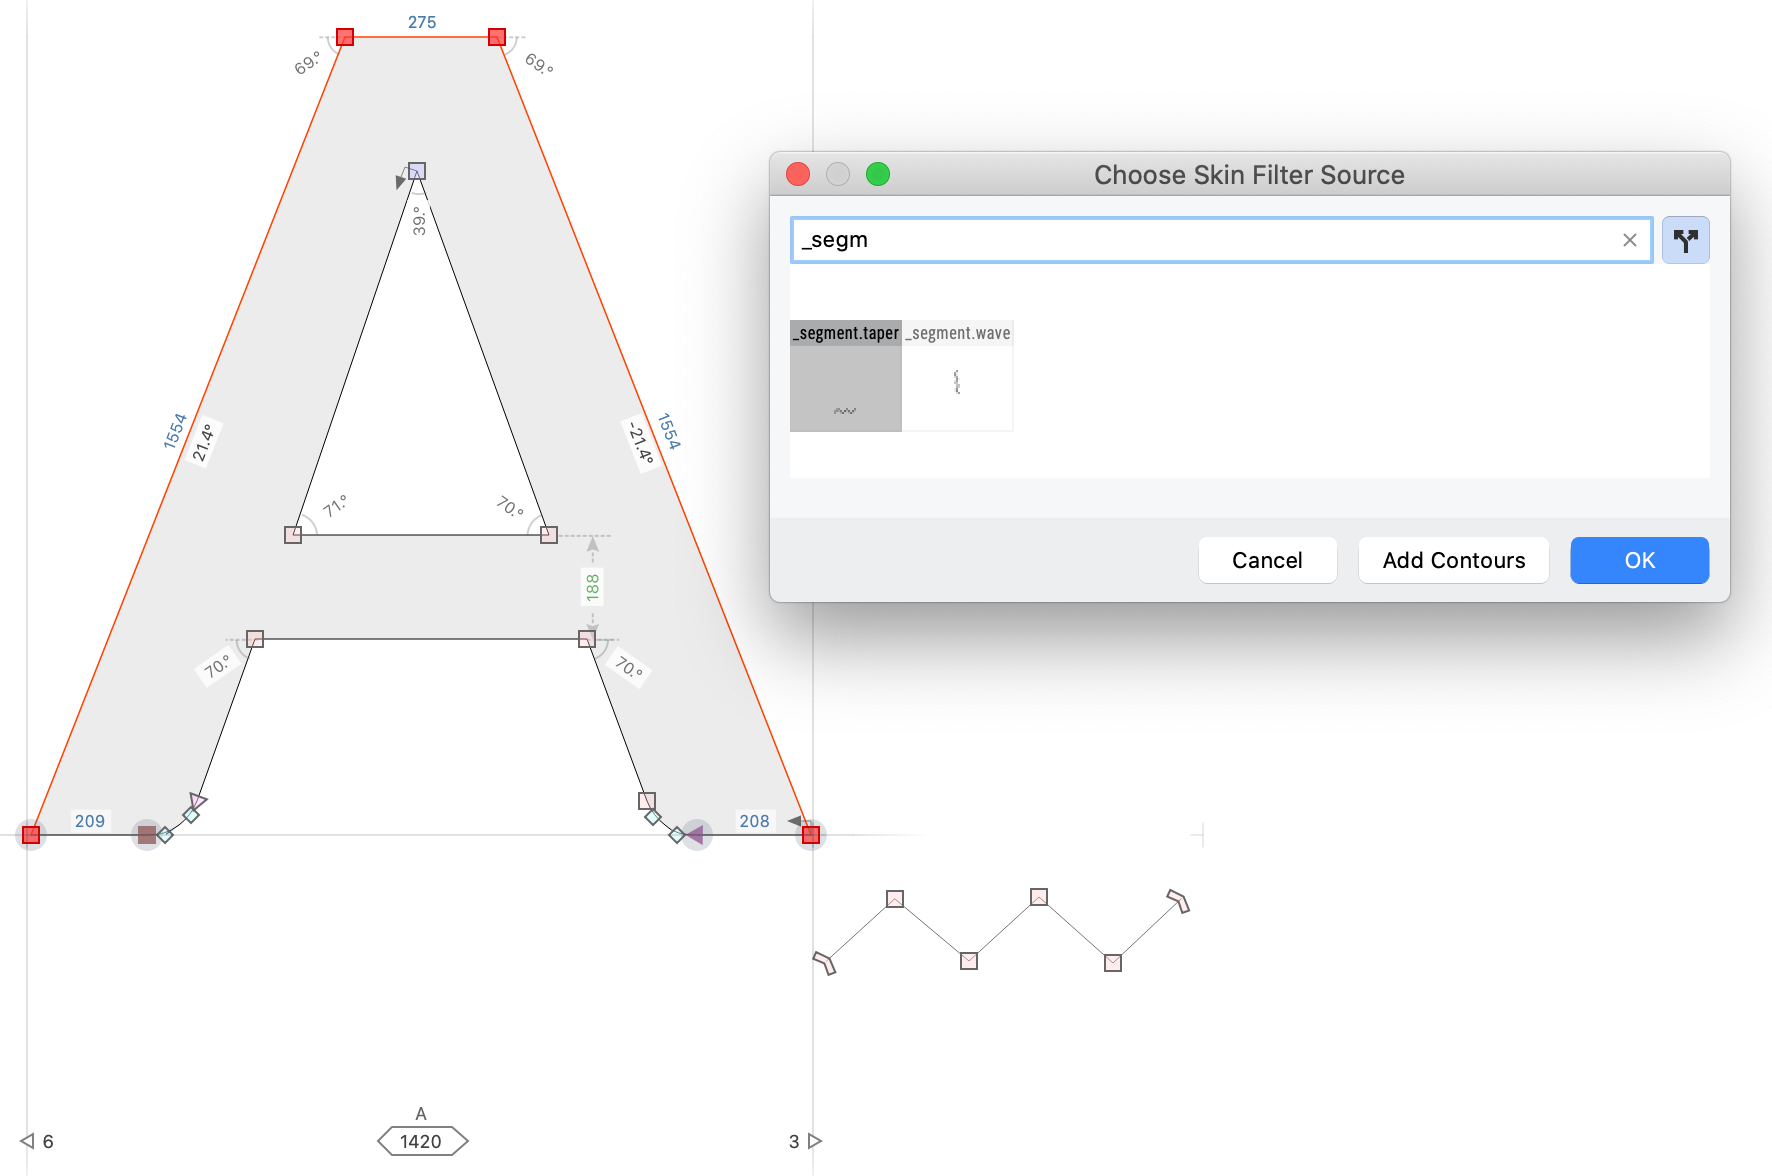
- In the body glyph, in which you want to use the skin, select one or more nodes, choose Element > Add Skin Filter, and in the dialog choose the skin source glyph.
- Optionally adjust skin settings in the Glyph window property bar.
Note
The Skin Filter is compatible with segment, corner and cap components used in the
.glyphsformat.
Segment skin
New Apply segment skin to a line or curve segment, and FontLab will replace that segment with the skin content. FontLab rotates, scales and bends the skin content so that the entire skin content fits into the body segment. Segment skins are most useful if you want to keep simple, editable paths as the basis of your outlines, but you want your final outlines to be more complex.
The segment skin source glyph must have a name that starts with _segment. Both the source and body glyphs must contain a layer with the same name.
-
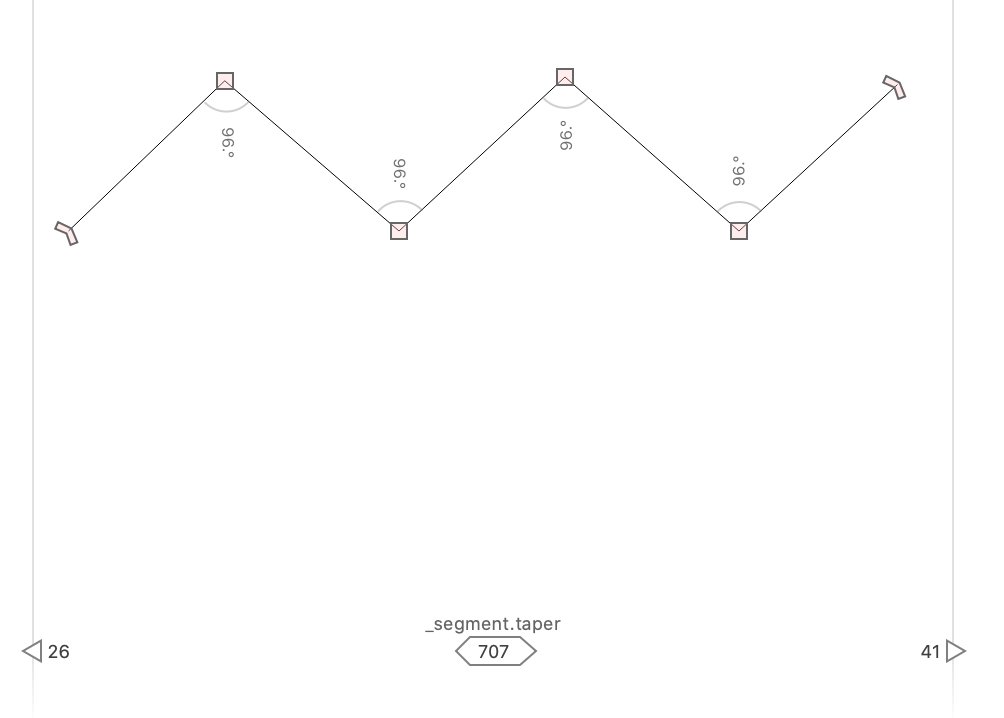
Create a glyph with a name like
_segment.taper. This will be your Segment skin source glyph. -
In your new
_segment.taperglyph, draw an open contour, or one or more closed contours. FontLab will fit (squeeze) the content of the Segment source glyph layer into the body segment.
-
If you made a closed contour: optionally, choose Glyph > Add Anchor to add the
startanchor at the origin point (0, 0), and choose it again to add theendanchor at the intersection of the baseline and the advance width. -
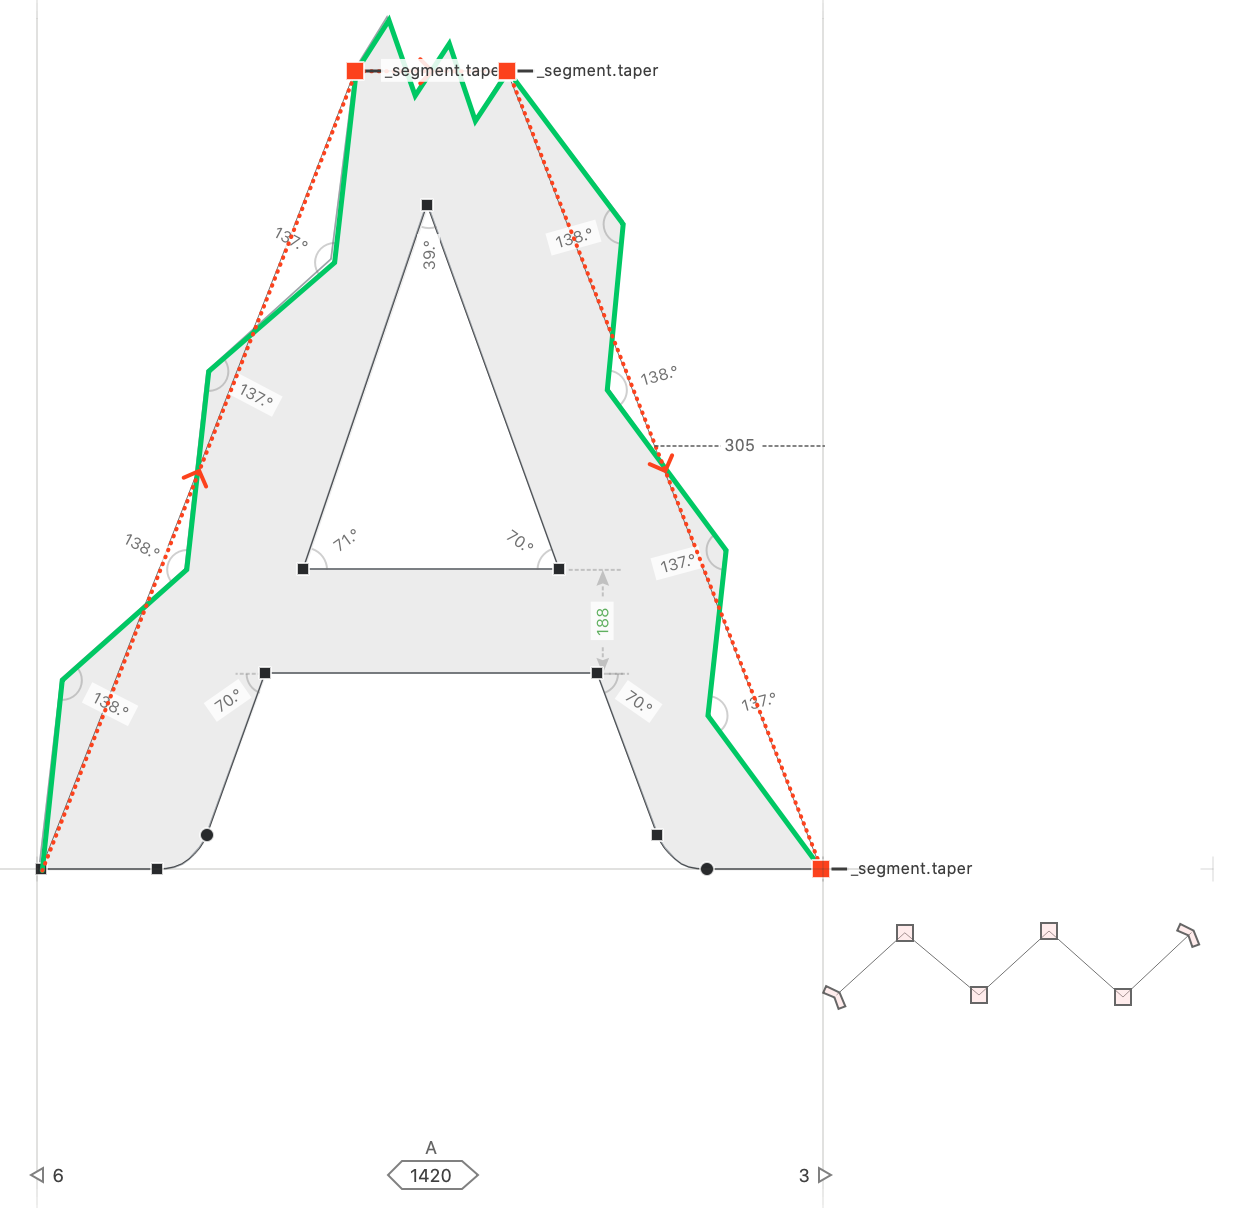
In your body glyph, select one or more segments, or in other words, the nodes that surround one or more segments. FontLab applies the skin to each selected segment, with the skin source contour direction following the direction of the body contours. Turn on View > Show > Contour Direction to see an arrow on the start point that shows the contour direction.
-
Choose Element > Add Skin Filter, and in the dialog box type the name of your segment source glyph (
_segment.taper). Each of the body segments now becomes a skeleton onto which FontLab fits the skin content.
If the Segment skin source has one or more open contours, FontLab:
- attaches the first node of the first open contour to the first node of the body segment,
- attaches the last node of the first open contour to the second node of the body segment,
- fits the skin content along the body segment.
If the segment source has one or more closed contours, FontLab:
- attaches the
startanchor to the first node of the body segment, or attaches the left sidebearing point (0, 0) if the anchor doesn’t exist, - attaches the
endanchor to the second node of the body segment, or attaches the right sidebearing point if the anchor doesn’t exist, - fits the skin content along the body segment.
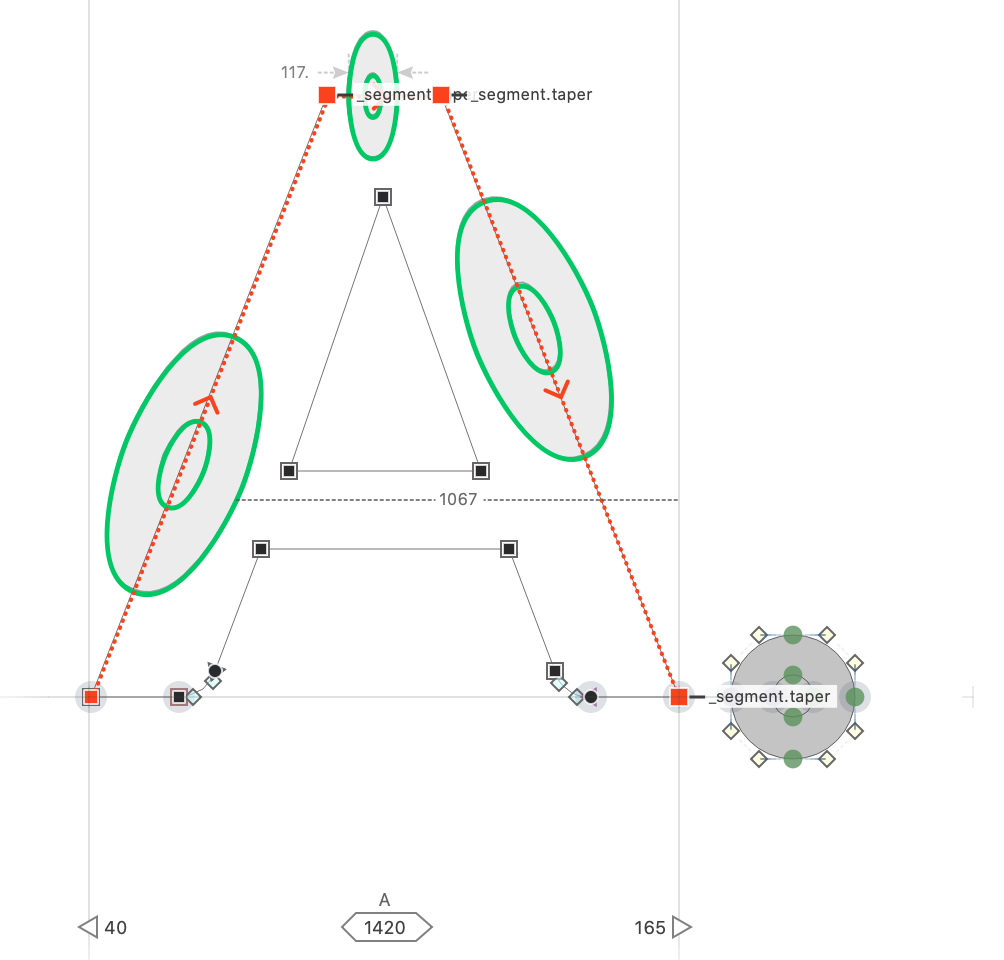
If the Segment skin source has both open and closed contours, FontLab fits the open contours using the first and last node, and fits the closed contours using the special anchors or the sidebearing points.
Note
Segment skins are compatible with segment components used in the
.glyphsformat.
Dash skin
New Apply dash skin to a line or curve segment, and FontLab will replace that segment with the skin content. FontLab rotates, scales and bends the skin content so that the entire skin content fits into the body segment. The segment skin source glyph must have a name that starts with _dash. Both the source and body glyphs must contain a layer with the same name.
If the dash source glyph has one or more closed contours, FontLab uses the advance width of the source as the reference length, and repeats the source content along the body segment as many times as the reference length would fit into the body segment’s length. If the dash source glyph also has the start and/or end anchors, FontLab uses the distance between them as the reference length instead. Either way, FontLab only uses rotation to repeat the dash source content, no scaling or bending.
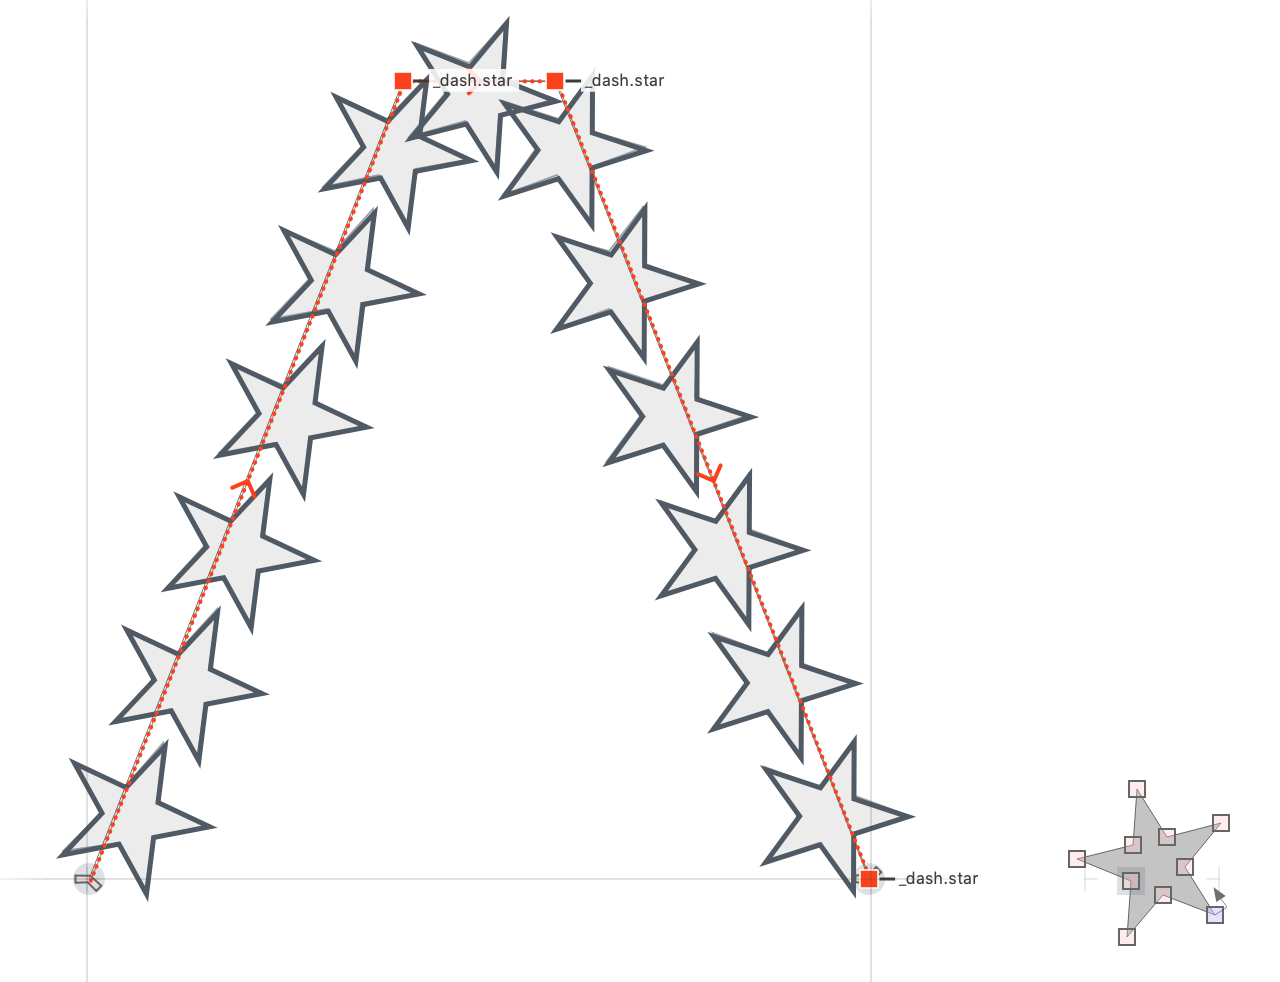
If the dash source glyph has one or more open contours, FontLab uses the length of the first open contour as the reference length, and repeats the content, but also scales, rotates and bends the open contour so that on every repetition, the end nodes of the open contour connect. FontLab also repeats the closed contours, but only uses rotation.
As with segment skin, FontLab applies the dash skin to each selected body segment, or in other words, between each selected node in the body glyph.
Corner skin
New Apply corner skin to a node, and FontLab will attach the skin content to that node. FontLab joins the segments adjacent to the body node with the first and last segment of the skin source’s open contour, and optionally rotates the skin content. Corner skins are most useful when you want to add a serif to a stem.
The corner skin source glyph must have a name that starts with _corner. It should contain one open contour. Both the source and body glyphs must contain a layer with the same name.
If you select a node in the current glyph, choose Element > Add Skin Filter and pick a glyph prefixed with _corner, FontLab inserts the skin source so that its origin is on that selected body node. The skin source’s origin is the anchor named origin in the _corner glyph, or the (0, 0) point if the anchor does not exist. Then, FontLab uses the first node, the first segment, the last node, and the last segment of the skin source’s open contour in a special way.
The corner skin property bar has settings for aligning the skin (Left, Center, Right and No alignment), and for scaling / flipping the skin horizontally and vertically.
If the skin has no alignment, FontLab:
- adjusts the “left side” of the skin: changes the incoming segment of the body node so that it joins with the first node of the skin source, rather than with the body node
- adjusts the “right side” of the skin: changes the outgoing segment of the body node, so that it joins with the last node of the skin source
The contour directions in both the skin source and the body contour should be the same.
If you flip the skin horizontally in the skin property bar, FontLab reverses the meaning of first and last node of the skin source: the incoming segment joins with the last node, and the outgoing segment with the first node.
If you left-align the corner skin, the left side of the skin becomes “fixed”. This is the default alignment after you add a corner skin. FontLab:
- joins the first node of the skin source so that the angle of the first handle or line segment matches the angle of the handle or line segment that is incoming into the body node
- rotates the skin, so that the angle (direction) between the origin and the last node of the skin source matches the angle of the handle or line segment that is outgoing from the body node
If you right-align the corner skin, the right skin side becomes “fixed”: FontLab matches the last node and outgoing segment for joining, and matches the first node with the incoming segment for rotation.
If you center the corner skin, FontLab matches rotation and joining equally on both sides.
Use the text fields or their associated sliders in the property bar to change the width and height of the corner skin (scale it horizontally or vertically). Use the flip buttons to flip them. Flipping uses scale, for example horizontal flip is the same as setting the width to –100%.
To modify how corner skin joins with the body on the left side, add an anchor named left to the skin source. The angle and distance between that anchor and the origin influence the location of the join. The modify the joining on the right side, add an anchor named right.
Note
The skin source glyph may also may have additional closed contours. FontLab rotates them accordingly if you use corner skin alignment.
Note
Corner skins are compatible with corner components used in the
.glyphsformat.
Cap skin
New Apply cap skin to a body segment, and FontLab will join the first open contour of the skin source so that its node1 anchor is the body segment’s 1st node, and its node2 anchor is on the 2nd node.

The cap skin source glyph must have a name that starts with _cap. It should contain one open contour. Both the source and body glyphs must contain a layer with the same name.
If the skin source has a node1 anchor and a node2 anchor, FontLab joins the first open contour of the skin source so that:
- The
node1anchor is on the 1st node. - New If the Fit cap toggle in the Skin filter property bar is turned on, the
node2anchor is on the 2nd node.
New If you add a Cap skin to an element, the Glyph window property bar now has a Fit cap toggle. If you turn the toggle on, FontLab will scale the cap to match the size of the segment to which the cap is attached.
Cap skins work similarly to corner skins. The difference is that in corner skins, the skin source’s origin gets attached to a single body node, and in cap skins, the skin source’s two special anchors get attached to two body nodes. Other than that, alignment, scaling and flipping of the skin, and the left / right anchors in the skin source work similarly.
Note
Cap skins are compatible with cap components used in the
.glyphsformat.
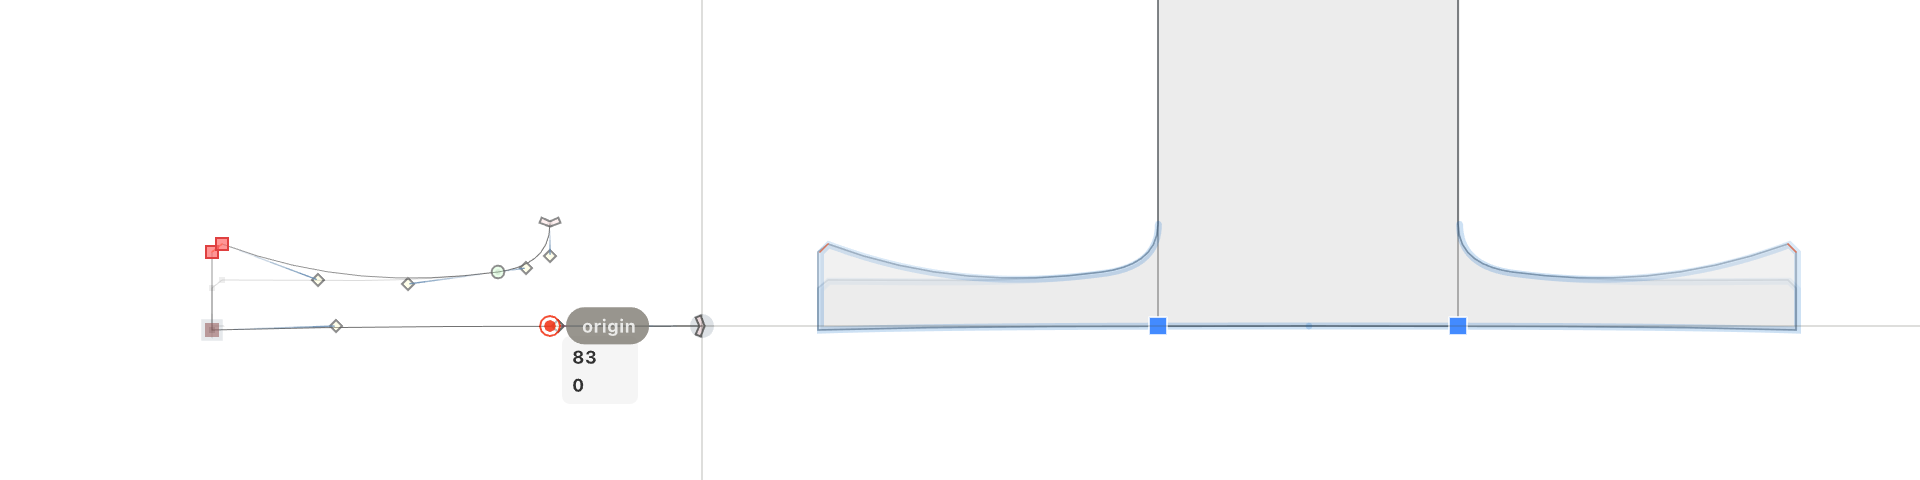
Editing skin
New If you have applied a skin to some segments, you can click the skin content to activate the skin. FontLab shows:
- the skin control points as red circles
- the flow of the skin on the skeleton with red lines that have arrows
- the resulting skins with blue outlines
For segment and dash skins, the skin control point is the 2nd node of the body segment. For cap skin, the skin control point is the 1st node of the body segment. For corner skin, the skin control point is the body node.
New If a skin is active, you can:
- change the skin source glyph: use the text box in the Glyph window property bar, or click the skin attachment control point with Cmd Ctrl
- change the alignment of corner skins: use the buttons in the middle of the property bar
- expand the skin (convert the filter result into simple contours): click the Expand filter on the right of the property bar
- remove the skin and keep the underlying skeleton: click the Remove filter on the right of the property bar
Add Anchor for skin source glyphs
New If you right-click the canvas in a skin source glyph, and you repeatedly choose Add Anchor from the context menu, FontLab creates anchors that have appropriate names:
- if the glyph name starts with
_dashor_segment, FontLab adds the anchorsstartand thenend, - if the glyph name starts with
_corner, FontLab adds the anchors:origin,rightand thenleft. - if the glyph name starts with
_cap, FontLab adds the anchorsnode1,node2,leftandright, in this order.
Glue Filter
If your glyph layer has an open contour or an element that contains and open contour, and it also contains another contour or element (the “body”), and can select the open contour or element and choose Element > Glue Selection. FontLab then applies the Glue filter. This produces a construction (filtered element), which attaches (glues) the start and end nodes of the open contour to the body element.
Both end nodes of the glued contour have a corresponding glue connection point, and you can decide how both glue connection points attach to the body.
New Glue filter
Glue was one of the earliest smart contour filters we introduced in FontLab VI. It was time to re-evaluate it. We’ve looked at how people use Glue, and what are its strengths, and we’ve greatly simplified the Glue filter in FontLab 8.
If you have at least one closed contour and at least one open contour in an element, or if you have an element with a closed contour and another element with an open contour:
- Select the open contour (with the Contour tool), or the element with an open contour (with the Contour or Element tool).
- Choose Element > Glue Selection.
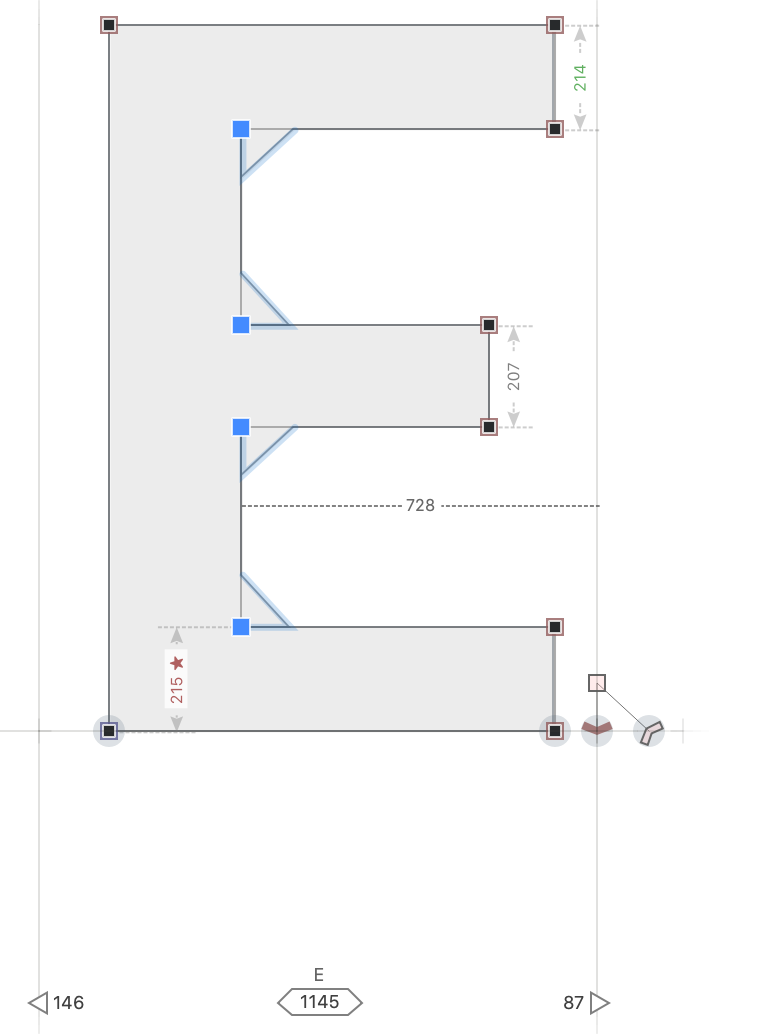
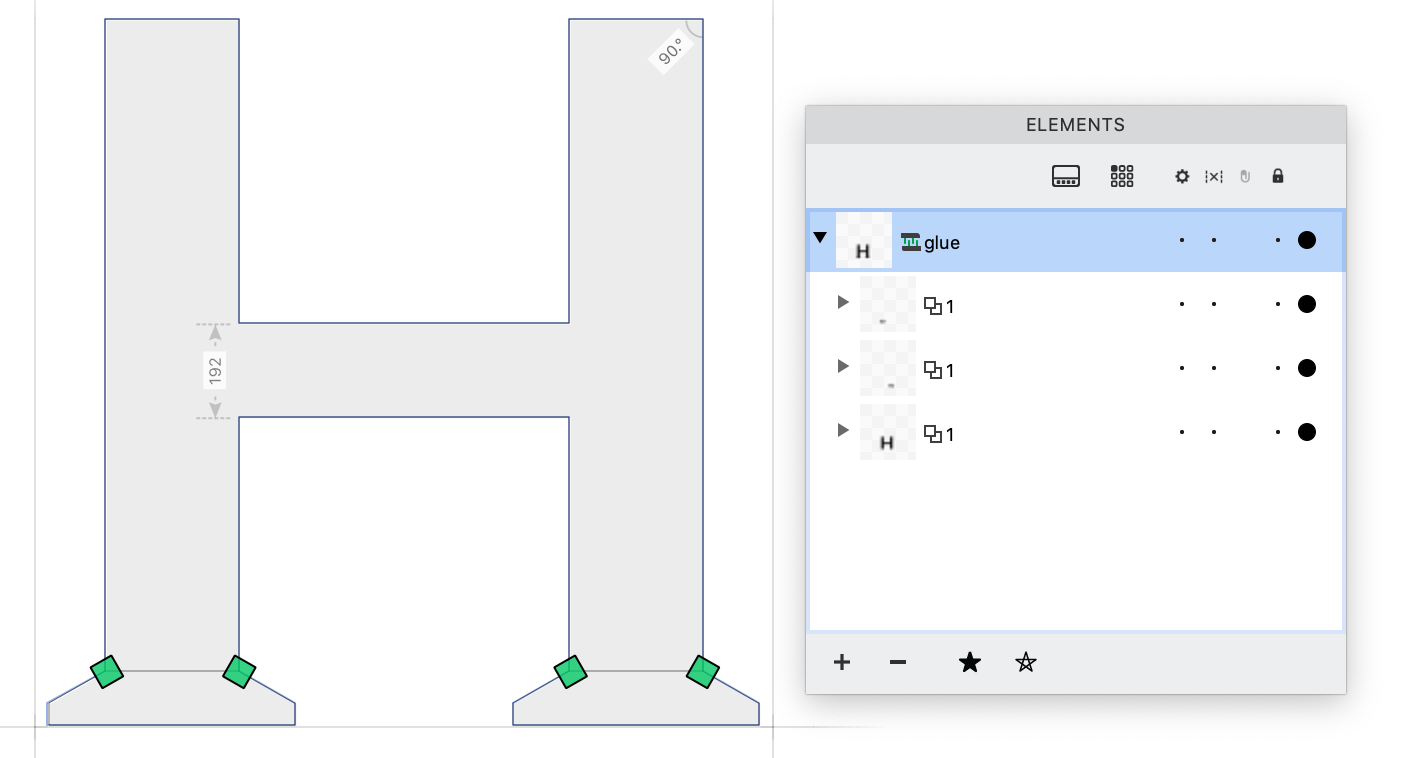
The new Glue filter will consist of the construction element labeled glue in the Elements panel. This construction contains the glued element that has the open contour, and the remaining contours which serve as the body. You can glue additional contours to the body: they will be added to the same construction.
To activate the construction element, click the filled area or outline with the Element tool, or click the whitespace in canvas with Contour tool, or click the glue entry in the Elements panel.
If the glue construction element is active:
- It has two green glue connection points per every glued element. Click any glue connection point to switch between smooth and sharp connection.
- It also has one central glue positioning point in the middle of the construction. Click the glue positioning point to change how the glued elements behave when you move the body element: they can stay in place (empty positioning point), follow only horizontally or only vertically, or follow in both X and Y (cross inside positioning point).
To activate the glued element or the body, click the filled area or outline with Contour, or click it again with Element, or click an element inside the glue entry in the Elements panel.
If the body element has a pin or node named, for example p1, and the glued element has a corresponding pin with the same name but prefixed with _ (in this example: _p1), the glued element will attach to the corresponding pin/node.
If the body has another pin or node, named for example p2, and the glue element has a corresponding pin (_p2), then the glued element will also rotate so that it attaches to both body pins or nodes.
If the body has multiple same-named pins or nodes, the glued element attaches to the geometrically closest pair of pins or nodes.
Legacy Glue filter
If you have used the Glue filter in FontLab VI or 7, and you open the VFC/VFJ in FontLab 8, FontLab uses the legacy Glue engine on existing glued elements. The legacy Glue consists of an element labeled glued group in the Elements panel. This element contains an element labeled glued that contains the open contour. It also contains the remaining elements which serve as the body with which the glued element is joined. The legacy Glue filter has two context menus:
- Glue point context menu: right-click a glue point with Element tool, or left- or right-click with Contour menu, then choose how the glue joins the corresponding start / end node of the glued contour into the base.
- Glue filter context menu: left-click with Element tool, then choose how the glued element behaves when you move the glued element or the base.
These context menus made the legacy Glue unnecessarily complex, so the new Glue filter no longer has these options. You cannot apply the legacy Glue filter to new elements.
Skin Filter vs. Glue
Skin filters (especially corner skins) and glue offer somewhat similar functionality. We introduced the Glue filter in FontLab VI, and we’ve improved it in FontLab 8. The .glyphs file format offers a slightly similar functionality, and FontLab 8 adds the Skin Filter to support that workflow as well. We plan to integrate both workflows more.
Here are some examples how you can achieve the same thing in two ways. Let’s say you have an integrated serif in a base glyph, and you’d like to re-use the serif shape in other glyphs.
Replacing a serif with a glued element
One solution is to convert the serif portion into a glued element.
- Select its nodes and choose Contour > Convert > To New Element and give it a name like
_serif.bl. This creates two elements, each with an open contour. - Switch to the main element (that has the stem), hold Q and drag between the start / end nodes to join to corner, release Q.
- Then switch to the serif element and use Element > Glue Selection.
Replacing a serif with a corner skin
Another solution is to convert the serif portion into component and then apply it as a corner skin.
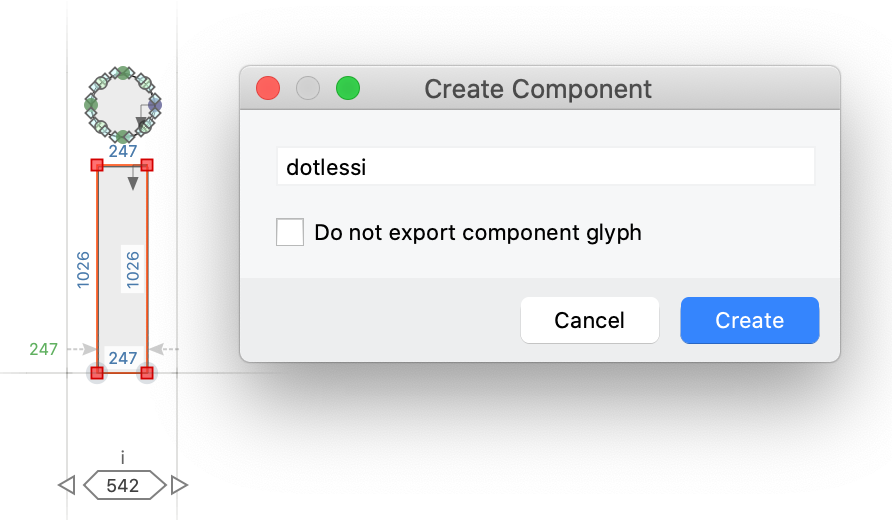
- Select its nodes and choose Contour > Convert > To New Component and give it a name like
_corner.bl.This opens the contour in the main element and inserts a component. - Switch to the main element, hold Q and drag between the start / end nodes to join to corner, release Q.
- Double-click the component to open its source glyph, add an
originanchor in the location that corresponds to the newly-added corner in the the base glyph. - Go to the base glyph, remove the component, click the new corner node and choose Element > Add Skin Filter.
- Choose the
_corner.blskin source glyph to utilize the corner skin.
Boolean operations on overlapping contours and elements
Traditional font editors offered the “remove overlaps” functionality (sometimes called “merging contours”). If you remove overlaps between two circles that have the same contour direction, you’ll get one contour. The contour will have additional nodes at the points where the contours intersect, and the overlapping parts will be gone.
Many vector drawing apps offer operations that go beyond removing overlaps: Boolean contour operations, sometimes called “pathfinding”. The “remove overlaps” operation is equivalent to the Boolean “add” operation, but with a full set of Boolean operations, you can also subtract, intersect, or exclude parts of vector shapes.
FontLab 8.2 offers four ways to use Boolean operations: the Contour overlap operations, the Fill tool & filter, New the new Fusion filter, and its predecessor, the Clipping Group filter.
Contour > Overlap operations
The Contour menu has Remove Overlaps, and in the Overlaps submenu has new Subtract, Intersect and Exclude. With these commands, you can perform Boolean geometric “path finding” operations on the closed contours in the current element. These operations work immediately (“destructively”): they directly produce the final contours. This is similar to Geometry operations in Affinity Designer, Pathfinder operations in Adobe Illustrator, or Path Operations in Adobe Freehand.
The Contour menu Boolean operations always take the entire contour into account, so if two contours overlap in two places, a contour Boolean operation will affect both entire contours even if you only select some nodes in both contours.
Choosing the “front” and “back” contours
FontLab needs one “front” and one “back” contour to perform the Contour > Overlap operations.
If you select one or more contours and perform a Contour > Overlap operation, FontLab combines all selected closed contours into one “front” contour, and combines all unselected closed contours into one “back” contour. If you don’t select any closed contours, FontLab uses the last closed contour in the element as the “front” contour, and combines all other closed contours as the “back” contour.
FontLab performs Contour > Remove Overlap in the “front” contour, and does the same in the “back” contour. Finally, FontLab performs the chosen Contour > Overlap operation between the “front” and “back” contour.
Contour > Overlap > Subtract
New If you choose Contour > Overlap > Subtract, FontLab uses the “front” contour to “punch a hole” in the “back” contour, or in other words: subtracts the “front” contour from the “back” contour. The result is the “back” contour, with overlaps removed, and the content of the “front” contour removed. FontLab removes the original “front” contour.
This is similar to Subtract in Affinity Designer and Adobe Illustrator, and to Punch in Adobe Freehand.
A non-distructive alternative to Subtract is the Fill tool: click the intersecting areas that should be kept, Alt-click the areas that should be removed. You can edit the contours. To produce the final contours, choose Element > Expand Filters.
Contour > Overlap > Intersect
New If you choose Contour > Overlap > Intersect, the result is an intersection contour that contains the overlapping areas of the “front” and “back” contours. The original direction of the “front” and “back” contours doesn’t matter. FontLab removes the original “front” and “back” contours.
This is similar to Intersect in Affinity Designer, Adobe Illustrator, and Adobe Freehand, and is, in a way, the reverse of FontLab’s Contour > Remove Overlap.
A non-destructive alternative to Intersect is the Fill tool (see above), or Element > Clipping Group: select the “front” contours and choose Contour > Convert > To New Element and click Create, then activate the Element tool, select the new “front” element and the previous element, and choose Element > Make Clipping Group. You can still edit the contours of the “front” and “back” elements. To produce the final contours, choose Element > Expand Filters.
Contour > Overlap > Exclude
New If you choose Contour > Overlap > Exclude, the result is a union contour, which contains the union of the “front” and “back” contours (same as the result of Contour > Remove Overlap), and an intersection contour, which contains the overlapping areas of the “front” and “back” contours (same as the result of Contour > Overlap > Intersect). The intersection contour has the opposite direction of the union contour. The original direction of the “front” and “back” contours doesn’t matter. FontLab removes the original “front” and “back” contours.
This is similar to Exclude in Adobe Illustrator.
A non-distructive alternative to Exclude is the Fill tool (see above).
Protecting contours from Contour > Overlap operations
FontLab performs the Contour > Overlap on closed contours in the current element, removes overlaps in the “front” and “back” contour before the operation, and always ignores open contours even if they’re selected.
To “protect” contours, that is, to exclude them from being merged into the “back” contour (especially: to protect them from overlap removal), you can do one of two things:
- Make each contour that you wish to skip an open contour: right-click a node on the contour and choose Break, then perform the overlap operation. Next, use Contour > Join to close it again.
- Move all contours that you with to skip into a new element: select the contours and choose Contour > Convert > To New Element and click Create, then activate the previously selected element and perform the overlap operation. Next, activate the Element tool (second arrow), select all elements, choose Element > Contours > Combine to Element, and activate the Contour tool (first arrow).
Fill tool & filter
With the Fill tool, you can non-destructively fill (make opaque) or unfill (make transparent) each area that’s fully enclosed by segments, across all contours in one element — or, if you group multiple elements, across all contours in the group. If you use the Fill tool, FontLab creates a Fill filter if there are any overlaps, or simply reverses a contour if there are no overlaps.
Fill is very intuitive (click to fill, Alt-click to unfill), but it requires you to use the operation on every single enclosed area. The Fill filter is “live” (non-destructive), so you can move the contours around.
However, if you move the contours apart and then back together, the Fill filter won’t recreate the previous state of filled/unfilled areas. The Fill tool may be complex to use in variable fonts, and doesn’t work with components.
As with other filters, you can use Element > Expand Filters to apply the Boolean operations created with the Fill tool, or you can use Remove Filter to restore the original simple contours.
Inverted glyphs with Smart Fill
New You can now easily build “inverted” glyphs such as a transparent letter within a filled circle.
- Choose Element > Element Reference > Add Element Reference and insert an element reference that points to a glyph such as a filled circle.
- Repeat the above to insert a reference to a glyph such as a letter, so that the letter is inside the circle.
- Activate the Element tool.
- Shift-click each element to select.
- Choose Element > Group.
- Activate the Fill tool.
- Alt-click the “letter” element to unfill it.
This now works even if the element that you’re unfilling is a simple contour without any overlaps or intersections. It is necessary to use element references (not components), and to group them. If you have an existing composite glyph where you’d like to apply this technique, use Element > Element Reference > Component to Reference.
Fusion filter
New With the all-new Fusion filter, you can perform live, robust, non-destructive “pathfinding” (Boolean operations) between elements or components.
If you have multiple elements or components in a glyph layer, select an element with the Element tool, and choose a Fusion type from the Element > Fusion menu, from the Element tool Fusion context menu, or from the Fusion type dropdown in the Element tool property bar.
If you apply a Fusion type to an element:
- FontLab puts all elements into a “Fusion group”, which is a filter.
- The element or component which has a Fusion type applied becomes the “fusor”: the instrument that performs the live pathfinding.
- The fusor performs the fusion (live pathfinding) on the “fused” elements, that is: all elements or components that are below it.
If you select parts of a contour with the Contour tool and apply Fusion, FontLab converts the entire selected contour into a separate element, and then makes it a fusor.
Different Fusion types give you different results:
Fusion > Add
New Fusion > Add keeps all filled areas of the fusor of all the fused elements, and removes the overlaps between the fusor and the elements. Some apps call this “Union”.
Like the other Fusion operations, Add is a live, non-destructive operation, and works even between components. The analogical immediate operation between contours within the same element is Contour > Remove Overlap.
Fusion > Subtract
New Fusion > Subtract keeps only the areas of the fused elements that didn’t intersect with the fusor. The fusor’s contours are invisible and only act like a cutter. Some apps call this “Difference”.
The analogical immediate operation between contours within the same element is Contour > Overlap > Subtract.
Fusion > Intersect
New Fusion > Intersect keeps only the areas where the fusor overlaps with the fused elements. The fusor element acts like a clipping/cropping mask.
The analogical immediate operation between contours within the same element is Contour > Overlap > Intersect.
Fusion > Exclude
New Fusion > Exclude keeps only the area where the fusor didn’t overlap with the fused elements. In other words, keeps the unique parts of each element, but removes the part where they intersect. Some apps call this “XOR”.
The analogical immediate operation between contours within the same element is Contour > Overlap > Exclude.
Editing Fusion
Once you have applied Fusion to an element, you can change its Fusion type in the Element > Fusion menu, the Element tool Fusion context menu, the Fusion type dropdown in the Element tool property bar, or using the Fusion type button in the Elements panel.
To change which elements are fused with the fusor, you can drag them in the Elements panel or use the Element > Arrange menu. The Fusion group fuses the fusor element with all elements that are below (in the back of) it. It won’t do anything to elements above the fusor.
Applying Fusion
-
To apply the Boolean operations created with the Fusion filter, and get the resulting contours, use Element > Expand Filters.
-
To restore the original simple contours without applying the filter, use Element > Remove Filter .
-
If you declare any element or component as a fusor and export the font, FontLab will decompose and fuse the contours in the glyph layer. So an easy way to declare a composite glyph as “to be decomposed and overlaps to be removed” at export is to apply Fusion to the topmost component. This works even with scaled or variable components. FontLab will decompose and fuse such components on export even if they don’t overlap.
Clipping Group
New If you have multiple elements and you choose Element > Make Clipping Group, FontLab uses the top-most element as a “clipping mask”. It combines the other elements into a single element, and non-destructively clips the result using the clipping mask.
This is very similar to Fusion > Intersect. Fusion allows more flexibility, but in FontLab 8.2, we’re also keeping Clipping Groups.
Note
In future, we may completely replace Clipping Groups with Fusion.
Text Shape
New The new text shape element is similar to a component, but you can typeset a word or a whole line of text using the current font and layer, at a specified UPM size, and use the resulting contours in a glyph.
To add a text shape element, choose Element > New > Text Shape. Then, use the property bar to:
- enter the text: you can use the glyphtext notation like
L/odieresis/f_f el - choose the font size in UPM: use the size specified in Font Info > Family Dimensions > Units Per eM to use the original size of the glyphs
- change tracking
The content of the text shapes does not automatically update when you change the original glyphs. To update the content of a text shape, select the element and in the property bar choose Refresh.
Note
Text Shape elements are similar to the Text sub-tool of the Paint toolbar in FontLab Studio 5. However, in this version, Text Shape can only typeset texts using the current font and layer.
Elements
Easier switching of the active element
If you have multiple elements in the layer, and you want to switch to between elements, you can click the filled area of another element to make active.

New If you turn on Preferences > Editing > Activate element on double-click, simple click will keep the current element active, and to switch to another element, you need to double-click its filled area.
Contour > Convert > To New Element…
New Contour > Convert > To New Element… moves the selection to a new element. You can give the new element a name: it then appears in the Gallery panel, and can be used as element reference in other glyphs.
Contour > Convert > Detect Element Reference
New If you select some contours in the Glyph window and choose Contour > Convert > Detect Element Reference, FontLab searches the current layer in all glyphs to find these contours, and replaces these contours in all glyphs with references that point to a common element.
If you already have an isolated element and wish to link it with other identical elements, choose Element > Element Reference > Link Reference.
To quickly connect all occurrences of a contour in the current layer of all glyphs, first select the contour and choose Contour > Convert > To New Element…, give it a name, and then choose Contour > Convert > Detect Element Reference.
Elements panel
New The Elements panel hides the sorting buttons for elements if only one element exists in the layer, and for contours if only one contour exists in an element. #6132
New If you apply some filters, the Elements panel shows new icons for:
- smart corner
- smart fill
- clipping group
- glued group
- glued element
- power brush
- power stroke
- skin
If you select a component, the bottom details section of the Elements panel shows the name of the source glyph. New Click the g button to open the source glyph in the Glyph window next to the composite glyph that uses the component.
New The icons for open and closed contours in the Elements panel are updated, some icons are slightly larger.
New Some filters in the Elements panel are indicated by an icon, not by a text label.
New Click the downward arrow on the right side of the Live rotation or Live slant field to open a visual control. Drag the arrow in the control to adjust the transformation.
Preview popup for contours and elements

New If you hover over a contour or element thumbnail in the Elements panel, FontLab now shows a popup that previews the contour or element at 200 PPM (pixels-per-em). This is helpful if, for example, you have multiple elements or contours in the glyph that are visually similar.
Copy-paste live transformation between elements
In FontLab, you can apply non-destructive live transformation to elements, including components. The element transformation is applied “outside” the element, and does not change the content of the element. To apply element transformation, you can use the Elements panel or the transformation tools like Free Transform, Scale, Rotate etc. if the Element tool is active.
New You can now use the new Edit > Copy Element’s > Transformation command or to the new Copy element transformation button in the Elements panel to copy the current element’s transformation (position, live scale, live rotation and live slant).
You can then select another element and choose Edit > Paste to apply the copied transformation to that element.
Element references and filters
When you apply a filter like Delta, Skin, Fill, Glue, Power Brush or Power Stroke to an element reference, FontLab by default applies the filter “inside” the element, so the result of the filter is visible in all element references. This is not always desired.
New You can now use the two commands in the Element > Element References menu to change this behavior.
- Select an element reference that has filters applied and choose Unlink Filter: FontLab will apply the filter “outside” the current element, and will remove the filter from other references that point to the current element.
- Select an element reference that has unlinked filters and choose Link Filter: FontLab will apply the element’s filters “inside” the element, so their results will become visible in all references that point to the current element.
Adding element references
New When you add or paste an element reference, FontLab now always inserts it as an unlocked element, so you cannot edit its content in-place.
If you turn on Preferences > Operations > Element references > Lock all element references except the primary element and insert an element reference from the Gallery panel or using Element > Element Reference > Add Element Reference, FontLab will insert it as a locked element. To edit the element content in-place, turn off Element > Locked.
Element tool context menu
New If you use the Element tool on a blank glyph (where the current layer has no content), right-click now opens a context menu with relevant commands. Previously, the context menu was only available if the glyph had content.
Automatic detection of composites and element references
If you choose Font > Detect Composites, FontLab will analyze the current master and will replace repeating contours (and contours enclosed in them) with either components (if it finds an appropriate standalone glyph) or element references (if the repeating portion does not occur by itself). New This operation now works more reliably.
If you don’t want element references, first go to any glyph where the contours occur, select them and choose Contour > Convert > To New Component, and give it a name. Then run Font > Detect Composites, and the same contours in all glyphs in the current master will be replaced by components that point to the new glyph.
To only replace a single selection with a component, use Contour > Convert > Detect Component.