
New in FontLab 8: Edit & refine
Reshape curves, splice contours and fill segments with clever Contour, Knife and Fill tools. Drag points while others follow intelligently with Nudge and Power Nudge. Move nodes precisely without zooming in using the innovative Lever. FontLab editing tools let your creativity flow.
New in FontLab 8: Make slanted selections, keep selections as you switch masters, and store them in Selections panel. Use toolbox for hands-free Power Nudge, handle Nudge and Lever precision dragging, and for easier curve cleanup with Eraser. Adjust curve tension numerically. Align and collapse points. Reverse contours with Fill tool. Sort contours. Paste to replace selection. Fine-tune individual ink traps and smart corners.
New In the Elements panel in FontLab 8.3, you can hover to quickly see a single contour or element. Numerical rotation inputs in various UI elements behave more consistently.
Selecting contours
Add node to selection on Shift-drag preference
New Preferences > Editing > Add node to selection on Shift-drag is turned off by default, so if you have one or more nodes or handles selected, and you Shift-drag a non-selected node or handle, FontLab deselects the previous selection, no matter if you hold Shift before or after you’ve held the mouse button and started dragging. To add to the previous selection, Shiftclick the point first, then Shiftdrag it.
Turn on the preference, and if you hold Shift, then hold the mouse button and start dragging the point, FontLab will add that point to the selection. To deselect the previous selection, first hold down the mouse button, then hold Shift and then start dragging.
Selecting entire contours
With FontLab, you have a few ways to select the entire contour with the Contour tool:
- Double-click the contour outline (but not a node or handle) to select that contour. Note: We recommend the other methods because if you don’t double-click precisely, you may inadvertently move the contour by a small distance.
- Alt-click or Cmd-click the canvas near the contour outline to select the nearest contour.
Rectangular marquee selection
- New On macOS, hold Cmd as you drag the rectangular marquee around one or more nodes to select the entire contour that the node belongs to.
- New on Windows, start dragging the rectangular marquee, then hold Alt and select one or more nodes or handles to select the entire contour they belong to.
If you also hold Ctrl as you select, the rectangular selection becomes horizontally slanted (rhomboid).
Lasso selection
New Hold AltCmd AltCtrl as you drag the lasso (freeform selection) around some nodes or handles to select the entire contour they belong to.
Select All for components and elements
New If the Contour tool is active, Edit > Select All now selects all components in the current layer of a composite glyph. If the Element tool is active, Select All now selects all components and elements in the current glyph layer.
Switching masters now keeps the contour selection
New If you select points or segments in one glyph layer, and switch to another matching master layer, FontLab recreates the corresponding selection.
Slanted marquee selection
New If you’ve started dragging your pointer from the canvas to perform a rectangular selection, you can now hold Ctrl and continue dragging to slant the rectangular selection. Release Ctrl and continue dragging to resize the selection. Release the mouse button to complete the selection.
Store contour selections in Selections panel
Selecting particular nodes, handles or segments, especially in complex glyphs, can be tedious. New You can now use the new Selections panel to store and recreate (re-select) selections within the current glyph and all matching master layers.
Select some nodes, handles or segments, click Add on the Selections panel, optionally type the selection name, and press Enter. FontLab now stores the selection in the Selections panel for this glyph, and saves it in the VFC/VFJ.
If you navigate to another glyph, the Selections panel loads the stored selections for that glyph, if any.
If you want to re-select the same nodes, handles or segments in a given glyph, navigate to that glyph and click one of the stored selections in the panel.
If the master layers in a glyph are matching, you can re-select any stored selection in any of the matching master layers.
If you activate one of the stored selections, then in Glyph window make another selection, click the Update button in the panel to replace the store the current selection under the activated name and forget the previous stored selection. Click the Remove button to remove a stored selection from the current glyph.
Note
The Selections panel only stores the selection that you make in one glyph layer. You cannot store selections made across glyphs (if Edit Across Glyphs is turned on), or across multiple layers (if Edit Across Layers is turned on).
Separate undo step for (de)selections
New If you select or deselect points and contours in the Glyph window, FontLab now records this as a separate Undo step.
For example, if you select nodes and move them, and then chose Edit > Undo, FontLab now moves the nodes back but keeps them selected. Previously, Undo caused FontLab to go back to the state before the selection.
Also, if you select some nodes and then click away to deselect, you can now choose Edit > Undo to get the selection back.
Select all Tunni lines
New If View > Tunni Lines is turned on, you click a Tunni line and choose Edit > Select All, FontLab now selects all Tunni lines in the current element. Previously, Select All selected the contours even if the Tunni line was active.
Contour tool (A key)
With the Contour tool, you can achieve different goals when you click, double-click or drag a node, handle or segment, and additional functionality is available if you hold Shift (typically aligns to horizontal or vertical), Ctrl (typically disables snapping), Alt (various alternate functionality) and, on macOS, also Cmd. Yet different functionality is accessible when you hold multiple modifier keys.
New The Contour tool now has a toolbox. If the toolbox is not visible, double-click the Contour toolbar icon. The toolbox has five toggles: Power nudge, Nudge, Harmonized drag, Slide and Lever. The first four toggles are mutually exclusive.
Power Nudge: adjust contours smartly
Power Nudge is FontLab’s unique mode of contour editing. If you select and move some nodes, FontLab automatically determines which nodes are static, so they stay in place, and which nodes become “virtual servant nodes”, so they nudge (move proportionally).
To permanently turn Power Nudge on or off, tap ShiftC or click its icon in the toolbox. To turn on Power Nudge temporarily, hold C. New Previously, Power Nudge was accessible from the Contour menu. It now is accessible in the Contour toolbox.
New It’s now easy to see if Power Nudge is turned on, and how it will affect each node. If you turn on the setting Preferences > Glyph Window > Show Power nudge status, and you turn on Power Nudge, the Glyph window shows a gray indicator on each node:
- vertical line: the node moves (nudge) horizontally like an X-Servant node if you move other nodes
- horizontal line: the node moves (nudge) vertically like a Y-Servant node if you move other nodes
- rectangle: the node is static: it does not move if you move other nodes

New If you right-click a node and turn on X-Servant or Y-Servant, and then turn on Power Nudge, the explicitly declared servant nodes now behave the same way as virtual servant nodes. So if Power Nudge identifies some nodes as static, but you want them to nudge, turn on their X- or Y-Servant status. Remember: explicitly declared servant nodes nudge even if Power Nudge is off, so you may want to do Contour > Nodes > Clear Genius & Servant after you’re done with power-nudging.
Nudge: proportionally move handles as you drag nodes
In FontLab, Nudge is a way to move a node or selection so that the handles of the adjacent curve segments follow proportionally. Hold CtrlAlt and drag a node or selection to temporarily activate Nudge.
New Turn on the Nudge toggle in the toolbox to permanently activate Nudge. Now, when you drag a selection or move it with the arrow keys, the handles of curve segments adjacent to the selection follow the dragging. You don’t need to hold any modifier keys.
Harmonized drag: adjust segments as you slide a smooth node, pull handles as you move a sharp node
With the Contour tool, you can drag smooth and sharp nodes in a special “harmonized” way. Previously, harmonized dragging was only available on macOS.
If you hold CmdAlt and drag a node:
- If the node is smooth, FontLab changes the surrounding curve segments so that they form a smooth shape, slides the node along and nudges the handles of the surrounding nodes.
- If the node is sharp, FontLab dynamically “pulls” the surrounding handles, so that they point towards the neighboring nodes, producing a harmonized corner.
New Turn on the Harmonized drag toggle in the Contour toolbox, and drag any node without using any modifier keys: FontLab will use harmonized dragging. This now also works on Windows.
Slide: move or extend node along the segment while preserving shape
When you hold ShiftAlt and drag a node, the node “slides” along a curve: moves along the curve while the shape gets preserved. When you drag a sharp node or a start/end node beyond the curve with ShiftAlt, FontLab continues (extends) the curve smoothly.
New Turn on the Slide toggle in the Contour toolbox, and drag any node without using any modifier keys: FontLab will slide the node, and will preserve or continue the curve.
Contour lever: drag precisely
In FontLab, Contour lever is a way to move nodes or handles by a distance that is smaller than the distance of your pointer drag, so you can make precise adjustments without zooming in.
If the Contour lever toggle is turned off in the Contour toolbox, and you drag a node:
- on Windows, hold Ctrl to suppress snapping suggestions and temporarily activate Contour lever (high-precision dragging)
- New on macOS, hold Cmd to suppress snapping suggestions and activate Contour lever, or hold Ctrl to only suppress snapping
If lever is turned on, and you drag a point for a short distance, the point moves by the fraction of the pointer movement that is specified in Preferences > Distances > Contour lever. Drag further and the change gradually matches your pointer movement. Release mouse and drag again to start precision move again.
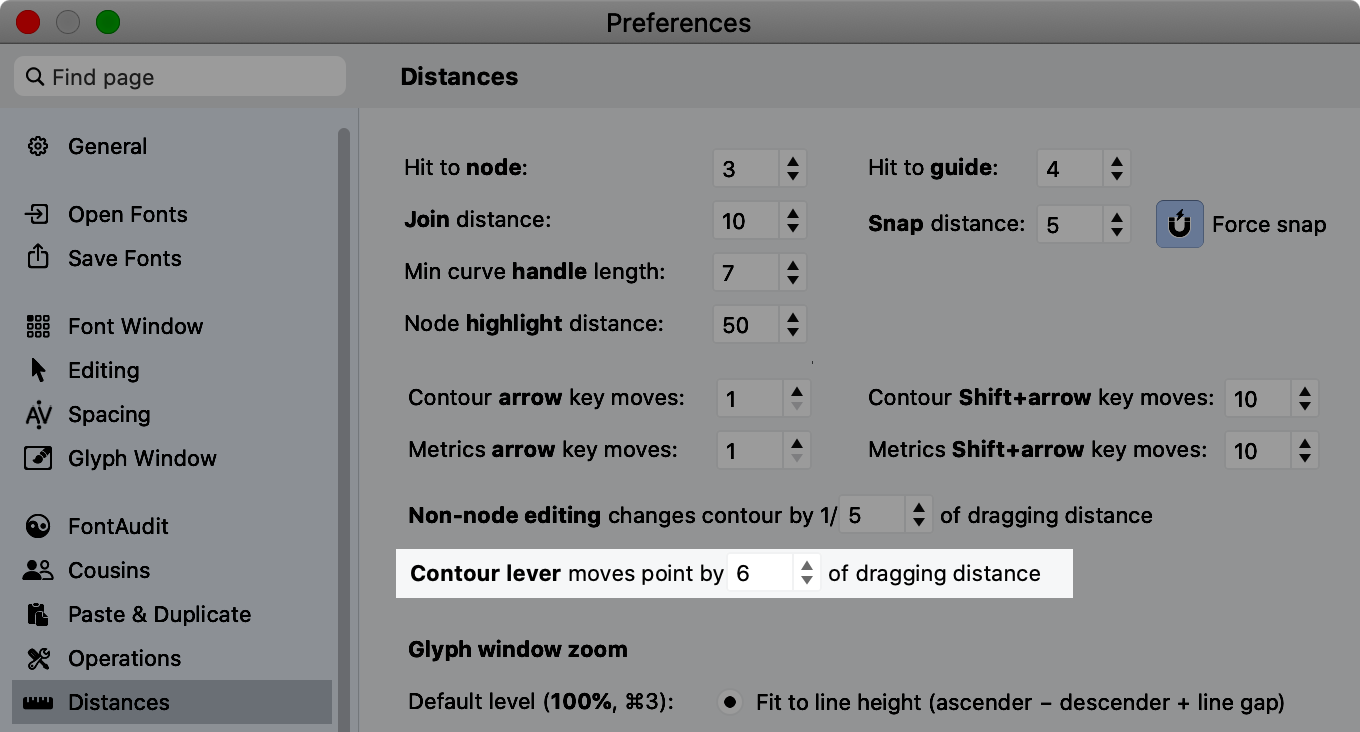
Default value of contour lever is 6. Constant dragging speed is 1. Highest precision at short drags is 10.
New Turn on the Contour lever toggle in the toolbox to permanently activate contour lever: then any drag of nodes or handles over a short distance are high-precision, and you don’t need to hold any modifier keys. If you dislike the Contour lever behavior, set Preferences > Distances > Contour lever to 1.
Curve segments
Numerical adjustment of curve tension in the Node panel
New If you select one or more segments, then in the Node panel, you can use the numeric field to set the desired curve tension for the selected segments, and then click the Set proportional curve tension button. With only one segment selected, this is equivalent to the Balance operation, but if you have multiple segments selected, this sets the same tension to all segments. You can achieve the same result using the Tunni lines, but this method is faster if you know your desired tension.
New You can also enter value for relative change of the tension and use the – and + buttons to decrease or increase the tension of all selected segments by that relative value.
Conversion of line to curve segments
New If you turn a line segment to a flat curve segment using Alt-click or Contour > Convert > To Curve, FontLab now puts the handles at ⅓ length of the line segment, so the resulting handles are a bit shorter than in previous versions. #6267
Nodes and handles
Corner and smooth nodes
In typical font editors and in vector drawing apps, if two segments meet at a node, that node can have one of two types of connections: sharp or smooth. FontLab 8.2 can convert between the two types “eagerly” (affecting adjacent segments), or “lazily” (preserving them).
Sharp connection
With a sharp connection, two segments meet at the node, and you can change the direction of the node’s handles independently.

FontLab calls such a node a Corner node, and indicates it by a square. If you turn on View > Contours > Curvature, the curvature comb on a Corner node between two curve segments will have triangular gap or an overlap.
A node between two line segments is always a Corner node.
Smooth connection
With a smooth connection, two curve segments meet at a node, and the node’s handles always have the same direction. FontLab calls such a node a Smooth node, and indicates it by a circle if the node joins two curve segments.

The curvature comb on a Smooth node between two curve segments has no gap or overlap.
A special type of Smooth node is called a Tangent node: it joins a curve segment and a line segment, it’s indicated by a triangle, and its curve handle has the same direction as the line segment.
Convert between smooth and corner nodes
There are several ways to convert nodes between Corner and Smooth. An “eager” conversion will also convert adjacent segments to curves or lines, while a “lazy” conversion will keep the segments as they are.
- To perform an “eager” conversion of one or more selected corners to Smooth nodes, click the Smooth button in the Glyph window property bar, or choose Contour > Nodes > Smooth. To convert just one corner node to smooth, double-click it. If you eagerly convert a corner node to smooth and back, FontLab will restore the original handle direction.
- To perform an “eager” conversion of one or more selected nodes to Corner nodes, click the Corner button in the Glyph window property bar, or choose Contour > Nodes > Corner. To convert just one Smooth node to Corner, double-click it.
- New To perform a “lazy” conversion of one or more selected nodes from corner to smooth, and from smooth to corner, choose Contour > Nodes > Toggle Smooth. This is most conservative operation: it will flip the corner/smooth status of nodes that are not between two line segments, and will not change the adjacent segment types.
If you prefer to work with the keyboard, you may want to map some of these menu commands to custom shortcuts (this is just a suggestion). Go to Tools > Commands & Shortcuts, turn on the gear icon, type Node: into the search box and then:
- choose Node: Toggle Smooth, click the shortcut box, press Enter and click Set
- choose Node: Corner and assign AltEnter
- choose Node: Smooth and assign CtrlAltEnter
Or you may just assign AltEnter to Node: Toggle Smooth, it’s up to you!
With Contour > Nodes > Detect Smooth, you can convert Sharp nodes that are have collinear handles into Smooth nodes.
Improve smoothness with Harmonize and Genius
A Smooth node ensures that there’s no abrupt change of direction between two curve segments, but there still can be visible “bumps” near the connection. In FontLab, you can increase the smoothness quality of any Smooth node to G2 or G3, which will usually often make the transition between two curve segments more visually pleasing. FontLab 8.2 can either move the node or its handles to increase the smoothness quality.
G2 smoothness
With G2 smoothness, a Smooth node has constant curvature.

The smaller the difference in height between the curvature comb on both sides of the node is, the closer the Smooth node is to G2 smoothness. If there is no height difference, the node is G2-smooth.
A G2-smooth node typically results in a more fluent transition between the segments.
There are several ways to achieve G2 smoothness:
-
Alt-double-click a Smooth node, or select one or more nodes and choose New Contour > Harmonize Nodes, or choose Nodes > Harmonize from the context menu, or click the Make Genius button in the property bar. This will move the Smooth nodes to a new position where the curve segments will join G2-smoothly, and will keep the handles where they were. Previously, this operation was just called Harmonize in the Contour menu.
-
New CtrlAlt-double-click a Smooth node, or select one or more nodes, and choose Contour > Handles > Harmonize, or choose Handles > Harmonize from the context menu. This will move the handles of Smooth nodes to new positions where the curve segments will join G2-smoothly, and will keep the nodes where they were.
-
ShiftAlt-double-click a Smooth node, or select one or more nodes, and choose Contour > Nodes > Genius, or Alt-click the Make Genius button in the property bar. This will perform the convert the Smooth nodes to a new type of node: the Genius node, and move it to a G2-smooth position. A Genius node remains G2-smooth whenever you move the neighboring nodes or handles, as if you’d perform Harmonize Nodes every time on it.
You can also use the Node panel, and actions. With Contour > Nodes > Detect Genius, you can convert Smooth nodes that are already G2-smooth into Genius nodes.
G3 smoothness
With G3 smoothness, the curve segments that join at the Smooth node have smoothly changing curvature.

The more fluent the flow of the curvature comb is, the closer a Smooth node is to G3 smoothness. If there is no sharp kink in the curvature comb, the node is G3-smooth.
Select one or more nodes, and choose New choose Contour > Handles > Superharmonize, or Handles > Superharmonize from the context menu. This will move the handles of Smooth and Genius nodes to new positions where the curve segments will join G3-smoothly, and will keep the nodes where they were.
This will typically standardize the tension of the curve segments, and make them more “round”. Previously, this operation was called Harmonize Handles in the context menu, but now Harmonize Handles does G2-smoothing of an existing node by moving its handles.
Remember: these Harmonize and Genius operations give a certain “mathematical” local smoothness at and around a node. Think of them as quick short cuts, they are not a replacement for your eye. If you use the operations, check if the results are consistent with your design intentions, and use your eyes to judge the overall flow of the curves.
You may use them as a learning tool: harmonize a node or its handles, and see how FontLab places the nodes and handles. Move the nodes and handles, see how the curves change.
Often, a good way to achieve smoothness is to just remove the node — the longer curve segment will naturally flow smoothly. Also, not all typefaces need ultra-smooth curves! Many designs use abrupt changes or conscious bulges and kinks to express the design intent.
Spike nodes
In FontLab, you can “harmonize” a sharp node with Alt-double-click: this sets the angle of the handles around a sharp node to a reasonable value in relation to the previous and next node.
New Now, you can also convert sharp nodes into Spike nodes: select some sharp nodes and in the Node panel, click the Genius button. Then, move a Spike node, and the handles adjust automatically. FontLab shows the handles of a Spike node with a small ×. If you drag a handle of a Spike node, FontLab makes the node a simple sharp node, and you can edit the handles explicitly.
Note
This functionality and its UI is experimental.
Contour > Align Points
New Contour > Align Points is now a submenu that lists all aligning operations that were previously available only in the Transform panel.
New They are also listed in the Tools > Command & Shortcuts dialog, so you can assign custom keyboard shortcuts to them, you can press ShiftCmdP, type Left or Right and choose the command. #6222
New Select multiple anchors, but not nodes or handles, and use the Align Points commands to align them.
Contour > Align Points > Collapse
New If you select multiple nodes and choose Contour > Align Points > Collapse, FontLab moves all the selected nodes to the center of the selection, and reduces the length of the affected curve handles to 0.
Tip
Collapsing points is useful if you work with multiple masters, and one of the masters has less visual details. For example, you may have a serif axis, where in one master you have a stem and a fully-developed serif, and in the other master (the “sans” master), all nodes of the serif portion are collapsed to a single location.
Align points to Guides
New The Contour > Align Points menu has a the command To Guides. It aligns the selected points to the nearest guide. Previously, this command was available as Contour > Snap to Guides.
Unit grid
With Font Info > Family Dimension > Round coordinates, you can control the low-level technical “unit grid” that affects all coordinates: of nodes, handles, anchors, guides etc. If the setting is turned off, all coordinates are fractional, which gives you very high drawing precision. If it’s turned on, the coordinates are integer, so all nodes and handles snap to full units at the precision defined in Font Info > Family Dimensions > Units Per eM. That’s the unit grid: if you have Round coordinates on, all your nodes, anchors and handles will snap to integer coordinates.
New The new unit grid helps find your bearings when you’re working on extremely fine details in high zoom.

Preferences > Grid, Guides and Hints has a new section Unit grid:
- Turn on Show font unit grid, and the Glyph window will show gridlines for every unit at high zoom levels. This is indepedent of the regular grid.
- Use the Pixel size box to choose when the grid appears. The value is the minimal pixel distance which one font unit corresponds to. The higher the value, the higher the zoom level must be for the unit grid to appear. For example, if the value is 10, the grid appears when the zoom level causes one font unit to be drawn 10 or more pixels apart.
Align points to Grid
In Preferences > Grid, Guides and Hints, you can also set up a high-level grid that is much more flexible, and which affects nodes, guides and anchors, but not handles and TrueType off-curve points. Set the horizontal and grid line distances, and a slant angle, and customize what the grid will look like in the Glyph window if View > Measurements > Grid is turned on (you can make it fully transparent).
The Preferences > Grid, Guides and Hints page also has a very important Round nodes, guides and anchors to grid points setting, which decides how “greedy” the grid snapping is:
- If it’s turned off, the grid snapping is “soft”: a node, guide or anchor will snap to the closest grid point only if it’s within the distance defined in Preferences > Distances > Snap distance.
- If it’s turned on, the grid snapping is “hard”: a node, guide or anchor will always snap to the closest grid point.
But how do you get the items to snap? There are three ways:
- If you move the node, guide or anchor, it will snap to the grid if View > Measurements > Grid is turned on and View > Snap > Grid is turned on (if either of those is turned off, it will not snap).
- New The current Glyph window selection or all nodes, guides and anchors will snap to the grid if you choose Contour > Align Points > To Grid.
- New All nodes, guides and anchors in the affected glyphs and layers will snap to the grid if you choose Tools > Actions > Contour > Align to grid.
The snapping will always be soft or hard, depending on the Preferences > Distances > Snap distance setting.
Note
The handles and TrueType off-curve points will never snap to the high-level grid. This is by design, and it’s actually great. The nodes, guides and anchors are responsible for the visual consistency of your glyphs. But the handles and off-curve points are responsible for the precision of the curve shapes, and you almost never want the odd visual bumps that their snapping would cause. If you really want the handles to snap, change the Font Info > Family Dimensions > Units Per eM value to something much lower, with scaling.
Tip
Automatic grid snapping with Tools > Actions > Contour > Align to grid is a great way to “regularize” or “quantize” your design, whether you’re cleaning up autotraced glyphs or a making a small optical size.
Align points to Mask

New The Contour > Align Points menu has a new command To Mask. It aligns the selected points to the nearest points in the Mask layer they’re within the distance of 50 units.
Customize the distance from your pointer at which FontLab shows nodes and handles if they are hidden
If you turn off View > Show > Handles, FontLab hides all handles on curve segments. If you also turn off View > Show > Nodes, FontLab renders all nodes as tiny. If you move your pointer near a node or a handle or its control vector, FontLab highlights (shows) the node and the handles associated with the node.

New Now, with Preferences > Distance > Node highlight distance, you can change the distance from your pointer at which FontLab highlights nodes and handles. If you have complex contours with many nodes, you may set the distance lower than the default 50 to reduce the visual clutter.
This setting has no effect if both Nodes and Handles are turned on in View > Show.
Lock the outline to disable manual editing of points and contours
New If you turn on View > Lock > Outline or the Lock toggle in the Outline row of the View panel top section, a lock icon appears in the top-left corner of the Glyph window.
This means that the outlines in the font are locked for manual editing: you cannot move the nodes, handles, segments or elements in the Glyph window, and you cannot perform contour-editing operations from the Contour menu. This is useful if you want to prevent accidental modification of your contours.
If the outline is locked, you can still work with guides, anchors, hints, etc., and you can modify the contours using Tools > Actions. #6155
Slide node with arrow keys
New If you turn on the Slide sub-tool in the Contour toolbox and activate a single node, you can use the arrow keys to slide the node along the curve.
Transform a single node
New If you select a single node that has adjacent handles (so it’s between one or two curve segments), and you use Tools > Free Transform (CmdT CtrlT), FontLab will let you transform the node and the handles. Previously, you had to explicitly select the handles with Alt-marquee.
Contours
Quickly reverse contour direction with Fill tool
New If you activate the Fill tool (F key), you can hold Shift and click any contour to reverse its direction.
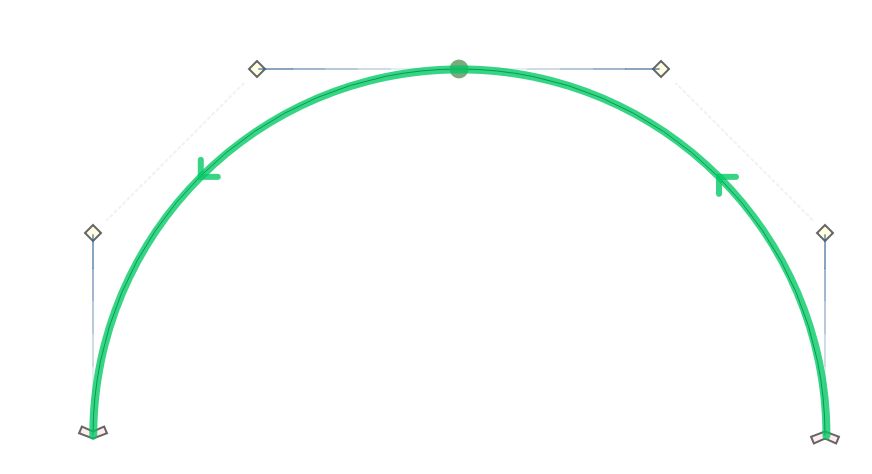
To do it quickly on one contour, hold F, then hold Shift while holding F, then hover over a contour and click it. A green outline appears with arrows that indicate the direction. Release both Shift and F to return to the previous tool.
To reverse the direction of multiple contours, tap F to activate the Fill tool permanently. Now hold Shift and click the contour to reverse its direction. Navigate to other glyphs and masters, and Shift-click again. Tap A to return to the Contour tool.
Element > Contours > Sort
New If your glyph layer (or current element) has multiple contours, you can now use the commands from the Element > Contours submenu to automatically change their internal order (sort them). #5472
Sort Vertically: sorts the contours by the top sides of their ink bounding boxes (makes the contour with the smallest topmost Y-coordinate first)
Sort Horizontally: sorts the contours by the left sides of their ink bounding boxes (makes the contour with the smallest leftmost X-coordinate first)
Note
The Elements panel shows the contours and elements in the stacking order, so the first element is at the bottom of the list of elements, and the first contour within an element is at the bottom of the list of contours. Use the buttons at the top of the Elements panel or use drag-drop to reorder contours manually.
Contour start and end nodes show contour direction
New If you have an open contour, the shape of the start and end nodes now shows the contour direction: they’re shaped slightly like an arrow, so you know which node is the “start node” and which one is the “end node”.
Nodes at Extremes
New When FontLab puts nodes at extremes (via Contour > Nodes at Extremes, or via Tools > Actions or on export), it now puts them at extremes if the existing nodes are closer to actual extremum. #6240
Paste to replace selection
If you select a series of continuous segments that belong to one contour, copy them with Edit > Copy, then go to another glyph, select one or more continuous segments and choose Edit > Paste:
- New If the new Preferences > Editing > Contour paste replaces continuous selection is turned on, FontLab replaces the current selection with the copied contours.
- If the preference is off, FontLab adds the copied contours as new contours in the current element, like in previous versions.

Note
This new workflow is a quick and effective way to make changes to a recurring design element, such as a serif. There are more sophisticated mechanism such as Edit > Find Outline, segment components, or Glue filter with element references — but the above workflow is very simple and intuitive if you’re only making few adjustments.
Number of nodes and points in a contour

New Each contour in the Elements panel now shows the total number of points in the contour followed by the number of nodes (on-curve points). For example, a typical circle shows 12/4: the contour has 12 points in total, out of which 4 are nodes (and 8 are handles).

Fractional coordinates
If you work with fractional coordinates, you can use Contour > Coordinates > Apply Rounding to round all coordinates in the current layer to integer values.
New Use Contour > Round to Integers to only round coordinates of the selected nodes or handles. (TODO: In future versions, this menu item will be placed in Contour > Coordinates > Round Selection.)
Node names
In FontLab (and also in formats such as UFO) a node can have an optional name. Node names are useful if some other constructs need to refer to them.
Hidden node names
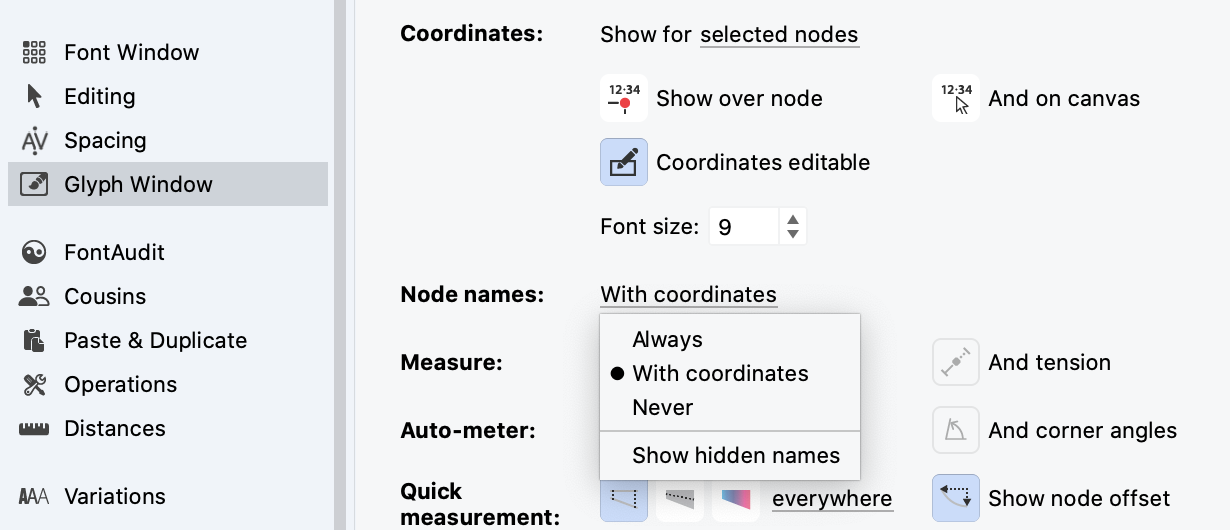
New In FontLab 8, if the name of a node starts with a period ( . ), the name is treated as “hidden”, and FontLab can ignore it when it displays other node names on the Glyph window canvas. In the Preferences > Glyph window > Node names dropdown, you can decide when the Glyph window canvas shows the node name (if that node has a name):
-
Always always shows the name for nodes that have one
-
With coordinates shows the node name if you turn on View > Show > Coordinates and the Glyph window shows the coordinates of the node
-
Never doesn’t show node names in the canvas
New This dropdown now has an extra checkbox: Show hidden names. If you turn it on, the Glyph window also shows the node names that are prefixed with . , but if you turn it on, those names won’t be shown.
Regardless of the above settings, FontLab always shows the name of the node in the Node panel and shows all node names in the Source panel.
Usage of node names
In traditional apps like FontLab Studio 5, constructs like TrueType Hinting commands referred to the index of a node in the contour, so if you added or removed nodes, your TrueType Hinting program could become invalid. In FontLab VI and newer, TrueType Hinting commands refer to node names. This makes the TTH programs more robust: it survives removing overlaps or converting from PS to TT curves, and you can use Paste Special to transfer visual TTH programs to similar glyphs, even in different fonts.
If you add TTH commands in the TrueType Hinting tool or use Tools > Actions > Hinting > TT Autohint, FontLab adds names to some nodes. New FontLab 8 now builds “hidden” node names in this case, like .av01 . FontLab 8 also adds “hidden” node names like .sk01 if you use the skin shape filter.
If you open an older VFC/VFJ file in FontLab 8 that uses TTH commands, the nodes are “visible” i.e. they don’t have the . prefix. New You can use Tools > Actions > Hinting > Reassign node names: this converts the visible node names used by TTH commands into hidden node names, and updates the TTH program. #5799
Scale paths to same width or height
New You can now scale paths to a desired width or height.
Note
A path is a continuous series of segments that belong to the same contour. So a path can be one segment, several adjacent segments, or an entire contour.
Scaling to largest path

If you select several paths, you can use the menu commands in Contour > Align Points to scale all selected paths to the largest path:
- New Same Width proportionally scales each path to the largest path width
- New Same Width Only non-proportionally scales each path’s width to the largest path width, keeping the height
- New Same Height proportionally scales each path to the largest path height
- New Same Height Only non-proportionally scales each path’s height to the largest path height, keeping the width

FontLab scales each path around its center. This works even for selections made across multiple glyphs if Edit > Edit Across Glyphs is turned on, and for selections made across masters if Edit > Edit Across Layers is turned on.
Scaling to advance width or font dimension
If you select one path (contour portion or entire contour):
- New Same Width proportionally scales the path to the advance width
- New Same Width Only non-proportionally scales the path’s width to the advance width
- New Same Height proportionally scales the path to x-height, or to caps height if the glyph represents an uppercase letter
- New Same Height Only non-proportionally scales the path’s height to x-height or caps height
Transform panel
FontLab applies Transform panel transformations to contours or elements. If you apply the Transform panel transformation:
- in the Glyph window to a Contour tool selection, FontLab applies the transformation to the contours, and performs rounding to integer coordinates if Font Info > Family Dimensions > Round coordinates is on.
- in the Glyph window to an Element tool selection, FontLab applies the transformation as a live element transformation. To apply the transformation to the contours, choose Element > Expand Transformation.
- in the Font window to a glyph layer that is not used as a component or does contain element references, FontLab applies the transformation to the contours.
- in the Font window to a glyph layer that is a source of a component, or contains element references, FontLab applies the transformation as a live element transformation.
Vertical slant
New You can now perform vertical slant transformations in the Transform panel. To see the Vertical slant box, make the Transform panel wider.
Increased precision
New The Transform panel now accepts values at higher decimal precision, which is useful for precise slant or rotation.
Eraser tool (2)
New Eraser (2 key) tool has a toolbox. Double-click the Eraser toolbar icon to open the toolbox. Click the icons in the Eraser toolbox or repeatedly tap the 2 key to toggle between the “universal” Eraser mode (all toolbox icons are off), and the specialized sub-tools (Simple Eraser, Lasso eraser, Simplify path).
You can also use the context menu to choose the universal Eraser mode, or a specialized sub-tool.
Universal Eraser
If Eraser is active in the context menu, or if all sub-tools of the Eraser toolbox are turned off, the Eraser tool works in “universal mode”:
- without any modifier keys, it behaves like Simple Eraser
- if you hold Alt, it behaves like Lasso Eraser
- if you hold Ctrl, it behaves like Simplify Path
Simple Eraser sub-tool
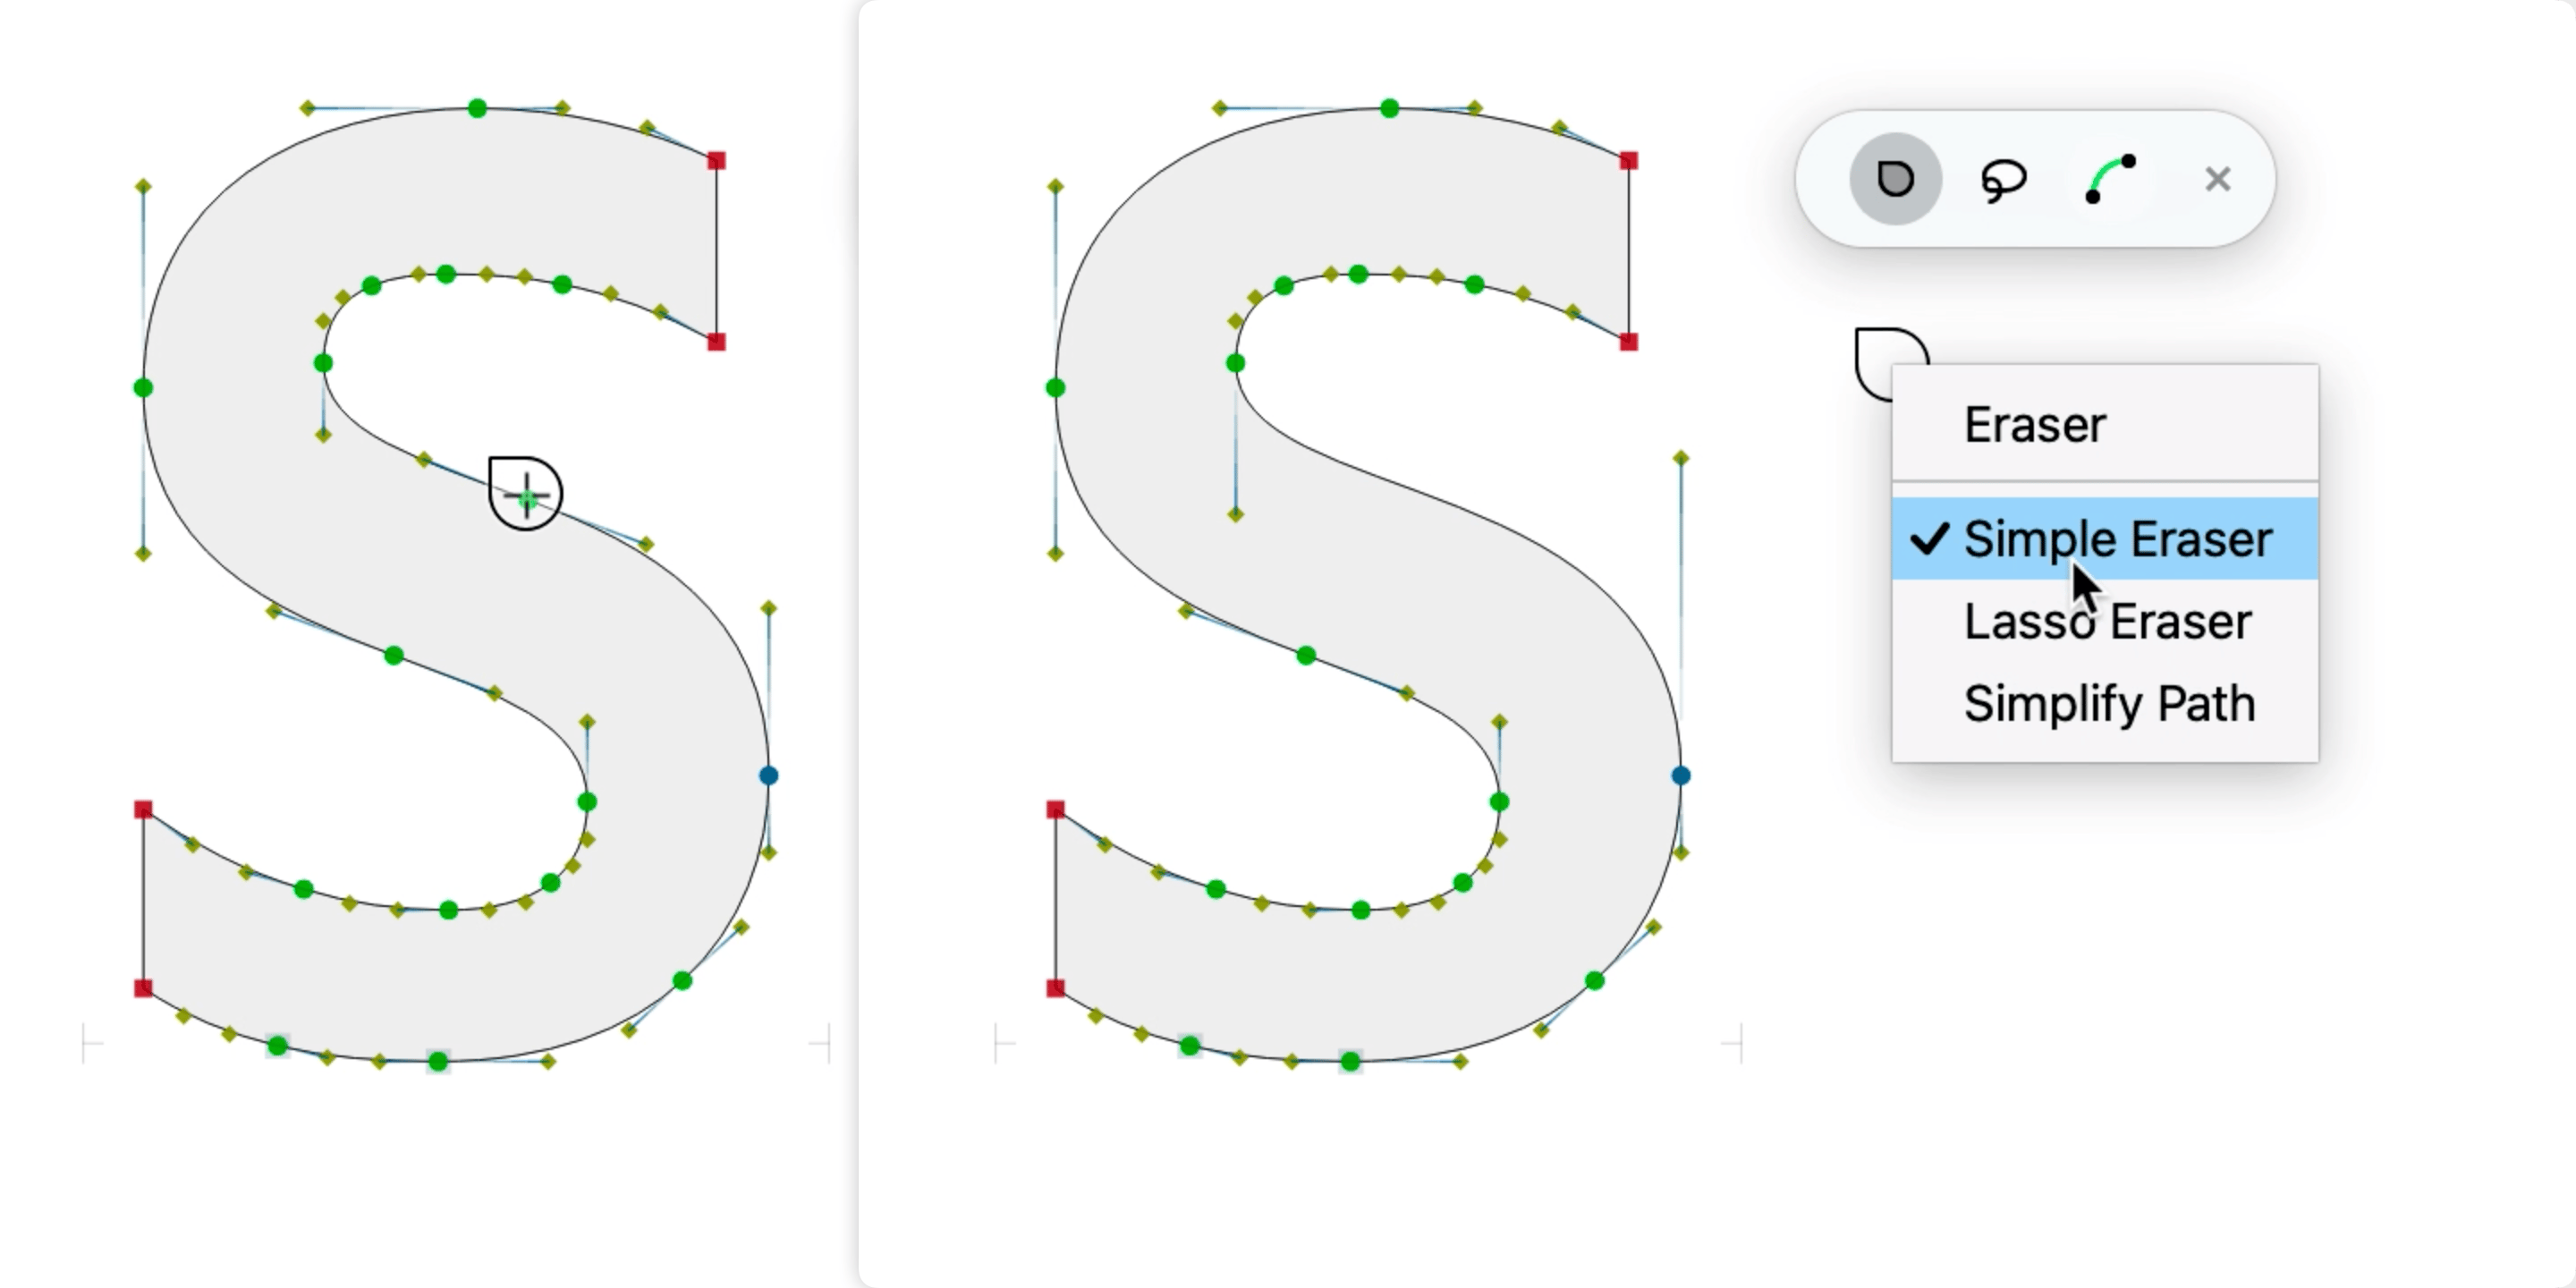
If Eraser or Simple Eraser is active in the context menu, or Simple Eraser is active in the toolbox, or if no sub-tools are active in the toolbox:
- Click or drag over nodes and handles to remove the points within the eraser radius. Hold Shift to keep key nodes.
- Alt-click a segment to break the contour and remove the segment.
- Alt-click a node to break the contour and remove the two adjacent segments.
To resize the eraser radius, Ctrl-drag on the canvas or New right-drag.
Lasso Eraser sub-tool
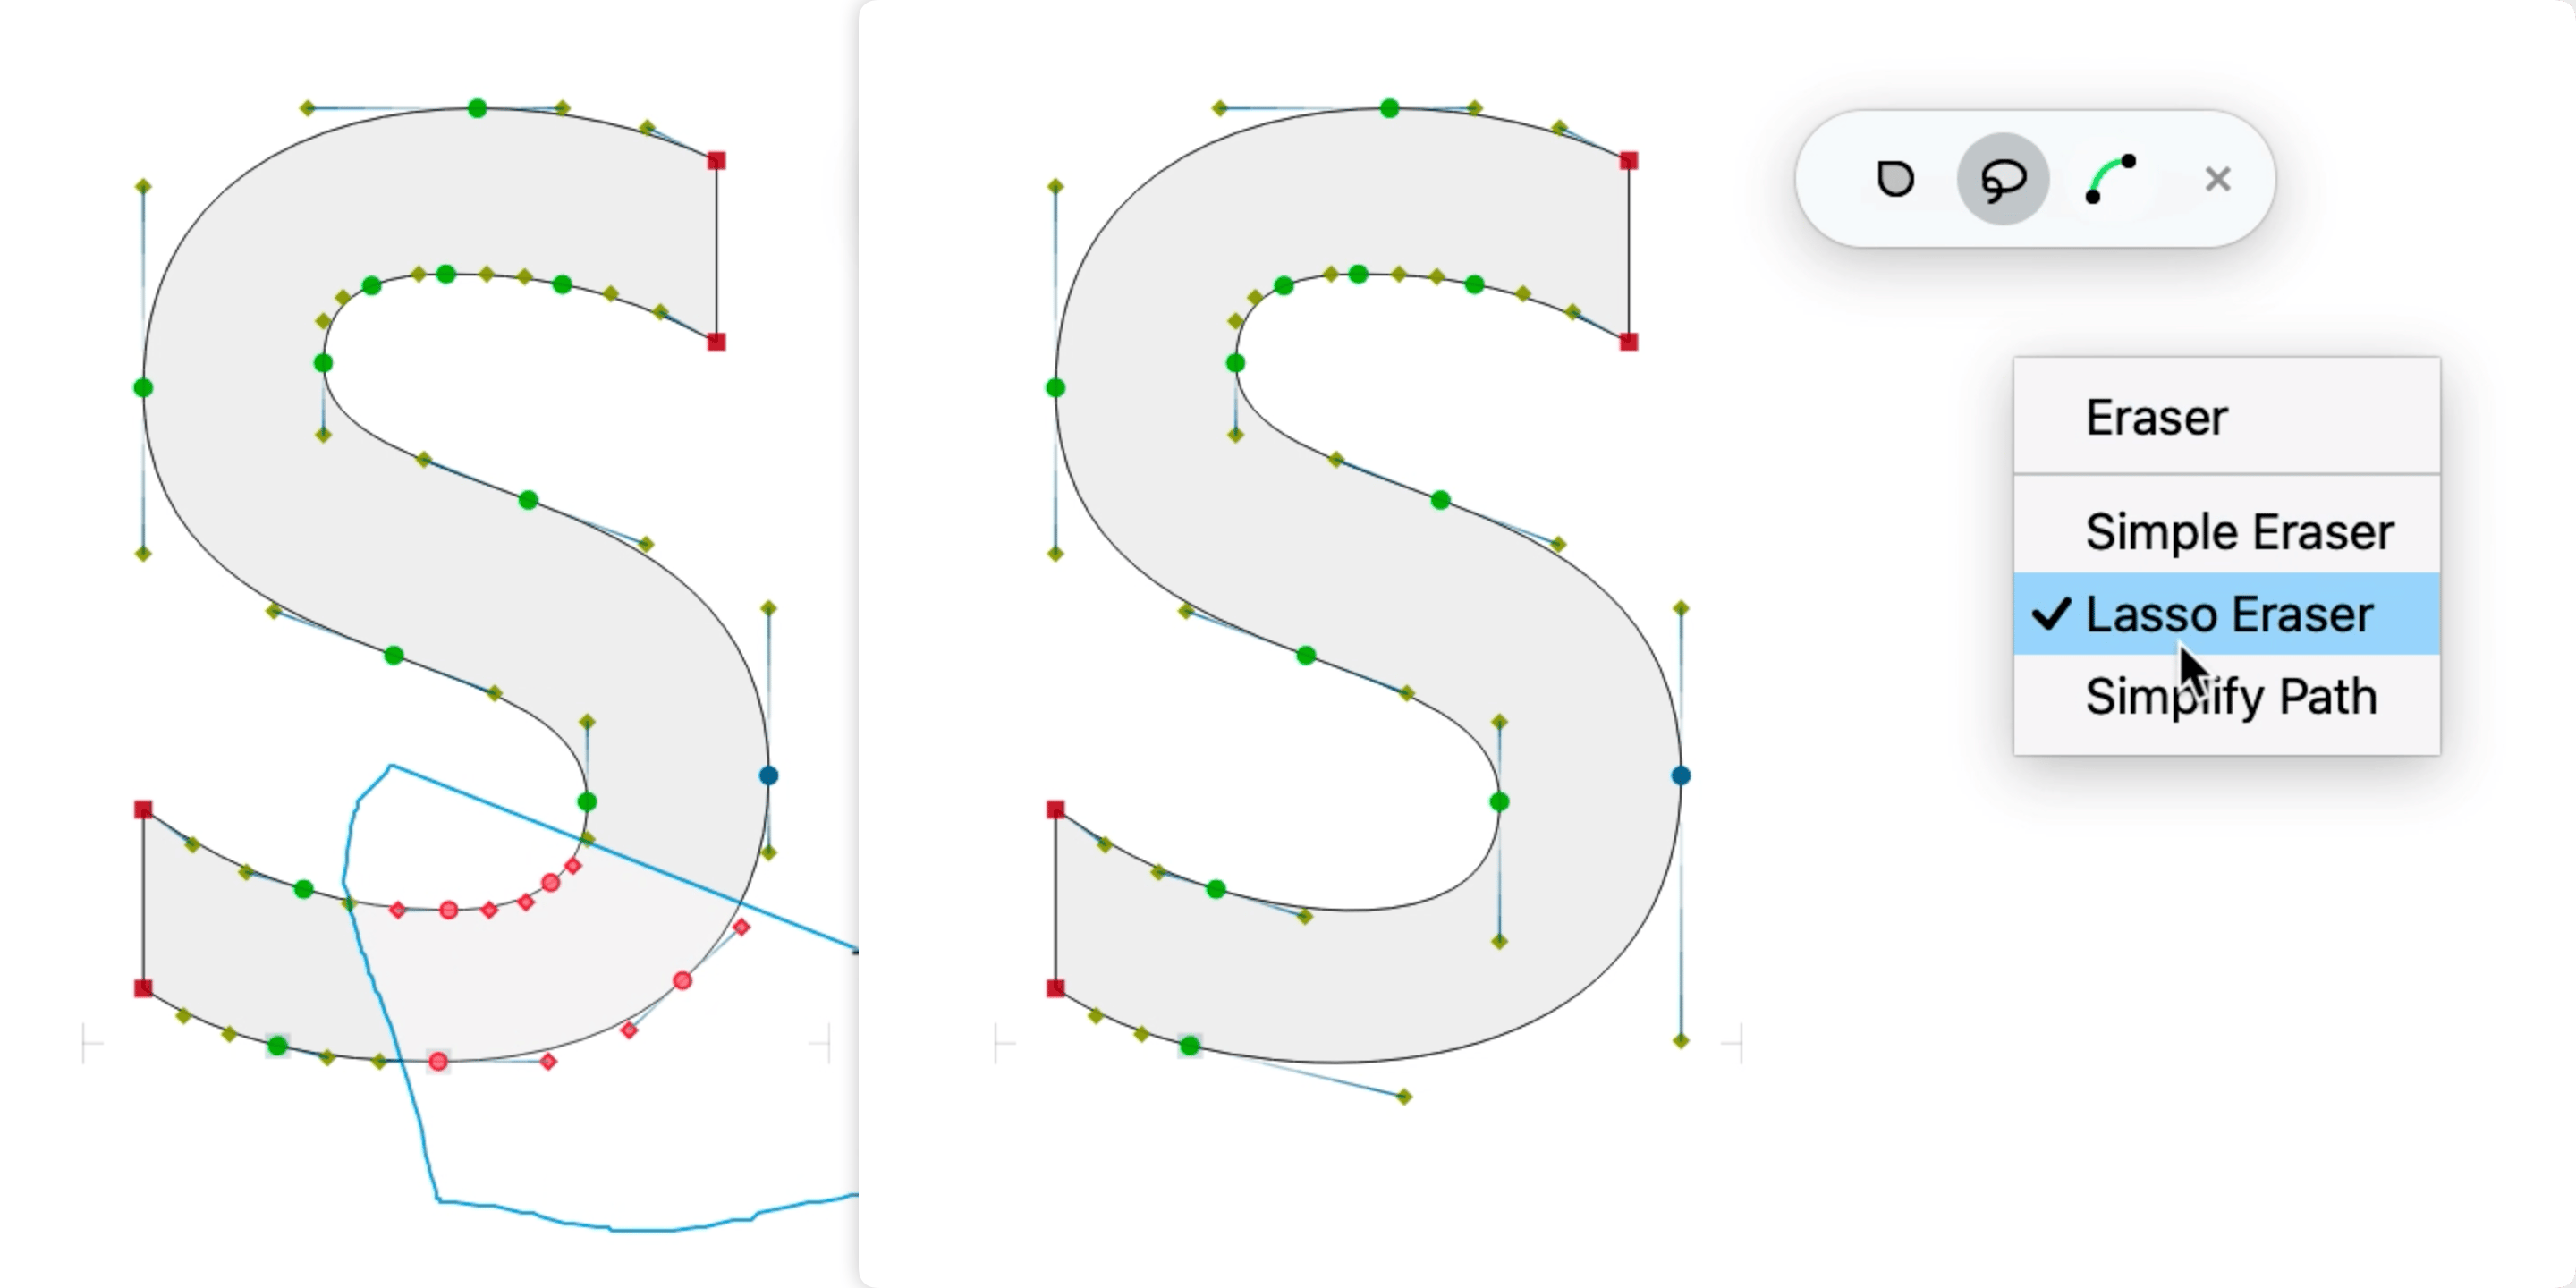
If the Lasso Eraser sub-tool is active in the context menu or toolbox, of if you hold Alt in universal Eraser:
- Drag on canvas to “draw” a freeform selector, release the mouse button to remove all nodes inside that selector.
- Hold Shift as you drag to keep key nodes.
Simplify Path sub-tool
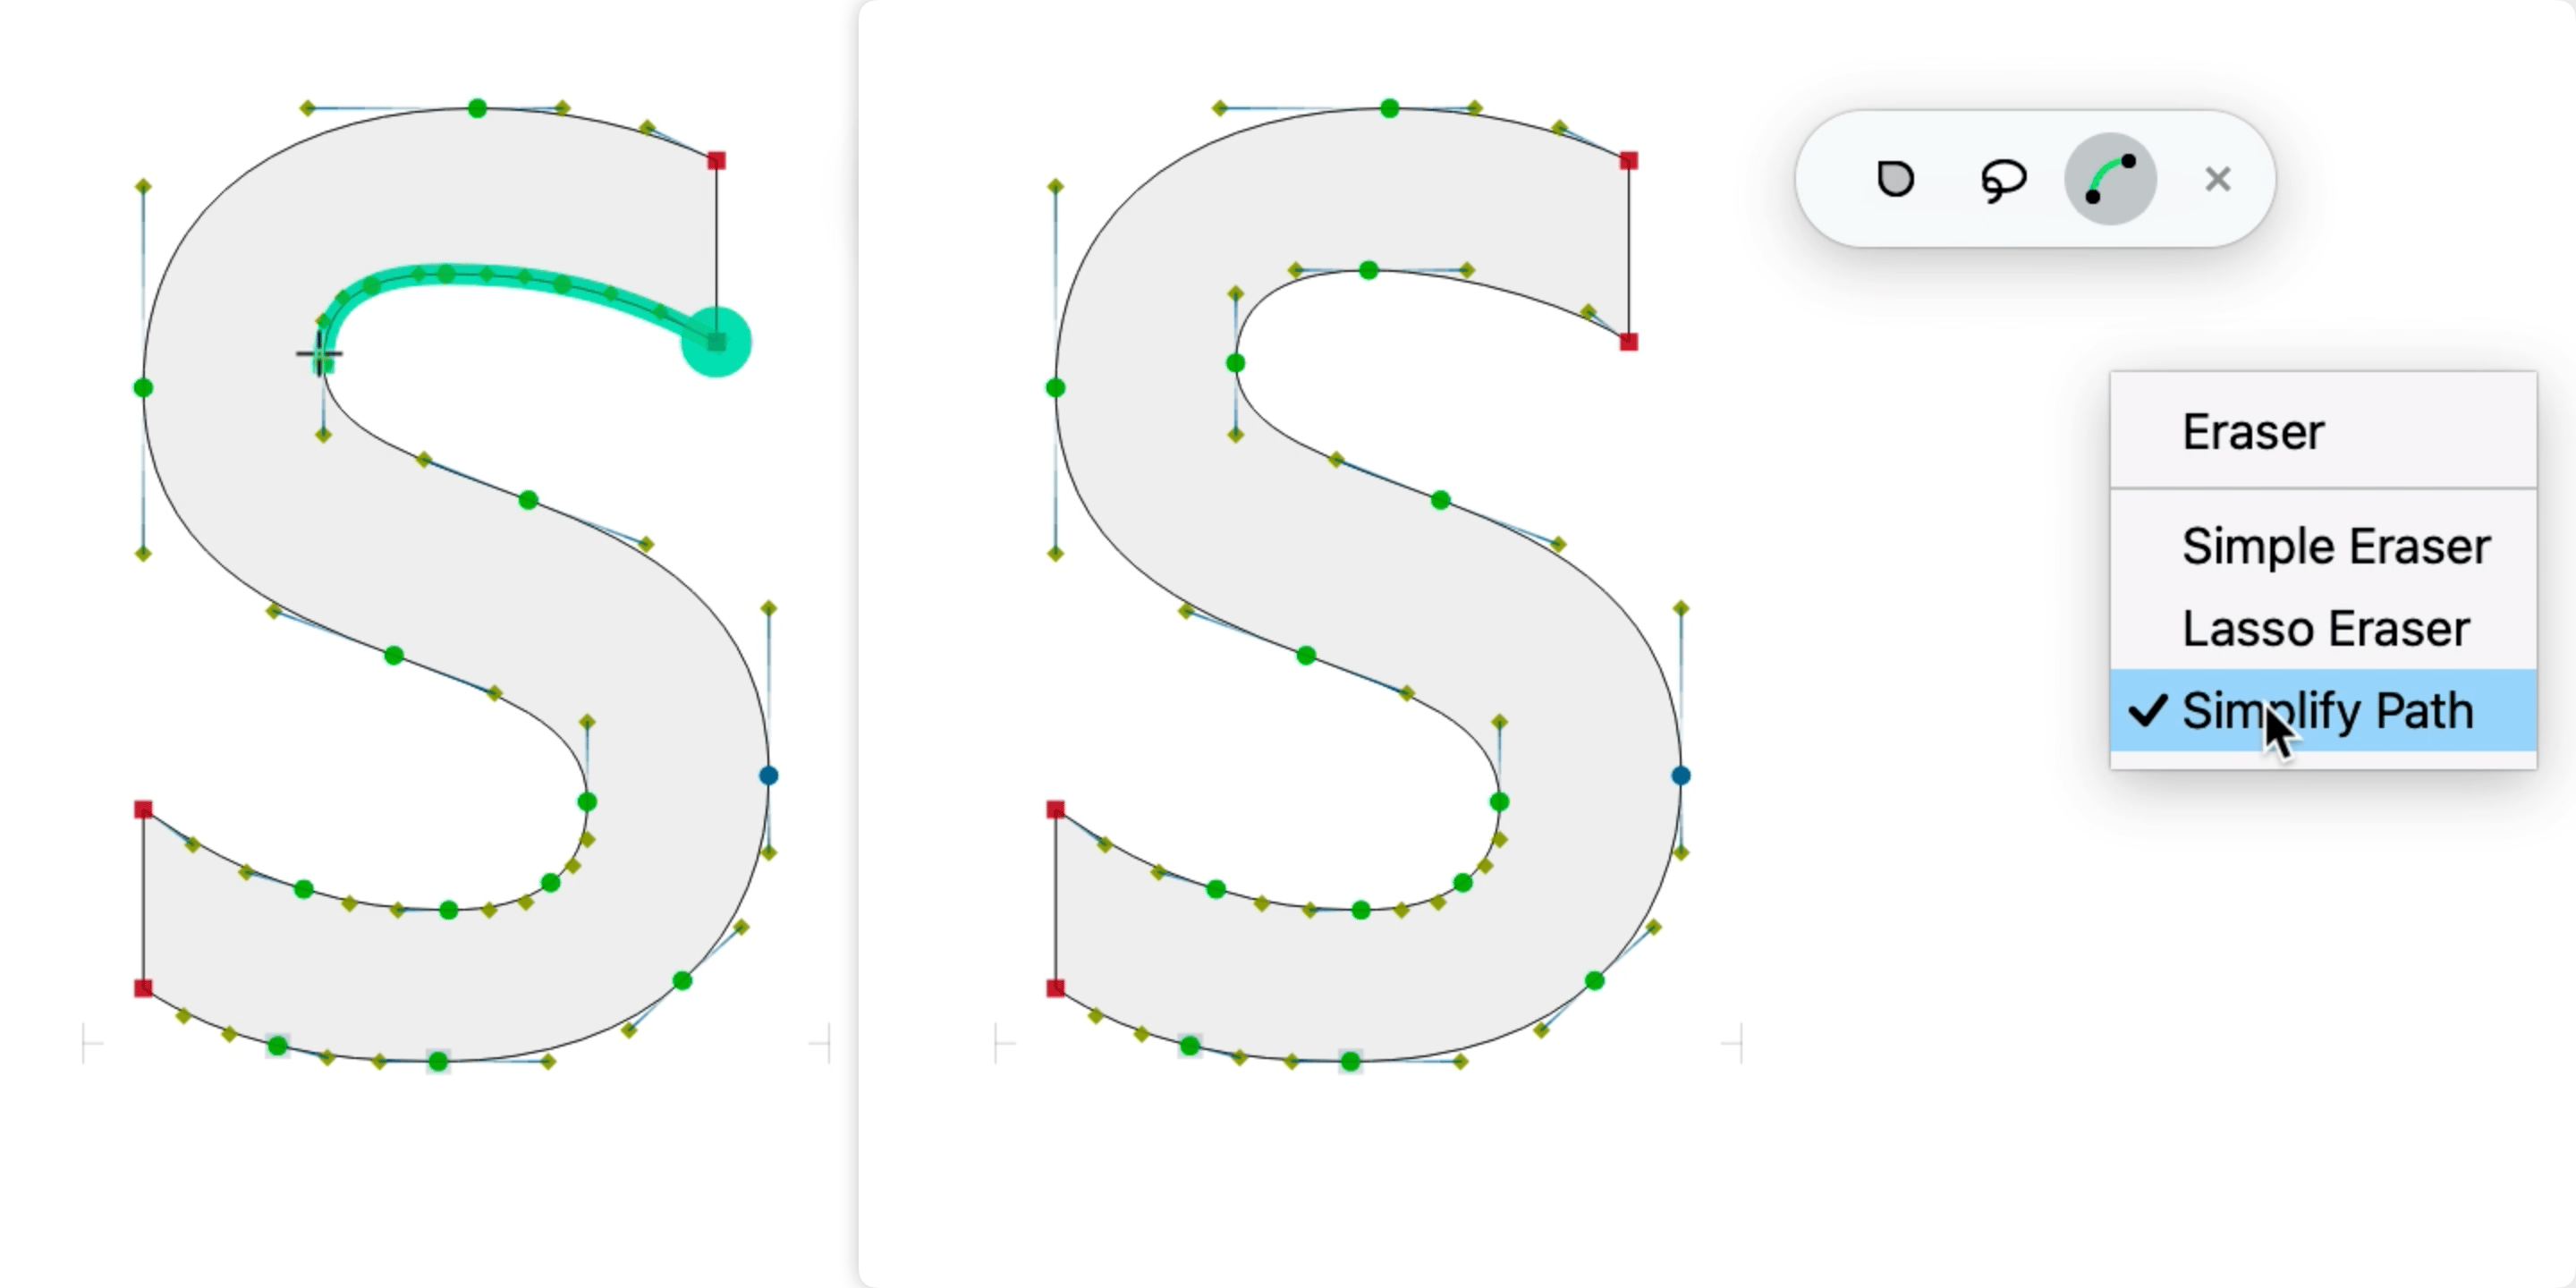
If Simplify Path is active in the context menu or toolbox, or if you hold Ctrl in universal Eraser:
- Click one node, then click another node on the same contour, and FontLab simplifies the shortest path between those two nodes.
Knife tool (J key)
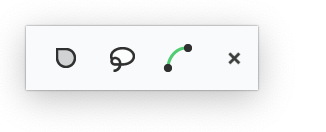
With the Knife tool (J key), you can add or duplicate nodes, and slice or break contours. New The Knife tool has a toolbox. Double-click the Knife toolbar icon to open the toolbox. Click the icons in the Knife toolbox or repeatedly tap the J key to toggle between the “universal” Knife mode (all toolbox icons are off), and the specialized sub-tools (Add Nodes, Break Contour, Slice Contour).
You can also use the context menu to choose the universal Knife mode, or a specialized sub-tool.
Universal Knife
If Knife is active in the context menu, or if all sub-tools of the Knife toolbox are turned off, the Knife tool works in “universal mode”:
- without any modifier keys, it behaves like Add Nodes
- if you hold Alt, it behaves like Break Contour
- if you hold Ctrl, it behaves like Slice Contour
Knife > Add Nodes sub-tool
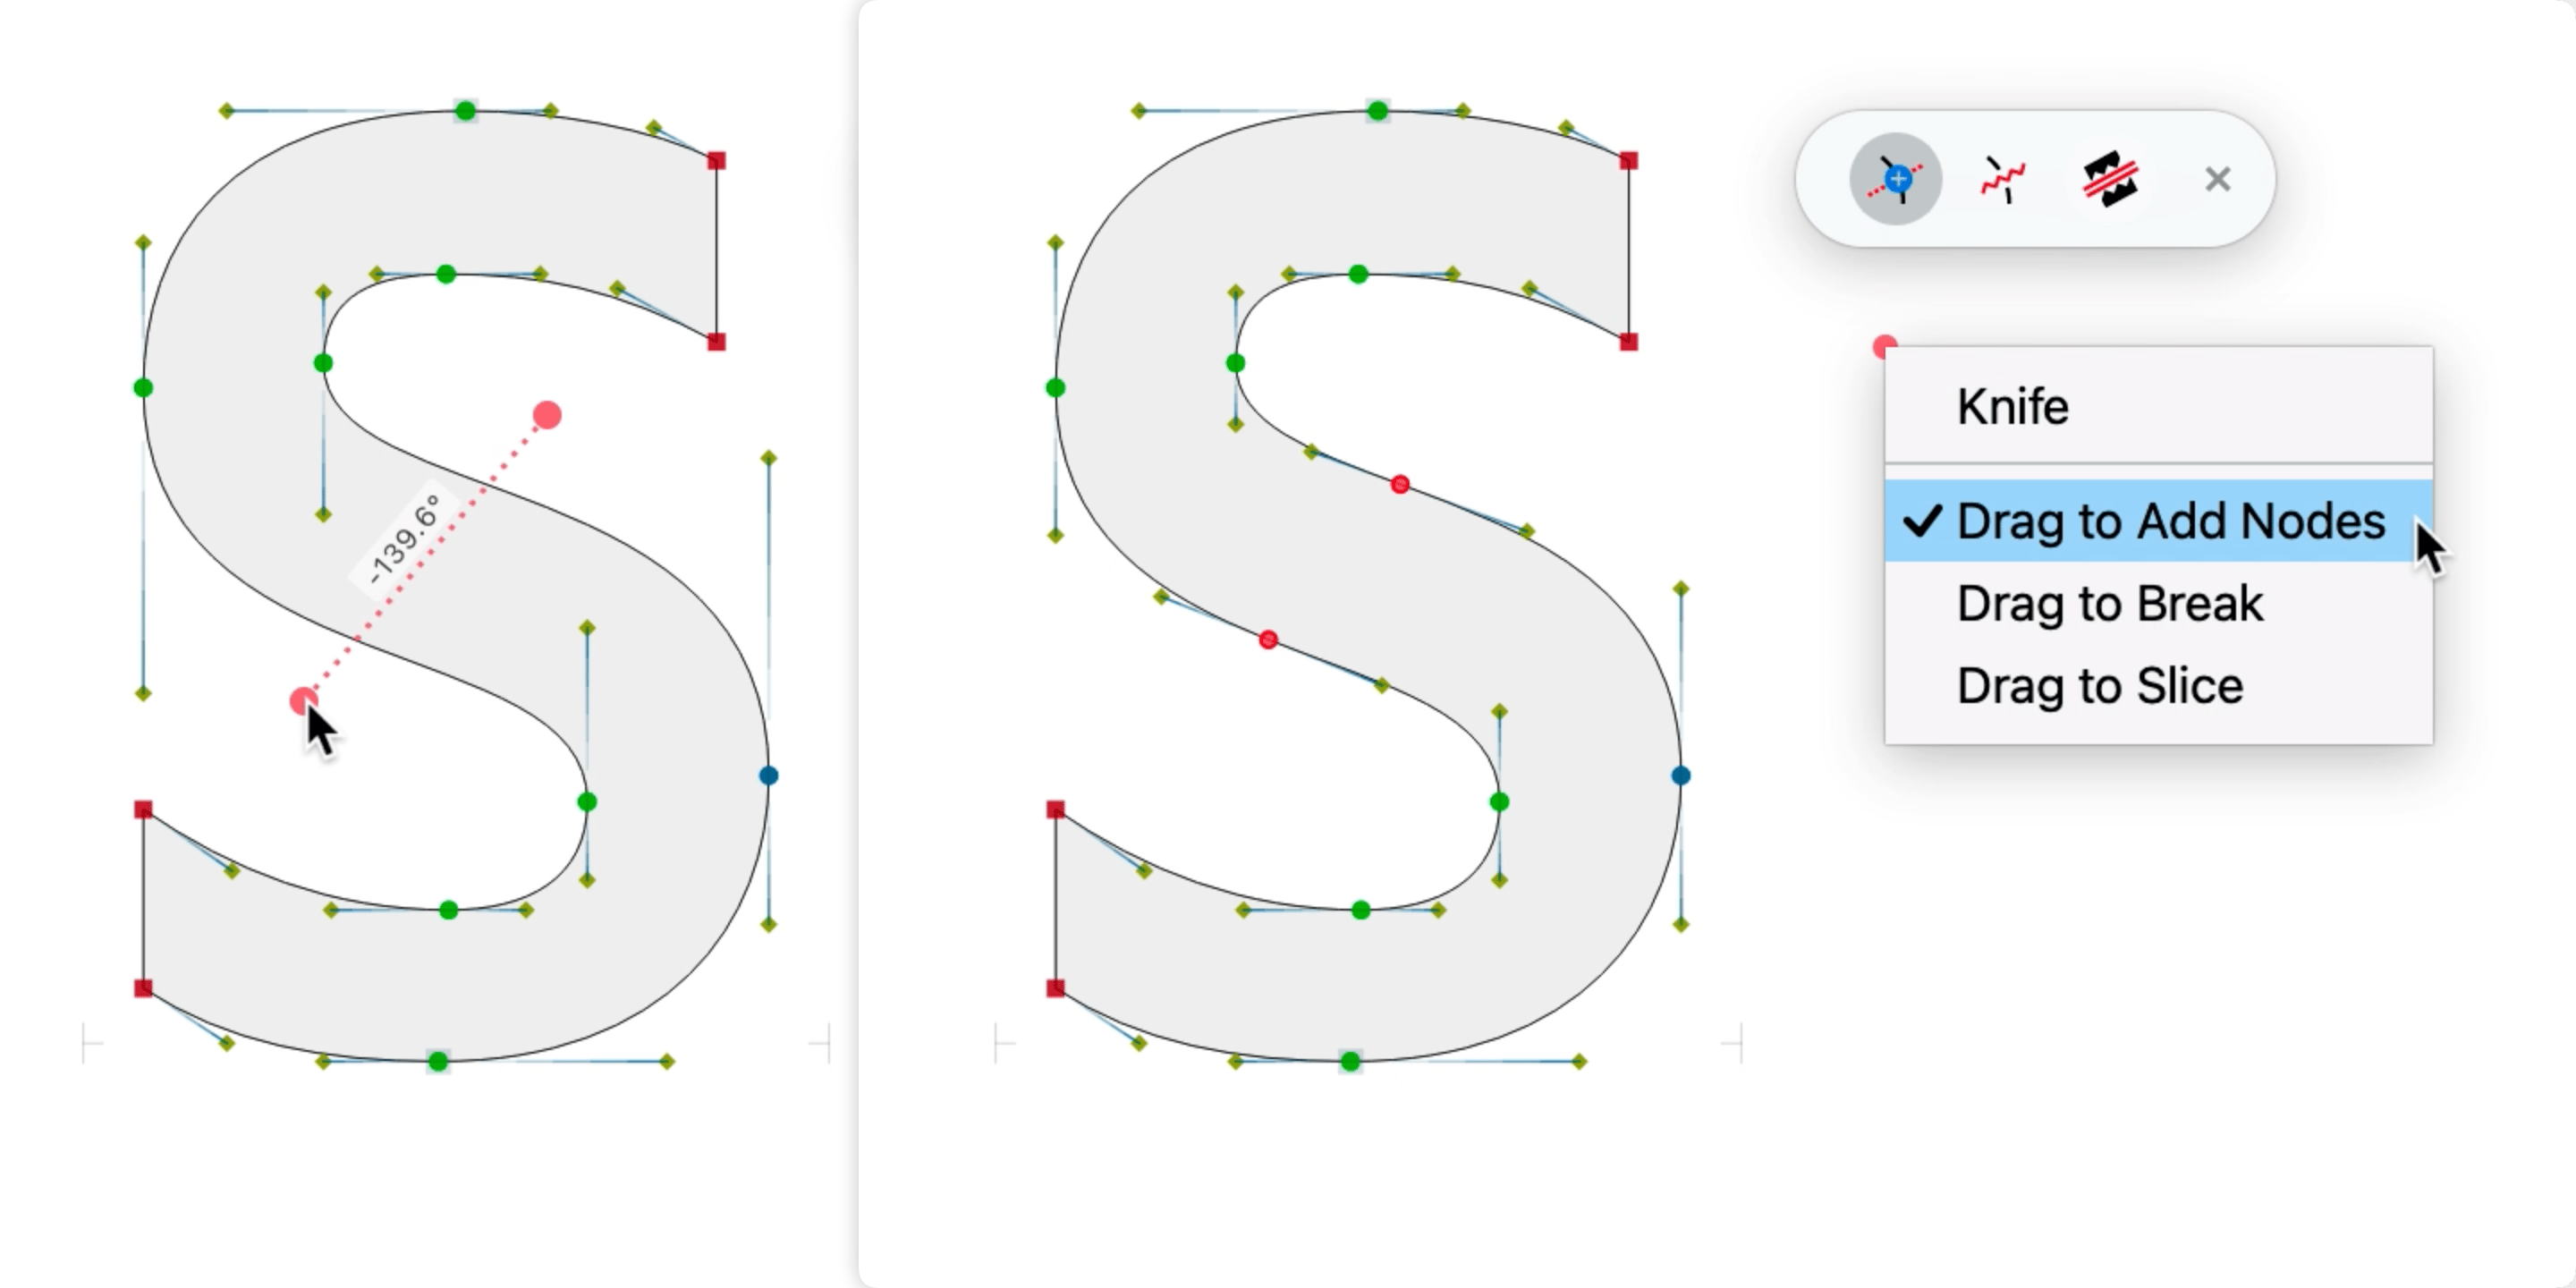
If Knife or Drag to Add Nodes is active in the context menu, or Add Nodes is active in the toolbox, or if no sub-tools are active in the toolbox:
- Drag through contours: add nodes, Shift-drag: constrain adding horizontally / vertically.
- Click segment: add node. Shift-click segment: add the closest extremum or inflection.
- Click node: break contour. Shift-click node: duplicate node.
Knife > Break Contour sub-tool
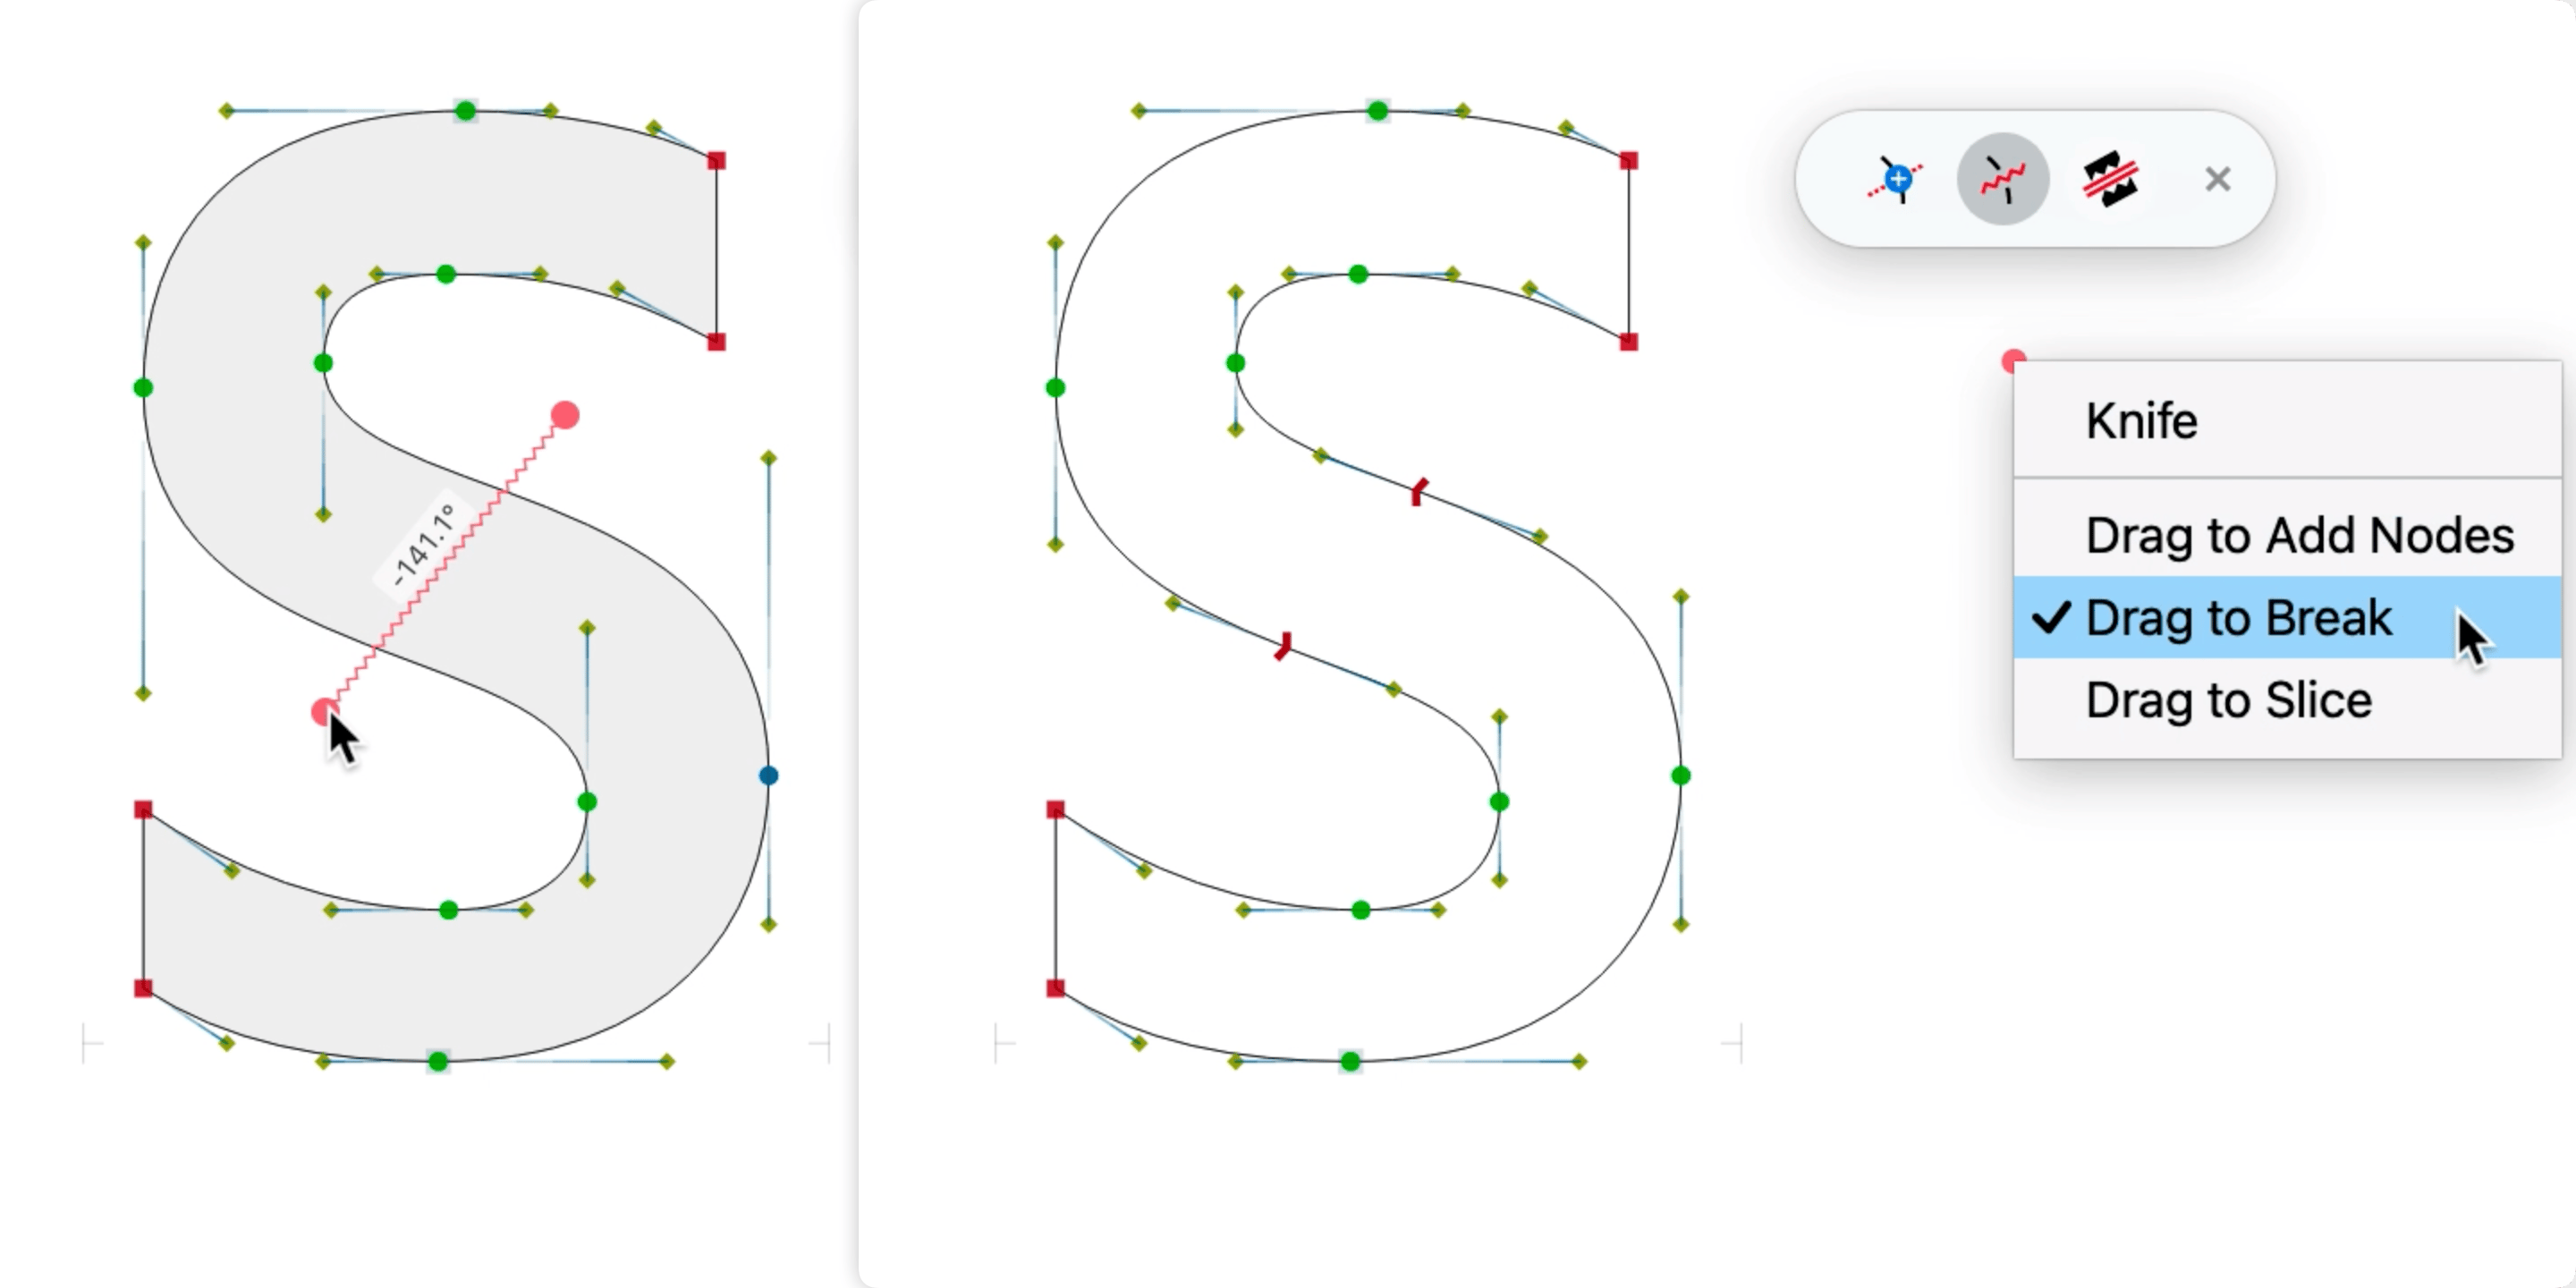
If Drag to Break is active in the context menu, or Break Contour is active in the toolbox, or if you hold Alt in universal Knife:
Drag through contours to add nodes and break contour at them, making open contours. Hold Shift to break horizontally / vertically.
Knife > Slice Contour sub-tool
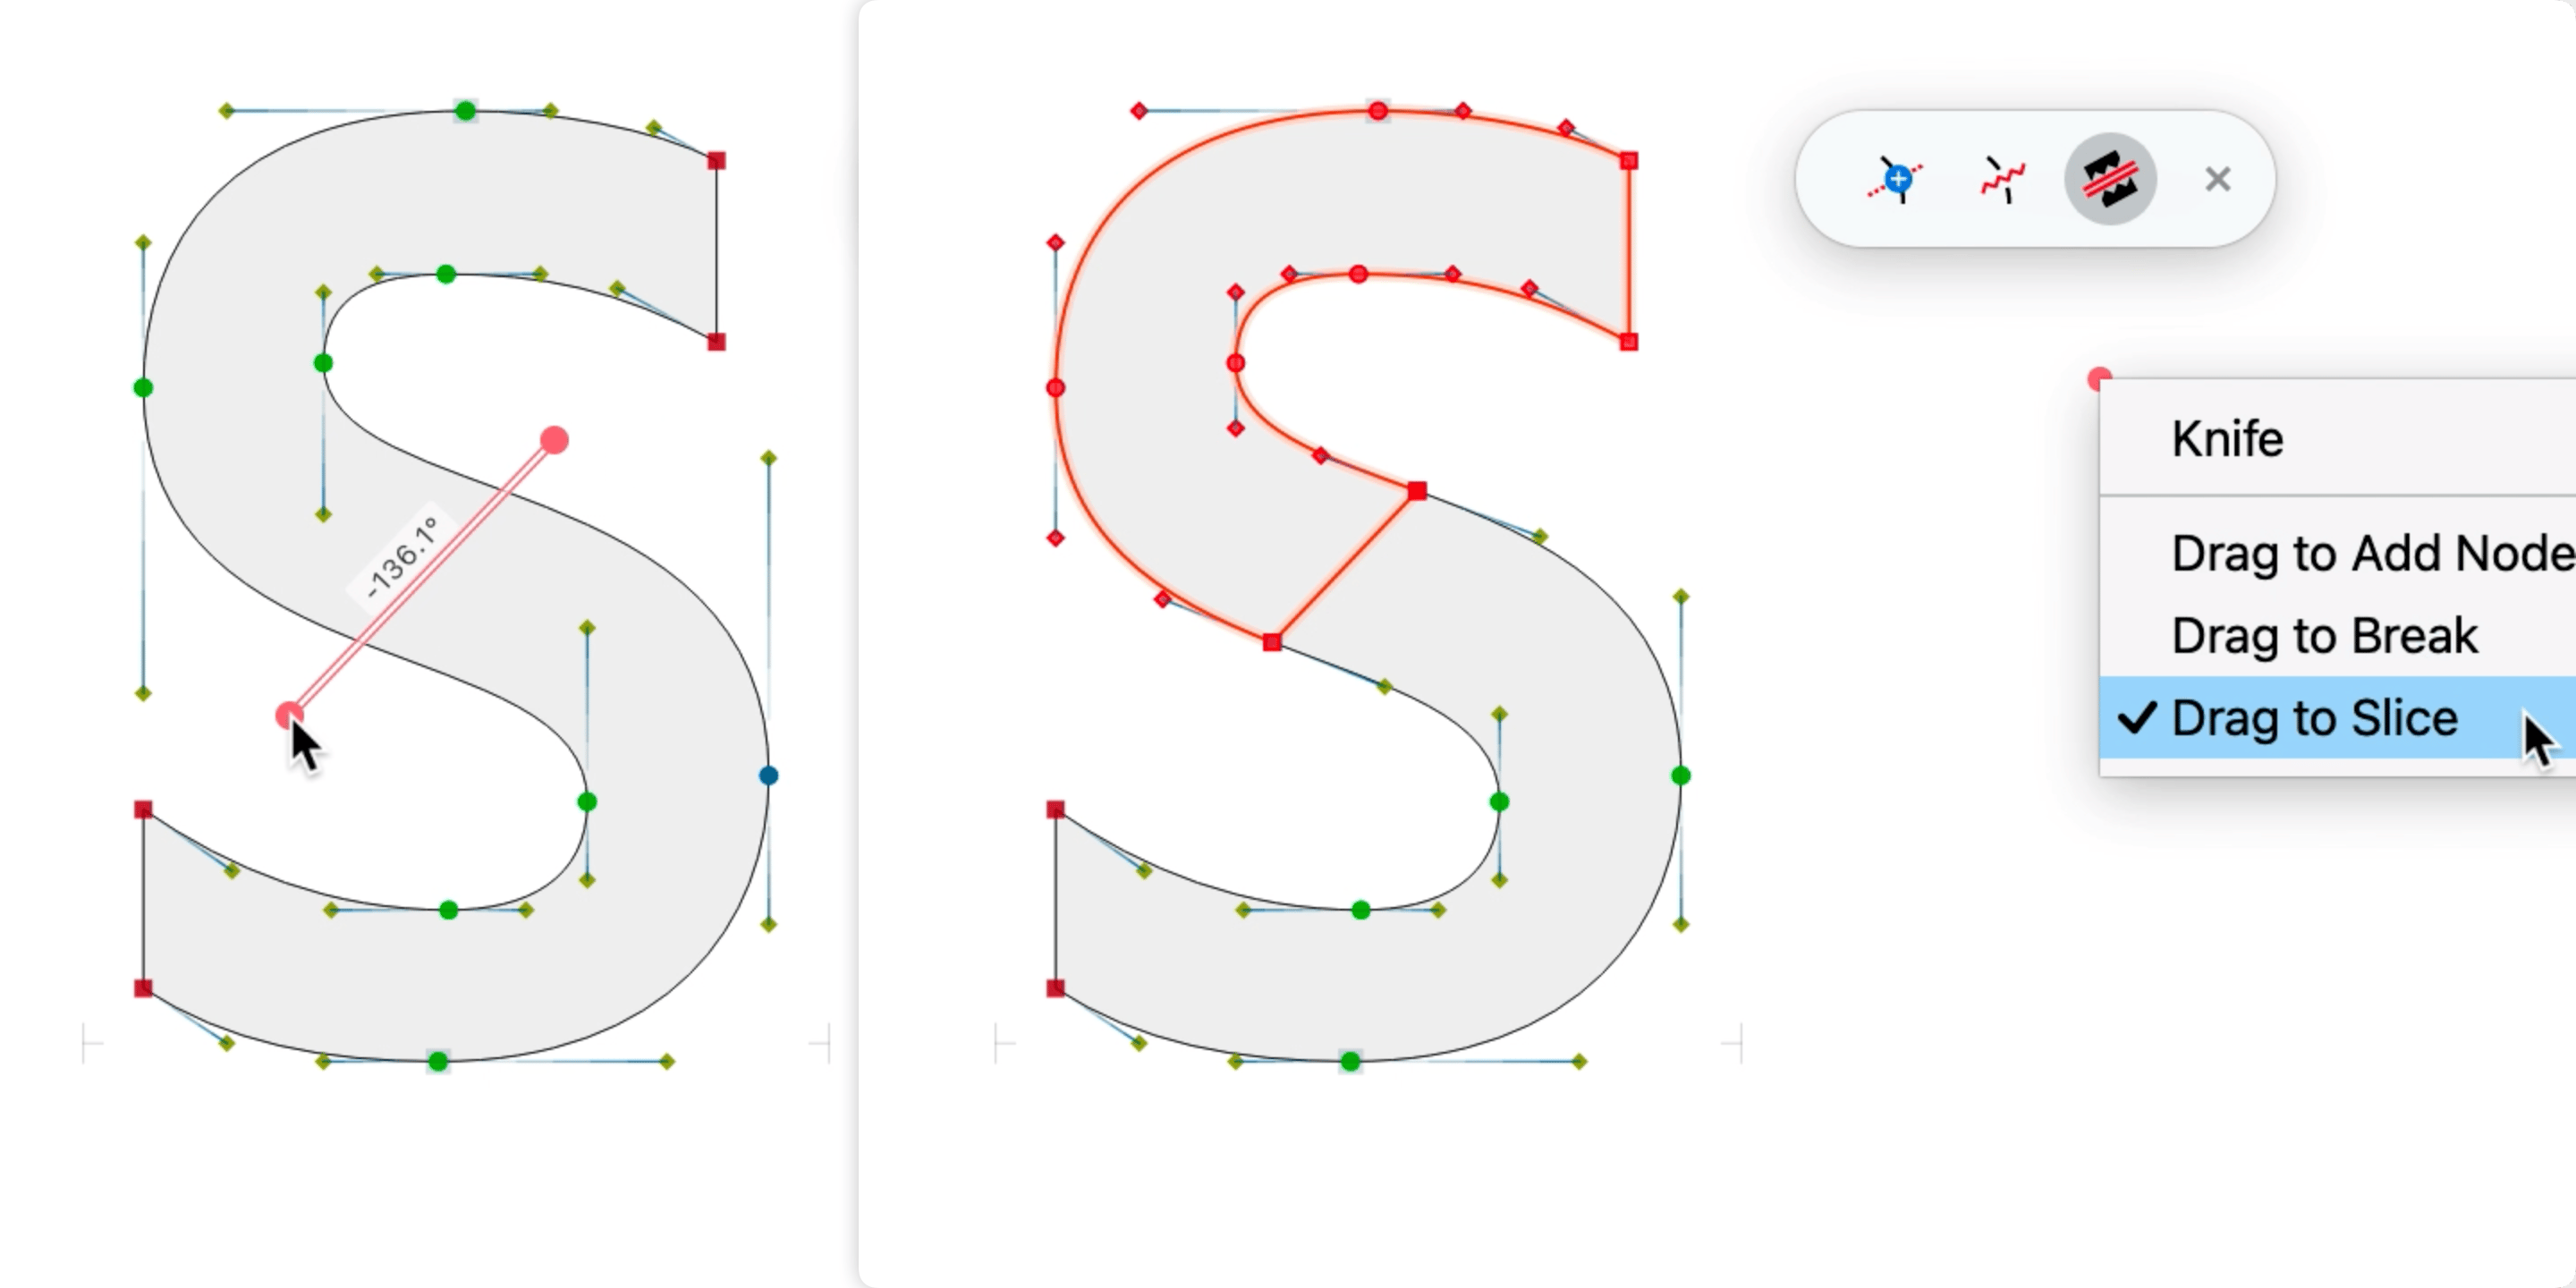
If Drag to Slice is active in the context menu, or Slice Contour is active in the toolbox, or if you hold Ctrl in universal Knife:
Drag through contours to add nodes, or drag between two nodes: this will slice the contour, making separate closed contours. Hold Shift to slice horizontally / vertically.
Once you’ve sliced a contour with Knife, FontLab automatically selects the shorter slicing result. Press ShiftCmdI ShiftCtrlI to invert the selection.
Scissors tool (Q key)
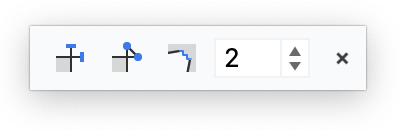
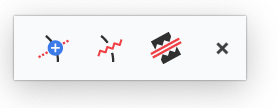
New Scissors (Q key) tool has a toolbox. Double-click the Scissors toolbar icon to open the toolbox. Click the icons in the Scissors toolbox or repeatedly tap the Q key to toggle between the “universal” Scissors mode (all toolbox icons are off), and the specialized sub-tools (Disconnect, Loop Corner, Ink Trap).
You can also use the context menu to choose the universal Scissors mode, or a specialized sub-tool.
Universal Scissors
If Scissors is active in the context menu, or if all sub-tools of the Scissors toolbox are turned off, the Scissors tool works in “universal mode”:
- without any modifier keys, it behaves like Disconnect
- if you hold Alt, it behaves like Loop Corner
- if you hold Shift, it behaves like Ink Trap
Scissors > Disconnect sub-tool: unlink nodes and make overlaps
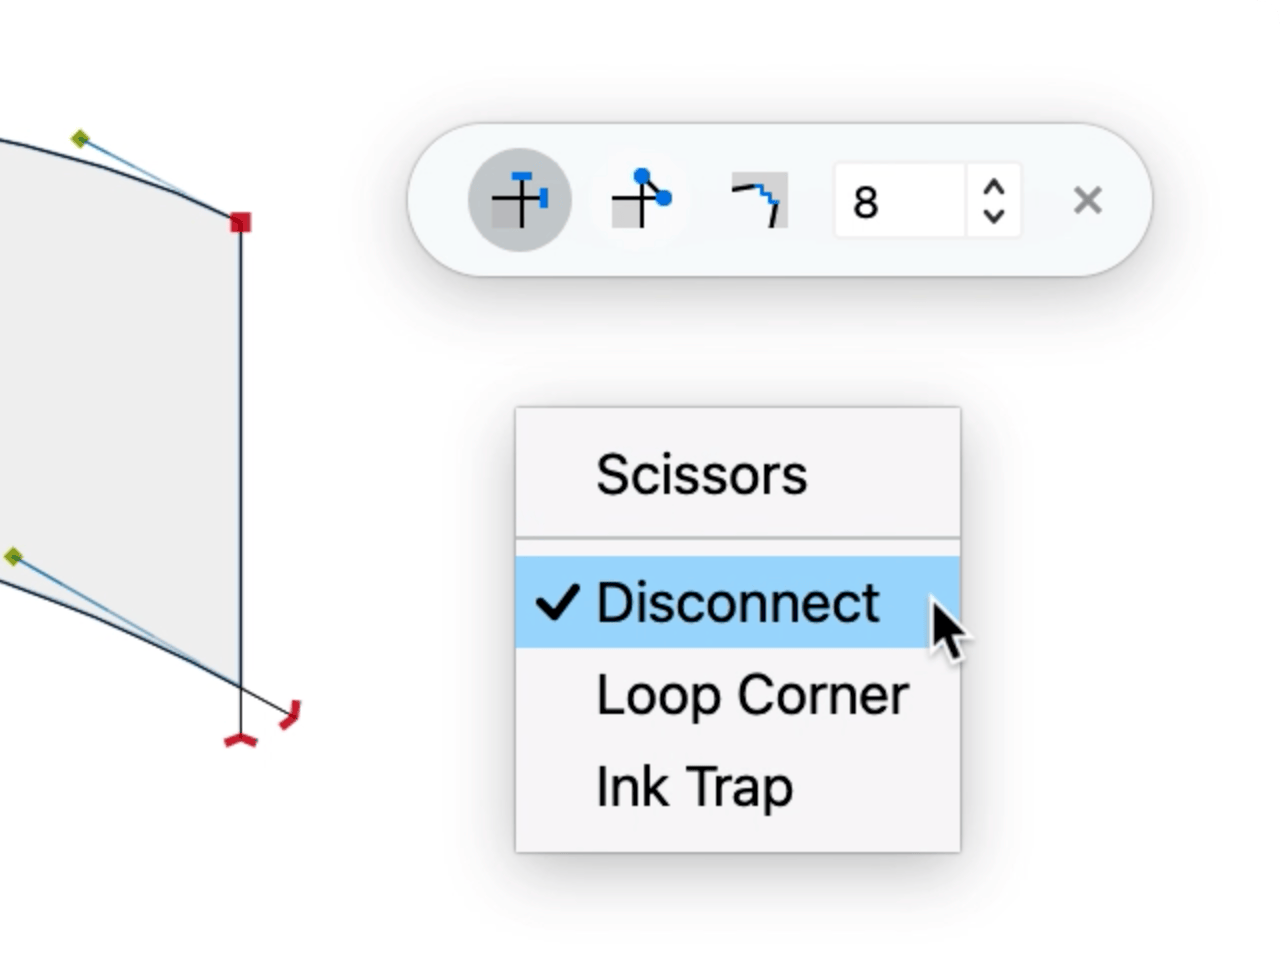
If Scissors or Disconnect is active in the context menu, or Disconnect is active in the toolbox, or if no sub-tools are active in the toolbox:
- Click a node to unlink the node: FontLab breaks it, elongates the new end nodes slightly, and applies a Power Fill. To disconnect multiple corner nodes, you can use New Contour > Nodes > Disconnect Corner (previously called Unlink Corner).
- Drag between or around two nodes, or drag around 4 nodes to make an overlap. To make an overlap in a contour selection, use Contour > Overlap > Make Overlap. To automatically create possible overlaps in the current layer of the current glyph or selected glyphs, use Glyph > Create Overlaps.
Scissors > Loop Corner sub-tool: make looped corners
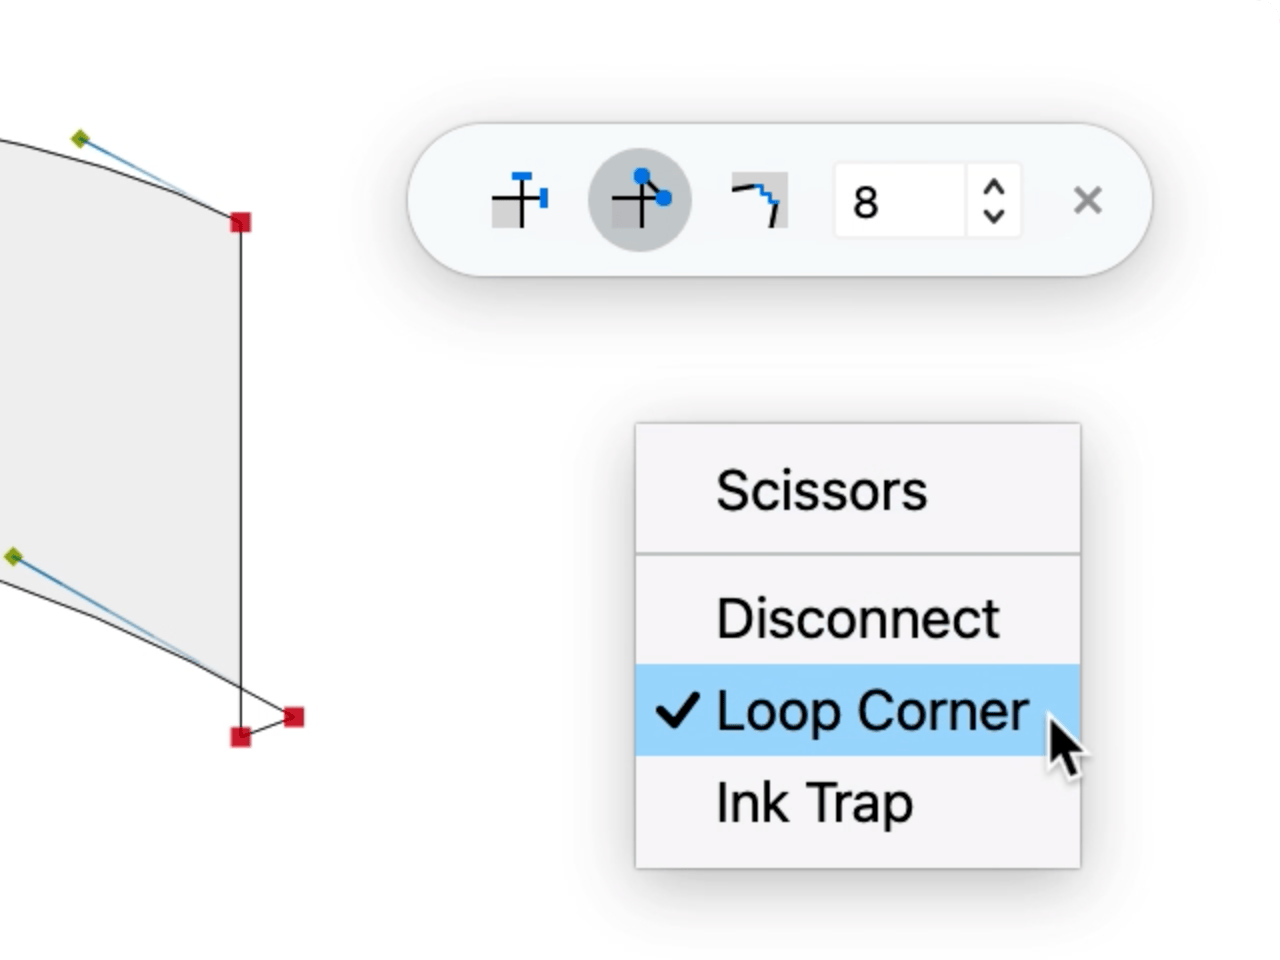
If Loop Corner is active in the context menu or in the toolbox, or if you hold Alt in universal Scissors:
- Click a node to create a looped corner: FontLab unfills it if Font Info > Other Values > Unfill looped corners is turned on, and if the loop is outside the filled area.
New To create looped corners on several sharp nodes, select some segments or contours in Glyph window and choose Contour > Nodes > Loop Corner.
Ink traps and rounded corners
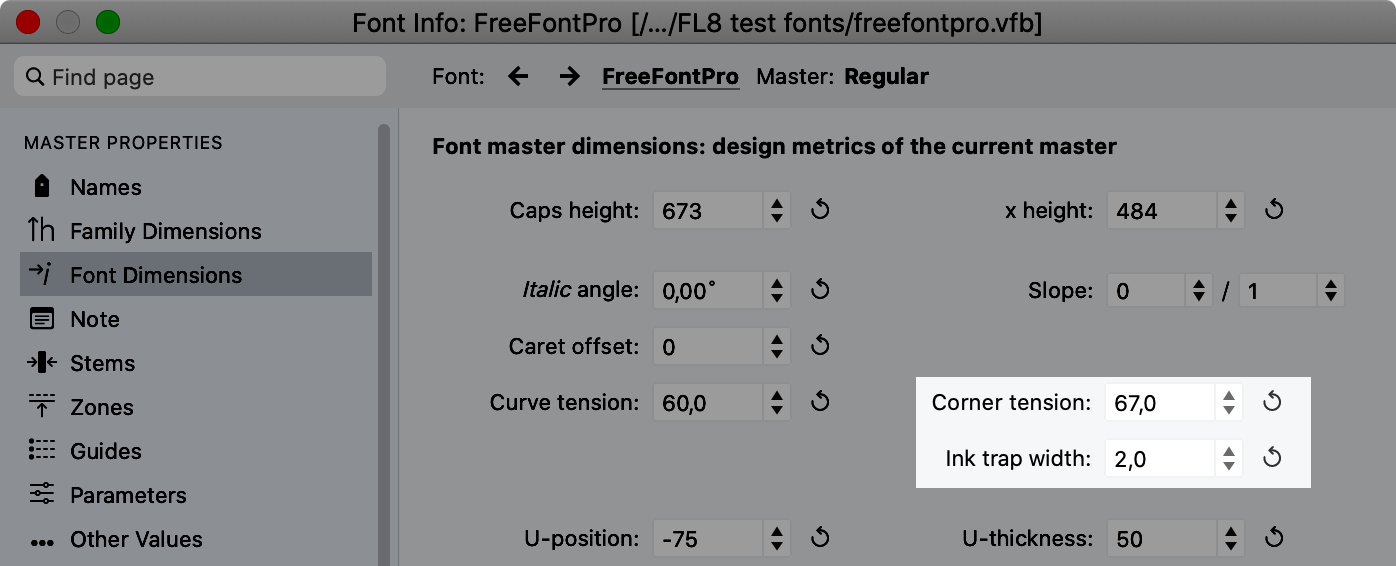
Ink trap width
In Font Info > Font Dimensions, you can use Ink trap width to predefine the width of ink traps that FontLab creates.
Simple ink traps with Scissors > Ink trap sub-tool
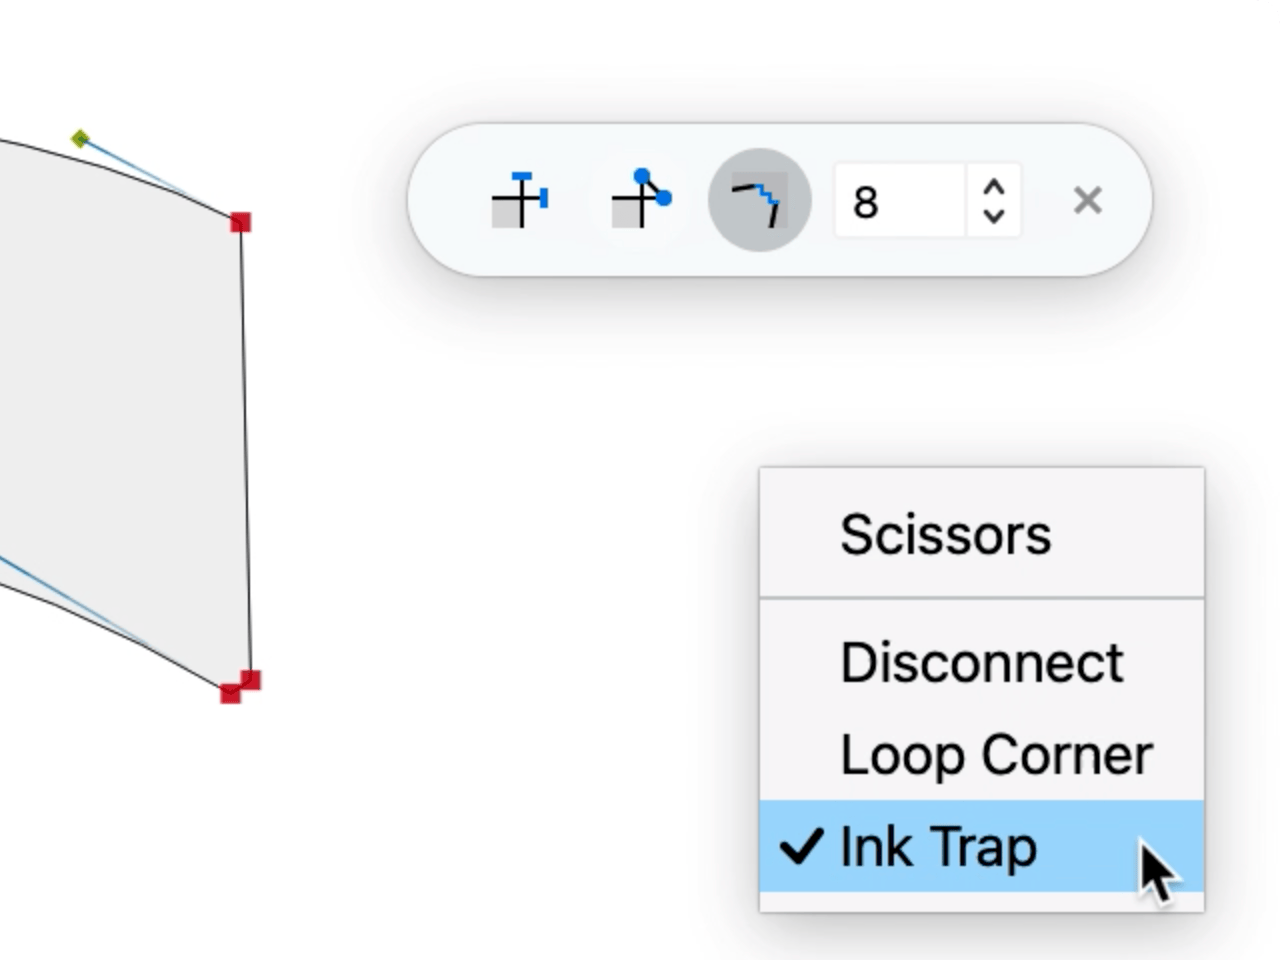
Whenever you activate the Scissors tool, FontLab copies the ink trap width from Font Info > Font Dimensions > Ink trap width to the ink trap width field in the Scissors toolbox.
If Ink Trap is active in the Scissors context menu or toolbox, or if you hold Shift in universal Scissors: Click a node to create a simple ink trap: FontLab duplicates the node and moves the new nodes apart by the ink trap width.
In the toolbox, you can temporarily enter a different ink trap width. This will affect the simple ink traps that you create in the current Scissors tool session. Simple ink traps are created once, and you can edit each of them later by simply moving the two nodes.
Smart ink traps with Smart corners
If you create a Smart Corner on a sharp node, FontLab creates a smart ink trap if the control point is inside the larger angle of the corner.
The ink trap width in Font Info > Font Dimensions > Ink trap width affects all current and future smart ink traps that you have in the current font master, except those defined individually in the Node panel.
Dynamic rounded corners with Smart corners
If you create a Smart Corner on a sharp node, FontLab creates a rounded corner if the smart corner control point is inside the smaller angle of the corner.
In Font Info > Font Dimensions, you can use Corner tension to define the global tension for smart corners. This tension will apply to all smart corners and ink traps that you have in the current font master.
New The default tension of the Smart Corner is now 67%. This tension produces smart corners in the shape of a squircle quadrant: the quarter of a superellipse close to icon shapes in macOS and iOS, and to shapes used in product design by Nokia, Android, Fiat and other companies. This shape makes a smoother visual transition between straights and curves.
Previously, the default tension was 60%. You can change the per-master global smart corner tension in Font Info > Font Dimensions > Corner tension. You can now also use the Node panel to change the tension for an individual smart corner.
Smart Corners always produce two nodes
New If you add a Smart Corner to a node and expand it, FontLab now always produces two nodes. Regardless of the radius, Smart Corners now produce matching, variable contours after expansion. #5441
If the Smart Corner radius is 0, each Smart Corner expands as two adjacent sharp nodes that have the same position, that is, are on top of each other. Previously, FontLab produced one sharp node in that case.
If the Smart Corner radius is such that two consecutive Smart Corners produce two consecutive curve segments, then, after expansion, there will be two adjacent sharp nodes between these segments, that is, a zero-length line segment. Previously, FontLab produced one smooth node there, or, at the start point, a short, non-zero line segment.
Per-node settings for smart ink traps and smart corners
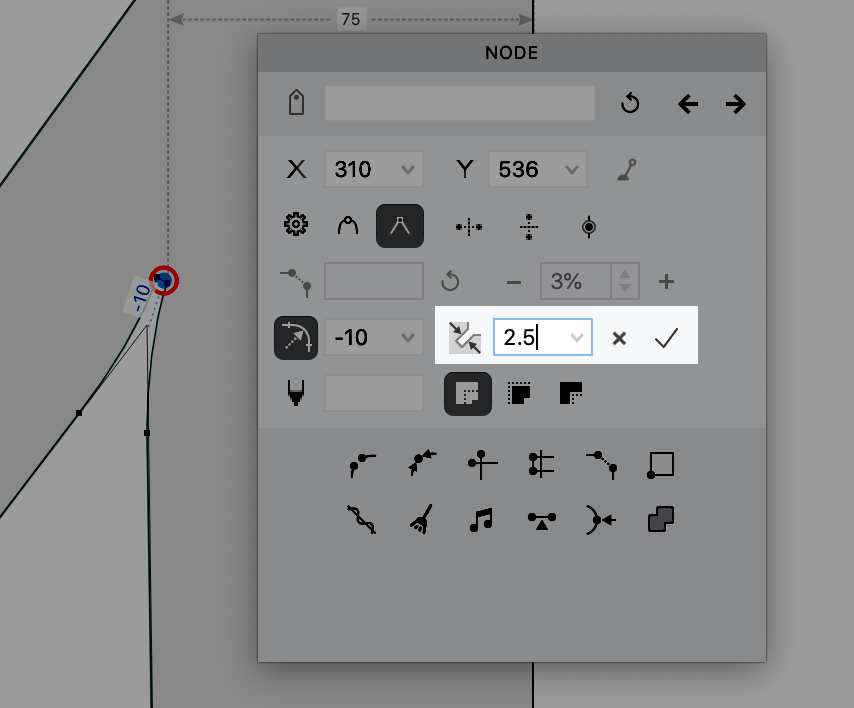
- New You can now use the new Corner tension / Ink trap width field in the Node panel to override the global tension (for a smart corner) or width (for a smart ink trap). The value you enter there only applies to the selected smart corner / ink trap.
Note
If you add a smart ink trap between line segments, FontLab adds small curved segments around the ink trap. If you add a simple ink trap with the Scissors tool, FontLab only moves the duplicated nodes apart.
Apply smart corner in Node panel
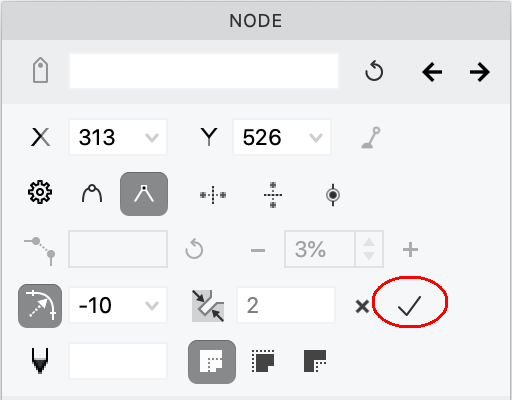
To convert a smart corner or a smart ink trap into final contours, activate the smart corner in the Glyph window, and then:
- either right-click the smart corner control point in the canvas and choose Apply Smart Corner
- New or click the Apply smart corner button in the Node panel
Other contour operations
Joining open contours with keyboard
If you have one or more open contours and you drag one start / end node onto another, they join.
New Now, if you turn on Preferences > Editing > Join contours while moving selection with keyboard and you use the arrow keys to move a start / end node (or a selection that includes a start / end node) onto another start / end node, FontLab joins the contour.
If you turn the option off, joining only happens if you drag, but not if you use the arrow keys. #5767
Replace with Corner
New You can now replace any segment, or the gap between a start and end node of an open contour, with a corner.
If you select one segment, or the start and end node of one open contour, you can choose Contour > Replace with Segment. FontLab then removes the segment if it exists, then elongates the adjacent segments until they intersect, and then adds a sharp node at the intersection.
Alternatively, activate the Scissors tool and drag between or around two neighboring nodes that have a segment between them, or between (or around) the start and end node of an open contour.
If the elongated segments (the segments adjacent to the segment you are replacing) are line segments, FontLab removes the original nodes. If the elongated segments are curve segments, FontLab keeps the original nodes, and selects them after the operation.
Note
Replace with Corner works only between the start and end node of the same open contour, or between two neighboring nodes which are at the opposite ends of a segment, and it works only if the angle between the segments to be elongated is sufficiently large.