New in FontLab 8: Test & adjust
Automatically find and fix problems, optimize contours, tweak tension and curvature, overlap & merge paths, and apply non-destructive tweaks like rounded corners and Delta adjustments. Change weight, convert contours, or creatively transform glyphs. Preview current or custom text in multiple masters and multi-size waterfalls. With FontLab’s built-in genuine HarfBuzz and Microsoft ClearType, complex-script features and Windows screen rendering are the real deal. In FontLab, any glyph map, glyph or custom text can be printed or exported to PDF.
New in FontLab 8: Print waterfalls or interpolations from Preview panel. Batch-run selected FontAudit fixes in glyphs and masters. Create, save and run action sets that combine multiple actions. Batch-adjust stem widths in a master. Adjust by variation to replace contours with a different dynamic instance. Perform complex non-destructive contour transformations with new Delta filter.
New FontLab 8.3 respects the italic angle when you center a layer. The Glyph repeater lets you see the current glyph in multiple places. With pre- & post-glyph strings can intermix with each glyph from your text or follow each letter with a mark. Better Preview panel blur helps you simulate poor vision.
Adjusting and correcting
Transform panel
In the Transform panel:
- New Click the downward arrow on the right side of the Rotate, Horizontal slant or (if you make the panel wide enough) Vertical slant fields to open a visual control. Drag the arrow in the control to adjust the transformation.
- Click the % dropdown to change how the Horizontal scale and Vertical scale works. Choose % to use relative scaling in percent, or u to use absolute scale in font units. New The panel now has a single %/u dropdown that applies to both horizontal and vertical scale.
Actions: batch operations
Multiple-master actions

New If you open Tools > Actions, and as layers you choose All Masters, some actions in the list will have a green dot.
Each of these actions is “multiple-master-compatible”: if the current masters are matching, the results of running the action will also match.
Searching actions
New The Find action search box in the Actions dialog is now on the top left. To access it, click it or New press CmdF CtrlF.
New If you type a phrase into the search box, the left-side pages list will show only the matching actions.
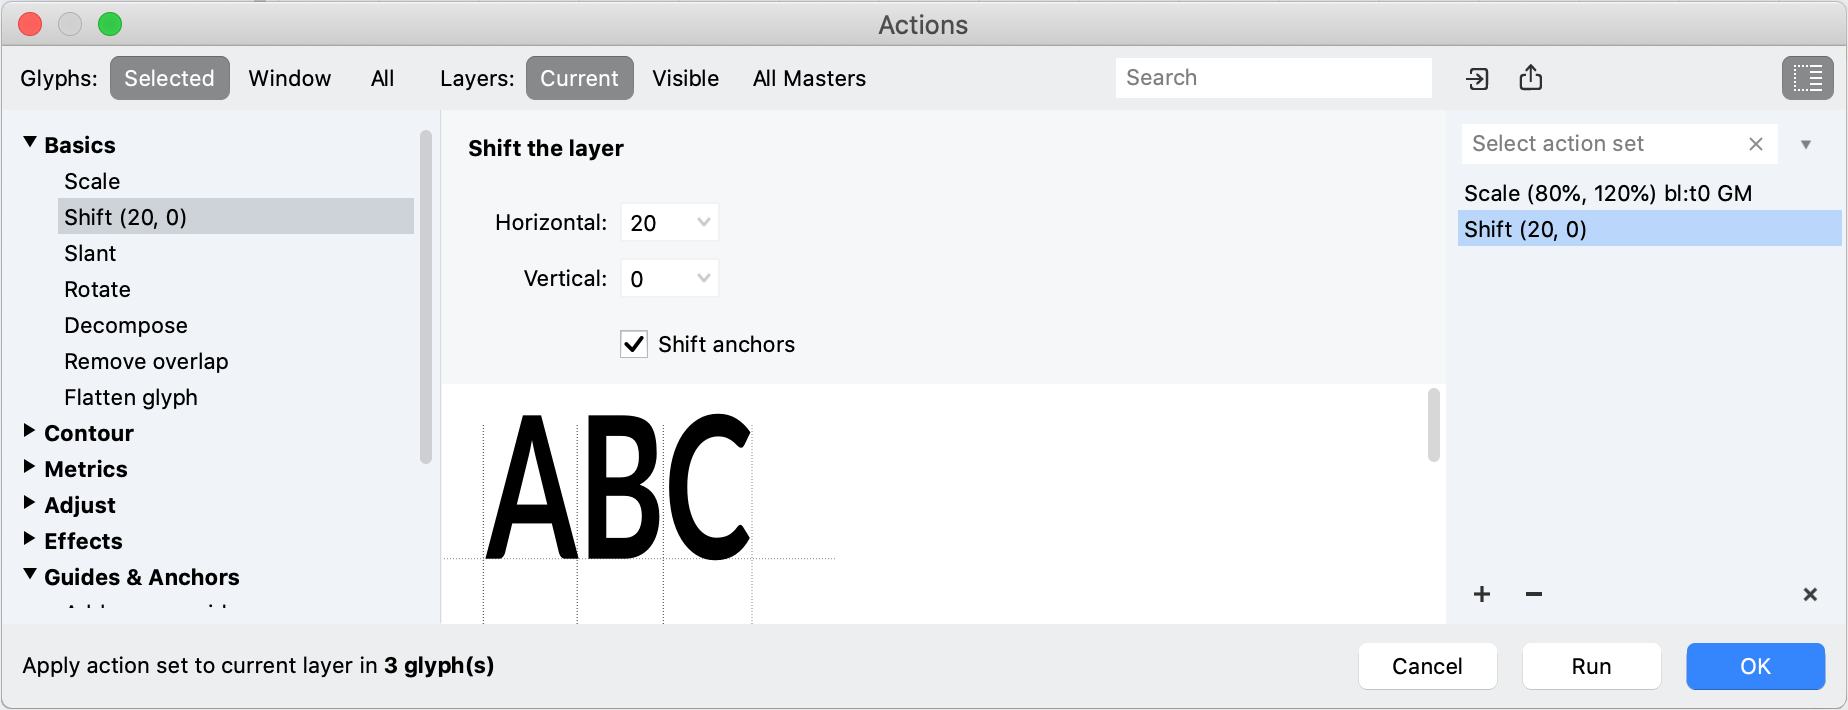
Action sets
New In the Tools > Actions dialog, you can click the top-right button to open the action sets sidebar. Click the button again to close the action set sidebar.
If the action set is open:
- Use the + button to add several actions, use – to remove the selected action, use × to remove all actions from the set.
- Click the actions in the action set sidebar to edit the settings of each action. The preview at the bottom shows the final preview.
- Use the Save button to save the current action set as a JSON file — by default, you can save them in the
Actionssubfolder of the FontLab 8 user data folder. - Click the down-arrow or type into the search box to load one of the sets that are saved in the
Actionssubfolder. - Use the Open button to load an action set from a saved JSON file that’s in a custom location.
FontLab runs the action set if the action set sidebar is opened, and if it has at least one action in the set.
FontLab runs the currently selected action if the action set sidebar is closed, or if the set contains no actions.
Action status bar
New The status bar (bottom line) of the Tools > Actions dialog now gives a better synopsis of what will happen:
- if FontLab will run an action set or an action (then its name is shown)
- which layers will be affected, depending on the top Layers selector
- how many glyphs will be affected, depending on the top Glyphs selector
Actions preview
In the Tools > Actions dialog:
- New You can now drag the top edge of the preview area (the lower part of the dialog) to enlarge the preview. You can also use Alt-scroll with the mouse wheel or pinch-zoom with the touchpad for additional zoom in/out.
- New You can toggle the Show nodes and outline button to show a filled or “wireframe”. The “wireframe” preview is useful if you want to preview the results of contour-specific operations.
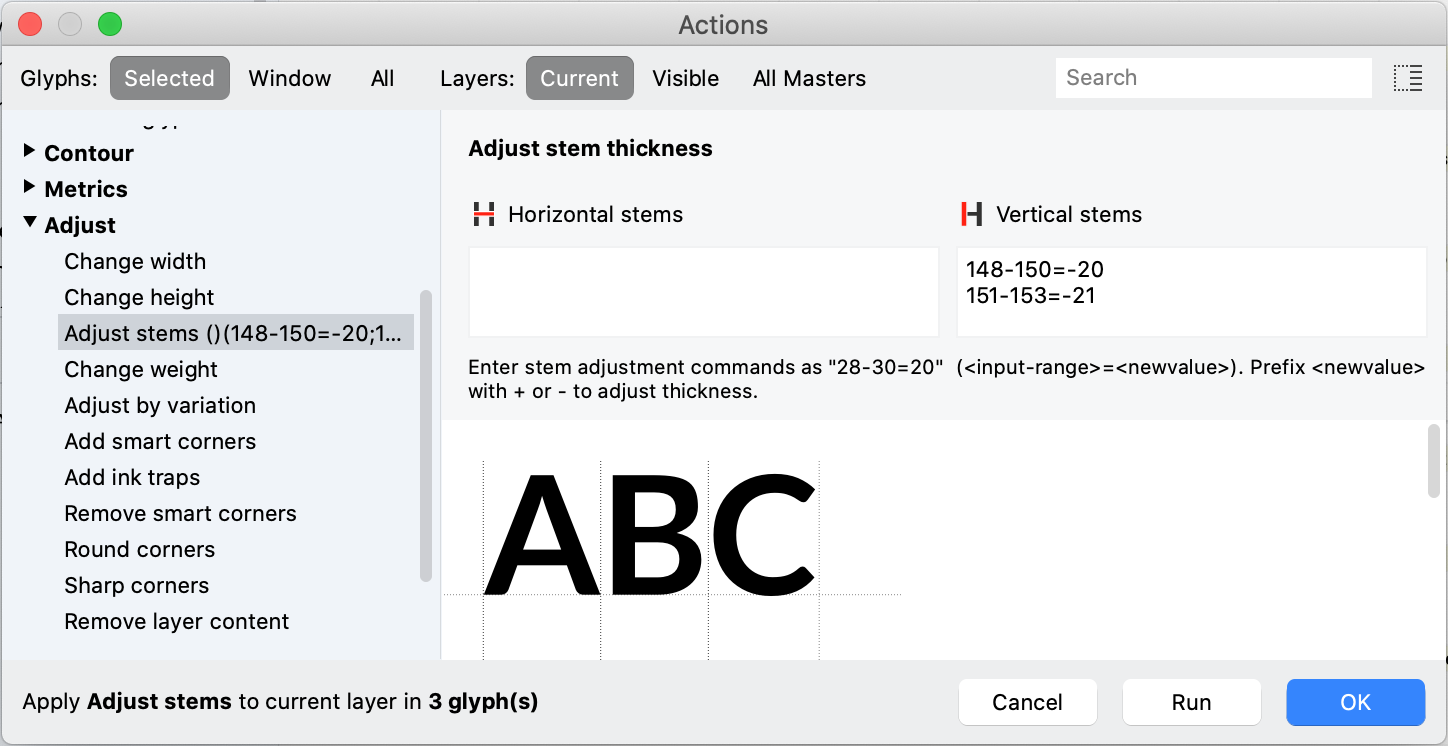
New Adjust stems action
New With the new Adjust stems action, you can set or change the thickness of horizontal and vertical stems across your design.
First, you need to group the existing stem thicknesses into groups. You can use several methods:
- Open Window > Panels > Measurements. Click the panel, press CmdA CtrlA and click the Recalculate button. The table shows the most common vertical Latin stems (
HOno) and horizontal stems (HOto). - Go to Font Info > Stems. There, make a note of the most common horizontal and vertical stems in your design, or click the Auto-detect stems. If you have multiple masters, you need to auto-detect stems in each master.
- Open a Glyph window. Switch to the Text tool and type in some glyphs that contain the most common stem thicknesses in your font. Switch to the Guides tool and turn on View > Details Across Glyphs. You’ll see auto-metered stem thicknesses in all glyphs in the text.
Adjust stems works on ranges of thickness, separately for horizontal and vertical stems. You need to decide which thickness ranges you want to change, and how much you want to change each range.
Let’s say the vertical stems are 149 in your n and 152 in your o . Select all your lowercase glyphs in the Font window and choose Tools > Actions > Adjust > Adjust stems. On top of the dialog, choose Glyphs: Selected and Layers: Current. In the Vertical stems area, you can enter:
145-155=-20
and click OK. FontLab find all vertical stems with the thickness between 145 and 155 in the current layer of the selected glyphs, and makes them 20 units thinner. But if you instead specify the adjustment:
148-150=-20
151-153=-21
then the action will make the stems thinner by 20 or 21 units, depending on how thick they are.
You can specify as many adjustment ranges for vertical and horizontal stems as you like within one action run — enter one adjustment range per line.
If you prefix the number after the = sign with -, FontLab will make the stems within a given range thinner by that number of units. If you prefix it with +, FontLab will make the stems thicker. If you specify a number without a sign, FontLab will set the thickness of those stems to that number.
Note
The Adjust stems action does not work for diagonal stems — you need to adjust these yourself.
Running actions
To run the current action and to close the Actions dialog, click the OK button or New you can press CmdEnter CtrlEnter.
So a quick way to run an action is:
- Press ShiftCmdT ShiftCtrlT to open Tools > Actions.
- Press CmdF CtrlF and type a part of the action name.
- Close the action set sidebar if it’s open. Make sure the scope (glyphs and layers) is as you intend.
- Change the parameters of the action in the central area if needed.
- Press CmdEnter CtrlEnter to run the action and to close the dialog.
Increased precision
New Actions like Scale, Rotate, Slant and Shift now accept values at higher decimal precision.
Effect actions
We have improved several actions from the Tools > Actions > Effects section.
Outline action
With the Outline actions, you can create an outlined version of a glyph. FontLab does this by creating parallel contours. You can specify the thickness of the outline and the join method.
New With the Repeat setting, you can create multiple outlines, offset by the same distance as the specified thickness.
New If the Inside checkbox is turned off, FontLab applies the outline outside the contours. If the Inside checkbox is turned on, FontLab applies the outline inside the contours.
Shadow and 3D extrude actions
New When you specify 0 for Thickness in the Tools > Actions > Effect > Shadow or 3D extrude action, the result of the action is now truly just the shadow or just the extrusion, with the original contour fully subtracted.
Previously, FontLab produced a 1-unit-thick version of the entire original contour.
Engrave action
The Tools > Actions > Effect > Engrave action produces a live, editable filter, which fills the existing glyph contours with engraved lines of specified angle and thickness. By default, the engraved lines are of uniform thickness, but if you load an image into the action, the lines thickness modulates by the grayscale value of the image pixels.
Once you’ve added the Engraving filter, you can still edit the original contours, and the engraving will adapt.
New We have extended the Engrave action.
In the Engraving column, you can decide how the engraving interacts with the original contours.
- Subtract engraving keeps the original contours as filled, and adds the engraving as unfilled. The engraving creates holes in the original contours.
- Intersect engraving makes the original contours transparent, and adds the engraving as filled.
In the Lines column, you can customize the appearance of the engraving lines.
- Angle: angle of the engraved lines, in degrees.
- Thickness: thickness of the engraved lines, in font units. The is the maximum thickness if you load an image.
- Gap: thickness of the white space between the engraved lines, that is, the distance from the final edge of one engraved lines to the start edge of the next engraved line, in font units. This is the minimum distance if you load an image.
- Indent: distance of the engraved line endings from the original contour.
- Peak: the length of the portion of each engraving line that becomes thinner as the line approaches the original contour.
In the Image column, you can load an image, which FontLab will use as a “mask” that changes the thickness of the engraved lines. The thickness will vary depending on the grayscale value of the pixel. Fully white pixels produce engraved lines at maximum thickness specified in the Lines column, and fully black pixels produce lines of zero thickness.
- Load opens a dialog where you can open an image file. Grayscale images without transparency work best.
- Paste pastes the image from the clipboard.
- Glyph lets you choose an existing glyph from the current layer of your font to serve as the mask image.
- Clear removes the loaded image.
- Invert reverses the influence of the image on the thickness of the engraved lines, so that fully black pixels will produce engraved lines at maximum thickness.
- Scale lets you resize the mask image. If you load or paste an image, then at 100% 1 pixel corresponds to 1 unit. If you choose a glyph, at 100% the glyph PPM equals ½ of the UPM.
New Scribble & Strokes effect action

New With the Scribble & Strokes action, you can replace the existing glyph contours with open contours that have an editable Stroke applied.
The action has two modes: Scribble and Strokes.
- Scribble draws an open contour in the shape of a “slalom curve” inside each closed contour.
- Strokes draws a set of “halftone lines” inside each closed contour.

You can set the Angle, stroke Thickness, Gap and Indent of the new contours.
The action removes the original contours. The new contours are open, and they have a Stroke applied. You can edit the Stroke, and you can edit the contours.
New Warp effect action

New With the Warp action, you can apply a geometric bending effect to the contours. Warp is similar to Perspective but the warp box uses curved edges.
FontAudit
Short segment FontAudit test
New FontAudit now has a new Short segment test, which detects segments that are shorter than the per-master Font Info > Font Dimensions > Ink trap width value.

If you turn on Short segment in Preferences > FontAudit or in the gear menu of the FontAudit panel, FontLab shows the results of the test for the current glyph window in the FontAudit panel, and if you also turn on View > Contours > FontAudit, also in the Glyph window.
If you Fix the Short segment problem, FontLab collapses the short segment nodes (moves them into the same location).
Tools > Actions > Contour > FontAudit fixes
New You can now fix FontAudit problems on multiple glyphs and layers.
- In Font window, select some glyph cells, or in Glyph window, type text or choose a specific glyph.
- Choose Tools > Actions > Contour > FontAudit fixes.
- Turn on the tests (problem types) for which FontAudit should perform fixes. Use the buttons on the right to turn on or off all tests.
- At the top of the Actions dialog, choose the scope of the action (glyphs and layers on which you want to run the action).
- Click OK to run the FontAudit fixing once, or repeatedly click Run to run it several times (then click Close to close the dialog).
Note
When you fix multiple types of FontAudit problems, FontLab may produce contours that have new FontAudit problems that weren’t there before, so repeatedly running the FontAudit action may bring further improvements. We recommend that you first identify what kinds of problems a small selection of your glyphs has, and then only turn on those tests when you run the FontAudit action. It’s best to first fix the problems that are shown in black in the FontAudit panel, then fix the problems shown in red. FontAudit’s automatic fixing is not always perfect. Sometimes, manually changing the contours is the best way to fix the red problems.
Search and sort FontAudit tests
Various UI places show a list of currently active FontAudit tests: the Glyph window FontAudit popups, the Select tests dropdown in the FontAudit panel, the Preferences > FontAudit section, and the Tools > Actions > Contour > FontAudit fixes page. New Those lists of tests now have a search box that you can use to filter the tests shown. Click the Sort tests alphabetically button to change the order of the tests.
Power guides
If you link some nodes to a guide, the guide becomes a “power guide”: if you drag the guide, the linked nodes follow the move, and unlinked nodes adapt their position. You can make any FontLab guide into a power guide: an element guide, a glyph guide, a hint, a font guide, or a zone. New If a guide is a power guide, it has a rhombus indicator.
To make power guides (link nodes to guides):
- Drag a node to an existing guide with the Magnet tool to manually link it to the guide.
- New Choose a guide and choose Make Power Guide from the context menu, or click the Make Power Guide button from the Glyph window property window, to link nearby nodes to the guide.
- New Double-click a guide with the Magnet tool (U) to link nearby nodes to the guide.
- New Select one or more guides and choose Tools > Guides > Make Power Guides to link nodes to the nearby selected guides.
- Choose Tools > Guides > Add Power Guides to automatically create element guides in the current glyph layer or in the selected Font window cells, and to link nearby nodes to them.
- Choose Tools > Actions > Guides & Anchors > Add Power Guides to automatically create guides in the specified glyphs and layers, and to link nearby nodes to these guides, or to existing glyph guides, font guides, or zones.
To unlink nodes from power guides:
- Drag a node to the canvas with the Magnet tool to unlink that node from a power guide.
- New Double-click a power guide with the Magnet tool to unlink all nodes from it.
- Choose Tools > Guides > Unlink Power Guides to unlink nodes from power guides in the current glyph layer.
- Use Tools > Actions > Guides & Anchors > Unlink Power Guides to unlink nodes from power guides in one or more glyphs and layers.
New As you drag a horizontal or vertical power guide, the Glyph window will show the distance by which you’ve dragged it (and the linked nodes) if you turn on View > Measurements > Quick Measurement, or if you turn on Auto-meter for stem widths or Auto-meter for counters in the View panel or in Preferences > Glyph Window.
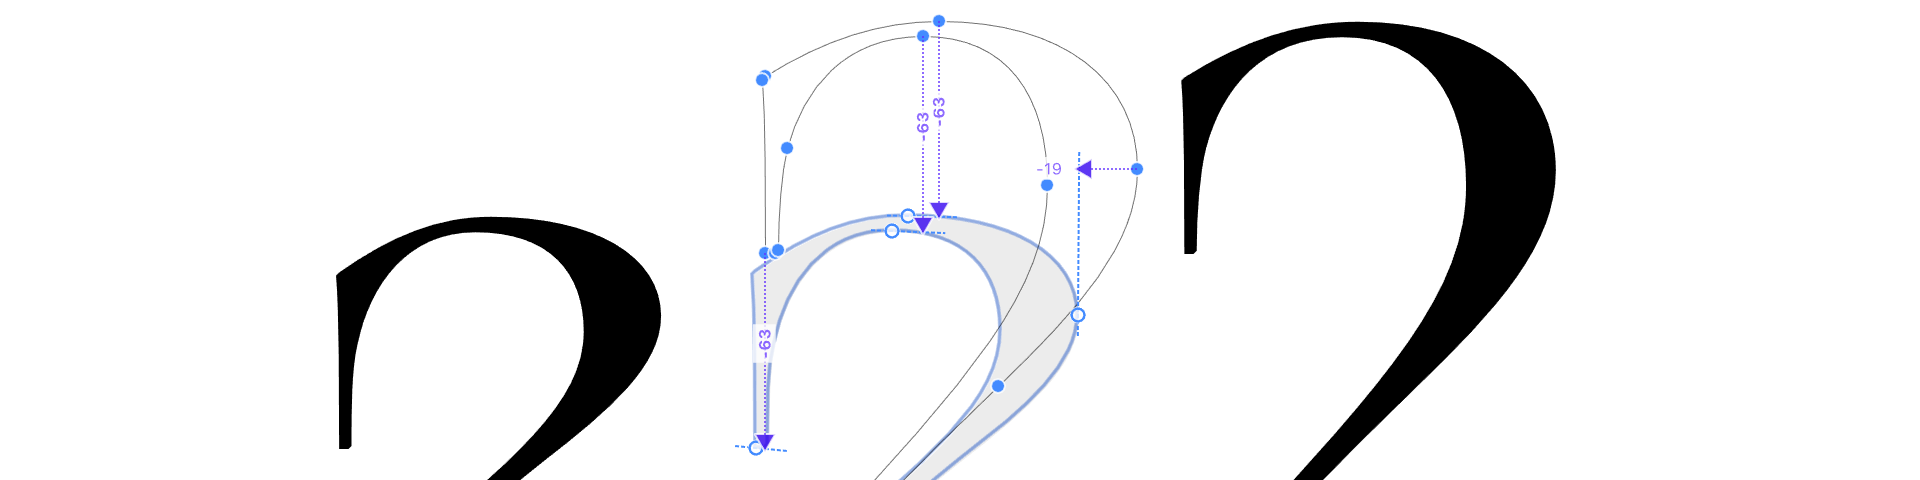
Delta Filter
New The Delta filter is a new way to non-destructively transform contours that goes beyond simple scale, rotate or slant.
With the Delta filter, you can move a few nodes in a contour to new positions and have all other nodes adapt (interpolate) their positions accordingly. This is a non-destructive transformation: you can still make edits to the underlying contour, and FontLab applies the the Delta transformations on top of those edits.
The Delta filter is similar to the Interpolate Nodes tool in FontLab Studio 5, and it closely mimics the way variation deltas work in variable OpenType fonts, and the way TrueType Hinting works.
You can use Delta in different scenarios:
-
Local adjustments: Use Delta filter as a way to make immediate changes to your current glyph layer that go beyond Power Nudge editing. Move some key nodes and have the rest of the contour adapt to your modifications. This is useful for condensing, boldening or slanting. In this scenario, Delta filter is similar to the FontLab Studio 5 Interpolate Nodes tool.
-
Variation across masters: Use Delta filter as a way to apply a live transformation to an element reference in another layer of the same glyph. Make a different master with a longer ascender, but keep the underlying common shape editable. In this scenario, Delta filter offers you an editing style close to the native representation of deltas in variable OpenType fonts: you may have a neutral master as static contours, and you only apply deltas sparsely in another master to perform some minor changes.
-
Derived glyphs: Use Delta filter as a way to apply a live transformation to an element reference in the same layer of a font, in the same or different glyph: make
.short,.swashor.saltglyph variant that changes some basic parts, or scale the glyph to create a half-width or superscript form and apply delta to compensate the weight loss. -
Revision proposals: Use Delta filter to make subtle pending changes to glyphs: make them a tad narrower, change the proportion of the elements a bit. Send the revisions to your colleagues and let them accept (apply), reject (remove) or refine the revisions.
With the Delta filter, you can independently define the X and Y coordinate of each node as transformed or untransformed. If you apply a delta to a node, its X and/or Y coordinate is transformed: it is moved by the specified delta amount, or it is kept in place. If a coordinate is untransformed, it is interpolated between the closest transformed coordinates.
You can apply one of three kinds of deltas to a node:
- The bidirectional move delta transforms both X and Y coordinates. It performs an additional move of the node in both X and Y direction, by the amount specified by the delta.
- The unidirectional move delta transforms only the X or only the Y coordinate, and leaves the other coordinate untransformed.
- The attachment delta can be unidirectional or bidirectional. It explicitly keeps one or both coordinates of the point at the location specified by the original contour.
With Delta, you only need to transform a few nodes. For example: if you draw a circle with 4 nodes, and apply a delta to the rightmost node, all nodes move by the same distance. But if you also apply a delta to the leftmost node that is an attachment (position lock) or a shift in the opposite direction, the top and bottom nodes interpolate their position.
Adding a Delta Filter
New Element > Add Delta Filter creates an empty Delta filter on your contour. An empty Delta filter has no deltas. All nodes are untransformed. They keep their original X and Y coordinates.
The Delta filter shows untransformed nodes as small light-blue circles. If you apply a delta to a node, the Delta filter shows the node as a darker blue rectangle or large circle. If the delta is a move delta, the filter shows an arrow. If you click an existing delta to select it, the Delta filter highlights it with red.
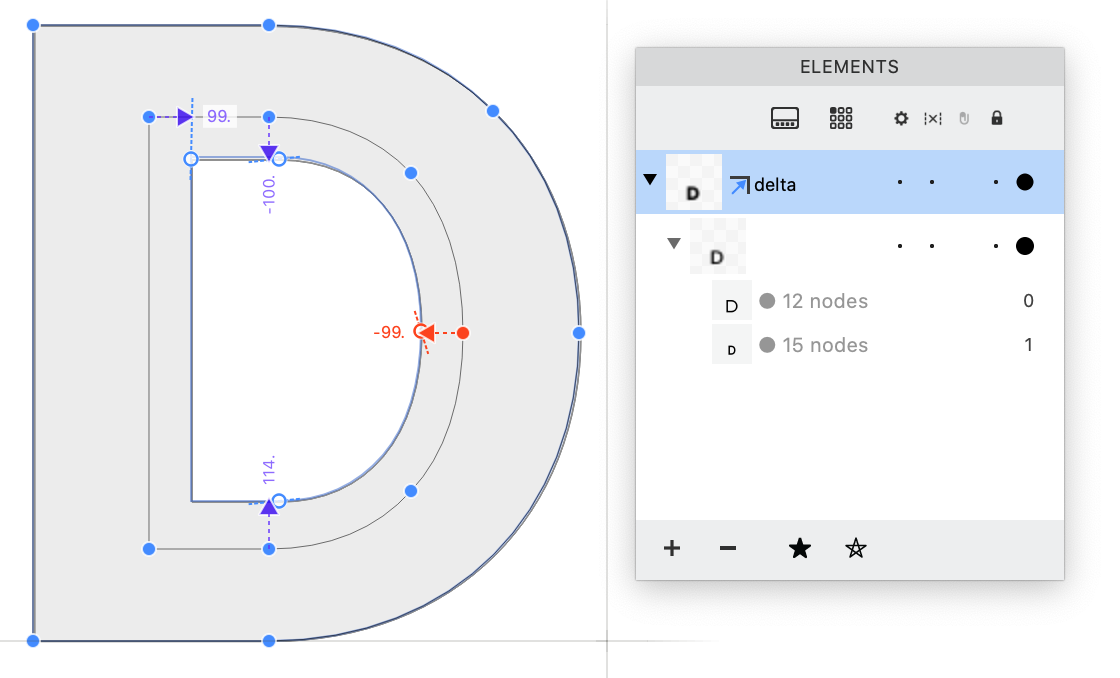
Since Delta is a filter, you can use the Glyph window to switch between editing the underlying contours or the filter. Double-click a node to switch to contour editing. Double-click the filter result contour to switch to Delta filter editing. If you find it difficult to switch, use the Elements panel: when you have a Delta filter applied, click the delta item in the object tree to edit the filter, or click the contour inside it to edit the original nodes.
Bidirectional move delta
Drag a delta (the node or the arrow) diagonally to a new location to apply a bidirectional move delta. This delta moves the X and Y coordinates of the node by the amount specified by the delta. The Delta filter shows a node with a bidirectional move delta as a large circle with an arrow that ends with a slightly smaller circle.
Unidirectional (horizontal or vertical) move delta
Drag or Shift drag a delta (the node or the arrow) horizontally to apply an horizontal unidirectional move delta. This delta moves the X coordinate of the node by the delta amount, and leaves the Y coordinate untransformed. The Delta filter shows a node with a horizontal move delta as a wide rectangle with an arrow that ends with a vertical dotted line.
Drag or Shift drag a delta vertically to apply an vertical unidirectional move delta. This delta moves the Y coordinate of the node by the delta amount, and leaves the X coordinate untransformed. The Delta filter shows a node with a vertical move delta as a tall rectangle with an arrow that ends with a horizontal dotted line.
New Click a unidirectional move delta to convert it to a bidirectional move delta. Click it again to make it a unidirectional move delta.
Attachment delta
Click a node to add an attachment delta. FontLab guesses if the delta should be bidirectional or unidirectional. Click repeatedly to convert between bidirectional attachment, horizontal attachment and vertical attachment.
- A bidirectional attachment delta keeps both X and Y coordinates of the node at the location specified by the original contour. The Delta filter shows a node with a bidirectional attachment delta as a large square.
- A horizontal attachment delta keeps the X coordinate of the node at the location specified by the original contour, and leaves the Y coordinate untransformed. The Delta filter shows a node with a horizontal attachment delta as a wide rectangle.
- A vertical attachment delta keeps the Y coordinate of the node at the location specified by the original contour, and leaves the X coordinate untransformed. The Delta filter shows a node with a vertical attachment delta as a tall square.
Editing deltas
- Click a delta (node or arrow) to select it. The delta is highlighted in red.
- Click a selected attachment delta, a horizontal delta or a vertical delta to convert it between bidirectional or unidirectional.
- Drag a delta (node or arrow) to change its value visually.
- Click a delta with Cmd Ctrl to specify its value numerically, or use the boxes in the property bar.
- Click a delta and tap BkSp to remove it. The node becomes untransformed.
- Select some nodes and Alt-click an existing delta point to apply the same delta to the selected nodes.
You can use the Glyph window property bar to edit the relative value of the delta on any point (how many units the point is shifted) or New the absolute position of the final point.
Adjusting the Delta strength
New If the Delta filter is active, you can use slider next to the “time” icon in the Glyph window property bar to adjust how much the applied delta transformations affect the final contours.
- If you choose
100%, the final contours are identical to the original contours with the deltas fully applied. - If you choose
0%, the deltas are ignored. - If you choose a value in-between, the final contours are an interpolation between the original contours and the contours that are made with the deltas.
Converting to simple contours
The Delta filter has a context menu and a property bar.
To convert the final result of the deltas into simple contours, right-click a delta point and choose Apply Delta Filter or click the Apply button in the property bar.
To get rid of the deltas and keep the underlying contour, right-click a delta point and choose Remove Delta Filter or click the Remove button in the property bar.
Tip
To perform this on the current layer in multiple glyphs, select their glyph cells in the Font window and choose Element > Expand Filters or Element > Remove Filter. This expands or removes the results of all filters that you may have applied, such as Delta, Skin Shape, Glue, Smart Corner, Power Brush, Power Stroke, Smart Fill and Clipping Group.
Using Delta filter for local adjustments
A portion of the functionality of the FontLab Studio 5 Interpolate Nodes tool is now covered with Power Nudge and Servant nodes. But if you want a very close experience to the FLS5 tool, you can use the Delta filter to perform the adjustments, then right-click and choose Apply Delta Filter or click the Apply button in the property bar. FontLab then converts the dynamic deltas into simple final contours.
Using Delta filter for variations
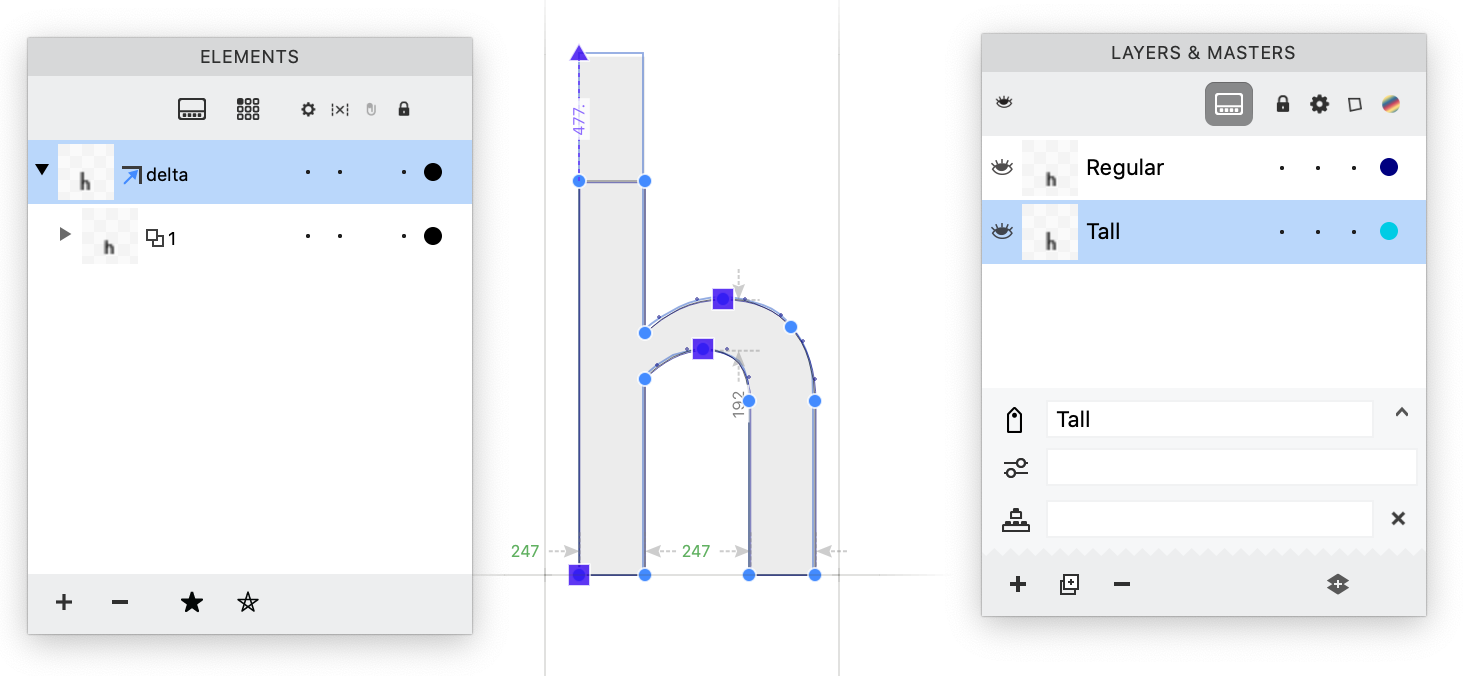
Let’s say you have an Ascender axis with two masters: Regular and Tall.
- In the Glyph window, go to a glyph that you’d like to make the variable ascender in, e.g.
h. - If the glyph already contains a layer for the
Tallmaster, use the Remove layer button in the Layers & Masters to remove it. - Activate the main master, e.g.
Regular. - Alt-click the Duplicate layer button on the Layers & Masters panel to create an element reference across layers.
- Rename the
Regular.1layer toTall. - In the
Tallmaster, apply the delta filter and adjust the ascending part of the glyph. - Switch to
Regular, make your changes there — your changes are also reflected in theTallmaster.
Using Delta filter for derived glyphs

Let’s say you have a zero glyph, and you’d like to make zero.onum:
- Create a new
zero.onumglyph. - Choose Element > Element Reference > Add Element Reference and type
zerothere. Alternatively: insert thezerocomponent into it and choose Element > Element Reference > Component to Reference. - Turn off Element > Locked.
- Double-click the
zeroelement reference within thezero.onumglyph. - Choose Element > Add Delta Filter.
- With the delta filter active, 3×-click the bottom node of each contour to lock its Y position.
- Drag to select the top two nodes, then Shift-drag them down.
Now you have a zero.onum glyph that contains an element that has been transformed with the Delta filter, but references the same content as the element in zero. If you edit the contours of the zero glyph, the changes are reflected in the zero.onum glyph, but the transformation remains applied.
Copy Delta to masters
New You can click the Copy to masters button in the Glyph window property bar, and then choose Copy to all compatible masters. FontLab will apply a delta filter with the same settings to all other matching masters for the glyph.
Previewing and printing
New Preferences > Editing > Live preview is turned on by default, so editing operations are immediately reflected in the Preview panel and other locations. If you experience slowness, especially with very large fonts, turn the preference off.
Text wrapping in Glyph window
The portion of the Glyph window where FontLab shows the glyphs is the canvas. With Text > Wrap, you can decide how FontLab wraps the text that it shows in the canvas. New In Preferences > Glyph Window > Text layout, you can now set the defaults for Glyph window text wrapping.
Manual text wrap
If you set Text > Wrap to Manual or you turn off the Auto / Manual text wrap button in the Metrics or Text tool property bar, the Glyph window text without manual line breaks forms one line. The canvas width is infinite.
Type Enter with Text tool or \n in glyphtext to add manual line breaks.
Auto text wrap

If you set Text > Wrap to Auto or you turn on the Auto / Manual text wrap button in the Metrics or Text tool property bar, the Glyph window text wraps at a fixed canvas width. New The fixed canvas width depends on Preferences > Glyph window > Text wrap:
- Window: The text wraps at the width of the visible canvas at the Actual Text Size zoom level (Cmd1 Ctrl1). The width changes when you resize the Glyph window or toggle its sidebar.
- Points: The text wraps at the width specified in typographic points. Turn on the Ruler with the Text tool to see width in points.
The number of glyphs per line depends on the text point size. To fit more or less glyphs into one line, change the text point size in Text tool property bar or in Glyph window sidebar.
Table text wrap
If you set Text > Wrap to Table, each glyph of the text is shown in a separate cell, and each line has the same number of glyphs. Wrapping behaves like Auto text wrap.
Apply text wrap
If Text > Wrap is Auto or Table, and you choose Text > Wrap > Apply or you Alt-click the Auto / Manual text wrap button in the Metrics or Text tool property bar, FontLab adds manual line breaks at the end of each line, and switches the wrap to Manual.
Tip
If you have a long Glyph window text, and you have variable width masters: pick the widest master with Auto wrap, Apply text wrap, then switch to narrower masters without text reflow.
Text tool
New The Text mode cursor is visible even if the Glyph window canvas does not have focus.
Right-to-left text
If you enter Arabic or Hebrew text into the Glyph window sidebar or Text Bar, then by default, Glyph window will show the text in left-to-right order.
New If you turn on Text > Right to Left, FontLab will perform a live on-the-fly reversal of the Glyph window text, so the input text will be shown in the right-to-left order. This is independent of the script of the text: if you enter the text TYPO and turn on Right to Left, the Glyph window will show OPYT, and if you turn Right to Left off, the window will show TYPO.
New The current glyph in the Text mode is now the glyph to the right of the text cursor. Previously, it was the glyph to the left of the cursor, but this was causing some issues.
Edit > Duplicate in Text mode
New If the Glyph window is in Text mode (the Text tool is active) and you select some glyphs and choose Edit > Duplicate, FontLab inserts the currently selected glyphs before the first selected glyph and keeps the selection.
If there is no selection, FontLab inserts (repeats) the glyph immediately after the text cursor (same as Text > Repeat Glyph). #5922
Go Back and Forward between changes of the Glyph window text
In FontLab, you can use many methods to change the Glyph window text: type with the Text tool or in the Glyph window sidebar or in the Text Bar, use the Window texts selector in the sidebar, click the entries in the Pairs & Phrases or in the Kerning panel, and so on.
New If you’ve changed the text, it’s now possible to restore the previous text. The Glyph window has two new buttons, and the Text menu has two new commands:
- Back: the window text changes to the text that was in the window before the change,
- Forward: the window text changes to the text that was in the window before you used Back.
If you use these commands often, you can use Tools > Commands & Shortcuts > ⚙ to assign custom keyboard shortcuts to them.
Cousins
See Cousins in quick preview when you hold Space

If you turn on View > Cousins, the Glyph window shows “cousins”: either the current master of the related glyphs, or other visible masters of the current glyph. This depends on the setting in Preferences > Cousins, where you can also customize the distances and appearance of the rendered cousins.
New Now, if you turn on Preferences > Cousins > Show on preview, the cousins appear in the Glyph window when you use the quick preview (when you hold Space). #4806
Preview panel
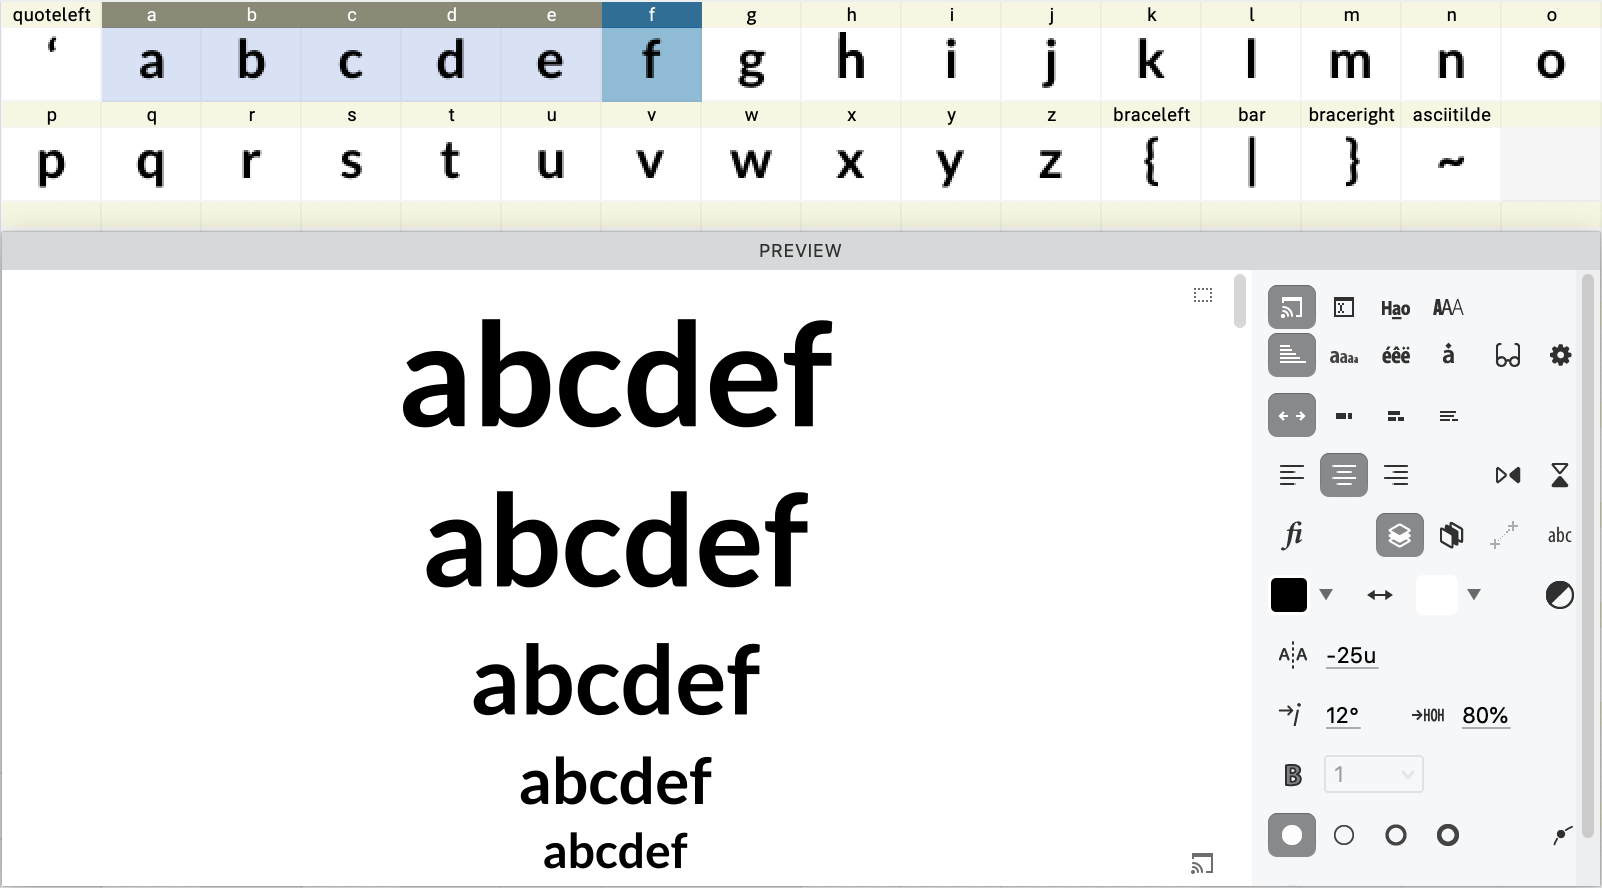
The Preview panel lets you see a real-time, accurate representation of your design as you make changes. Simulate various scenarios and design contexts by viewing different text arrangements at different sizes and colors, with dynamic transformations and graphic filters like blur. Enter custom text and apply OpenType features to evaluate how your font performs in specific words, phrases, or sentences.
If the Preview panel is open, click the Show / hide Sidebar button in the top-right corner to open or close the sidebar.
Preview panel without sidebar
New If the sidebar is closed, use the buttons on the the right edge to quickly change what the panel shows:
- Click Content mode multiple times to switch between text, glyph waterfall and text waterfall.
- Click Align multiple times to switch between left-aligned, centered and right-aligned text.
- Click Size multiple times to switch between fit size, 1, 2 or 3 lines, and custom size.
- Click Invert preview to switch between a light and dark view of the content.
- Click Echo / Custom text in the bottom-right corner to toggle between custom text or Echo text. If Echo text is on, the panel shows the text of the Glyph window or the glyphs selected in the Font window. If you type your own text, the panel switches to Custom text.
If the panel sidebar is open, only the Open/close sidebar and Echo/Custom text buttons are visible. Use the sidebar to change all aspects of the panel look and content.
Preview panel with sidebar
If the sidebar is open, you have a much more detailed control of what the panel shows. New We have fully redesigned the Preview panel sidebar. We introduced text labels for sections of the settings, and integrated the feature selection widget right into the sidebar (it was a separate dialog).
New If you turn on Options > Show glyph names in the Preview panel sidebar, the Previewed glyph names field now correctly shows the glyph resulting from conditional glyph replacement.
All or visible masters mode of the Preview panel
You can preview all or visible masters in the Preview panel if you choose All or visible masters in its sidebar. If any masters are set to visible in the Layers & Masters panel, only those masters and the current masters are shown. If all masters are set to invisible, all masters are shown.
If the Font window has a single glyph selected, or if the Glyph window contains a single glyph, the Preview panel shows its masters as a single line.
If the Font window has multiple glyphs selected, the Preview panel shows their masters as multiple lines.
If the Glyph window contains multiple glyphs, you can choose what the Preview panel shows. Click the gear icon in the panel sidebar and choose:
- single-line: a single line with the masters of the current glyph
- multi-line: multiple lines with the masters of the current text (all glyphs shown in the Glyph window)
- New automatic: multiple lines with the masters of the current text if the Metrics, Kerning or Text tools are active, otherwise a single line with the masters of the current glyph
#4946
Echo text in Text waterfall mode of the Preview panel
New In Preview panel, if you choose Text waterfall and turn on Echo text in waterfall the waterfall text automatically reflects the current selection of the Font window or the current text of the Glyph window.
Optical size (opsz) axis in waterfall modes of the Preview panel
New If the font has an optical size axis with the tag opsz defined in Font Info > Axes and you choose the Text waterfall or Glyph waterfall mode of the Preview panel, a binoculars toggle appears in the panel sidebar.
If you turn off the toggle, the Preview panel shows the current instance or master in each font size of the waterfall.
If you turn on the toggle, the Preview panel ignores instance selections along the optical size axis done in the Layers & Masters and Variations panels, and automatically shows the optical size dynamic instance for each font size of the waterfall.
Note
The Preview panel shows font sizes in waterfalls using logical pixels, so each number is a PPM size, which corresponds to point sizes at 72 dpi. When the waterfall automatically shows optical sizing, it maps each PPM size to an
opszaxis location in design coordinates. This is different from the behavior in web browsers. With the CSSfont-optical-sizing: autoproperty, a browser maps either CSS points or CSS pixels (this depends on the implementation) to user coordinates. If the axis graph for youropszaxis in Font Info > Axes uses different scales for design and user coordinates, or uses a non-linear mapping, the automatic optical sizes in the Preview panel will be different than those used in the browsers. However, there is also an upside of this: you can set up your design coordinates to be, for example, 2× of the user coordinates, and then use size 20 in the waterfall to preview the optical size 10 etc.
Preview panel colors and light/dark preview
The Preview panel sidebar now has additional items for previewing color. The actual colors used in the Preview panel depend on the current user interface theme that you’ve chosen in Preferences > General > Color theme, and on the Light/dark preview switch in the Preview sidebar.
If FontLab uses the light user interface theme and the Light/dark preview switch is turned off, or if FontLab is running in the dark theme but the switch is turned on, the Preview panel uses the light preview. This means:
- the background color is the color chosen in the Background color selector of the Preview panel sidebar (by default: white)
- if an element is filled with the default
blackcolor, its preview is filled with the color chosen in the Text color selector of the Preview panel sidebar (by default: black) - if an element is filled with any other color or gradient, its preview is filled with the element’s fill color or gradient
If FontLab uses the dark theme and the Light/dark preview switch is turned off, or if FontLab is running in the light theme but the switch is turned on, the Preview panel uses the dark preview. In dark preview, FontLab performs a special inversion of the colors, using a built-in perceptual color inversion algorithm:
- the background color is the inverted color chosen in the Background color selector of the Preview panel sidebar (black if white is chosen)
- if an element is filled with the default
blackcolor, its preview is filled with the inverted color chosen in the Text color selector of the Preview panel sidebar (white if black is chosen) - if an element is filled with any other color or gradient, its preview is filled with the inverted element’s fill color or gradient
Toggle the Light/dark preview switch in the Preview sidebar to switch between light and dark preview.
New Click the Swap button to exchange the text and background fill color. This gives the same result as toggling the Invert preview button in FontLab 7.
If you export a font with the OT+COLR and Export auto-generated dark palette settings turned on in the export profile, the exported -COLR font will include a CPAL table with the default palette that corresponds to the light preview colors, and an auto-generated “dark” palette based on the dark preview. In supporting browsers, end-users can choose the dark palette with CSS font-palette: dark.
Printing
Printing the Preview panel contents
New If you open the Preview panel and click its canvas, and you then choose File > Print, FontLab now prints the contents of the Preview panel. This way, you can use all the settings of the Preview panel sidebar, such as All or visible masters, Text waterfall or Mark attachment by anchors and print flexible arrangements.
For example, to print the same text in multiple masters, switch to the Glyph window, in Text mode enter your text, open the Preview sidebar and choose All or visible masters. Click the gear icon and turn off For Glyph window, prefer single-line preview. Then in the Layers and Masters panel, turn on the eye icon next to each master you’d like to see and print, or Alt-click the eye in the header to see and print all masters.
Remember: in order to print the content of the Preview panel, click its canvas. The canvas will show a blue border if Preferences > General > Focus > Highlight UI elements is not set to minimal.
Tip
If the Font window is active and you print, FontLab prints a glyph map with the visible glyphs. If the Glyph window is active and you print, FontLab prints the current Glyph window text at the current font size set in the Glyph window sidebar or in the Text tool property bar.