PS Autohinting
Prepping Letters and Setting Zones
Sorry, autohinting is not one of those things where you can push a magic button.
Well you do have a button.
But it’s like having a mechanical dishwasher. The dishwasher washes the dishes.
You don’t have to do it…
But you do have to prep the dishes. You do have to know what a dirty plate looks like!
In this tutorial, we’ll zoom in at least 40× to check out the dirt on your fonts!
The dirt’s the fuzzy pixels that appear when your font is unhinted.
Unhinted fonts have two primary problems, two types of fuzz.
Here’s What Happens to the Overshoot without Hinting

Info
Examples from inDesign rasterizer. (What I had access to.) Actually, this is rare for the H to look this crisp without hinting. I had 21 lines in my waterfall and this was the crispest H.
At this size, the O looks huge.
Stem Problem
If we go down in size to 6pts (@218dpi), it looks more like this.▼

These letters are fuzzy kittens.
The rasterizer is doing its best to make this look good without hinting.
So the two basic problems:
- Round letters with overshoots look too large, fuzzy, and poke down/up too much.
- Stems are fuzzy and inconsistent.
And, I’m going to add a third problem:
Bad Hinting
If you do hinting wrong, you might do more harm than good!
Here’s an example of hinting gone wrong.▼

Info
So as not to offend anyone, I want you to know that this was an example made by me from a look-alike font. However, this is in fact how the hinting came. (TT hinted.)
Better to have no hinting, than bad hinting.
Solutions
There are three levels of hinting: family, font, and glyph.
80% of the results are at the font level!!!
So when you autohint, you have to carefully set your font values.
For the overshoot problem, you use font Zones. For the stem problem, you use font Stems.
Fix Overshoots by Setting Zones
But before we can do this, we need to fix our letters for hinting!
(And this is really 95% of what we need to do.)
Prepping Your Letters for Hinting
Download VFJ
Download and open this file in FontLab.
If you’ve kept your letters nice and neat, you won’t need to do too much fixup.
In the attached file, I deliberately futzed up some of the letters so that things are not aligned.
Fix up the letters in the file to follow these rules.
Rule 1: Nodes at Extremes (Print and Screen fonts)
Curves need to have nodes at their highest and lowest points.
Rule 2: Tops And Bottoms of Flat Letters Aligned (Print and Screen fonts)
This actually has to be perfect.
Even a value of 1 unit off will give you fuzzy letters!
Align the flat tops and bottoms exactly onto the baseline, x-height, and cap height.
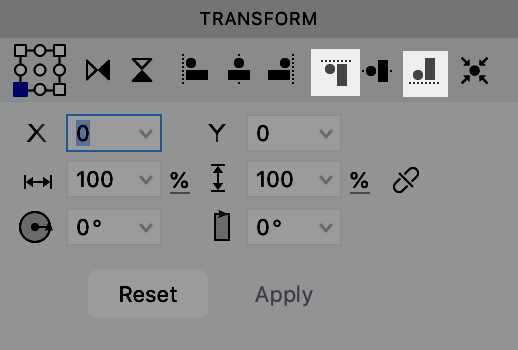
PRO Tip
Use Font Audit or Transform panel, to help you align the tops and bots.
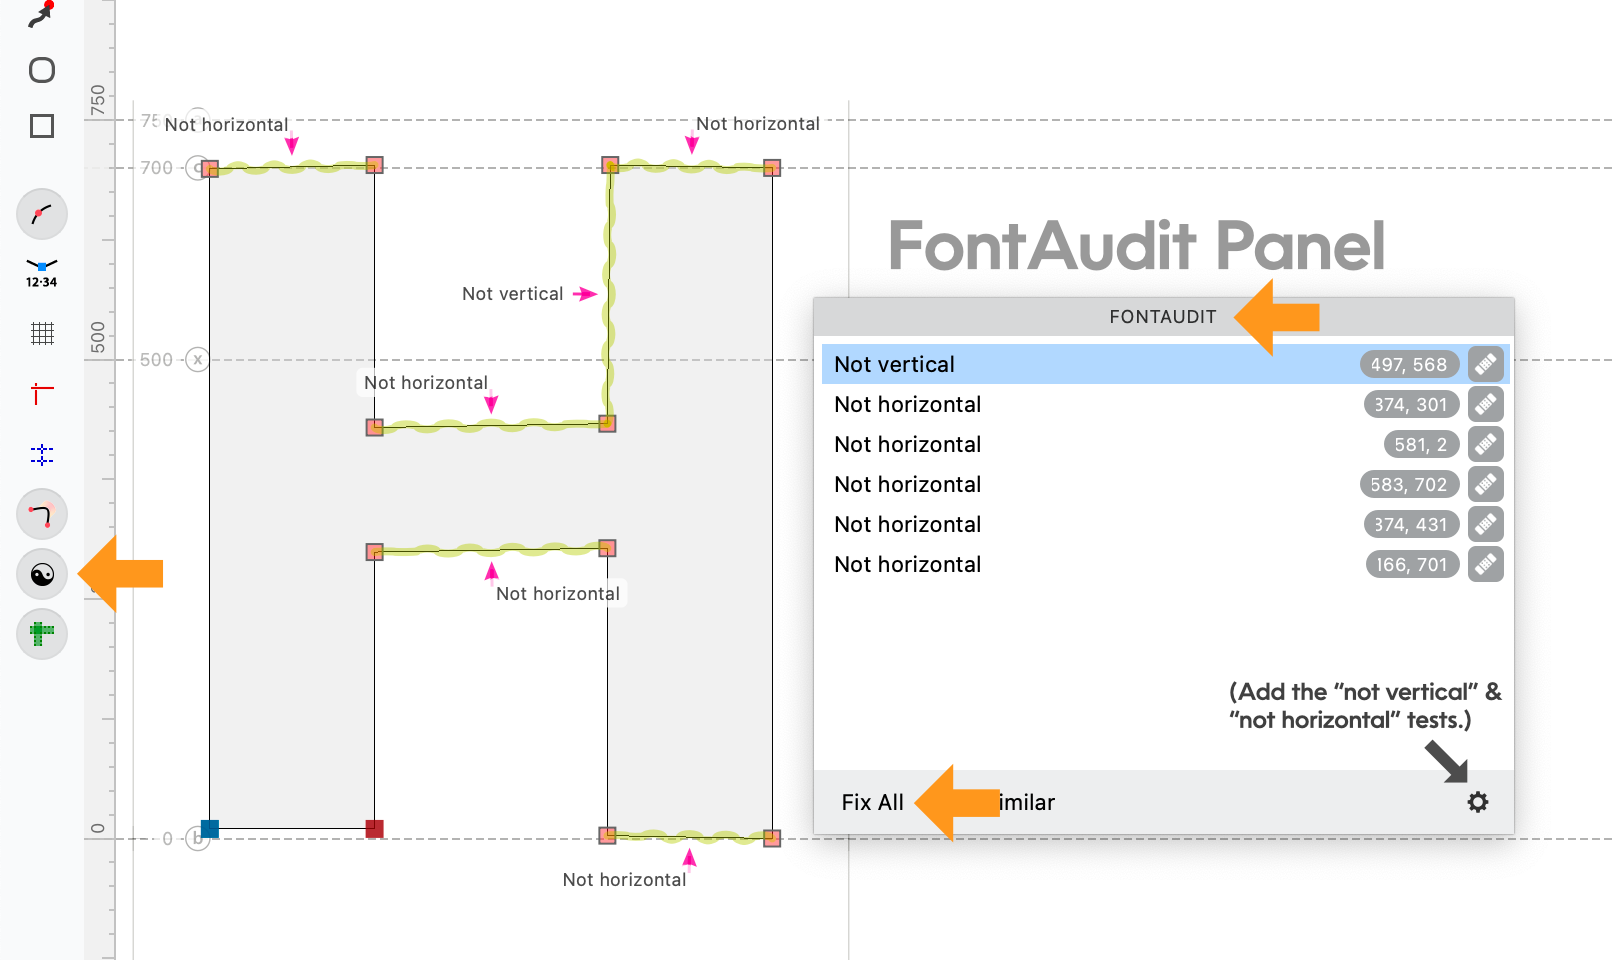
Info
Under default settings, when nodes are not aligned they look lighter. They are darker when aligned.▼
If everything is the same color, go to Preferences > Glyph Window > Node style. Choose the middle option.


OK!
Now what do we do with the round letters?
Rule 3: All Overshoots and Undershoots Must be Equal (Screen fonts only)
If you don’t make these equal, you will get slight rounding errors. Different letters will transition to different pixels at different sizes, and it overall won’t look quite as professional.
Before you look down at what I did, try adjusting your O and o and n rounds in the file.
Info
If it looks better to you, your top overshoots can be different than your bottom ones. But all top overshoots need to match each other.

Here I went with the overshoots being all the same. For computer text, this will make the letters as consistent as possible.
Warning
This rule applies only to text letters designed for screens. For displays or hi-res fonts, masters like Adrian Frutiger would very subtly adjust their overshoots—even just by a unit or two.
Warning
When choosing overshoots for displays or for print and hi-res, the open letters, CceGSs, should have less overshoots than closed letters, Oo. Being open somehow make the C seem taller compared to the O. Again, for small screen fonts, the overshoots should be all the same.
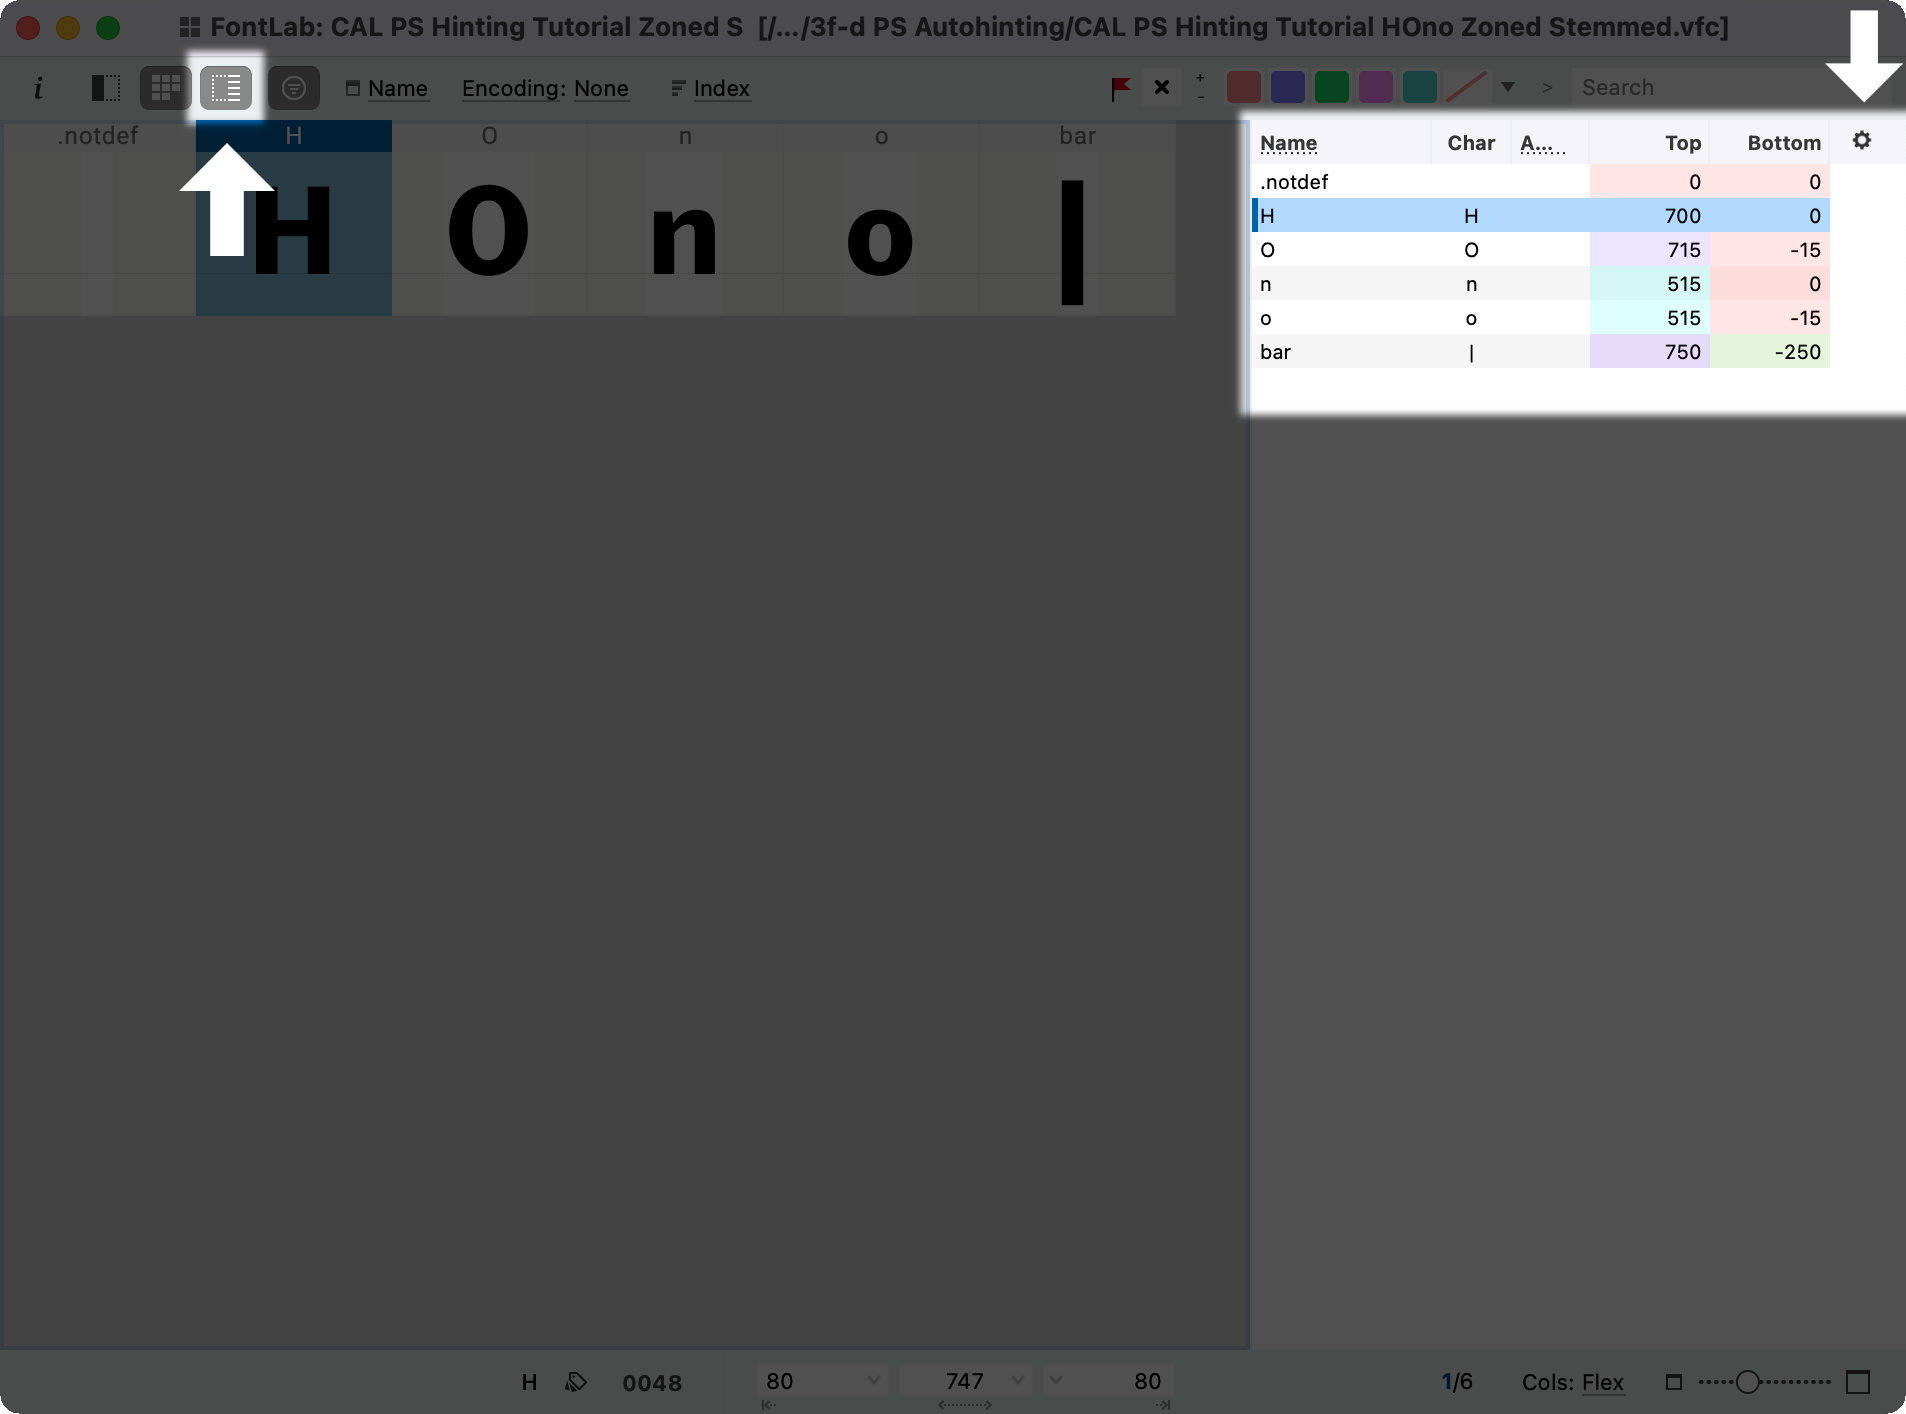
Check the tops and bottoms in the right side panel of the font window.
Ok we prepped our letters. Now lets…
Set Zones (BlueValues)
Once you have your letters following those three rules, let’s put in your zones (technically called BlueValues).
Go to menu: File > Font Info > Zones sidebar.
Make sure the button at the bottom says “Local Zones”. (Those are the ones for this master.)
Since our HOno font is pretty simple, we can hit the diamond to automatically populate this. Here’s the breakdown of these options.
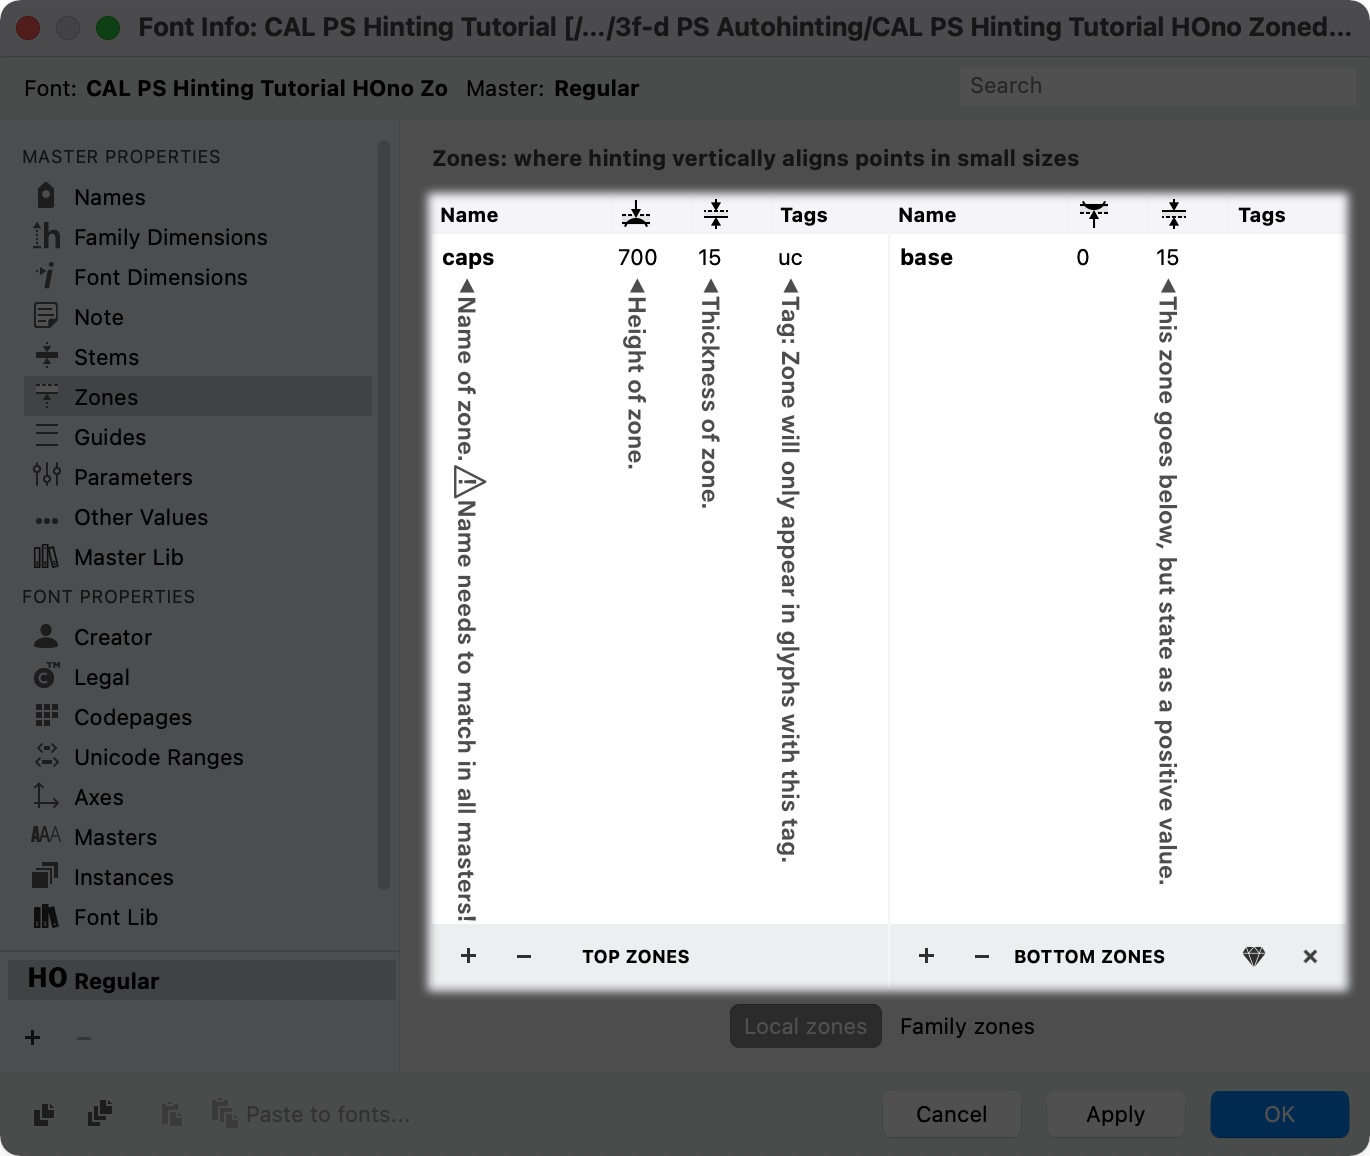
Now add a top zone for the x-height. Your zone might look something like this:
xHeight 500 15 lc
Info
I like to use camel case. The first word is lowercase, then the rest are uppercase. thisIsAnExample
Punch OK!
Let’s check our values.
Go into the H. Notice that there are faint circles around the nodes, when they just touch the zone.

If you don’t see the zones, go to menu: View > Show > Zones.
Also notice that top zones are blue and bottom zones are green.
Go into the O.
Your O should have faint squares. If not, your zone might be too small.
The n should have a mixture of faint circles and squares. Because we tagged the zones, it will only show the xHeight zone. The o should have faint squares.
PRO Tip
If you set up zones at the beginning of your font process, you can use these faint circles to help you check your work.
Problem Zones
You cannot have zones that overlap. You can also not have zones closer than specified by BlueFuzz (more on that later). On export, FontLab will give you a warning if your font breaks those rules.
Zone Rules
- Zones should be small as possible. (Don’t add extra space unless necessary.)
- You are allowed the baseline zone plus 6 top zones (blue) and 5 bottoms zones (green).
Common Zones

Conclusion
Good work!
If you are new to this, that is a lot to learn all at once.
I’m breaking this into two parts to make it more digestible…so there’s not too much food on your plate.
In the next section we take on stems, and tweaks that can make your letters look even better!
PS So to recap this tutorial, align the tops and bottoms of all your letters. Then set up your zones.